But economical, highly reliable lighting devices have a fairly high cost and therefore not every owner is able to purchase the required quantity on the market to illuminate the entire local area.
Therefore, many home craftsmen make LED lighting with their own hands. How to choose the right design for self-production, purchase consumables and assemble an electrical circuit, all about this in this article.
Is it possible to make a park lantern yourself?
A garden lamp is not structurally complex; it can be made with your own hands , either from scrap materials or from parts purchased in a retail chain. To do this, you will need a schematic and electrical diagram of the device, experience with the tool and knowledge of simple electrical circuits.
Lamps for landscape lighting work outdoors throughout the year, in hot weather, in cold weather, and in rain and snow. Therefore, it must be made with protection from moisture and dust of at least IP 64 -65, especially at the junction of electrical contacts, so that the electrical wiring does not short out in a humid environment.
Before starting work on the production of landscape lighting on the site on your own, you will need to evaluate the following parameters :
- Select the type of lamp: LED, halogen or regular incandescent lamp.
- Develop a power supply diagram for lanterns.
- Draw a plan for the location of lamps, determine their number.
- Choose a structure that will hold the lamps.
- Select the power type: 220 or 12 V, from the electrical network or battery.
What types of outdoor lamps are available for manufacturing?
At home, you can make quite a few types of landscape lamps, from the simplest in the form of an incandescent light bulb and a lampshade to LED automatic lamps with a long range, operating automatically from motion and light sensors.
The preferred options for making your own landscape lamp are:
The light source is an LED lamp, the most modern energy-saving model, which provides a high level of luminous flux and saves electricity, since it consumes 2-3 times less than halogen lamps.- Functionality – automatic switching on based on a signal from a motion or light sensor.
- Power options are non-volatile from solar panels and batteries and energy-dependent from a 220 V household network.
- Technical lighting – for illuminating roads, gates, stairs and parking lots.
- Decorative – for illuminating bushes, gazebos, pools or ponds.
- Accented – illumination of the facade of the house.
- Accompanying lighting and running lights along the path, luminaires react to movement with built-in motion sensors.
- Mechanical protection – high-strength glass and metal case.
- Mounting method - support, bracket and wall type.
- The type of lantern is landscape, floor lamp or façade.
- LED lighting power is 5-50 W, depending on the lighting area.
DIY stand for audio equipment made of solid beech
I have long wanted to have a shelf for amplifiers and a record player to organize everything. I spent a lot of time on the Internet choosing the desired shape and design. The price for new racks is quite high, especially since you can do it yourself if you have the tools. The plan was even made of marble, but it will turn out to be heavy. In the end, the choice fell on solid wood.
Between ash, oak and beech, I chose the latter. The price for oak reached the level of marble, but it’s worth it, the texture of the oak is very beautiful, and even more so with the coating. But the shelf will be practically covered with equipment and all the main beauty will be hidden, which is why I chose beech.
If you make a stand for speaker systems, then the beauty of the wood will be more visible, and I advise you to invest in oak.
A few shelf options to consider:
I chose the design for the same long time, but in the end I came to a simple solution - a pair of legs on each side, into which shelves were cut and glued. Size is also an important point. The height of each shelf is 40 mm, the side bars are 40x40 mm, I wanted 50s, but they weren’t there. The shelf depth is 300 mm, anything more would be cumbersome for me. Width, the widest amplifier I have come across is the Odyssey-u-010, its width is 460 mm.
Therefore, I chose the width of the shelf with a margin of 20 mm on the sides plus 20 mm that will cut into the side bars - it turns out 540 mm, the total width is 580 mm (the remaining 20 mm in the side bars). Height, here you need to estimate it in 3D and at your discretion. I needed 5 places with a margin of 10 mm in each shelf. The result was a height of 900 - 1000 mm.
1000 mm looks pretty ugly so I chose 900 mm.
- Hardness of different types of wood:
I ordered a tree online. Look on websites that sell wooden stairs, that’s where I ordered. Received the order in 2 weeks (including work). The wood arrived good, dry, perfectly even and smooth, everything was sealed in durable polyethylene, moisture ingress during transportation was excluded.
The work involved making grooves in the side bars, rounding some corners and gluing everything together. You need to cut the grooves precisely; I did this in all the bars at once. I even built a special table . The tool is a hand router; cutting out with a hacksaw is of course not an option.
I did everything in a day. I rounded the corners on all the shelves, but only the front ones, and on the bars as well, I left those corners that are glued to the shelves sharp. By the way, rounded corners look better than sharp ones, but again, not everywhere.
I put all the wood back together and glued the shelf together at home. Clay applied "Moment Carpenter". I covered all the wood adjacent to the gluing area with carpenter's tape to avoid glue getting into unnecessary areas.
The result was a massive and beautiful shelf weighing 27 kg. Size HxWxD: 900x580x300 mm.
- The shelf is coated with medium dark wood oil:
- Especially for ldsound.ru
- Author of the work: LDS
- 2015
Source: https://ldsound.ru/stojka-dlya-audioapparatury-iz-massiva-buka-svoimi-rukami/
Materials for landscape lighting in the country
These outdoor lights can be made from a wide variety of materials, many of which can be found around the home. The most popular materials at hand that are used to make landscape lamps with your own hands:
- Glass and plastic products: bottles, jars and other glass vessels, any are suitable. With this type, it is very important to choose a special light bulb with a high level of light dispersion. An unusual design for a glass lantern will be to cover its walls with patterns of special luminescent paint.
The coating will accumulate solar energy throughout the day and create a very attractive glow in the evening. Advantages: low costs and a wide variety of shapes. Disadvantages: low dispersion and high fragility.
- Tin cans with patterns over the entire area, it is better to paint the inner surface with a white background, and the outer surface is covered in a tone that matches the landscape design. Advantages: low costs, high design characteristics, variety of shapes. Disadvantages: low strength and durability, low anti-corrosion characteristics.
- Lanterns made of wood or wooden rods, which are assembled into a certain shape, such as a ball. Advantages: simple production, special appearance, you can use scrap materials, low costs. Disadvantages: massive structure, they are afraid of a humid environment, require special antiseptic treatment.
- Silumin is an aluminum alloy, molded and powder coated. Advantages: light weight, various shapes, low cost. Disadvantages: high fragility in the cold and a tendency to damage in an aggressive environment, for example, when salt and fertilizers come into contact with them.
- Metal the most reliable material for street lamps, especially for poles, fasteners and lamp housings. It is better to use for these purposes: cast iron, copper, steel and brass. The techniques used to process metals are welding, bending, forging and cutting.
Advantages: durability, many different shapes, resistance to mechanical damage and climatic influences. Disadvantages: high price, heavy weight, need for a foundation, susceptibility to corrosion if the external coating is damaged.
Rules for choosing lamps for the garden
The quality and cost of lighting depend on the type of lamps that will be installed in landscape lamps. Acceptable modifications of lamps that can be used for this type of street lamps:
Regular incandescent lamps. Advantages: low purchase price, availability in retail chains, continuous emission spectrum, “warm” color tones.
Disadvantages: low level of color rendering, high costs of electricity for lamp operation, high heat transfer rate.- Halogen light bulbs . Advantages: more economical, longer service life, stable luminous flux, smaller external dimensions, high thermal and mechanical resistance characteristics, high power, lower power consumption to operate the lamp. Disadvantages: you need a transformer for operation, sensitivity to voltage changes, strong heating, which requires the use of heat-resistant materials for the lamp and housing.
- LED lamps – the most popular devices for landscape lighting. Advantages: very economical, do not contain harmful substances, high level of color rendering, can be used for lamps made of any materials, even paper, long service life up to 100,000 hours, belong to low-voltage equipment, and therefore have an increased degree of safety.
Disadvantages: susceptible to power surges, high price, emit uneven light.
According to all characteristics, the best option for street lighting of the local area is LED lamps.
Selecting a Power Source
For landscape lighting, a 220 V household power supply is used, autonomously powered by rechargeable batteries or solar panels. Unlike a traditional incandescent lamp, an LED lamp can only be powered by direct current.
To operate them, you will need a special current source that produces a constant voltage at the output. All power supplies differ in the type of assembly and voltage conversion option.
They are divided into the following groups:
Transformer .
The composition includes: transformer, filter, rectifier and stabilizer. Advantages: simple installation, withstand idle function. Disadvantages are vulnerable to overload and carry a lot of weight.- Pulse . Advantages: light weight, compact and able to work with increased impulses. Disadvantages: they do not tolerate idling and overload conditions well.
- Driver . Rectifies stabilized current, capable of operating at frequencies of 30-50 Hz. Wide range of output parameters adjustment.
There are 3 options for connecting the LED lamp to a 220 V household network :
- Consistently. When all the lamps are connected with one wire, a phase is applied to the beginning, and zero is applied to its end. The advantage is low installation costs. The disadvantage is that if one lamp fails, the entire lighting line will not work.
- Parallel. Each lamp is connected to a phase and a neutral or grounding. The advantage is the high efficiency of the circuit, even if one or more lamps fail. The disadvantage is the high consumption of wires for connection.
- A beam circuit is a particular type of parallel system, when the sources are installed around the perimeter, 2 or 3 grounded wires are supplied to each lamp.
Thus, for LED lighting in the local area, the best effective constant current source is considered to be a 220 V household network, with a parallel circuit for connecting lamps, with the installation of a driver for rectifying the current.
To illuminate objects on the site, non-volatile LED lamps powered by solar batteries or batteries can also be used.
Diagram and photo of the design
Before making a landscape lamp, you will need to develop a design diagram of the garden lamp itself, an electrical circuit for powering the lamps and a plan for installing devices on the territory.
The composition of the latest documents will depend on the area that needs to be illuminated and the landscape project. These indicators determine the type of lamps, their power and quantity, as well as the volume of consumables :
- wires;
- cable;
- switching equipment;
- automatic start sensors;
- automatic protection of power lines from voltage overload in the network.
The first document, a design diagram of a garden lamp, determines the appearance of the lighting device, the specification of its parts and the assembly procedure.
For example, to produce a metal lantern in an antique style, the design diagram will look like this:
In order to make such a lantern with your own hands according to the diagram, you need to make 4 side walls, a top cover and a bottom, cut out glass for the sides, preferably with matte patterns. Decorative finishing of metal parts can be painted with regular paint or with imitation of antiquity.
The assembly of metal parts is carried out by cold welding. Next, the side windows and cartridge are inserted. After assembling the housing, begin connecting the power supply.
The assembly of the electrical power supply circuit from a 220 V household network must be carried out by a specialist with the appropriate electrical safety clearance group, so if the home craftsman does not have such qualifications, you need to invite an electrician for this work.
To lay the power line, it is better to choose an underground option, then hanging wires around the site will not spoil the landscape project.
You will first need to purchase a two-core copper electrical cable VVG with 1.5 mm2 conductors along the length of the laying determined according to the power supply diagram for lighting fixtures on the site, a corrugated pipe or metal hose D from 18 to 25 mm to protect the cable from rodents and terminal blocks with drain load 5 -10 A to ensure reliable electrical connections.
With an underground power supply circuit for landscape lighting, the owner of the house must save the executive circuit for future construction and excavation work on the local area.
To lay the cable, dig a trench at least 70 cm deep , with a distance from objects on the site of at least 60 cm. For floor lamps, you will need to install supports, which can be steel pipes, including used ones. In this option, they are thoroughly cleaned of corrosion products and treated with protective compounds.
Then a cable with leads sufficient to connect a 10-15 cm lamp is pulled through them. After this, the cable is placed in a corrugated sleeve with a 15 cm exit to the outside. The second piece of cable from the trench in the corrugated pipe is connected to the cable in the support using terminals.
If the lantern is of a wall type, then the connection is made through junction boxes. All contacts must be securely soldered, insulated and hidden in the box.
Assemble the connection diagram for the lighting device in such a way as to exclude the possibility of electric shock.
The connection point can be a simple protected outlet or terminals on an electrical panel .
After assembling the power supply circuit, it is checked for functionality and the wires are covered. If the circuit is assembled incorrectly, the LED lamp will not light up or will “blink”.
DIY equipment rack
I just ordered it from a furniture factory, a la fireplace.
but I saw how they made a stand out of cheap IKEA tables (for 500 rubles a bucket).
and I myself liked the stand, the basis of which was polypropylene pipes connected by the same corners with legs on which massive wooden panels (the shelves themselves) were placed. And he sold it inexpensively. I just couldn’t come to an agreement with him. I started selling equipment for twenty rubles to the rack for 3,000 rubles. I sent him
If you have the opportunity to post a photo, please post it.
I started making myself a new rack a la SOLID TECH Radius, while in the process, I’ll post a photo when I make it.
This is made to order, dear bertier, and we are talking about racks made with your own hands.
So I indicated in the first post that I didn’t do it myself. However, if my photos are off topic, ask the admins to remove them, I have no complaints. Let those who did it post it, good luck!
Cool :) You were really impressed from the first question :) The lamps are already in the setup!
ABOUT! And the lamp got in the way)) I see I’m completely off topic here. Okay, I'll read on the side)
No! On the contrary, everything is great! It’s just that we all remember very well how you started your path to the right sound and dear Sergey, you just noted this!)))
I’ll brag) I’m interested in your opinion. Made it entirely myself. I bought larch (stiffness, I wanted only four supports), the metal in Leroy for the fence is thick and embossed. I cut and sanded the ends myself; it was hard to cut this three-meter stick at one level with a grinder.
Step-by-step instructions for creating
To select the type and materials for making landscape lamps, you can use DIY projects , which are presented on the pages of online publications and have detailed instructions. Most often, such crafts are made from ready-made wooden, metal or plastic objects. For example, you can use ordinary wooden hangers for this.
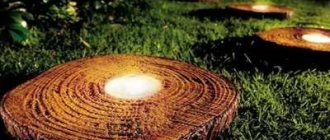
Made of wood
A very stylish lantern can be made from pieces of edged board . To do this, it is sawn into five identical parts, 20 cm long. A rhombus is cut out in the center of all the boards. Using a drill and a drill bit D = 8 mm, cut out 4 holes at the same distance from each other. For the base you will need a circle and an equilateral pentagon.
In order to give a beautiful appearance to a wooden lantern, the outer surface is fired with a gas burner and then brushed on the annealed surface with a metal brush. As a result, all defects and irregularities are removed from the wooden surface, and the lamp acquires a warm brown color.
The manufactured parts of the landscape lantern are assembled, the circle is fixed on the pentagon, the side parts are attached to it with small nails, these parts are tied with a rope “crosswise”, so that the knots remain inside.
A hole for an 8 mm cable is drilled through the center of the circle and pentagon.
To attach the flashlight handle, drill two holes from the end of the circle with a 4 mm drill. The handle is made from a piece of rigid wire , giving it an elegant shape, the socket and lamp are installed, the body and electrical circuit are assembled, and the operation of the finished product is tested.
For such a lamp design, it is necessary to decorate the cable so that it does not spoil the “antique” look of the lamp with its modern look; for this, the cable is wrapped with twine and secured with a glue gun. The lamp is powered from a 220 V home network from a separate circuit breaker in the electrical panel.
LED Strip Light
You can easily make an unusual landscape lamp in the form of a flowing light stream from an old teapot yourself using an LED strip.
This lamp is energy efficient and
consumes little electrical energy, so it can be powered by solar panels and made portable for installation in any part of the garden or recreation area in the local area.
To form a jet, the ICE cord is folded in half, and a bundle of such cords is secured inside the kettle. To do this, insert a metal washer into the spout and thread a cord through it. They assemble a circuit powered by a solar battery, which can be bought in a retail chain or taken from a faulty lamp.
A drop
If you install a glass flask, which is used for watering flowers, on an old water tap, you can get a unique lamp in the shape of an amazing drop of light.
In order for the flask to be filled with uniform light,
the LED strip is wrapped around the wire and filled with a glass vessel .
The tape can be purchased with a control panel and a unit, which will allow you to choose colors and shades of lighting, creating an extravaganza of color, bringing a unique style and novelty to the landscape design of the site. The lamp can be powered from a 220 V network, batteries, solar or conventional batteries.
Made of plastic
This outdoor LED lamp is made from ordinary disposable white plastic spoons. For the base, a 5-liter plastic container with the bottom cut off was used.
The handles are broken off from the spoon, and the remaining parts are fixed to the base with an imitation of pineapple peel using a glue gun.
For this model of a homemade lamp,
only a low-temperature LED bulb is suitable . The lamp can have either an independent power supply from batteries or be connected to a 220 V power supply with a special electrical circuit with a choke.
Making a stand for a spotlight
For this we need about two meters of pipe, maybe a profile one, I had a regular one, round in cross-section, with a fairly thick wall. The walls of the materials used must be thick so that the stand does not shake when the light source is installed.
- I decided to make the legs for the stand from a curved pipe, there will be 4 legs in total, it’s more stable.
- Then I welded them in the same way as in the photo
- The drain itself will be made from the same pipe, I decided to make it about 160 cm high, but first I need to make an adjustable spotlight mount.
Adjustable tripod mount
- The easiest way was to take a piece of pipe of a larger diameter, so that it would “climb” onto the stand tube, but there was no such thing in stock, so I had to saw the one that did not fit and cook it like in the photo below
- The bolt will act as an adjustment bolt, all that remains is to weld the lamb to it.
- Now you can weld the main pipe of the stand to the legs.
Attaching the spotlight to the stand
To attach the spotlight to the adjustable mount, I welded a bolt onto which a nut is subsequently screwed; the spotlight turns out to be removable; if necessary, it can be changed for another in a couple of minutes.
Extension cable for floodlight stand
The stand must be mobile, it must move around the garage without any restrictions, so it definitely needs a long wire, for it I welded special hooks and nails on the legs and bent them to wind them up, it turned out like in the photo below.
In the photo, the stand has already been painted; you can use a can of spray paint for this; it lays flat and dries quickly. General view of the stand with an attached spotlight, raised to maximum height.
The result is a convenient portable lamp for additional illumination of the workplace, the height is quickly adjusted, and it is very compact.
Factory tripods for spotlights
For those who don’t like to do it themselves, you can choose a factory tripod and buy it in an online store. Prices start at 500 rubles, but you need to look at the height and dimensions in general, for example, I found these examples
Where to buy a tripod
Search page on aliexpress - here
How to buy in online stores at a discount, see article
(Visited 1,824 times, 1 visits today)
Source: https://samoblog.com/stojka-dlja-sveta-v-garazh-svoimi-rukami/
Possible difficulties and errors
Technically, making the lantern itself for landscape lighting does not seem difficult; for this it is permissible to use both new parts from the store and those that can be found in any household. To do this you just need to use your imagination.
Difficulties with landscape lighting are caused by power supply schemes, choice of power and number of lighting devices. All 220 V power lines are classified as dangerous, the calculation and installation of which can only be carried out by specialists.
The main mistakes that users make when installing landscape lighting:
- The power, type and number of lamps are incorrectly selected. The installation does not perform its lighting functions or is energy-consuming to operate.
- Violation of underground cable laying standards.
- The cable characteristics do not correspond to the connection power of lighting devices.
- There is no protective grounding and no automatic safety system in the electrical network.
- The connection of lighting devices is made using twists without the use of terminal blocks.
- The cable is laid in the ground without metal hoses.
- The incandescent lamp is hermetically sealed in the lamp; there is no ventilation to cool it.
Pros and cons of homemade decorative light
For those who are planning to make landscape lighting with their own hands from scrap and store-bought consumables, the main advantage of the finished project will be its low cost, which can be either zero or several times less than that of a new landscape lamp.
In addition, a homemade economical lamp gives its owner the following advantages :
- lighting of the local area, gazebo or recreation area;
- realization of creative potential;
- creating a colorful landscape in the local area.
The disadvantages of this type of landscape lighting include the low protection of home-made structures from atmospheric and mechanical influences, since they are mostly made of wood, plastics and old metal forms.
To create more reliable waterproof metal lamps, you will need metalworking experience and special welding equipment.
Podiums for instruments in the A-pillar
Hello to all car tuning lovers! After increasing the power in my car, I had to purchase various sensors to monitor the condition of the engine. Where should we sculpt them? I decided to improvise and make the podium exactly on the left side, even though the car is right-hand drive. (Already done this in the right stance before).
So, the trim (donor) of the left pillar was taken. While sitting in the car, I roughly figured out how convenient the location of the sensors would be for me and got to work.
I was thinking about how to make an even layout for the cutout for the sensors - the idea came to my mind to cover the lids of cans with a diameter of approximately 64 mm with fiber (the diameter of the Defi BF sensors is 60 mm).
But under the AEM sensor (diameter 52 mm) a faceted glass caught my eye!)
Average expenses
They can be zero, since to create them you can use improvised materials that are at the disposal of the home craftsman. In this case, the main costs may be for underground cable laying and hiring electrical installation personnel.
Average costs for creating a 4-arm landscape lantern “grater”, with laying an underground two-core copper cable 1.5 mm2 10 m long:
The cost of a 10 m cable is 75x10=750 rubles.- Corrugated pipe 10 m – 14x10=140 rub.
- Cable laying 10 m (without excavation work) – 120x10=1200 rub.
- Connection to a house panel with a protection system – 1,500 rubles.
- LED lamps E27 4 pcs. - 4x96=384 rub.
- Lamp sockets 4 pcs. – 4x62=248 rub.
- Wooden base (waste) – 0 rub.
- Graters 4 pcs. – 130 rub. x 4 = 520 rub.
- Fasteners – 50 rub.
- Household electric circuit breaker – 480 rubles.
- Total: 5272 rubles, including underground installation and in-house power supply circuit - 4120 rubles, lamp - 1152 rubles.
What material is it made from?
If you look on the Internet and YouTube for tips on how to make it, 90% of them will start with recommendations - “take regular packaging cardboard.”
But the fact is that the reliability and rigidity of such a design is extremely unsatisfactory. The individual halves of the reflector are glued together with ordinary tape, which dries out over time and everything falls apart.
Therefore, if you want your softbox to last for a long time, it is better to immediately abandon this idea. You can also try fiberboard.
But this will have a negative impact on the overall weight of the structure. There will also be problems with mounting such a heavy “head” on a tripod.
Based on all this, the best option for making a homemade softbox is polystyrene foam 2cm thick.
This is a very light material with sufficient rigidity and strength. In a hardware store, one sheet of polystyrene foam costs about 200 rubles.
One such sheet is just enough to make your own softbox.