Useful tips
Watch the video if you are too lazy to read
Watch the video if you are too lazy to read
Envelope
- This is just a shell or packaging for inserting various objects or papers. Basically, we are used to thinking of an envelope as a “packaging” for letters or documents. But there are also envelopes made of thick fabrics or blankets for newborns.
Today we will learn how to make envelopes for different needs
and let's start, perhaps, with the most common envelope - a paper envelope.
How to make an envelope out of paper?
The simplest envelope
can be made from a square sheet of paper by folding the corners towards the center. To do this, you will need a square sheet of paper of the desired size, a ruler and a pencil.
1) Mark the very center of the sheet
point, measuring the distance to it using a ruler.
2) Fold the left and right sides inward so that the corners touch the center point
.
3) Then fold the bottom side up so that it covers the center and can be glued to the two already folded corners
.
4) Apply glue to the bottom sides of the envelope as shown in the photo. You can also use double sided tape
.
5) Fold the top corner down. The envelope is ready!
This envelope can be made in just a couple of minutes. It is based on the simple principle of adding angles. Here are a few more schemes for making envelopes from sheets of different shapes:
Diamond envelope
Envelope “from the heart”
Envelope with a square
Envelope with center
The neat diamond shape in the middle is great to decorate with a design, sticker or print. This envelope is easy to open and close without glue, so it is convenient to store all sorts of small items. But in fact, the scheme is practically no different from the classic one, so you won’t have any difficulties.
Bend a sheet of paper diagonally and bend the top triangle - it should rest against the base from below. Fold the sides of the envelope and place them on top of each other so that they match. Bend the lower right triangle to the other side and straighten it into the central diamond.
Photo: personal-diary.rf Photo: infourok.ru
8 best schemes for how to make a box out of paper
Envelope templates
With this template you can make envelopes from colored cardboard
:
By adding a ribbon, you will get envelopes for different occasions
: For greeting cards, money, invitations, etc.
Long envelope template
:
Envelope template on A4 sheet
:
You can decorate envelopes with colored lace or appliqués
:
You can use beads and threads
to close the envelope:
Envelopes are sometimes decorated with various paper details
, made in various techniques: origami, quilling, scrapbooking, etc.
Read more about the quilling technique
you can read here.
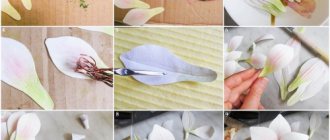
More about paper flowers
you can read here.
Envelope with fold
This one differs from the classic envelope made of A4 paper by a straight line in the middle. To do this, mark a paper square, as in the diagram, and traditionally bend it to the center of the side. Fold the bottom triangle exactly to the center, not going over the side flaps. Tuck its sides and form a trapezoid, and then secure the sides with the resulting “tongue”.
Photo: livemaster.ru
Photo: pinterest.ru
How to make a paper heart: 6 simple patterns
DIY money envelopes
What could be more banal than a gift in the form of money
, but sometimes this is the only thing that comes to mind.
To make your gift unique, you can place it in a handmade envelope
. The envelope can be beautifully decorated and signed like a postcard.
Envelopes for money are usually made of cardboard and have an elongated shape so that the bill can fit completely inside it
. You can draw the templates yourself or use ready-made templates:
Heart envelope
Cut out a large heart from thick wrapping paper and turn it over with the colored side down. Fold its edges like side flaps, turn it over again and fold the bottom, like a classic envelope. The bottom corner of the heart will become the top flap of your brand new envelope.
Photo: svoimirukamy.com Photo: pinterest.ru
Scrapbooking for Beginners: 8 Step-by-Step Ideas
Envelopes for money (templates):
Here are some helpful ideas on how to make and decorate money envelopes that make great gifts.
along with their contents.
Envelope box
Take a large square of thick paper - preferably double-sided packaging. Mark the diagonals, central vertical and horizontal with folds. Fold the corners to the middle, folding them at the same time to get a small square - according to the diagram.
Turn the small square over with the opening side up and fold one triangle over. Fold two corners of the bottom layer to form a heart. All that remains is to straighten and shape the envelope-box, and then carefully tie it with ribbon.
Photo: bestlj.ru Photo: paperkawaii.com
Money in an envelope: original ideas
The envelope design allows you to place the money inside in different ways.
.
Here are some ideas to help you make original envelopes. For example, you can use a postcard
, inside which you paste a small envelope with money.
You can write wishes on the card, and when you look inside, the recipient will find a cash gift
.
Another option is to make the envelope also in the form of a postcard, and attach satin ribbons inside that will hold the bills
.
Book of envelopes
. This original idea will appeal to those who would like to learn how to save money. You can make some simple envelopes and sign them, indicating the purpose for which the money is stored in them and the time when it can be spent.
Square envelope
Cut out a square of colored paper and fold the first flap, going a little to the middle, and then bend the corner at the top along the central horizontal line. In the same way, form the second and third valves so that they overlap each other in turn. The last fourth part will be the closing part - all that remains is to seal or seal the envelope in the center.
Photo: dm-arina.rf Photo: handmade.jofo.me
Creative envelopes
You will need: paper, pencil, scissors, glue, black marker.
Master Class
- Fold a piece of paper in half and draw half a heart.
- Cut out and unfold the heart.
- Fold the sides of the heart into the center.
- Fold the top down and turn the workpiece.
- Fold the top down to form an envelope.
- Cut out ears, arms and legs, then glue to the envelope.
- Draw a face with a marker.
- Get creative and make completely different envelopes this way.
Creative envelopes are ready! I recommend watching this video!
DIY gift envelope | Step-by-step origami lesson for beginners
Soldier's envelope
This type of envelope is perfect as a gift for war veterans; they will be very pleased to receive a recently found letter from a colleague or read congratulations on a holiday.
Place the sheet in a vertical position. It’s good if you have artificially aged paper on hand, it will add color to the craft. Fold the sheet diagonally, aligning both opposite sides, to form a triangle with right angles. Next, make a bend in the center of the right triangle, thereby transforming it into an isosceles triangle.
Carefully smooth out all fold lines. There will be a small strip under this triangle; it needs to be folded towards the base. This will act as a tab responsible for opening the envelope. Carefully bend the protruding corners of the tongue, thereby forming several more small triangles on both sides of the strip. Now the result is not a strip, but a trapezoid, which needs to be placed in the hole of the triangle. The craft is ready, you can present it to a veteran or leave it in the school museum.
Envelopes, regardless of type and color, have always been popular with the public. This is due to the fact that they can be used not only to send letters, but also to present money, small trinkets, invitations, or even jewelry in them.
That is why envelopes made in the origami style are not a shame to present for some holiday or to build a small business on this hobby. It is not for nothing that such products are considered one of the easiest ways to make money, which even a child can handle. You just need to be careful and use your imagination.
List of materials
Well? Shall we begin?
What we need to make such an envelope:
- large cardboard from a used box;
- tools: scissors, pencil, ruler;
- large tape + double-sided;
- a clean yogurt cup;
- any wrapping paper for wrapping gifts;
- decorative tape;
- penoplex 5 cm thick;
- green sisal;
- ribbons for decoration.
Gift envelopes in Japan
In Japanese culture, it is customary to treat gift wrapping with great care. Even the most beautiful and valuable things, if not wrapped and tied properly, will not only not bring joy, but will also be perceived as an insult. Each case has its own packaging, bearing a certain symbolism. This could be a good wish, an expression of gratitude, respect, admiration, and so on.
One of the most popular gifts among the Japanese is money, which is usually placed in special envelopes - noshi-bukuro. Similar packaging exists all over the world, but the inhabitants of the “Land of the Rising Sun” have brought it to perfection. It is thanks to the envelope, which is a work of decorative and applied art, that money is perceived as a full-fledged gift, and not as a way to show a minimum of attention.
Noshi-bukuro envelopes use handmade washi paper, which is classified as a UNESCO Intangible Cultural Heritage. Thanks to a unique manufacturing technology that originated in the 8th century AD. e., the sheets acquire an expressive, noble texture, their quality is considered unsurpassed. The envelope must be decorated with mizuhiki knots made of thin colored twine. This is not just an exquisite decorative element, but an encrypted message. Depending on what event was the occasion for a monetary gift, the weaving combines different colors and patterns. Etiquette in this regard is so complex that reference books are published with recommendations from specialists.
To make life easier for modern Japanese who want to give money, special handmade kits are sold for folding beautiful envelopes, which already have everything they need - from paper and diagrams to a suitable mizuhiki. The packaging, like classic origami, does not use glue; it is held in place only by carefully thought out folds. The cost of the finished envelope should be no more than 2% of the amount invested inside. For example, with a package price of 100 yen (about $1), you will have to give at least 5,000 yen.
Envelope "Heart"
- The outline of the product is applied to paper and cut out along the contour with scissors.
- The side walls of the workpiece are folded inward.
- After this, the part of the workpiece that has a recess is bent.
- The remaining part forms the envelope flap.
- The joints of the parts are glued.
Master class on making a pillow box
A pillow box is similar to an envelope box, but, unlike it, it requires gluing. And it closes due to its own shape.
- To make a pillow box with your own hands, transfer the template drawing onto thick paper. Cut out the template along the outline.
- Take thick paper of the chosen color and place the template on it. Circle it.
- Press the fold lines with dots.
- Cut out the box blank along the contour.
- Bend the box.
- Apply glue to the inner flaps on both sides of the box and glue it together.
- Do not seal the top flap, just close it.
Advice. When gluing, make sure that the sides of the box completely cover the flaps.
The pillow box can be made more solemn:
- Cut, fold and glue a box of thick silver paper with a holographic effect.
- Cover the middle of the top and sides of the box with decorative tape, forming a strip approximately 2/3 the width of the box.
- Cut out a tag in the shape of a cloud from lilac paper.
- Gather a bouquet of artificial flowers and stamens and tie it with a thin lilac ribbon.
- Place the tag on a strip of tape and secure the bouquet on top.
- Glue a small ladybug figurine - it will create a bright accent.
Advice. It is quite difficult to work with paper with a holographic effect: it is too active in itself, and it is not easy to come up with a design for packaging. The background for decoration can be created from a strip of tape.
The final section of the article is devoted to the step-by-step production of a cake box with your own hands.
Beautiful templates for greeting envelopes
Today everyone is accustomed to receiving material gifts in envelopes - it’s convenient and presentable. If you are going to a holiday and don’t want to put money in a regular white package, I suggest you find an original template with a suitable theme.
All you need for work is a color printer, A4 paper, scissors and glue. Choose a suitable template, print it, cut it along the indicated lines, fold everything as shown in the picture and glue it together.
There are many templates that are suitable not only for celebrations, but also for sending letters. Agree, it will be much more pleasant for your recipient to receive news from you in bright and non-standard packaging. Many of the templates have original inscriptions, consider these options for yourself.
The printable template is designed for a standard sheet of paper, so all you need to do is print it out, cut and glue it, and add postage stamps. The tradition of sending news in such beautiful and bright wrappers will definitely appeal to your loved ones and, perhaps, will become your tradition, continuing even in the age of digital technology.
Beautiful envelope made of scrap paper
The scrapbooking technique is becoming increasingly popular and in demand. If you need to make beautiful packaging for holiday invitations, greeting cards or money that will be given as a gift, use this option. You will be able to create a beautiful envelope that looks more like a holiday card rather than the packaging of the present itself.
If you are interested in this idea, watch the video master class, where the author describes in detail all stages of the work and talks about the materials that you will need for this.
Elegant envelope made of kraft paper
Craft paper is a great favorite among craftswomen, because it can be used to make stylish and practical things that are needed every day. If you have not yet decided what your envelope will be made of, I suggest using just such material.
To work you need to prepare:
- sheet of craft paper;
- pencil;
- ruler;
- glue.
Step-by-step instruction
- Take a square piece of paper and cut a rectangle out of it.
- Fold the rectangle in half.
- Unfold the sheet vertically, and then fold the top right and left corners.
- Leave the workpiece in the same position, take a ruler and measure 4 cm from the vertical edge on one and the other side.
- Fold the paper, focusing on the drawn lines.
- Fold the bottom up to the part that will become the flap of the envelope.
- Tape the edges.
If you want to use this type of packaging for invitations to a wedding, anniversary, or birthday, be sure to think about how to decorate it. You can decorate such a product with beads, stickers, and rhinestones.
I have prepared a video for you with three interesting options for decorating a previously prepared product. Watch the master class carefully, find something for yourself there and start creating with pleasure.
How to quickly make an original gift envelope
If you need original packaging for invitations to your holiday or a gift for someone, I suggest making an interesting envelope in a matter of minutes without glue. If you like this idea, read the instructions quickly and get to work.
- Take a square sheet of colored paper.
- Fold it 2 times diagonally.
- Fold the bottom edge toward the center of the sheet.
- Fold the sheet diagonally without bending the corner that is in class=”aligncenter” width=”720″ height=”366″[/img]
- Bend one edge of the resulting triangle, literally 1-1.5 centimeters beyond its line.
- Repeat the same manipulation with the second triangle. As a result, their edges should overlap.
- Fold the edge that overlaps.
- Make a pocket from the resulting corner.
- Carefully insert the top triangle of the envelope into your pocket.
The proposed method is very simple and accessible to everyone. If you plan to make a large number of packaging for invitations to a children's party or other celebration, this option will be simply irreplaceable. You can decorate the front side as desired with appliqués, drawings, and beads.
Stylish three-dimensional envelope using origami technique
While you are thinking about what kind of packaging to choose for your holiday gift to family or friends, I suggest you watch a video of creating voluminous envelopes. The author works using the origami technique, creating stylish gift packaging of various sizes. I am sure that this master class will be useful to you, and you will use such tips in the future.
Envelope for holiday invitations
To beautifully pack invitations for your planned celebration, you can use fabric. This idea may seem strange at first, but believe me, the produced envelopes will look cute and original, which is the most important indicator in such work.
To work you should prepare:
- paper envelope - it will be used as a template for the pattern;
- thin white felt;
- cotton;
- small scraps of cotton - you can easily make stamps from them;
- glue;
- curly scissors;
- small pieces of non-woven fabric;
- floss of different colors.
Now let's look at how to make such a product step by step.
- Tackle future brands first. Cut out beautiful pieces of the same size from the prepared scraps and apply a little glue, and then glue the stamps to the felt. Use scissors to cut them out.
- Now enter the recipient's address. You can write it by hand on non-woven fabric or print it on a printer. Once the ink is dry, glue the address onto the felt.
- Carefully unfold the paper envelope. Place it on the wrong side of the felt and trace along the contour with a pencil, not forgetting to leave a small allowance of literally 0.5 cm. Repeat the same procedure with the cotton lining. Iron the fabric well. You should have the same blank as in the photo.
- Attach the stamps to the front side of the workpiece by applying a little glue and then smoothing everything out with an iron.
- Iron the interlining to the fabric, placing it as shown in the photo. This is where the button will be attached.
- Place the lining and outer part together, right sides should be on the inside. To prevent the fabric from coming apart, secure everything with pins. Using a machine, sew the workpiece, leaving a small area open so that the product can be turned inside out.
- Turn the workpiece inside out and carefully sew up the previously left area.
- Fold the product along the required lines, it should take the same shape as in the photo.
- Take white floss and sew along the side parts, and then sew on a button to close the envelope; you can use a small Velcro instead.
This is where the making of the envelope comes to an end, look at how non-standard and beautiful the packaging for gifts and invitations turned out to be.
Original templates of stylish envelopes
If you know that you simply won’t physically have time to make a beautiful wrapper for a holiday gift, I suggest using ready-made templates. This will greatly facilitate the task facing you, save time, and the gift will receive beautiful and bright packaging.
I have a few templates for you to choose from that you can print at home, I hope you like them.
To make such bright envelopes you will need:
- color printer;
- scissors.
Print your favorite template onto a white A4 sheet. Using scissors, carefully cut out the shape along the dotted lines indicated. Bend the sides of the resulting workpiece along the lines. To ensure that the paper holds its given shape well, you can even go over the fold lines with an iron.
Glue the bottom of the envelope and wait for the glue to dry. Now all that remains is to put the money intended for the hero of the occasion inside.
Making an envelope from paper without glue
Before you make a paper envelope at home with your own hands and without glue, study several instructional diagrams. It turns out that there are several options from the simplest to the more complex. Pre-made envelopes can even be a great option for wrapping a greeting card.
Interesting! Crafts from coffee beans
How to use a ready-made envelope
It’s not always possible to run out to the post office or the nearest stationery store to get an envelope for a letter or postcard or money. Therefore, armed with a simple sheet of A-4 paper, you can make your own paper product. Depending on its shape, the envelope can be used:
•for packaging a small chocolate bar;
•cash gift;
•postcards;
•storing individual parts of the family budget into groups (for groceries, utility bills, vacation, etc.).
Moreover, you can make an envelope even without glue, if you suddenly don’t have one at home.
What are the benefits of working with paper?
Working with paper without glue (the art of origami) gives many advantages:
•Develops fine motor skills in children. As a result, conversational speech is normalized (especially in children).
•Trains perseverance and patience. Making a simple envelope, even for beginners, takes some time to understand.
•Allows you to acquire a new skill, which, on occasion, you can demonstrate to your friends and thereby surprise them.
Interesting! Children's paper crafts
What to make from
A paper envelope is best folded from moderately thin coated paper. It can also be made from thin cardboard, but provided that the sheet is at least A-4 format or larger. A smaller sheet is more difficult to work with. You will have to carefully smooth out the fold lines and at the same time make an effort to give the cardboard the desired shape.
For work, you can use plain white paper and then decorate it with decor or use one of the varieties of craft paper. You can't find one like this in office supply stores today. You can choose by shade, design. If you want to distinguish yourself and create a retro envelope, then use special newspaper paper (purchased) or take a simple old newspaper folded in half for work.
You can even make an envelope out of notebook paper without using glue. Overall, use your imagination.
It is only important that the shape of the paper is initially rectangular.
Master classes on making envelopes
The simplest version of a paper envelope is the following step-by-step steps:
•Take a rectangular sheet of coated paper. Let's step back 72 mm from its upper right corner towards the left and make a mark. We will do the same in the lower part, but moving from the lower right corner towards the left, we will also put a mark. Pay attention to figure A in the photo.
•From the given points, draw dotted lines down, as shown in Figure A and cut the paper along them. We ended up with a slightly beveled square.
•Now let’s lay a sheet of paper so that one of its corners looks up, the other down, and two to the sides.
•For simplified work, you can draw a rectangle in the center of the template, along which we will then bend the corners. Pay attention to figure B.
•Finally, we make folds to form the bottom of the envelope. First you need to bend the side corners of the template inward. Then we bend the bottom corner, and tuck its tip a little inward.
•All that remains is to fold the top corner of the paper to get a full-fledged postal envelope.
If you want to close it securely, after placing a gift or money inside, seal it with a fun flower or heart shaped sticker.
Master class 2
Now let's try to make another envelope from paper from a rectangle. The job is simple:
•Take a rectangular sheet of paper and mark a stripe on it, slightly offset from the center by about 1.5 cm. Pay attention to figure A in the photo. Fold the paper along this line and press the fold well.
•Now you need to form the sides of the envelope. To do this, put it in front of us so that the central fold line looks down. We bend the two sides of the workpiece on the sides by about 1.5 cm.
•And finally, all that remains is to cover the envelope with the top part of the paper that is freely peeking out. But first, let’s cut the corners into it on the bias so that the envelope has a full-fledged appearance. This product can also be decorated nicely if desired and the top edge can be secured with a sticky sticker.
Interesting! DIY napkin flowers: step-by-step instructions
By the way, if you want to securely fasten the envelope on the sides, but there is no glue, then you can use a stapler with colored staples for this. This decor looks very interesting.
Master class 3
Let's try to make another envelope from paper for money or a postcard. The work is very simple:
•Take a rectangular sheet of paper and lay it lengthwise in front of you. Pay attention to Figure 1 in the photo. Let's bend its corners so that they form an acute angle in the upper central part of the sheet.
•Now pay attention to figure 2 in the photo. We need to form the side folds. Their width is approximately 1.5-2 cm. Try to smooth the fold lines well so that the envelope holds its shape well.
•Once the sides and top of the envelope are ready, visually draw a center line on the piece. If this is difficult to cope with, draw it with a pencil and ruler. In this case, mark the center on a piece of paper without taking into account the top (corner of the triangle), as shown in Figure 3.
•Fold the paper along the marked line so that we get a full-fledged envelope. Smooth it out well with your finger.
•Finally, close the top corner of the envelope.
Attention, when placing money in the envelope, make sure that it falls into the side grooves of the paper product. Then the gift will remain safe and sound. To be on the safe side, you can seal the envelope with a funny sticker. And if you wish, write congratulatory words on it.
Master class 4
There is another more artistic process for making an envelope from paper without using glue. We will work according to this scheme:
•Take a rectangular piece of paper and give it a square shape. In order not to wrinkle the sheet (otherwise the front side of the envelope will turn out unpresentable), it is best to measure the sheet using a ruler and pencil. We cut off the excess paper. Or we’ll bend it at a corner and cut off the rest.
•The resulting square must be folded in half diagonally so that we end up with a triangle. Pay attention to Figure 2.
•Then take one part of the triangle (the top corner) and bend it down to the base of the fold line. Pay attention to Figure 3.
•After this, you need to wrap the sides of the workpiece, as shown in Figure 6. That is, as if swaddling our triangle.
•The outer tip of one of the folded corners should be bent again in the opposite direction (Figure 4 and 5). We will get a tail like this. Now all that remains is to open it and fold it straight to the upper corner of the envelope. It is in this pocket that we will tuck the corner of the product when we close the envelope tightly. Pay attention to Figure 8 and 9.
The finished envelope is made completely without glue and at the same time holds its shape perfectly.
Now you know how to quickly and easily make an envelope out of paper with your own hands and without glue. Make crafts with pleasure and teach this to your children, friends and acquaintances.
Lesson #1
1: Take a sheet of A4 paper and fold it in half lengthwise. Then unfold it again - this way you will mark a fold.
2: Place the sheet vertically in front of you, fold the upper right corner towards the middle. Fold the upper left corner in the same way.
3: Measure 3.8 cm from the right edge of the sheet and fold it towards the middle. Do the same on the left side of the sheet.
4: Bend the bottom of the sheet so that the bottom edge coincides with the intersection point of the upper triangles with the curved sides (see picture), bend again.
5: Place the letter or card inside the envelope, placing it between the folded edges.
6: Close the envelope. To do this, fold the bottom part first, and then the top (so that the triangle-flap is located on top).
7: Using adhesive tape, glue the flap of the envelope, and also seal the sides with tape.