How to make a hole in a glass plate?
There is a way to drill a hole
in glass using sand and solder, which is used for soldering.
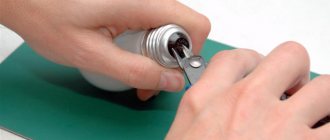
Mark the place where you need to drill a hole
and pour wet sand there and make a small depression. Melt the solder in a bowl and pour it into the resulting recess. After some time, remove the sand and solder.
Interesting materials:
How to create an xbox live 360 account? How to create an active link on Instagram? How to create an album in the mail cloud? How to create an American Apple ID iOS 12? How to create an American Apple ID? How to create animation from photos? How to create animation in power point? How to create an animation in powerpoint? How to create animated telegram stickers? How to create a questionnaire in Google Forms step by step?
Warning
When working with glass, you should strictly observe safety precautions: work only with gloves and carefully remove the fragments after finishing work.
Children who are too young should not be allowed to work with glass products and light bulb crafts.
Snowball
Many children want to have a snow globe at home. Such a product can be created with your own hands from an ordinary light bulb. You just need to prepare the composition correctly.
It consists of glitter, 70% water and 30% glycerin, although the proportions can be adjusted to your liking. This will result in the following:
- with a small amount of glycerin, the glitter will fall more slowly;
- If the amount of glycerin is exceeded, the glitter will remain in one place, no matter how much or how much you shake the flask.
LiveInternetLiveInternet
—Categories
- Interior design, decor (63)
- Clocks, panels and other small items for the home (52)
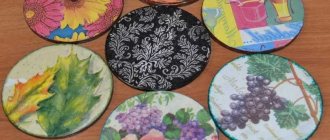
- Decoupage (39)
- We do it ourselves (37)
- There are different master classes on decor. (37)
- Sewing, patchwork, accessories (31)
- Glass, stained glass, painting (29)
- Useful tips for home (29)
- Books and magazines on decor (27)
- Paper, quilling. (19)
- Light, lamps, fixtures. (19)
- Modeling, plastic, fimo (17)
- Useful links (17)
- New life for old things (15)
- Creative materials (15)
- Drawing and painting lessons (10)
- For furry and tailed pets. (8)
- Green corner in the house. Flowers and plants. (8)
- DIY soap (5)
- Candles (5)
- Batik, fabric painting (4)
—Tags
-I'm a photographer
Oil candle
Remove all the parts through the hole drilled in the base, insert a cotton wick and fill the flask with oil.
Making a candle
Drill a hole in the base, get rid of the internal elements of the lamp, insert a cotton wick and fill the flask with melted paraffin. Then break the flask and clean the candle from fragments.
Various original crafts:
- Miniature plant in a lamp;
- In the same vase are plants that require little water (succulents, for example, cacti) or do not require watering at all (aerophytes);
- Various small objects in the flask, from gravel to coins. This easily accessible and stylish decor makes a big impression;
- Gifts in a light bulb: money, congratulations, messages, etc.;
- Spices, salt, miniature cookies in former light bulbs;
- Ladybugs from light bulbs in the garden;
- A miniature kerosene lamp made from a burnt-out lamp.
Manufacturing stages
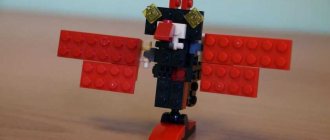
You need to fold 5 light bulbs so that they form a pentagon or other shape.
Mark the contact points with a felt-tip pen, and then apply glue to the marked places and glue the lamps together. Glue can be replaced with adhesive tape. Place a working lamp inside the resulting figure.The easiest way to make a lamp
Around the burning lamp, hang several burnt ones on a thin chain, cord, fishing line or wire.
Decorative decorations
Using your creative imagination, fill the clear lamp bulb with soil, moss, small rocks, shells or twigs.
Such crafts are hung or mounted on a support, which is most easily made from thick copper wire. The stand also uses sticky silicone holders, sold in many stores.
Craft No. 4 - Christmas tree
Another New Year's themed toy. In order to execute it, we will need:
- bulb
- green wool threads
- glue
- star - you can make it from cardboard or take a ready-made Christmas tree toy in the shape of a star of the appropriate size
- beads
- stand
Wrap the light bulb tightly with wool thread, while coating the glass surface with glue. Let it dry, after which we place a star on the top of the resulting Christmas tree, decorate it with beads, like Christmas tree decorations, and fix it on a stand. The craft is ready!
Craft No3 - Christmas tree toy Snowman
On the eve of the onset of winter, and with it the New Year holidays, a great idea would be to while away the evening with your loved ones by creating Christmas tree decorations from old light bulbs. This can be done by painting patterns or drawings on the glass surface. You can glue the light bulbs using glue with sparkles, rhinestones and small beads. And you can make various figures.
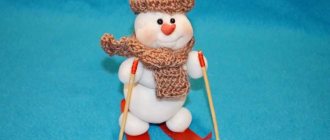
A snowman will be a win-win option for a Christmas tree toy. To create such a toy you will need:
- old light bulbs
- scraps of fabric
- paints
- polymer clay
- glue
- decorative elements: ribbons, strings, strings from which you can weave braids
Paint the light bulb with white acrylic paint. While it dries, we cut out triangles from scraps of fabric, sew them together in the shape of caps, the edges of which are decorated with fringe. After this, you can decorate the caps using ribbons, beads and other available materials. For example, you can weave braids from ropes. Make small carrots from polymer clay that will serve as noses for future snowmen. We paint the noses with orange paint and make black lines for maximum naturalness. Draw a cute face for the snowman. After all the parts have dried, all that remains is to connect them with glue. Make a loop from a rope, with which the toy will be hung on the Christmas tree, and sew it to the cap.
Tip: to paint toys, use special acrylic paints for glass and ceramic products. To create complex designs, use contour paints. With their help, only the outline of the picture is created, because the thickness of such paints does not allow different colors to mix.
Safe work with fluorescent lamps
CFLs can be disassembled, but not for the purpose of further use for crafts, but only if you need to repair the launcher. It is better not to touch the bulb of a fluorescent lamp at all, since you need to stay away from toxic mercury vapors.
The wires coming from the lamp filament to the board are sometimes not soldered to the latter, but wound onto special pins
This lamp consists of five parts:
- U-shaped or spiral flask;
- the upper component of the body with the bulb attached to it;
- an electronic board with a ballast mounted on it;
- lower housing element with electronic ballast placed in it;
- plinth - together with the bottom of the case, this is an integral structure.
To disassemble and access the launch controller, use a flat-head screwdriver with a wide tip. With its help, the housing latches are disconnected one by one. To perform the operation, you need to insert the tool into the groove and turn it.
This is not so easy to do. After prolonged use, accompanied by constant heating, the plastic loses volatile substances and becomes hard. The latches themselves often break during the disconnection process.
The lamp opening line is located in the place where the technical parameters of the device and the name are written. The base of the flask is also located here.
If the constipations do break, they are simply cut off with a sharp tool or sawed off. To do this, you need to arm yourself with a small disk cutter. You can buy it or make it yourself.
First, measure the circumference of the body with a caliper. Then a pin with a cutter is inserted into the chuck of the drilling machine. This is done in such a way that the latter is above the frame at a height equal to ½ the diameter of the lamp body.
The drilling equipment is turned on, the lamp body is pressed against the cutting tool and the outer part of the body is carefully cut. Similar cuts are made at intervals of 1.5 cm along the entire contour.
A screwdriver with a thin rod is inserted into the slots and the cuttings are lifted. Then take a screwdriver one size larger and open the housing of the lighting fixture.
Next, check the lamp bulb for serviceability. Why take a multimeter and check the conclusions in pairs. Resistance within 15 ohms is considered normal. If everything is normal, they conclude that the ballast module is faulty.
If the filament breaks, the ballast may still be operational. In this case, the flask is disposed of, and the working device is used as a spare part.
If there is a fuse in the control circuit, it may blow. The issue is resolved by installing a resistor with a resistance of several ohms in its place.
Burnt elements on the electronic board are visible to the naked eye. Based on the power of the lamp, this could be one or a pair of resistors, transistors or swollen capacitors (+)
If only one filament has burned out, it can be shunted with a resistance, but this will result in an overload of the ballast. Such a restored lamp will not be able to work for a long time - a year maximum.
Once the repair is complete, the two halves of the lamp are simply glued together. To simplify the reconstruction process, the product is sometimes heated using a hair dryer.
If the lamp cannot be repaired, it must be disposed of. Read about where to dispose of used fluorescent lamps in this article.