Making a hedgehog from leaves
The most important material for our painting is autumn leaves; you and your child will find them in abundance in city gardens and parks.
Choose those that you like, however, but narrow, sharp leaves are best suited for crafts. Pay attention to oak and rowan. At home, rinse our natural material thoroughly, then dry thoroughly
If there is not enough time, then iron the leaves with an iron, they will become smooth and beautiful.
Next we prepare the basis for our application. There are several ways to do this. The easiest option is to find an image of a hedgehog on the Internet, print the picture and stick it on cardboard. Remember that the image should be black and white, because children will love coloring their forest dweller. If you are good at drawing, then you can draw a hedgehog yourself.
To further develop your son or daughter’s fine motor skills, draw an outline on a piece of paper and ask them to cut it out. Additionally, outline the outline of the figure with a brown felt-tip pen so that it is bright and clear. Always focus on the age of your baby and the skills that he has or, conversely, those that need development.
When our foundation is ready, it's time to begin the most interesting and enjoyable part of our work. Spread the hedgehog's body with glue and begin to carefully glue the autumn leaves-needles. You shouldn’t limit your child’s creativity; let him realize his ideas and fantasies. After our hedgehog acquires its prickly coat, the application will need to be put aside for a while to allow the glue to dry thoroughly.
To prevent your child from getting bored, invite him to think about how you will further decorate your work. Show him pictures of an autumn forest or watch a funny cartoon where the main character is a funny prickly animal. When the sheet has dried and there is no chance of damaging the already created craft, we proceed to the final, decorative stage of the work. First, we paint the face and give it a certain expression. Our hedgehog made of leaves can smile or, on the contrary, frown with its drawn eyebrows. Imagine with your child, come up with a story about where the forest dweller is running and what he is carrying. Draw him the apples and mushrooms that he drags into the hole. You can also recreate a forest or clearing. If you have leaves left, you can make trees using the applique technique. Don’t forget that the sun should be shining in the sky and white clouds should be floating.
Our autumn craft made from natural materials is ready, all that remains is to figure out how to hang it on the wall. Using fallen leaves, you can make not only a hedgehog, but also other animals or plants.
Autumn crafts made from natural materials are an important part of lessons on work and the surrounding world in the lower grades of school, and older kindergarten groups are sure to devote some time to them every year. The most popular materials are leaves, twigs and acorns. It's better to stock up on them in advance. Since most often (and especially in kindergartens) autumn crafts begin with applications, the leaves must be well dried.
This is done like this: the collected leaves are straightened and placed between the pages of a thick book with matte, loose pages that absorb moisture well (multi-volume Soviet collected works of general secretaries are perfect). Remember that the pages of the books will look a little distorted and warped after drying, and the leaves will not remain exactly as bright as they were when you picked them from the ground. The colors always fade slightly. This effect can be slightly weakened by additionally lining each sheet with tissue paper, but not by much. And remember - the longer the leaf dries, the duller it looks.
Try to space the leaves several pages apart. It will take you at least a week to dry them, so go to a park or square with your child at the very beginning of autumn.
Making animals from autumn leaves
Children love to draw, sculpt and make all sorts of animals in various other ways. So why not make them from autumn leaves? This is not at all difficult, and therefore any child, starting from 3 years old, can cope with the task. Well, the task of adults is to be present during the creative process and help the child when he needs such help.
You can make almost any animal from the leaves if you wish. Let's look at how exactly this is done, using the example of a squirrel.
So, what do you need to make a squirrel out of leaves:
- all sorts of autumn leaves. Since the real squirrel, as you know, is red, yellow or orange, the leaves should be the same color;
- black beads for eyes;
- scissors;
- glue;
- one sheet of thick paper of any color.
Let's get creative.
- To begin with, we select leaves that in shape resemble one or another part of the animal’s body.
- If the leaves do not look too much like a body, we bring them to the desired shape using scissors.
- Scissors will be needed in any case. For example, to cut out ears for a squirrel or paws from a leaf.
- Since the squirrel is known to be fluffy, to make it you need to select “fluffy” leaves. That is, with carved edges imitating fluffiness.
- We glue a piece of paper similar to the body of a squirrel in the center of the cardboard.
- We select another autumn leaf that looks like a squirrel’s tail and glue it to one side of the squirrel’s body, point up.
- We select another piece of paper that looks like a squirrel’s head and paste it at the top of the body.
- We select two very small leaves and glue them to the squirrel’s head.
- Now it's the turn of the pre-prepared beads. One bead is an eye: glue it in its proper place. Another bead is the squirrel’s nose: we glue it to the very tip of the sheet representing the animal’s head.
- There is no need to glue any eye on the back side, since our squirrel does not have any back side. After all, it is glued to a sheet of paper, therefore it will turn out flat (as if drawn). Not all children are able to understand such abstractionism, and therefore this point will need to be clearly explained to them.
- At the bottom of the body we glue paws from the leaves. To do this, we look for suitable whole leaves or cut out the desired configuration with scissors.
That's it, the squirrel is ready. Everything is simple, fast and beautiful.
To preserve the craft longer, you need to carefully place it in a transparent file. By analogy with the squirrel, make other animals.
Ideas for inspiration
Yellow leaf bird:
Printable bird:
Simple paper crafts
A few more printable templates:
Just give free rein to your imagination and follow the step-by-step photo instructions.
Pictures made from autumn leaves are a wonderful craft and good entertainment for children and parents. For any medium-sized picture, occupying about three-quarters of an A4 sheet, you will need a lot of leaves, at least 20-30 pieces, and a variety of them.
Collect them with your children in early autumn and dry them - you can use a special press for this, but the easiest way is to put the leaves in books (but, firstly, these should either be books you don’t really need, because drying even leaves among the pages spoils them a little these pages, or place the leaves between sheets of tissue or plain paper.
And, secondly, put these books in a visible place or remember them in some other way, because the leaves in the book are easy to “lose” in the home library). Drying usually takes 1-2 weeks, even if the leaves you picked were not fresh, but already slightly wilted.
If there is any damage on the leaves (for example, a few holes from insects), this is completely normal; such leaves can also be dried and used in crafts.
In the process of collecting and creating the application itself, you can additionally tell children about what kind of leaves they are, what trees they are, their features, etc.; creative work that develops motor skills and imagination can also be educational.
Preparing leaves for use
Many leaf products require dried material. To do this, the collected foliage must be prepared for use. If the craft does not require perfectly smooth material, then the collected foliage can be left to dry in a cardboard box in a warm, ventilated room.
If smooth and even leaves are needed for the craft, then they should be laid out between newspapers or paper and covered with a heavy press. The drying process takes about two weeks.
In order to speed up the drying process, you can use a household iron. Ironed leaves will become smooth and dry.
What do you need for work?
Whatever application option is chosen, you will definitely need maple leaves, which must be collected and dried. There are two ways to properly dry the leaves: place the leaves between the pages of the book, it is better to lay each leaf with a paper napkin, or place the leaves on sheets of paper, cover with another sheet of paper and iron. In addition, you need to purchase sheets of cardboard, preferably colored, plasticine, glue, paints and brushes, scissors.
It is important to remember that no matter where the child makes appliqués, at home or at school, for example, if it is 1st grade and the child is just learning how to make crafts, you need to teach the child to prepare a workplace before starting work; it is best to cover the work surface with oilcloth. Before you begin the process of gluing the leaves, you need to think through the plot of the future painting, then select the necessary leaves and arrange them according to your plan
The leaf is always glued first - the base, for example, for a hedgehog - this is the body, then additional leaves. It is better to apply glue to the edges of the leaf, and not to the middle, so that the leaf does not become deformed during drying; the finished picture can be placed under a press and a frame can be made for it
Before you begin the process of gluing the leaves, you need to think through the plot of the future painting, then select the necessary leaves and arrange them according to your plan. The leaf is always glued first - the base, for example, for a hedgehog - this is the body, then additional leaves. It is better to apply glue to the edges of the leaf, and not to the middle, so that the leaf does not become deformed during drying; the finished picture can be placed under a press and a frame can be made for it.
Craft a wreath of maple leaves
You can combine a wreath of maple leaves with many other natural materials:
- Bunches of rowan
- Cones
- Spruce branches
To create such a wreath you will need time and perseverance, as well as available materials:
- Willow twigs, wire or any other available base for the frame
- Scotch tape or thread
How to make a wreath from maple leaves:
- First make a round base from willow twigs or hard wire
- After this, twist each maple leaf onto the base with its tail.
- To keep the leaves in place, secure them with thin wire or thread
- Add decorations as you weave the wreath
Another option for a wreath base is cardboard.
:
- Cut out a ring from cardboard
- Carefully wrap the circle with knitting thread
- After which you can start decorating the wreath with leaves, fixing them with PVA glue
DIY autumn rose
Roses from maple leaves, in order to avoid damage to the collected natural material, are recommended to be made in accordance with the generally accepted algorithm. It involves the step-by-step creation of the rose itself, the flower stem and the final formation of the composition.
Forming a rose
Roses made from maple leaves turn out beautiful if you use different sizes of working material. In this case, the collected leaves should be approximately the same color. Otherwise, the appearance of the craft will be far from the natural appearance of the flowers, which will cause conflicting feelings when visually assessing the final result of the work done.
For one component of the composition you will need at least 7-8 maple leaves.
It is recommended to start with the smallest flower:
- Check the collected leaves for damage. After making sure that they are absent, rinse the natural material under running water. Remove excess moisture with a cloth made of natural fabric.
- Fold the smallest maple leaf crosswise. When deforming the sheet, make sure that no cracks form, which can later lead to a complete rupture of a piece of working material.
- Roll the used sheet into a tube. This will be the core of an autumn rose bud.
- Take a second sheet, slightly larger in size than the first.
- Fold the second sheet in half. Wrap it as carefully as possible around the first “tube” - the core.
- Fold the edges of the outer leaf outward, as if forming a rose petal.
- Repeat steps 4 – 6 7 – 8 times depending on the number of leaves prepared to create 1 bud. If all the leaves used are the same size, the order in which they are placed in the bud does not matter.
- Tie the lower part of the craft with thread to secure the bud.
- Spread the petals and add volume to the rose bud. If the resulting flower is not full enough, add 2-3 more maple leaves to the bud. It is not recommended to use a larger number of leaves, since it will be almost impossible to fix such a bud with a thread. Tying the bases with denser material or a wide ribbon will significantly reduce the natural appearance of the final composition.
If the integrity of one of the petals in the bud is damaged, it is not recommended to unfold the rest and redo the craft. The final result of the work done should be as close as possible in its naturalness to the appearance of a real rose. The vast majority of plants found in nature do not have ideal forms.
Despite this, if the tears that have formed in the maple leaves are very noticeable and are in excessive quantities, it is better to make the bud again. Serious violations of the integrity of the petals can lead to the rose falling apart during the formation of the bouquet.
Such unforeseen circumstances will force you to disband the composition, at the risk of breaking other roses made from maple leaves.
Stem
Maple leaf roses will look unnatural without a properly made stem. It can be formed in 2 ways.
Rose from maple leaves step by step
The first, simplest method, assumes that all (or the absolute majority) of maple leaves used in crafts have cuttings at the base.
Creating a rose stem in this case requires several steps:
- Using scissors or a stationery knife, achieve the same length for all leaf cuttings included in the composition. If the branches at the base are too short, it is recommended to cut them off completely, and then use another method of forming the rose stem.
- Cut a piece of transparent tape at least 15-20 cm long. Narrow adhesive tape is best in this case. It will be less noticeable, increasing the naturalness of the final appearance of the resulting composition. If you don't have tape, you can use foil and a stapler or glue gun.
- Wrap tape around the maple leaf cuttings. It is not recommended to tighten the bases, as this may interfere with the fixation of the petals inside the bud.
- If there is no sufficient fixation, staple the adhesive tape in several places.
If the leaves used in creating the craft do not have cuttings, you can create a stem for the future rose separately, and then glue it to the base of an existing bud.
To do this you need:
- Take 2 or 3 A4 paper sheets.
- Roll 1 sheet into a tube. Secure the joints with glue, a stapler or double-sided tape.
- Repeat step 2 with each piece of paper prepared for the craft.
- Slightly bending the upper part of the stem, attach it to the base of the bud using glue, a stapler or double-sided tape.
- If necessary, the stem can be painted green (to create a natural appearance) or wrapped in foil (or colored paper) to disguise the original working materials.
When using the second method of creating a stem, it is recommended to cut the paper tube so that its total length is no more than 10-15 cm.
Otherwise, the bud will not be able to be tightly fixed, which will lead to the fact that when it falls, the integrity of the maple leaves used in the craft may be damaged. As a result of this, the overall appearance of the rose will be spoiled, and it will be impossible to restore it without redoing the flower again.
Video Children's autumn crafts from leaves
Autumn gives us not only a harvest of vegetables, fruits and berries, but also a large number of dry leaves of a wide variety of colors and shades, which gives us the opportunity to show our imagination and use them for joint creativity with children or to create some kind of decoration for the interior of our home.
In addition, in order to engage in this type of activity, practically no financial investments are required (with the exception of glue and cardboard) - dry leaves lie under your feet, collect as much as you want. And how much joy and positive emotions your child will receive if you entrust him with this important task.
Maple leaves are especially popular for autumn crafts, since the shape of its leaves and beautiful colors allow them to be used in a wide variety of applications. In general, you can make a huge number of crafts from autumn leaves - it all depends on your imagination, but today we will focus on one of them, namely the applique called “hedgehog made from natural maple leaves,” or rather, its most interesting variations.
Crafts from autumn leaves for children – photos and ideas
In fact, with such a convenient, varied and colorful material, there are no restrictions. You just need more imagination and inspiration. Look!
Photo: biohimist.ru Photo: . Photo: pinterest.ru Photo: ectrl.ru
Photo: retete-usoare.info
Photo: bestlj.ru
Photo: infourok.ru
Photo: mycrafts.ru
Photo: biohimist.ru
Photo: vidtube.ru
Photo: culture.ru Photo: youtube.com
Photo: .
Photo: larecmasterici.ru Photo: ok.ru Photo: fotostrana.ru Photo: sanmarco1.ru Photo: pinterest.ru Photo: stroyblok56.ru Photo: ectrl.ru
Photo: nl.pinterest.com Photo: ectrl.ru
Did you like the post? Subscribe to our channel in Yandex.Zen, it really helps us in our development!
Where to begin
Regardless of which appliqué technique you choose, there is a certain procedure that must be followed. First, natural material must be collected. You need to choose whole, undamaged leaves of a wide variety of colors. Then the leaves should be dried. There are two main technologies for drying leaves:
- Place each sheet separately between the pages of an old book;
- Carefully iron each sheet placed between two sheets of paper with a warm iron.
Choose the method you like best. Next, let's prepare our workplace: cover the table with oilcloth, take sheets of paper or cardboard, PVA glue and scissors and felt-tip pens.
If you are creating an application together with a small child, it is better to use fresh leaves and then dry the entire finished composition. In other cases, after preparing (harvesting and drying) the natural material, you can come to the most interesting thing - creating the image of your future application. After choosing the main idea of the painting, you should prepare the necessary leaves and arrange them on the sheet in accordance with your creative idea. First, we need to glue the base of the future figure onto our background - for the hedgehog, the base will be its torso. Other leaves will be attached to it. Do not apply glue to the entire sheet
, otherwise after drying the craft will become uneven. After all the dried leaves are glued, the application is placed under a press, for example, in an old thick book for two to three days.
Autumn tree
- Taking plasticine, make a trunk and branches;
- Stick the resulting parts onto a cardboard sheet, pressing them more tightly to the plane;
- Using a stack, reproduce the cracks on the trunk;
- Mark the approximate boundaries of the crown with a pencil;
- Crush the leaves and, after applying glue to the crown area, scatter them onto the cardboard;
- Fill all the resulting gaps with pieces of leaves;
- Mark where the ground is approximately and do the same, covering it with autumn leaves.
- Decorate the craft with rowan berries and other natural materials.
Autumn trees
Plasticine tree
For work, prepare colored plasticine and cardboard.
Draw a tree trunk on thick cardboard. Now let your child roll a lot of thin and long plasticine sausages in 2-3 shades of brown.
Glue them along the tree trunk, alternating shades for realism. Fill in the entire contour of the trunk and don't forget about the branches.
Add some more branches for a lush crown.
Roll out many thin sausages in red, orange and yellow colors. Roll each sausage into a spiral shape. You will see that your child will really enjoy this exciting activity. Glue the spirals in random order onto the crown of the tree. Shape the tree to the desired size. Make blades of grass from green plasticine. “Plant” the grass near the tree.
Complete the applique with falling leaves. This is the kind of man-made beauty we have. A bright frame will make the picture even more expressive.
See our step-by-step MK photos and be inspired to create your own masterpieces.
Sun
For such an application of dried leaves, you need to prepare those that are thin and long in shape. A good option would be willow or ash. But you can take others that fit the criteria.
The leaves must be dried and smoothed so that after a while the product does not lose its appearance and continues to please the eye.
Cardboard in dark colors, for example, dark blue, is perfect for the base. This way the sun will look more spectacular, and this color also resembles the real sky in autumn:
- You will need to cut out a circle from yellow colored paper that will serve as the face of the sun. You can immediately decorate it: cut out and glue the eyes, mouth and nose. Try to do everything carefully, following the proportions, so that the craft looks great;
- Attach all prepared elements to the center of the face. Use a pen or felt-tip pen to highlight the freckles. The sun often gives them to people, but he himself has such spots;
- Glue the leaves neatly in a row along the entire circumference of the sun’s face. There should be two such layers. In the first one, it is better to try to stick to the same length of leaves. The second layer will need to add fullness and remove any gaps, if any;
- Now you can attach the face of the sun on top.
Thus, it is easy and simple to make this product that gives warmth and comfort. It will be placed in the interior of the house and will add joy and light to the overall atmosphere and will be pleasing to the eye.
Using a similar technique, you can create other applications from leaves, for example, a butterfly, a peacock or a hedgehog.
Leaf fish applique in detail with photo
- On a blue or dark blue colored cardboard (we choose this color if we want to show that the fish is swimming in the aquarium), glue 1 yellow piece of paper, which will represent the body of the fish:
- We make a fish tail from identical red leaves.
- We tear off a small piece from the same red leaf to make a mouth for the fish:
- From the red leaf from which you will tear off part to create the mouth, tear off more pieces of fins. You can simply fold the rest and tear it in half.
- Make a fish eye out of colored paper. You need to make one circle white, and the second (it should be smaller in size compared to white) black.
- Under the finished fish, glue any dry grass or twigs that will act as seaweed:
How to inspire children to create
A stand on the theme “Golden Autumn” will help to interest children. Schoolchildren often make crafts from plasticine. If the crafts are planned to be done at school, then there will be no problems with this.
Bogorodskaya toy drawing factory, museum, history What is plasticine made from, how to make it from flour, salt, starch at home, video Owl with coffee, how to make a cat, paintings, drawings, pictures, photos, master class Burning for children: unusual and useful creativity
A great way to showcase other work for inspiration is through a presentation. You can use beautiful pictures of landscapes, poems by famous poets and stories of writers about this wonderful time of year in your presentation. The presentation must be decorated with drawings and applications from other children on the theme “Autumn”, so that the children feel the magic that Mother Nature brings. A presentation can not only get children into the mood for work, but also inspire them to create masterpieces.
Applique autumn leaf fall: iso 2nd grade
This application is made using a combined technique - drawing and appliqué.
First, the background is created using paints or pencils. And the crown of the tree and leaves on the ground are not drawn, but glued.
How to dry leaves for crafts
Dry leaves are an excellent free raw material for various herbariums, applications, and crafts. In order for your crafts to last for a long time, you need to learn how to properly dry leaves. To do this, study these rules:
Collect natural material only in dry weather. Choose leaf color yellow or green
Pay attention to the appearance of the leaves. The most suitable ones will be smooth, beautiful and clean, without damage or black spots.
There are several options for drying leaves. Let's look at each:
- Long-lasting and high-quality method (takes 14-30 days). Carefully level each leaf and place it between the pages of the notebook, which must be placed in a large thick book. Weigh the book on top with something heavy.
- Accelerated. If you didn’t have time to make the preparation, but you already need leaves for tomorrow, this method is the most suitable. Place the leaves between the newspapers and iron them with a warm iron 3-4 times. Then let the plants cool and repeat the procedure several more times. It is worth saying that when using this method, the plants become fragile and cannot be stored for a long time, the green leaves immediately darken, and the yellow ones remain bright.
- Alternative. Some craftswomen have gotten used to preparing leaves using a hair dryer. They claim that with this method the plants do not darken, but there is a chance that the leaves will curl into a tube.
To introduce your child to the properties of different materials, you need to come up with an interesting task that can be easily completed in several ways. The “Hedgehog” applique is a good option for an art class. By sorting through different types of paper, the child will not only develop fine motor skills and creativity, but will also expand his knowledge about the world around him.
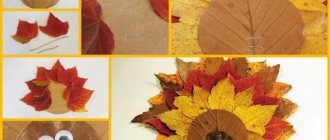
DIY Hedgehog applique made from autumn leaves
Our first application is called Hedgehog
For work we prepare: - maple, plum and acacia leaves - PVA glue - plasticine - cardboard or album.
I want to immediately focus your attention. We always apply glue only in the center of the plant
Two or three drops of PVA is usually sufficient. There is no need to smear the edges of the parts with glue, otherwise you won’t be able to make some applique elements. Here is our wealth in all its glory. If the color of real hedgehogs is gray with brown shades, then our hero shines with almost all the colors of the rainbow. Now we will glue the leaves one by one. Work should begin with the largest sheet.
So, like a pyramid, we gathered together multi-colored hedgehog thorns.
Now we need to design the hero’s abdomen. The head, belly and paws of real hedgehogs are covered with coarse dark fur. On the applique, the body of the animal will be brown. It's even more interesting this way.
Gently coat the sheet with PVA glue and push it under the spines. To ensure that the parts adhere well to the paper, you can place a heavy book on top of the applique for 3-4 minutes.
Shown here are the hero's paws - two light yellow acacia leaves.
We work according to the traditional scheme - we lubricate the parts with PVA and push them under the glued belly.
It's time to practice with plasticine. With its help, we will design the animal's face, sculpt a brown nose, eye and tongue. We press the plasticine onto the base of the applique. It holds on quite tightly. If there is any doubt that the nose or tongue may fall off, then you need to glue them with PVA.
We really liked the picture with the image of a hedgehog. However, there are still not enough red colors. Add your favorite applique color and sculpt a pourable apple from plasticine.
December 1, 2015
All my creativity
Popular this month:
Author's creative portal
Hedgehogs are all different
Volumetric hedgehog made of seeds and plasticine
For joint creativity you will need:
- foil;
- leg-split;
- black and brown
- unpeeled seeds;
- PVA glue;
- acorns and leaves for decoration.
Cover the hedgehog's body with black plasticine and its face with brown plasticine. This important stage can be safely entrusted to the child; nothing will be spoiled, and all the flaws will then be hidden.
The next stage is the design stage. You need to make needles for the hedgehog from the seeds. Start work from the head, arrange the rows of seeds in a checkerboard pattern. Stick the “needles” into the plasticine as tightly as possible to each other.
Mushrooms can be easily made from acorns by simply covering their caps with brown plasticine. If you wish, you can attach real leaves to them. Using plasticine, attach the mushrooms to the back of the hedgehog.
Hedgehog applique made from dry leaves
All you need is to draw an outline. Your baby will be happy to glue the leaves on himself. Just show him how it's done.
You can download the hedgehog template, we offer you 4 options:
With a little perseverance, you can make a surprisingly cute and easy craft for kindergarten.
Making a hedgehog from leaves
The most important material for our painting is autumn leaves; you and your child will find them in abundance in city gardens and parks. Choose those that you like, however, but narrow, sharp leaves are best suited for crafts
Pay attention to the oak and rowan. At home, rinse our natural material thoroughly, then dry thoroughly
If there is not enough time, then iron the leaves with an iron, they will become smooth and beautiful.
Next we prepare the basis for our application. There are several ways to do this. The easiest option is to find an image of a hedgehog on the Internet, print the picture and stick it on cardboard. Remember that the image should be black and white, because children will love coloring their forest dweller. If you are good at drawing, then you can draw a hedgehog yourself.
To further develop your son or daughter’s fine motor skills, draw an outline on a piece of paper and ask them to cut it out. Additionally, outline the outline of the figure with a brown felt-tip pen so that it is bright and clear. Always focus on the age of your baby and the skills that he has or, conversely, those that need development.
When our foundation is ready, it's time to begin the most interesting and enjoyable part of our work. Spread the hedgehog's body with glue and begin to carefully glue the autumn leaves-needles. You shouldn’t limit your child’s creativity; let him realize his ideas and fantasies. After our hedgehog acquires its prickly coat, the application will need to be put aside for a while to allow the glue to dry thoroughly.
To prevent your child from getting bored, invite him to think about how you will further decorate your work. Show him pictures of an autumn forest or watch a funny cartoon where the main character is a funny prickly animal. When the sheet has dried and there is no chance of damaging the already created craft, we proceed to the final, decorative stage of the work. First, we paint the face and give it a certain expression. Our hedgehog made of leaves can smile or, on the contrary, frown with its drawn eyebrows. Imagine with your child, come up with a story about where the forest dweller is running and what he is carrying. Draw him the apples and mushrooms that he drags into the hole. You can also recreate a forest or clearing. If you have leaves left, you can make trees using the applique technique. Don’t forget that the sun should be shining in the sky and white clouds should be floating.
Our autumn craft made from natural materials is ready, all that remains is to figure out how to hang it on the wall. Using fallen leaves, you can make not only a hedgehog, but also other animals or plants.
When walking or doing activities with young children, it is very important not only to have an interesting time, but also to try to teach them something new that will contribute to the development of their imagination, hand motor skills, imagination and resourcefulness. Autumn Park is a wonderful opportunity to use available natural materials from which you can make many crafts or souvenirs
Crafts made from chestnuts, twigs, and fallen leaves will help the child learn to understand geometric shapes and also contribute to the development of color perception. It is worth noting that such an activity will not be expensive, but can benefit the child.
This article will talk about how you can keep your child busy in an interesting and useful way by making together with him an autumn applique “Hedgehog” from leaves and other scrap materials.
Even the youngest children will be able to make such an autumn applique, since it requires a small amount of materials, and the task itself is completely understandable. So, to create such a “Hedgehog” application you will need:
- dry leaves;
- paper;
- stencil in the shape of a hedgehog’s body;
- PVA glue;
- a simple pencil, felt-tip pen or marker;
- scissors;
- glue brush.
First you need to transfer the shape of a hedgehog’s body onto paper using a stencil and a simple pencil.
Visually, you need to divide the body into the head, where the leaves and the main body will not be attached, then draw a barely noticeable thin line with a simple pencil, and coat with PVA glue the part where the so-called needles of their leaves will be located on the hedgehog.
You can start attaching “needles to the body”; you should start from the upper part of the body, gradually filling all the necessary space with needles from leaves.
The application is ready, so this option is perfect for keeping little children occupied in kindergarten or at home. If desired, you can use any other natural material that will serve as an additional finishing touch for the craft.
Table decoration made from maple leaves
You will need:
- multi-colored leaves (if you use artificial ones, the decoration will last a long time)
- strong thread or fishing line
- scissors
- superglue or hot glue
- baking paper
- masking tape
- centimeter.
1.
Using a centimeter, measure the distance between the chandelier and the table so that you know how long to cut the thread and baking paper.
2.
Cut the paper to the desired length.
3.
Cut the thread, the length of which should be 15-20 cm longer than the baking paper.
4.
Using masking tape, secure the thread at the top and bottom of the paper, leaving 15-20 cm hanging from one end of the paper. You will use this end of the thread to tie the craft to the chandelier above the table.
5.
Starting with the top piece of masking tape, begin laying out the leaves (face down and from largest to smallest), leaving a few centimeters (5-7 cm) between them. Continue adding leaves all the way to the bottom.
6.
Once you have everything laid out and are happy with how the piece looks, use glue to glue the leaves to the string.
7.
Make several of these strips with leaves and tie them to the chandelier above the table.
Hedgehog leaf applique
For appliques you will need PVA glue, a sheet of cardboard, a felt-tip pen and dry leaves.
Simple hedgehog made from leaves (top view)
This animal looks as if we are looking at it from above. The child needs to first draw the outline of the hedgehog with a felt-tip pen (the circle is the body, and the cone is the head with the points of the nose and eyes) - you can help by showing a sample, but you shouldn’t draw for the child - and then smear the “back” with PVA glue and just glue the leaves , one after another, starting from the center.
The leaves should be as sharp as possible and stick out from the edges of the outline. Let the application dry and it is ready.
Hedgehog made from leaves (side view)
Leaves of any shape are suitable for this craft. Now the hedgehog is depicted sideways: the head is still in the shape of a cone, but the body is already oval, flattened from below. Help draw it or just follow the process.
The principle of creating this application is the same - glue the leaves to the “back” of the outline - but here it is better to smear each leaf separately with glue, and you should start gluing them from the very bottom layer and the most “distant” needles, that is, exactly those leaves that will protrude beyond the contour.
For the lower layers it is better to choose leaves that are darker in tone, and for the upper layers - those that are lighter.
How to choose material
Plasticine must be selected based on some important criteria:
Color. Bright color is a sign of good material. From this plasticine the applique will turn out fresh, autumnal and colorful. You can choose different shades of orange, yellow, green and red, or you can even use shiny plasticine. In art stores there is a huge amount of working material, which, if chosen correctly, can be made to play with different colors.
Consistency. Oddly enough, the plasticine should not be too sticky and stick to your hands. This material becomes warm if you knead it in your hands for a few seconds.
However, it is important to remember that plasticine that is too sticky makes for sloppy crafts. This material can be used in applications
The main condition is to wash your hands well with soap and dry them before sculpting.
Strength. After drying, plasticine may become too hard, and figures made from it may break and crumble. This turn of events can upset the baby, because he has been trying for so long to create a beautiful craft or applique. Before you start working with plasticine, you should make sure of its strength. To do this, you can roll a small ball, warm it up in your palms, and then wait for it to dry completely. If you want the resulting figurine to remain strong and durable for a long time, cover it with transparent nail polish.
Pumpkin
To work you will need:
- painted nylon;
- filler (foam rubber or padding polyester, even ordinary cotton wool will do);
- needle and thread;
- thin wire;
- a small piece of wire;
- green tape;
- scissors;
- brush and paints.
Using a needle, make jumpers with thread. Do them at the same distance until you go around the entire workpiece in a circle. Use small pieces of thin wire to make round blanks for the leaves. Cover them with green nylon, secure its ends with thread and trim off the excess. Slightly deform the edges of the leaves, giving them a realistic look. Wrap the ends of the wire with tape. Wrap a piece of wire with tape. Wind it around the handle and carefully remove the resulting spiral. The result is a branch-tendril, which we will attach to the pumpkin.
Collect a pumpkin branch, gradually connecting the leaves and tendrils with tape in a random order.
At the top of the pumpkin, fix a piece of wire and wrap it with tape. Attach a branch with leaves to the tail. To achieve realism, tint the depressions orange. Blot excess moisture with a napkin. As a result of the efforts made, a wonderful handmade autumn gift was obtained.
Mushrooms
To work you will need:
- cotton wool;
- water; starch;
- long nails or thick wire;
- cardboard;
- paints and brushes;
- PVA glue;
- dry tea leaves or poppy seeds.
Pierce each circle in the middle with a nail. It will serve as the base for the leg. Instead, you can use thick steel wire. But it’s better not to bother and buy a dozen or two potential “mushroom legs” at your nearest hardware store. Now it’s time to cook the paste. Boil a liter of water. Stir 5 tbsp in a glass of cold water. with a heap of potato starch. While stirring boiling water, pour starch into it in a stream. Stirring, bring the paste to a boil. It is ready to use, all you have to do is wait for it to cool to room temperature.
Coat the mushroom preparation with paste. Roll a cotton wool ball for the hat, dip it in paste and glue it to the hat. Wrap the mushroom stem with moistened cotton wool. Repeat this procedure several times until you get the fungus of the desired size and shape. Don't forget to squeeze out excess glue from the cotton wool! The resulting blanks must be completely dried on a radiator or in a warm oven. Already at this stage the mushrooms turn out very nice.
The time has come for creative work - painting.
It is she who will turn faded preparations into real autumn mushrooms. You can paint crafts with any paint: acrylic, gouache or watercolor. Color the caps according to the selected types of mushrooms.
Wait for the paint to dry completely. Cover the end of the leg with a thin layer of PVA and dip it in dry poppy seed or tea leaves - this will simulate the remains of earth.
For additional shine and chic, you can coat the mushroom caps with any colorless varnish.
These hand made beauties are the result of the efforts made.
Don't have a suitable basket? No problem! A beautiful composition using moss, coniferous or dry twigs and real dry leaves can be arranged in an ordinary cardboard box or on a small stump, or on your own.
Imagine and think outside the box - in kindergarten, and any other creativity, this is only welcome.
Hedgehog made from natural materials three-dimensional figurine
Making a three-dimensional figure, the second step after appliqué, is even easier. Hedgehogs can be made from natural materials other than leaves in several ways, here are two of them:
Hedgehog made from a pine cone and a pompom:
take doll eyes with Velcro, glue, a small black pompom (or a bunch of black threads), and glue it all to the sharp end of the cone - it will be a nut shell, a regular fir cone or any other, the main thing is that it is round and slightly elongated with one end, like the muzzle of a hedgehog.
You need to glue a pom-pom nose to the sharp end of this “muzzle”, and a little higher, on the sides - the eyes.
Hedgehog made from chestnut peel and plasticine:
you will need a piece of plasticine, three black peppercorns and half a chestnut peel (it is better to stock up on it even earlier, at the end of August - chestnuts ripen faster than the same acorns).
Roll a ball the size of a chestnut out of plasticine, pull it sideways in the form of a cone, forming a muzzle. Attach a chestnut peel on top - it has “needles” on it, so the hedgehog will look prickly, and place three peppercorns on the face - a nose and two eyes.
Autumn crafts for school are needed for various exhibitions. They help develop imagination and creativity. On the theme of autumn, we will make a hedgehog from leaves.
We will need:
- dried leaves;
- PVA glue;
- colored paper for background;
- a sheet of white paper;
- scissors;
- brown felt-tip pen or pencil.
Step-by-step instruction:
- First, let's cut out the face for our hedgehog. To do this, take a sheet of white paper and scissors. First, use a brown felt-tip pen to draw a thick outline to make it easier to cut out. We make a pointed muzzle with a circle at the end (this will be the nose).
- Glue the cut-out piece onto colored paper closer to the left edge.
- Now we are making an imitation of needles on a hedgehog. Glue the dried leaves overlapping. It is better to take multi-colored elongated blanks. We start doing this from the top and cover the entire back of the animal.
- Use a brown felt-tip pen to paint over the hedgehog’s nose, draw a mouth and paint over the outline of the entire face.
An interesting and simple autumn craft for school is ready. You can also make hedgehog grass from small green leaves. This manual work only takes a few minutes.
Volumetric crafts
Autumn leaves make very impressive three-dimensional crafts. By using other materials along with leaves, you can create a very beautiful piece of furniture.
Miracle tree
To make a tree craft you will need:
- Dried autumn leaves;
- Paper bag;
- Stapler;
- Thick cardboard;
- Glue;
- Wire;
- Paper;
- Decor items.
To create a miracle tree, you need to twist a paper bag so that it resembles a tree trunk. We install the barrel on thick, durable cardboard using glue.
We form tree branches from wire and paper and attach them to the tree trunk. Next, we create the crown of our craft from the leaves. You can use different leaves. And the more they despair of each other in shape, size and color, the more interesting the craft will be.
The next stage is the most interesting. The tree needs to be decorated. On the branches of our tree you can hang acorns, clusters of rowan berries, and figures of fruits and vegetables cut out of colored cardboard and paper. You can use purchased decor items. The main thing in the decorating process is imagination and a good mood.
Roses from autumn foliage
To make roses you will need:
- several leaves of different sizes;
- dry branches;
- scissors;
- scotch.
To make roses, the leaves do not need to be dried. We take freshly fallen leaves, which are elastic and curl well and fold without creases.
We start making a rose flower from the smallest leaf. Fold the top parts of the sheet inward and roll it into a roll. Next, take the second sheet. We also bend the upper part of the sheet inward and wrap it around the first, already folded leaf. We roll the next leaves one by one using the same technology around the previous ones. Gradually we get a blossoming rose flower from a small bud.
Then, carefully holding the lower part of the flower, we thread a dry twig into the center of the workpiece. Also, without letting go of the leaves, you need to start wrapping the branch with tape, while capturing the lower part of the rose.
Having made several flowers in this way, we get a luxurious rose.
Applique carpet of leaves, details with photos
A carpet of leaves is very easy and simple to make. Any preschool child can cope with this application in 2 counts:
- First, ask your child to arrange the leaves on a sheet of paper so that there is practically no gap between them.
- Then let him smear each leaf with dry glue and glue it to the place where he intended.
- If some gaps still remain, tell your child that they can be filled in with a felt-tip pen.
You can make a carpet of leaves, but do not completely cover the paper sheet. Come up with some kind of pattern, draw it on paper so that the child can clearly see the contours. Let him glue the leaves that he likes to the places of the pattern. Of course, guide your child during the creative process so that the picture ultimately looks symmetrical.
Making an autumn hedgehog
A hedgehog made from autumn leaves is usually made a little differently than other animals. But still, it turns out beautifully. First, let's prepare everything you need:
- we collect autumn leaves in the park, in the yard or in the garden;
- We stock up on a sheet of thick white paper, a pencil and glue.
That, in fact, is all the preparation. And then pure creativity begins.
- Draw the outline of a hedgehog on a piece of paper. It’s better, of course, if a child does it. But if he doesn’t know how, let one of the elders draw a hedgehog.
- We select suitable leaves and glue them onto the body of the drawn hedgehog - so that they look like needles.
- We leave the hedgehog's face simply drawn.
- We make his nose from a small piece of paper, gluing it to the right place.
The end result is such beauty.
Making an owl from leaves
An owl is a completely different matter. For some reason, of all the birds, kids usually love her the most. And they try in every possible way to depict this bird: at least sculpt it, at least draw it. So why not make it from autumn leaves?
What you need to get started:
- collect autumn leaves of different colors, shapes and sizes;
- Prepare a thick sheet of paper, scissors and glue, as well as several scraps of colored fabric or colored paper. Yellow or green for the eyes, dark for the pupils, red for the beak.
How to make an autumn owl.
- We choose a suitable leaf (maple is best - it looks more like an owl’s head than others). Paste it onto a sheet of paper.
- We cut out the owl's eyes, its pupils and beak with scissors. We stick them on the appropriate places. That's it, the head is ready.
- Let's start making the body. Draw an oval at the bottom of the owl's head and glue different leaves onto it, trying not to go beyond the oval.
- Separately, we make wings from oblong leaves, gluing them on top of the “feathers”. You can - lowered, you can - spread out. In general, as your creative imagination dictates (preferably, it should be a child’s fantasy).
That's all the skill is. Nothing complicated. The result is an autumn owl like this.
By the way: this video will tell you more about making an owl from leaves.
Paper Hedgehog applique
This is the easiest material to process. This craft can be easily completed by a younger preschooler. You can use this method:
- Find a ready-made template for an applique or just a picture you like with a hedgehog.
- Print the image in duplicate or according to the instructions included with the template.
- Cut out the element blanks (from one sheet), the second will be the base.
- Glue the parts to the appropriate places. If you use an intermediate layer of pieces of cardboard or foam for each part, you will get
Another method, where templates are not needed, will require you only a base sheet, a body blank and a strip of any paper on which the fringe is cut.
It is convenient to use corrugated paper. It is easy not only to cut such wide needles from it, but also to twist thin flagella from each, which will look very natural and even voluminous. If such fringe is cut not into strips, but into circles equal in diameter to a hedgehog’s fur coat, which are glued on top of each other, you will get a voluminous craft.