Paper, fabric, cardboard, cotton pads, leather scraps and natural materials - all this is suitable for children's creativity. The “owl” applique is considered a completely accessible theme for nurturing creative inclinations.
Owls are often found in catalogs in the form of jewelry, fashion decor and accessories. A relevant character does not cause difficulties in performing work when there are aesthetic role models. We offer different types of techniques, templates and materials for making a mysterious night bird.
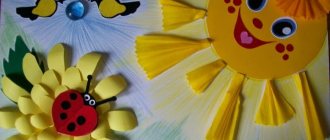
Owl applique made from paper palms
An owl or eagle owl is a popular theme for crafts. They are knitted and crocheted, made from paper and scraps of fabric, and painted with paints and felt-tip pens.
For children, the most accessible type of artistic creativity remains appliqué made from paper and fabric. A sample made according to a template often evokes admiration among others. A preschooler is able to create a completely recognizable character with his own hands using scrap materials.
Application is part of the educational process in kindergarten and school. Children are taught to think creatively, to look at familiar materials as a source of inspiration, when there is a desire to create something with their own hands.
One of these materials is ordinary cotton wool. Invite your child to make an owl out of it.
As a template for the owl applique, you can use children's palms, which are traced with a pencil on napkins. It is easy to lay out the body and wings of an owl from these soft “palms” - they will resemble fluffy feathers.
To complete the application you will need:
- pointed scissors,
- PVA glue;
- a pack of napkins;
- scraps of colored paper for the eyes, beak and paws of the owl;
- thick dark cardboard as a background.
The main stage is to prepare the “palms”. Children willingly participate in this process, tracing their palms with a pencil on napkins.
Important! Adults can join in the cutting process so as not to damage the rather fragile material. If the child is good at it, let him cut out the base of the future owl himself.
The background of the application needs to be demarcated so that the fragments of the owl’s body do not extend beyond the sketch. To do this, use a pencil to outline the outlines of the character where the napkin blanks will be glued.
Once the formation of the owl's silhouette is complete, you can move on to reviving it. You can use convex buttons for the eyes - black with golden rims. You can place eyelashes cut from dark paper under your eyes.
Some elements can be drawn; it is better to make the beak from a piece of cardboard, adding a little volume. The composition can be supplemented with elements of a night landscape - stars and the moon.
Step-by-step diagram for creating an origami owl craft
It is worth considering simple step-by-step instructions as one of the options for creating a beautiful owl.
How to make origami correctly:
- take a square piece of paper and turn it over so that it looks like a diamond;
- by using a ruler you need to divide this sheet into 4 equal squares;
- slightly bend a third of the sharp end of the paper diamond;
- bend the lower half of the prepared paper sheet, and the resulting triangle needs to slightly bend the sharpest edge, which will serve as the beak of the future bird;
- Next, you need to bend the two parts of the sheet evenly so that the resulting structure is in the shape of the letter “V”;
- when the inner part has already been highlighted, you can draw the bird’s eyes;
- You can also draw several stripes on the sides, which will indicate that this owl has plumage.
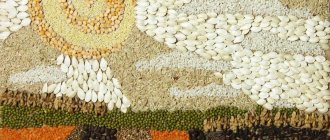
Owl applique made from geometric shapes
Children are most willing to do crafts on a familiar topic. Younger schoolchildren like to make appliqués from scrap materials using various techniques.
The theme of wildlife can be reflected in geometric shapes. A good example is the original “owl” applique made from cut colored paper. Feathers on the belly and wings - geometric figures:
- triangles;
- oval elements;
- small circles;
- diamonds.
Let's look at the photo as an example of making an owl applique from triangular corners. The color of the feathers can be varied, but variegation is inappropriate. The belly and breast may be lighter than the wings and other parts of the image.
Helpful advice! The application must be done with a creative approach. It is better to glue the triangles in rows onto the oval body or fix them chaotically, but within the limits of the sketch.
Wings can be formed from halves of a circle, complemented by triangular feathers. The parts can first be laid out without glue to make a preliminary assessment of the result. Once completed, you can complement the theme with landscape elements.
Four "children's" models
For a child with creative inclinations, origami is one of the best ways of self-expression. Failures, especially if there are adult assistants nearby, are extremely rare here. And the resulting figurine will be happily received as a gift by family members and friends. Of course, it’s not worth offering a complex model from a famous author to a child aged 5–8 years. There are many simple origami owl patterns that he can implement on his own.
barn owl
Long eared owl
Owl
Tawny Owl
Owl from broken elements
A popular technique is cut-off appliqué. Laying out an image of an owl from pieces of paper or napkins is a fun activity. It shapes the child’s thought processes - fragmentary fragments create a complete picture.
This technique is suitable for preschoolers and elementary school students. Paper scraps to form the body can be easily made from different materials using color variations. You can limit yourself to colored fabric or paper, but fragments of napkins will give the fluffy owl more volume.
Note! As a basis for the owl, you can use scraps of napkins, white Whatman paper or cut toilet paper. They can be complemented with feathers.
It is important that the image is harmonious - think about what to make the pupils, ears, beak and paws out of. It is suggested to buy haberdashery “moving eyes” if they fit the size of the head.
The composition can be supplemented with elements of the landscape visible in the distance - city outskirts with illuminated windows. Offer the children your own design option for the composition - a tree with a hollow and owlets or two owls under the moon and stars.
Fabric wise owl applique
Invite younger schoolchildren to create something together - a large panel with an owl in glasses and an academic cap. It is worthy to become a decoration of the classroom. The character can be used at school parties and quizzes.
Children themselves can use templates to make a “wise owl” applique from thick fabric - wearing a funny “academic” cap with a tassel. It's a pleasure to do this craft.
The owl can be dressed up in pants with suspenders, a white shirt with a bow tie or a tie - it depends on your imagination and desire to tinker with the panel a little longer.
“Smart Owl” is done exactly like other types of applique, the thematic decor is different. Otherwise, the same tools (glue, scissors) and materials are used:
- fabric for background or base
- flap for the main image;
- colored cardboard (brown, orange, black) for eyes and beak.
The body can be made using an owl stencil for applique from a plain or colored fabric that matches the color of the bird’s feathers.
It is better to make image fragments using ready-made templates so that there are no errors in the proportionality of the details. If the feathers are made separately, they need to be prepared in advance.
The critical stage is to form the wings and head. The individual elements are glued to the bottom with an overlap so that they overlap the lower parts. The wings are attached to the shoulder part of the body. One wing can be raised up with a pointer.
Ready parts can be cut out of cardboard, leather or thick fabric. Eyes with glasses and a hat are the main attributes of a “smart owl”, so adults must participate in their production. The applique can be supplemented with a corner board with letters in the background.
How to use a ready-made craft
The wonderful owl you have created can be used as a decoration for your home. It will look wonderful on a bookshelf or table, and your friends will certainly notice such an original interior detail.
And you can find other uses for the owl. To do this, make a cover from the modules on top of the head, and you will get a box. Or don’t cover the top of your head with parts and use the craft as an organizer for office supplies. You can also take a photo of an origami owl and show it to your friends on social networks! They will definitely appreciate your creativity.
Let the origami technique become exciting leisure time and interesting creativity for you and your children!
Owl applique made from leaves
Creating compositions from natural materials is an important part of a child’s development. Applications made from autumn leaves do not require the use of templates, but they contribute to the formation of a creative approach when performing simple tasks.
At the same time, fine motor skills and abstract imagination develop.
A pleasant pastime - applications from autumn leaves. Children learn to sort them by color and shape, and evaluate for which part of the autumn composition they can be used.
Note! The best analogue of feathers is willow leaves, but they are not always found in your area. A full-fledged replacement is any oblong-shaped opal foliage. For wings with “fingers”, oak leaves are suitable.
It’s easy to create a beautiful owl applique after a walk in the autumn forest or park, when there are a lot of leaves of different colors around. Often such crafts are prepared for a children's exhibition.
Although the leaves will quickly dry out, it is advisable to photograph the child with his own “work” in order to preserve it as a good memory of the stages of children’s creativity.
An excellent ornamental material is the autumn leaves of trees growing in the central zone:
- maple;
- cherry;
- Linden;
- chestnut;
- oak;
- willow;
- aspen;
- Rowan.
Additional material for autumn applique is glue, thin colored cardboard. In some cases, thread, fishing line and double-sided tape are used.
The owl can be assembled from individual fragments on a rigid base - plywood, colored cardboard, unnecessary facing tiles or a piece of plastic.
It is better to glue the applique with PVA, having first laid out the layout on the table. It is better to assemble the body from the bottom up, row by row, outlining the contours. You can take 2-3 large sheets as a basis, gluing them from the inside with tape.
If the body is ready, we decorate the head in the same way, connecting it with tape. The pointed leaves can be immediately secured in such a way that the owl’s “ears” stick out. It is better to make the eyes and beak from colored cardboard, draw them in with a felt-tip pen, and then glue them to the head.
In a similar way, you can make a “flying owl” using a cardboard mold to hang it on a fishing line in a child’s room.
Three-dimensional owl applique
From scrap materials and cardboard you can make a three-dimensional applique in the shape of an owl.
Method No. 1 – cover a plastic bottle with the top cut off with autumn leaves. When the base of the body is ready, add eyes, eyebrows and beak.
The wings and paws of an eagle owl can be made from any dense material that does not require edge stitching:
- felt;
- cloth;
- artificial leather or suede (offcuts from an old wallet or bag).
An improvised “Owl” can become a favorite decoration on a shelf with educational supplies. Something similar can be built in the form of a pencil holder.
Method No. 2 – volumetric applique of colored circles attached to a small cylindrical roll of thick paper or wallpaper. When forming it, you need to immediately wrap the “owl ears”.
Children may find it difficult to shape the cardboard base of the figurine. But they will willingly take part in the process of covering the body with elements of colored paper.
Advice! It is better to cut the lower part of the cardboard blank so that it resembles feathers. An option is to glue the base onto a backing in the form of paws in the front and a small tail in the back.
Wing blanks are made separately. The wings can be attached so that they go around the body, or inserted perpendicular to the base.
The head can be made separately by placing a “cap” on top of the body blank. The shape of the eyes and beak is arbitrary. The owl can be seated on a stump made of brown crumpled paper, pasted over toilet paper rolls or a cardboard blank of the desired shape.
Felt owl
You can create such a craft together with your child - we assure you that you will enjoy the joint creativity!
To implement the idea we will need:
- felt (several different pieces, sold in craft stores);
- buttons or ready-made eyes - can also be bought at any specialized store;
- threads;
- PVA glue or superglue;
- stencil paper.
Well, let's get started!
- Download a stencil from the Internet with the details of the future owl, cut them out along the contour. You can also select ready-made stencils from the catalog of many online stores and order delivery.
- Transfer the details to felt, taking into account the desired colors.
- Connect the parts using glue or thread and a needle - as shown in the photo you chose.
- Complete the applique with the necessary details - eyes, beak, tail. You can decorate the bird with a beautiful bow (if you plan to have a lady owl) or a tie if it is a gentleman.
Glue the finished application to a sheet of thick paper or cardboard. Ready!
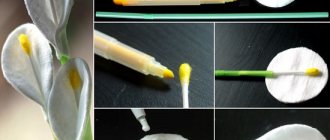
Owl applique made from cotton pads
Cotton pads are a good material for children's creativity. A funny applique made from cotton pads – a white owl. Minimum materials and maximum emotions from the results of labor.
The technique is close to working with felt, but cotton pads are softer and more pliable; they are easy to cut with sharp scissors, forming something like feathers.
To complete the work you will need:
- sheet of colored picture - background;
- glue stick;
- 4-5 cotton pads;
- foil for stars and crescents;
- scraps of colored paper (black, brown, dark gray and white).
Work order:
- The owl needs to be seated somewhere - we prepare a “landing place” in the form of a thick branch made of brown cardboard. It may be part of a trunk with a hollow.
- We prepare the body of the owl from a cotton pad, making notches. Glue it above the branch.
- The owl's head is made from the same cotton pad and is attached above the body.
- We cut the third disk in half and make deeper notches along the rounded parts - these are the wings. We fix them end-to-end to the body.
- We make eyebrows or ears in the form of tufts with notches, insert them into the disk, complementing the character’s head.
- When the body with head and wings is ready, the owl needs to be “revitalized.” To do this, cut out the eyes from yellow paper and add black pupils. Then we glue the beak and paws from brown cardboard or paper.
Decor - optional. The branch can be supplemented with green or autumn leaves. Behind the owl in the night sky, stars and a Moon made of foil, glitter or yellow paper will look good. If the design is winter, add snowflakes to it.
In the same way, it is easy to make a fabric applique of an owl from scraps of felt or cloth.
Let's move on to the eyes of the owl
Take cardboard or thick paper (for example, yellow or white). Cut out round eye blanks from it. Then glue round pupils made of black paper onto them. The eyes are ready!
Glue them to the owl. If you want, you can even make plastic eyes like a doll's with rotating pupils - it will look quite realistic!
So, your origami owl is ready!
Paper owl applique
The simplest application for preschoolers is made according to templates. Finished parts are made in stages, superimposing elements on each other. They are glued to the base - a sheet of dark colored cardboard will do.
The advantage of this owl is a small number of simple shaped parts. To begin with, prepare templates and colored paper to cut out the details of the owl and a tree branch for its “landing”.
Advice! Teach children to place symmetrical patterns on the wrong side of colored paper. It should be colored differently from different sides.
The first part is the torso. A branch is placed on top of it below - the owl must sit on it, even if its paws are not visible. Next the paws are fixed.
For a child, the most difficult part of the process is the head. It is advisable to help him if difficulties arise. Do not rush to connect the parts until all the elements are ready - eyes, ears and beak.
Lay out the pieces to see how cute the owl turned out. Perhaps you want to replace something - attach “running eyes” to the finished applique base.
The wings and beak can be colored with a felt-tip pen. The branch can be supplemented with leaves on the tree, lubricating the ends, they can be slightly wrapped for volume.
We offer ready-made owl templates for application and ready-made options for completing the work.
How to make modules for an owl
Modular origami owl is made from a large number of small triangular parts. There are origami from modules of different sizes, but our craft consists of parts of the same size. To make one module, follow these steps:
- Bend the rectangular piece lengthwise.
- Bend the piece crosswise to mark the center.
- Fold the corners down toward the center (the fold of the sheet should remain on top).
- Turn the workpiece over.
- Fold the bottom panties up.
- Bend the corners sticking out on the sides in the opposite direction.
- Fold down the panties.
- Fold the corners inward along the marked lines.
- Fold the bottom of the piece again
- Fold the resulting triangle in half.
Such actions need to be done with each of the many modules.