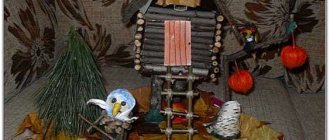
Autumn time is generous with gifts. An ordinary family walk in a park or forest can end with the collection of beautiful leaves, cones, nuts and other natural resources. Using your imagination and skillful hands, you can create amazing crafts from these supplies. Crafts made from pine cones can be seen here. The author of these master classes is Anastasia Batina.
DIY chestnut caterpillar
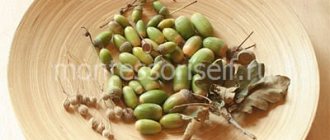
In autumn, in the park you can see a sea of chestnuts under your feet. Having collected a decent amount, you can keep even the smallest children occupied at home. One of the simple crafts can be called a caterpillar made from chestnuts.
Materials:
- Chestnuts
- Toothpicks
- Plasticine
Arrange a dozen chestnuts by size in a row, from largest to smallest.
Pre-prepare pieces of plasticine to connect the caterpillar. Take brown plasticine for this.
We assemble the caterpillar by gluing the chestnuts together using plasticine.
After making the body, attach two toothpicks to the head, which will act as ears-antennas. Make a funny face for the caterpillar.
Children of kindergarten age can cope with such a simple craft. A minimum of time and material is required to make such a simple caterpillar from chestnuts.
Autumn crafts from chestnuts: God's eye (Ojo de Dios - Mexican craft)
You will need:
- chestnut
- skewers or straight branches
- nail and hammer (for holes)
- knitting thread.
1. Make 6 holes in the chestnut tree and insert branches of the same size into them. You can secure the branches using superglue or hot glue applied to the tip of each branch before inserting it into the hole.
2. Take a knitting thread of any color and start wrapping the branches as shown in the image. You can change the color of the threads as you like. Tie a knot at the end.
DIY potato caterpillar
Another vegetable that can be found in abundance in the fall is potatoes. You can also make interesting crafts from it. The child will make a caterpillar from potatoes in just a few minutes.
You can make a caterpillar from potatoes using the same principle as from apples. The vegetable itself can be partially painted with green paint. We'll make her paws out of carrots.
The appearance of your caterpillar will depend on the baby’s imagination and how he will decorate it.
Crafts from chestnuts with cones and acorns for children for school
With materials such as acorns, pine cones and chestnuts, you can make a lot of different projects. I will show only a few directions. They are completely different from each other.
Wreath.
Cut out a base of the size you need from thick material.
Glue cones, chestnuts, and nuts to the base. You can add leaves or spruce branches.
You can make a wreath only from chestnuts.
Composition in a jar.
- But here everything is simple! I will describe the photo in the center. Moss spreads to the bottom of the jar.
- The gifts of nature are laid out on the moss. For example, you can make a spruce tree from a pine cone. And from a chestnut or acorn - a mushroom.
Topiary.
- We glue cones, physalis, chestnuts and acorns to the foam ball. It is better to pre-paint the base in a dark color so that it is not visible.
- We put the ball on a thick branch and fix it with glue.
- We attach the bottom of the stick to the foam in the flower pot. We decorate the pot.
Below I will show you how to make topiary from chestnuts. But I simply couldn’t pass by this bright craft.
How to make a caterpillar from a tomato
Every fall we have to fantasize about crafts for kindergarten. What are they used to make crafts for thematic exhibitions? Crafts made from vegetables and fruits have become the main characters lately.
We are familiar with such a vegetable as the green tomato, which is denser than its red relative. Therefore, green tomatoes are suitable as crafts.
You can hold the tomatoes together using toothpicks. The legs can be made from small tomatoes or rowan berries.
Caterpillar legs made from carrot rings will look great
And carrots can also make an original fantasy hat.
The caterpillar can still be so funny
Quick and beautiful crafts from chestnuts on the theme of autumn
These crafts, although simple, are interesting for kids. And, if the little ones try a little, their work will turn out beautiful!
Fungus.
- We choose a chestnut that is similar in shape to a mushroom cap.
- We make a mushroom stem from plasticine. And we attach the leg to the base of the nut.
- Now we use green plasticine to make a base that looks like a clearing.
- We fix the “mushroom” in the “clearing”.
Caterpillar.
- We fasten many, many autumn leaves with thread. You can even fasten 10 pieces together and insert a chestnut between them.
- A chestnut is attached to the front. And it has eyes and a nose.
It is best to secure chestnuts with glue. But, if you want a movable caterpillar, then the leaves are stitched with a thick thread in the middle. A hole is made in the chestnuts and the nut is threaded through a thread using a needle.
Or you can make a snake, as in the photo on the right.
Painting chestnuts.
For painting, you can use a permanent white marker, acrylic paints or gouache. The designs can be simple - patterns, ornaments, just stripes or polka dots.
Or you can draw beautiful flowers or a whole picture or a funny face.
And if you glue the eyes and tail, you can get a beautiful animal.
How to make a caterpillar from acorns
Anyone who has seen what a caterpillar looks like understands perfectly well that making one from natural material is not at all difficult. Acorns are one of the best and most convenient materials for creating crafts.
Acorns are a malleable material that can be easily pierced and can be held together with matches, toothpicks, and even twigs. And children love to hold them together with plasticine.
A simple caterpillar made from acorns can be made quickly by simply connecting acorns using plasticine
Plasticine will help not only to hold the acorns together, but also to draw the face of the caterpillar
You can use acorns with caps to create the body of a caterpillar and fasten them with toothpicks
It would seem that such a simple craft as a caterpillar can be so simple and original.
Master class “Brown Bear” made from natural materials and plasticine
Try making a brown bear with your children from chestnuts, acorns and plasticine. A detailed description with photos will help bring this original idea to life.
For children's creativity you will need:
- 2 chestnuts;
- 3 acorns;
- small bump;
- colored plasticine;
- modeling board, stacks;
- hairpin (toothpick);
- wet wipes.
We create a figurine of a brown bear from natural materials and multi-colored plasticine.
Select two large chestnuts and wipe with a damp cloth if necessary.
Thoroughly knead the brown plasticine and roll into four rolls. Give each limb a “clubfoot” shape. Use a hairpin to make indentations, separating the fingers (claws).
Connect the paws to the animal's body. Stick a small brown ponytail behind.
Take three acorns: two large and one medium. Carefully remove the caps from them.
Fill the inner cavity of the hats with brown plasticine and connect the parts to the head. You will get two ears and a muzzle, as in the picture.
Roll out a small oval from black plasticine. Using a pin or a stack, highlight the nostrils and make a longitudinal notch. Connect the nose to the muzzle.
Use white, brown and black plasticine to make eyes as in the picture. Stick them over the animal's nose.
Make a mouth by pressing red plasticine onto the brown “drop-shaped” base. Connect the mouth to the muzzle.
Make a beautiful red bow, highlight the folds with a toothpick or stack. Stick the head to the body using a small piece of brown plasticine. Press the bow against the animal's body.
Give the bear a small pine (fir) cone.
A brown bear made from plasticine and natural materials is ready!
What a wonderful figurine of a forest dweller we got - a real clumsy bear! As a gift, he brought the most beautiful pine cone that he found in the forest. The bear loves honey and raspberries, so you can invite your new friend to a tea party with these sweets.
Basket
You will need: chestnuts, glue gun, balloon, tape, felt-tip pen, decoration elements - thuja sprig, walnut shell, autumn leaves.
Master Class
- Inflate the balloon until it is round.
- Attach the ball with tape to your work surface.
- Draw a line in the center of the ball.
- Glue the chestnuts together around the ball, then deflate it.
- Place the circle of chestnuts on your work surface and glue the second row on top of the first. It is worth noting that the chestnuts of the second row should be in a checkerboard pattern and their number should be less than in the first.
- When 2 rows are ready, it is necessary to strengthen them with glue from the inside.
- Glue the third row of chestnuts on top of the second in a checkerboard pattern and in smaller quantities. Make the remaining rows in this manner, gradually reducing the number of chestnuts until the bottom of the basket is covered. Also, don’t forget to reinforce the inside of the basket with hot glue.
- Create the handle of the basket by gluing the chestnuts on both sides until they meet in the center.
The chestnut basket is ready!
Chestnut heart
This is another elegant, light and cozy decoration for the interior. It’s not difficult to make, but since production will require special tools, it’s impossible to do without the participation of adults.
What to prepare:
- chestnuts;
- soft steel or copper wire;
- electric drill;
- pliers.
Let's start manufacturing.
- Using a drill, make holes in each chestnut nut. How many chestnuts do you need for one heart? This depends on the expected size of the product. Larger size means more chestnuts, smaller size means fewer chestnuts. In general, this is an arbitrary matter.
- We string the drilled chestnuts onto the wire.
- When all the nuts are strung, bend the wire into a heart shape and fix the structure with pliers.
- That's it, the chestnut heart is ready.
Of course, one such product is beautiful, but two or more are even more beautiful. Therefore, using exactly the same methods, we make a third, third, etc. chestnut heart. We hang them on the wall indoors. Wonderful interior decoration!
By the way: this video will also tell you in detail how to make a heart from chestnuts.
Chestnut caterpillar
Chestnuts are just begging to be made into a wonderful caterpillar! This is perhaps the very first product that children see and try to make from chestnut fruits. Well, great: we just need to help them with this a little.
First, let's prepare:
- chestnuts;
- soft and strong rope;
- scissors;
- corkscrew or drill;
- black felt-tip pen;
- glue eyes (they are sold in stores).
Let's start making a caterpillar.
- Using a corkscrew or drill, make holes in each nut. For obvious reasons, this operation is not for children, so moms and dads, roll up your sleeves.
- We begin to string the drilled chestnuts onto the string, after tying a knot at one end. This operation can now be entrusted to children: it is absolutely safe.
- We cut off the excess part of the rope with scissors.
- Glue eyes to the outer nut. Draw a cheerful or sad smile on the light side of the nut with a felt-tip pen. These procedures should also be performed by children. After all, the cute caterpillar is made for them in the first place. Let the children do it themselves.
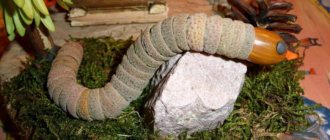
Using the same scheme, a snake is made from chestnuts.
Making a spider
This is also a wonderful product, souvenir, toy and decoration all rolled into one. Making a chestnut spider is easy and safe, so the process can be entrusted to children.
Cooking:
- chestnuts;
- glue eyes. Exactly how many depends on the child’s imagination, since it is known that real spiders have many eyes. But you can only have two eyes - no problem;
- glue;
- chenille wire.
Let's start creating the spider.
- Glue the eyes onto the chestnut.
- Prepare four pieces of chenille wire. If it is difficult for a child to cope with this creative task, we help him.
- Bend each piece of wire at both ends at right angles. These are spider legs. This gives a total of eight legs.
- Using glue, we connect the chestnut with eyes and the bent wire so that there are four bent ends of the wire on each side of the nut (see photo above).
A funny and at the same time scary spider is ready!
Letters made from chestnut nuts
This is a fun, funny, exciting way to teach your child to read.
- We lay out a letter from chestnuts on a flat surface (on a table, on the floor, etc.).
- We call her a child.
- Mix the chestnuts, and let the child now try to form the same letter from the nuts. He will definitely try to do it because it is essentially an exciting and fun game.
- In this way we teach the baby all the letters.
- Then we lay out “chestnut” words from the “chestnut” letters.
Practice shows that in this way a child learns to read much faster. Give it a try. After all, you don’t need anything other than chestnuts for this.
Crafts from chestnuts and plasticine
Chestnuts and plasticine go well together and complement each other. Therefore, they can be used to make excellent crafts. For example, Cheburashka is one of the most beloved cartoon characters by children.
For this you will need:
- large and small chestnuts;
- plasticine of different colors.
Let's start creating Cheburashka. The entire creative process here is simple, so the child can handle it on his own - from start to finish.
- We make a small cake from light plasticine. Glue it onto a medium-sized chestnut. This is Cheburashka's face.
- We make eyes from dark plasticine and glue them onto the face (that is, onto a flat cake).
- Next, we make a nose from the same plasticine and place it in the appropriate place.
- We make Cheburashka's mouth out of red plasticine. We sculpt eyebrows from the same plasticine. We stick all this in the right place.
- We take two small chestnuts and use plasticine to attach them to both sides of the head. These are ears.
- Choose the largest chestnut. This is the body. We sculpt arms, legs and neck from orange or yellow plasticine. We attach the arms to the sides of a large chestnut, the legs from below, and using the neck we connect the head to the body.
That's it, Cheburashka made from chestnuts and plasticine is ready!
To make it even clearer how to do it, watch this video.
Various little animals and birds are made in the same way.
Here they are, autumn crafts made from chestnuts. A real pleasure for both adults and children. Finally, look for more information on this topic. Here's a video.
Ideas for chestnut crafts with photos
Check out these chestnut craft ideas. All these crafts are made similarly to those given in the article above.
Christmas wreath
For this holiday decoration you will need the following tools:
- chestnut fruit;
- wreath frame;
- ribbon;
- glue sticks and gun.
How to make:
- glue one of the chestnuts onto the frame;
- place them close to each other. There should be no gaps;
- Having finished one row, start the second. It should be located above the first;
- place the third layer below the first;
- by analogy, make the fourth and fifth rows;
- do all subsequent layers in the same way;
- in the end, all rows should form a circle;
- make a bow from ribbon and place it on the product;
- make a small loop and glue it to the back of the wreath. With its help, the decoration will be attached to the wall.
Snails made from chestnuts and plasticine
You will need: chestnut, plasticine, wooden skewer.
Master Class
- Roll a “sausage” out of plasticine.
- Shape the snail's eyes using a skewer.
- Shape the snail's body.
- Attach the chestnut.
- Make a whole family of these snails.
Snails made from chestnuts and plasticine are ready! I recommend watching this video!
Massage mat made of chestnuts (massage Mat).