Advantages and disadvantages of products
Twine is widely available and could always be purchased at any hardware department or store. Currently, high-quality fiber is produced, softer and more manageable in work, in different colors. All new items are available in craft stores.
The advantages of crafts made from jute twine are as follows:
- Durability; a high-quality product retains its shape and color well; the natural straw shade does not fade or fade over time;
- Environmental friendliness; twine does not emit harmful fumes;
- Ease of processing;
- Low cost; jute threads and fabric cost much less than linen and cotton.
This natural material also has disadvantages:
- With active use of fibers, tiny fibers fall off, which can provoke or aggravate allergies;
- Perfectly collects dust and odors, requires ventilation and cleaning;
- Quickly absorbs moisture, after which it dries for a long time; When wet, it accumulates bacteria and mold spores;
- The fiber is quite stiff, so it can rub your hands during the weaving process; for the same reason, it is not recommended to make hat ties, bag handles, and beads from twine.
Natural and hygienic
Twine is a natural, plant-based fiber from the jute plant, which is collected and processed in a special way. Burlap, ropes, ropes are made from it.
The fabric has a rough texture and visible holes. It is used as packaging material in the trade and agricultural industries, postal services, and food trade. For crafts, jute threads of different thicknesses and woven fabric are used.
Simple curtain tiebacks
Tiebacks made from twine work well with linen or cotton curtains. They are easy to make, and you can start working with this material with them.
For grabs you will need:
- Two CDs or thick corrugated cardboard;
- A ball of twine;
- Two wooden or plastic skewers.
The ends of the thread must be fixed with hot glue or “Moment”.
Step-by-step instructions for beginner needlewomen:
- Draw a circle with a diameter of 7 cm on the disks, carefully cut them out so that you get a solid “donut”.
- Unwind a few meters of twine and cut it off.
- Glue the tip of the twine to the disk and wrap it tightly around the workpiece.
- When the thread runs out, take the next piece. Wind without gaps or gaps, in several layers.
- When the entire disk is wrapped, hide the tip of the thread inside and secure with glue.
- Wrap wooden skewers at the blunt end with twine.
- If desired, you can decorate the tiebacks with curls or other elements of jute filigree.
The hooks are ready. The curtain is looped through the tie hole and secured with a skewer. Just like from a disk, the pick-up is made from cardboard.
Burlap panel in a marine theme
If you like to bring numerous shells, pebbles, and corals from vacation, then most likely all this wealth is stored in boxes or bags. However, both you and those who were with you during your trip or trip to the sea will be much more pleasant if the seafood is on public display, and even decorated appropriately in the form of a unique individual panel.
What you will need to make the panel:
A glue gun (if you don’t have one, a regular tube of glue will do), which will significantly speed up the process of making panels Scissors Knife Burlap Wooden board Twine (made of flax or jute) Thick paper (the size of the paper should correspond to the size of the board) Wooden sticks Wood cuts Moss (pieces )
Manufacturing process:
We cut out a piece of burlap, lay the fabric on the board and fold the fabric over the underside.
We crumple the paper a little. This will give it texture. After this, we glue the paper onto the front side of our craft. It's time to use sticks and twigs. We place them on the craft in random order, grouping them together. When the composition of sticks and twigs is firmly attached to the craft, place shells on top of it and glue them. To make sea waves, we will need pieces of twine or jute. We will imitate the sea surface by gluing a rope with waves. We cut pieces of twine or jute of equal size, twist them into rings and glue them along the edges of the panel. The finishing touch is to take the moss and glue it onto the panel, giving it the appearance of algae. The original decoration for your home or garden is ready.
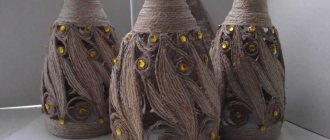
Decorative vases and bottles
Decorative vases can be made from fancy-shaped bottles. You just need to wind the twine tightly and secure its ends with glue.
Tall narrow bottles and bottles with handles look great with jute. This way you can breathe a second life into an old (cracked and glued) jug or teapot.
As a rule, decor is not limited to simple wrapping. You can add decoration:
- Bouquets of dried branches and herbs;
- Shiny beads and glass aquarium pebbles;
- White lace or macrame elements;
- Contrasting bright threads and ribbons.
Or you can lighten some of the fibers and wind the jute in fancy stripes.
What products can be made from fiber?
The photo of crafts made from twine shows samples that you can make yourself using our master classes. The fiber is quite durable, does not tear when working with it, does not wrinkle, and does not lose color over time.
The finished products have a pleasant, natural shade, from dark to light tones, depending on the thickness of the threads. Useful things in everyday life are made from jute: napkins, capes, covers, bags, coasters, amulets, wreaths; decorative: vases, flower pots, wall panels, openwork napkins; various decorations for hair and clothing: brooches, hairpins, buttons. Beautiful crafts made from twine and burlap are made on a children's theme: all kinds of toys, pencil holders, Christmas tree decorations, weaving.
Bottle animals
It’s easy to make a series of animals using a bottle wrapped in twine. Most often they create cats and cats, and owls are created from wide egg pods. The technology for making rope crafts is the same, you just need to make another head and decorate it accordingly.
For the base of the head, it is good to use a foam ball of suitable diameter. If you don’t have this at hand, you can make a base from wet paper and PVA glue using the papier-mâché technique. Soft paper is best - toilet paper, newspaper.
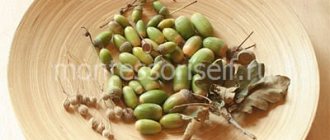
Garland of acorns
An excellent decoration would be a garland of acorns made from twine, Kinder Surprise containers, wire and coffee beans.
Instructions on how to make a craft with your own hands are as follows:
- Make the required number of acorns: take a container, glue the wire, coat it with glue and tie it with thread, from bottom to top, fix the grains like a cap.
- Connect the acorns in clusters, which in turn are strung on a single wire or twine.
- If desired, supplement the composition with “oak leaves,” which are made from pieces of burlap covered with twine around the edges.
Jute filigree - arts and crafts
In relation to this type of needlework, the word “art” can be applied. The complexity of the patterns and the spectacularity of the final result do not allow us to call paintings, panels or caskets crafts made of jute.
It’s possible to make such beauty with your own hands, but you will need a lot of patience and the following materials:
- Twine (natural color and dyed);
- Template (drawing) on paper;
- Film, package or file;
- Needle (you can take an awl, a short knitting needle or a toothpick);
- PVA glue or transparent;
- Stationery knife.
If the product is flat, then a press is used to level the surface. Transparent acrylic varnish is used to secure finished products.
Numerous decorative elements - beads, rhinestones, stones, ribbons, lace, coffee beans - are selected for a specific job.
DIY interior doll made of twine. Master class with step-by-step photos
Master class on creating an interior doll from twine
Instructions for creating an interior doll from twine in a Tatar costume
Author: Olga Vladimirovna Vanichkina, teacher of decorative and applied arts, MUDO “DSHI r.p. Sennoy", Saratov region, Volsky district, r. Sennaya village. Age category: children from 10 to 17, teachers and people who are not indifferent to beautiful objects. Purpose: used in the interior and as a gift. Goal: Learn to create an interior doll from twine, decorating it with various available, affordable and inexpensive materials that are in the house. Objectives: - Arouse interest in creating gifts with your own hands from what is at hand. — Develop imagination and love for decorating. - Cultivate interest and love for beautiful things made by yourself.
Dolls have been made from twine for a long time and this is not new.
Yes, I also started with this, but every time I came up with new ideas for decorating them, adding something new. What came of it is up to you to judge. Materials and tools: - Barbie doll;
— Plain cardboard or a plastic bottle (I used cardboard in the master class); — Glue gun (if you use a bottle); — Ceiling adhesive (Titanium); - Leg-split; - Scissors; — Self-adhesive paper (Golden color); — Threads for knitting (you choose the color yourself); — Hard cardboard (for the bottom of the doll); — Fabric, beads, lace, braid, etc. Progress:
We take the necessary materials for the work. We remove the hair and legs from the doll. Take glue, lubricate the doll (torso) and glue the cardboard, as if creating a bag.
We glue the twine, lubricating it with glue each time. So the whole doll from head to bottom.
We cut out a circle from hard cardboard, glue it into the bottom of the future doll and also glue it with twine. The result is a mummy like this. Now I form the bottom of the dress from the fabric and glue everything with glue.
I also glue everything to the edge of the top of the dress, hiding any irregularities, folding the edges of the fabric inward. I start working on the sleeve (I don’t have any specific patterns; everything is done by eye), I sew the sleeve together to make a tube that looks like a sleeve. I put everything on and here are the sleeves. Everything is glued on. So they put her in a dress.
Let's start with the vest. edge and glue it, again hiding all the fuzzy edges. I start gluing the hair from knitting threads (mine is brown). I glue it to my head as I plan to lay them, on this cullet of braids (I divide my head in half with a pencil and glue it from the forehead to the bottom to braid the braids). The more threads. the more voluminous the hair. My doll is missing a national hat. I cut out parts from ordinary cardboard for the base. I glue them to the fabric, the color is the same as the vest. Then I glue everything from the inside out and connect all the parts. The very finishing touches are adding patterns from self-adhesive paper, ribbons, beads, and rhinestones. Ready. (eyes and everything else are optional, I do not add).
I can’t help but show you what my kids did.
And this is one of the hairstyles up close.
Thank you for your attention. I hope you will like my master class and find it useful.
We recommend watching:
Volumetric quilling. Fairy. Master class DIY vintage watch DIY twine basket. Master class with photo DIY twine napkins
Similar articles:
Lesson notes for younger students. DIY amulet doll
DIY rag doll
DIY straw doll. Master Class
Craft from napkins. Do-it-yourself Tumbler doll
Herbal egg capsule. Master Class
Fabric souvenirs
Burlap is woven from jute fiber. You can also make a lot of interesting things from this fabric:
- Souvenir bags for storing fragrant herbs and spices;
- Flowers (often roses);
- Rustic style dolls;
- Bags and clutches;
- Curtains and organizers;
- Tablecloths and capes;
- Pillowcases for sofa decorative pillows;
- Lampshades.
Crafts made from burlap look best in Provence, chalet and country style interiors.