Without decoration, the kitchen seems empty. Experienced housewives know this and try to add something interesting and bright to it. For children, the activity will seem exciting, but adults will have to weigh the pros and cons of each decorative object. The task is usually not to spoil the finished design, not to overload it, and not to do something that will quickly become unnecessary due to inconsistency with the style. If we are talking about creating crafts for the kitchen with your own hands, then in this sense the situation is simple. It is enough to make something beautiful, compact and relevant in relation to the modern style or dominant in the kitchen. Store decor is often moved to another location or thrown away. Each of the homemade options has been improved, and now ordinary people have access to creative ideas that can be adjusted to their home. Step-by-step master classes contain advice for all occasions.
Features of DIY kitchen decor
In addition to the design aspect, which states that crafts should be purchased in a style that matches the decor, there are also clear requirements for the items placed. In the kitchen, only environmentally friendly decor is used that is resistant to external factors or treated to impart such properties. In the kitchen, all products are exposed to temperature contrasts, moisture, and steam. Drops of fat fall on them. It should be understood that many crafts will not fit in the kitchen, and that the finishing that already exists should not be damaged. The most suitable places for placing decor are the kitchen table, free wall, window sill and furniture facades. You can decorate almost any surface with stickers; most of them can be painted. But whether to screw individual parts to furniture and walls or not is a more complicated question. Whatever the decor, durability and the ability to be easily cleaned are important.
Main advantages:
- Minimum expenses;
- Non-standard solutions;
- Options for a specific interior;
- Possibility of using unnecessary things.
Wooden masterpieces
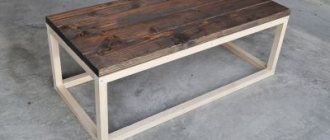
Crafts for the kitchen made of wood are offered in a wide variety. An ordinary board will appear as a serving tray on which snacks and drinks are served; it can be decorated at your own discretion by attaching handles. Candlesticks on unusual driftwood and candles surrounded with sticks will add a romantic mood.
An owl on a wooden cut looks unusual, its nose is a spoon, its legs are forks, and its eyes are tin bottle caps. Craftsmen create real works of art by firing and cutting. Dried flowers, ears of corn, and burlap are perfectly combined with wood.
What style should you use to make crafts?
The kitchen interior is characterized by high surface congestion. Open storage systems perform a decorative function: cutlery, dishes and other kitchen utensils are visible, so their style should be coordinated. But it is not necessary to follow the interior design. Crafts in the Provence, Greek, Art Nouveau, Victorian, and Baroque styles look appropriate in any kitchen. The Greek style is clay objects, wood, meanders and patterns, mythological drawings, flowers. Crafts in this style feature the listed motifs. Provincial style is expressed in old-fashioned design, the presence of ceramics, whitened colors, and hand-drawn drawings. Baroque, Art Nouveau and Victorian styles are similar due to their desire for expensive decoration. Crafts are made from valuable wood, carvings, stones, and gilding are added. Baroque style is characterized by light colors. The range of Victorian and modernist movements is much darker.
Crafts for storing something
Boxes are considered the most convenient storage option. They are roomy and at the same time compact, they are convenient to stack on top of each other. Homemade trays made from sheets of plywood and textiles are not inferior in ergonomics, as they organize items well into categories. Several more storage options will appear thanks to containers and baskets. Products are woven from any materials, according to simple patterns and in a short time. Housewives not only weave, but also sew. This is how they make pockets for vegetables and fruits. They turn old bags into anything, not only into storage space, but also into pots and decor. Hanging storage systems, baskets, and bottle covers are made from ropes. In turn, containers, as well as jars, are converted into pepper shakers, salt shakers, etc. Cellular storage systems are also assembled from them. Jars are attached vertically, horizontally, and even upside down with the lids closed.
Cutlery organizer
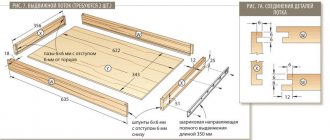
You will need a sheet of plywood the size of the kitchen drawer and the length of the cutlery, with a thickness of 5 to 10 mm. We cut out a fragment from the blank so that it matches the parameters of the furniture. We place kitchen utensils on the resulting figure: spoons, forks, etc. separately. We determine convenient boundaries for the blocks and leave 10 mm for each of them. We will then place the sides along the lines. To cut the base fragment, use a stationery knife (if the sheet thickness is about 5 mm). We cut the thicker blank for the sides with a circular saw. The partitions and outer edges are “set” with adhesive. We drive thin nails into the ends. We install posts in the four inner corners around the perimeter for strengthening and decorative purposes. Rounded parts with parameters 60×10×10 mm are suitable. After gluing the last element, you will need to wait another hour before using the organizer.
Wicker baskets
Baskets are made from wicker, twine, veneer, rope and paper. Veneer wicker, for example, is assembled using the checkerboard method. The material is pre-soaked in water at room temperature. The wet veneer is hung to dry. When the moisture has completely disappeared, the material is cut into strips of 1 or 2 cm, approximately the same. At the same time, slight carelessness, discrepancy in width and slightly wavy edges will contribute to the aesthetics of the product. The first half of the strips are placed on the table and secured with adhesive tape. After this, transverse sections are woven - one at a time. All paired ones are under three longitudinal ones, and unpaired ones are under four – or vice versa. When the wicker figure has the outline of a square, it begins to be bent. At this moment, check the bend on each side. Most likely, one of them will have more visual defects, and it is better to hide it. The strips are folded so that they maintain a vertical position. Then the remaining strips are woven into the walls, and the already woven protruding fragments are carefully wrapped.
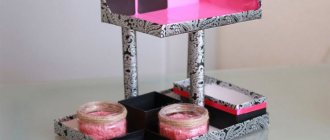
Jars for storing spices and bulk products
Containers for spices are made from ordinary glass containers and lids with slots. Seasonings are sometimes stored in open jars. Original homemade products are made from raw materials, and this requires minimal drawing skills. First of all, wash the glass surface. Then we wipe it with alcohol and apply paint: on open glass or in shapes on a stencil. In the second case, the background will be empty, but it can be completed with slow, controlled movements. The most beautiful drawings are made with stained glass paints. Another decoration option involves gluing tape. First, measure the required amount of strip by wrapping it around the jar. We cut off the required piece and divide it into segments around the circumference of the jar. Lubricate the inside of the strips with PVA glue. Glue them one by one to the glass and carefully smooth them out. We overlap the edges of each individual fragment. We decorate the coating with sparkles or a small pattern.
Bags and pockets for storing vegetables
Something similar to vertical systems with pockets for flowers is also used for storing vegetables and fruits. Colored storage units look modern and stylish, while transparent ones are more practical. Products are also kept in eco-bags and eco-bags. Waterproof sealed bags are made for tomatoes. Dirty vegetables like carrots are stored in raincoat pockets. For legumes, cotton beans are usually chosen. Cucumbers, cabbage, etc. are placed in products made from linings, tulle, organza, tulle, chiffon, and sports mesh. The first step is to determine the size of the pockets and prepare the pattern. Afterwards, the parts are cut out in the required quantity and the side sections are connected with a double seam. The rectangles are folded, and the side seams are basted or chipped. They are ground 0.3-0.4 mm from the cuts. On one side they do not reach the top and leave a 3 cm margin. After this, the bag is sewn and the drawstring is processed.
Baskets
Bread, fruits, eggs and other products are kept in wicker containers. Crafts for the kitchen made from newspaper tubes are as strong as baskets made from wicker. Step-by-step instruction:
- The newspaper is twisted around a pencil or wire, creating a long tube fixed with glue;
- At least 30 copies are made this way;
- Painted in any color;
- Weaving begins from the bottom, folding the samples into a lattice and running one strip horizontally around the vertical posts, gluing the ending strips.
It is easier to braid an object, removing it after finishing the work. Such a creation can be made from bulky rope.
Wall decoration
The right practical appliances and decorations for the kitchen meet the criteria of hygiene, ease of care, moisture resistance, and are not inaccessible to cleaning. Classic decor, clocks are made from painted paper, cardboard or iron plates with cutlery. Trays and painted plates are attached to the walls: collecting a geometric figure, rows or waves. Dishes are sometimes placed on stands. Horizontal surfaces are also equipped with shelves. Decorative options are made from slats on which bottles are placed, and to which mugs and buckets are attached. The slate board will appeal to lovers of artistic techniques and original design. The design is developed by adding magnetic boards and tapes. Residents also resort to using murals, stickers, glass bulbs and panels. Paintings, prints and photo wallpapers in the genre of landscape and still life are no less popular.
The decor should not occupy all the walls; it is important to leave light areas in the kitchen!
Towel holders
Inventive housewives came up with original options. For example, a regular fork can be bent and nailed to the wall, and some of the tines can be folded like fingers. To place towels, planks with hinges and homemade carved boards with hooks are used. In addition, the walls are decorated with rings on the same hinges and even rods with ceiling mounts. Among the non-standard ideas, it is worth noting ordinary hangers. The material used is old belts and wooden planks. The main part of the holder is glued to the hinges so that it does not move left and right, and such fastening is also necessary for the rings. At the same time, all options with nails spoil the wall covering, so holders with suction cups will be a more flexible solution. A way out of the situation would also be a ceiling mount, with towels placed at hand level.
Painting and decorating dishes
Painting techniques:
- Spot;
- Using stencils and templates;
- Artistic with brushes;
- Markers.
The first method involves drawing contours using individual dots, resulting in the effect of embossing, beadwork or stone inlay. For subsequent use of the plates for their intended purpose, you need to use paints labeled dishwasher resistant or dishwasher ability. The second technique means painting using a ready-made stencil or one drawn on a computer and printed, followed by preparation with a stationery knife. The artistic method requires brushes of different sizes and shapes, acrylic paints for ceramic and glass surfaces or stained glass. Different colors are mixed, actively playing with halftones. Markers create graphic and detailed drawings. With felt-tip pens they draw stylish lines, straight and curved, starting from the more general and going to the detailed. The dishes can be painted and decorated with plants, Gzhel, New Year and fairy tale themes.
DIY shelves
Types of shelves:
- hanging;
- corner;
- floating;
- floor;
- wall-mounted
To create hanging shelves you will need boards with four holes in each and ropes. Spice racks are cut out of 3 parts, and then glued and clamped with clamps. Original shelves from cans are assembled using retaining rings (clamps) and glue. Corner shelves are most often floating (flying), because the fastenings on them are hidden. Wall-mounted multi-level options are made ordinary and narrow. In the second case, cable channels are used as the material. The assembly of classic wall systems includes cutting parts, creating grooves, gluing the outer ends with veneer strips, fastening to hardware and treating the coating with stain if wood was used. The most non-standard shelves are made with the addition of luminescent pigments and epoxy resins. Floor levels, in turn, are more like tables, but they have a shallow depth and are adjacent to the wall.
Panels and paintings made from bulk products
Compositions are created from cereals, seeds, nuts, coffee beans and even coconut flakes. They are pre-drawn, and then individual fragments are filled with content of different textures. Mosaic panels for walls and aprons are the result of long-term work with the selection of colors and shades. Conventional square appliques are folded with a perimeter of large particles, a rounded pattern in the center and a background of small grains. The fragments are fixed with a glue gun, theoretically with “moment” glue, but then it will take a very long time and not so reliably. Dense compositions are made using paints in one tone. Gaps with pigments will be invisible. Finished crafts are varnished. Coffee beans make beautiful animal figures. Crafts are applied to walls, fabrics, decorative napkins made of paper and textiles. Before the main stage, a training mold is created in the shape of an animal: drawn or cut out.
Non-standard ideas
The room needs many devices that make the cook’s work easier and relieve the workspace. To do this, use old utensils in the form of forks and spoons, bent with a hook, clothespins mounted to the wall to hold towels.
You can free up the tabletop with glass jars whose lids are screwed to the bottom of the hanging cabinet. This is an excellent storage for spices, sugar, and groceries.
An organizer made from tin cans will accommodate spatulas, ladle, tools, and brushes. DIY kitchen crafts master class:
- The required number of containers are painted in the desired color and dried.
- Using a nail, holes are made in the side for further attachment to the board.
- Self-tapping screws are used to screw the workpieces to the base.
- Leather or furniture handles are attached to the top for easy transportation to any point.
The modifications are different; they are decorated with jute, signs, painted in attractive colors, and hung on the wall. Knives can be kept in original stands filled with bamboo skewers, spaghetti, and bulk mixtures.
The rake will act as a pendant for glasses, and unnecessary graters will act as lampshades or containers for small items.
Needlewomen knit colorful coasters for hot dishes, but in the absence of this skill, accessories are made from jute rope, twisted in a circle, wine corks, glued in any configuration and attached to a base, for example, a compact disc. A cork picture looks good, to which photographs and notes are pinned.
You can lay out the letters using the herringbone laying technique in rows.
Textile crafts
The creation of such crafts will interest housewives. Decorating with fabrics is a logical continuation of the overall design: matching the color and texture of the curtains, as well as textile trim, is important. Old fabrics and fragments of fabrics and clothes are turned into potholders, covers and dolls for teapots, pockets, tablecloths and fabric napkins. Furniture is covered in covers, and seat cushions are placed on chairs. Bread baskets and animal figurines are sewn from textiles for storing small products. Textile paintings on any theme are hung on the walls. The situation can be played up, for example, by creating various still lifes of fruits, vegetables or dishes. Kitchen utensils are sometimes placed in soft pockets. Window sills are decorated with flowerpots in the form of homemade organza compositions. Light fabric lamps look great in the kitchen and blend harmoniously with the decor.
Potholders
Kitchen mittens are made from natural fabrics with the addition of filler such as felt, batting, padding polyester or drape. Sintepon has high thermal conductivity, so it is better to choose other materials, and the denser the specific sample, the better. Ruffles, appliqués and embroideries will decorate the finished product. There are many sewing methods, but the essence comes down to using 4 pieces of fabric and 2 pieces of filler. First, we make a pattern: place your palm on the paper (or directly on the fabric), and draw the contours of the potholder at a distance of 2.5-4 cm from the fingers. Then we cut out 2 linings and the same number of pieces of facing fabric. For the wrong side we choose a softer fabric, and for the front side we choose a denser and painted one. We cut out pieces of the same shape from the filler. We create three-layer parts with padding inside and sew the edges with an allowance of 5-7 mm. Then we sew them together, remove the protruding fabric and turn the product inside out. At the end we make a decorating edging.
Cover-warmer for the kettle
First of all, we select the material and measure the teapot. For two tanks of approximately the same size, one cover the size of a larger container will fit. The first measurement is the distance from the bulge on the lid to the bottom of the bottom. The second parameter, the diameter, is measured from the spout to the base of the handle (if it is on the back). After this, we draw a rectangle according to both measurements, where the first is X and the second is Y. Its sides should be equal: X / 2 + 2 × 1.5 + 2 and Y / 2 + 2 × 1.5 + 2 (cm). We round the two upper corners of the pattern, but you will need 2 fragments in total. We immediately make a loop, which we will then secure in the seam. You can also use ready-made braid. We fold the cut out rectangles with the wrong side out, then insert a loop and sew along the rounded side. We cut out parts of the appropriate size from the stuffing - only two.
Pockets for serving cutlery
You will need:
- sewing machine;
- pins;
- chalk;
- ruler;
- scissors;
- threads;
- interlining;
- linen fabric.
In total, you need 3 fragments: a pocket measuring 13x17 cm, a backing with a fold, 13x53 cm, and a piece of non-woven fabric - 13x53 cm. We mark the allowances with chalk. We apply interlining on the wrong side and iron it. We make a lapel on the pocket detail. We make a centimeter allowance on the wrong side, baste or pin it, and smooth it out. We turn the 1.5 cm margin inside out and do the same, after which we stitch next to the lapel. Press the allowance under the bottom opposite seam, also inside out. Next, iron the seam allowances of the backing. We mark the middle of the parts where the separator seam will be. We place the pocket decorated with embroidery on the front part of the backing, applying allowances and the middles of the fragments. We fold the pocket allowance over the backing and pin it. Then fold the layer in half, facing inward. Cover the pocket in this way and align the edges. After that, we sew the details - the craft is ready.
Cushions and chair covers
Three types of covers are made for chairs: back covers, seat covers and solid covers. Covers with elastic will be better for the kitchen, even for chairs with a back. The main fabric can be sewn from tapestry or scraps, and the filling can be foam rubber. To make a seat you will need a ruler, pins, a sewing machine, chalk, textile elastic, strong threads and the fabric itself. The lining is made of soft material that follows the shape of the chair. The thickness of the filler layer is selected depending on the presence of the backrest. If it is not there, you need 3-4 cm, and for options with a back - 6-7. Other indicators will lead to the fact that sitting will become uncomfortable, or the pillow will move. In addition to foam rubber, felt and padding polyester are also suitable. Sewing from individual square pieces, each filled with padding, will take longer, but the comfort level will be much higher.
Mini garden bed on the windowsill
A very interesting decorative option for a kitchen window sill is making flower pots for subsequent planting of cultivated herbs, aromatic spices, herbs and lettuce.
Such an idea is of great practical importance and allows the owner to give his kitchen area a unique charm.
Original kitchen decor ideas:
- Pots made from glass jars or incandescent lamps. You must first remove the socket and metal base from the light bulbs; you can melt a small area in the side wall of the bulb (to drain the watering moisture). Then drainage in the form of expanded clay and soil are placed at the bottom, and herbs or greens are planted.
- Excellent containers for planting are made from cement. To pour concrete mortar, you can use any form, even a homemade one. After the cement has completely hardened, you can paint the facades of flower pots in an original way.
- Old utensils are useful for the creative process: metal bowls, mugs, vases and plates.
- Original kitchen decor can be made from old vinyl records. The plates are cleaned of paper stickers, heated, and then given the desired shape in the form of a pot or vase.
Containers for aromatic herbs can be made from wooden saw cuts, plywood, wooden slats, but all surfaces should be pre-treated with a moisture-resistant composition (a mixture of drying oil, turpentine and melted wax).
From wooden cuts
Useful things like cutting boards, glass holders and candlesticks are made from logs. Various compositions are also assembled - volumetric ones from stumps, long fragments and flat ones from thin cuts. A large round panel will decorate an empty wall. Volumetric products with a fairy tale theme are assembled from a variety of different fragments. Larger arrays are converted into decorative tabletops and seats. Craftsmen transform wide-diameter material into stands for large dishes and wall clocks. Just one more or less strong branch is enough to make a whatnot with 3-4 saw cuts. Log houses up to 4 cm wide can be folded into something similar in size to a pot. Just a few hours of work with a glue gun, and you can put a row of flowerpots on your kitchen windowsill. Cup holders are most often made from saw cuts.
Cutting board
Select cuts with a minimum number of defects. Treated versions with synthetic adhesives are avoided. Any type of wood is suitable, but remember that birch, spruce and pine deteriorate relatively quickly. For wood, dryness throughout the material and structural integrity are important. Select cuts without knots, loose areas, cracks, and without large chips. The smell determines whether the raw material contains technical oil or gasoline. If the cutting board will be used for processing meat, then choose a thicker cut. During the work along the contour, the desired figure is cut out from the drawing. The diagram itself is printed or drawn by hand. A cutting board is produced using a jigsaw, circular saw, router, planer and jointer. The edges are processed with a grinding machine, sandpaper and file.
Cup holders
They are made from thin sections: separate for glasses, and joined in several for pots and teapots. To make a high-quality cup holder, you need to acquire waterproof sealant, sandpaper, saw, tape, ballpoint pen, pencil, carbon paper, brushes, white and colored paints. We prepare the product according to the template. Using carbon paper, we transfer the picture onto the tree. We paint the craft with paints, and when the top layer dries, we cover it with sealant. We select either an abstract design or somehow emphasize the natural structure of the tree, for example, adding asymmetrical rings with curvature. The cup holder can be made the size of a plate to accommodate several mugs, dishes, pans and other accessories. In this case, we use several small cuts or process one large one. If we use small ones, then in this case we give them any shape: from simply adding all the fragments to a regular square with cut edges.
Candlesticks
The cut itself is already ready to become the basis of a candlestick. We are talking about cuts over 10 cm in height. Holes are made in them into which candles are inserted according to size. At the same time, they maintain a margin of about 2 cm from the top or, on the contrary, make an elevation above the cut - the decorative effect depends on this. Serving elements are also made from store-bought versions. Shops with original handmade goods sell high-quality log houses without cracks or chips. They are already dried and sanded. All that remains is to choose the height, diameter and type of wood; it is possible to select more logs to create a large composition. A cell for a candle is made in the acquired cut using a drill with a Forstner drill or any other drill capable of cutting a blind or through hole of large diameter. These tips may include:
- feather drill;
- spiral;
- wood crown;
- "ballerina"
The material for candlesticks must be treated with a fire-resistant compound!
Wall decorations
Emphasis with expressive strokes is done:
- stickers and stencils;
- artistic painting;
- panel
The theme is represented by butterflies, floral variations, delicious fruits and berries. Place for cute images is given on the apron in the dining area. They recreate mosaic pictures using natural materials.
Most often they operate with shells, cutlery, and pasta. The room will be enlivened by potted plants, vegetable dummies, and bundles of onions and garlic.
It should be noted that a small room cannot be overloaded with decor; a few elements arranged vertically are enough.
Photos of kitchen crafts demonstrate that a catchy and functional attribute of the interior is a clock, which is constructed independently from painted plates, cardboard, frying pans, drilling a hole in the middle for the clock mechanism.
Chalk wallpaper is a chance for both adults and children to try themselves as artists every day. You can stylishly decorate your refrigerator, range hood and old furniture, breathing new life into them.