The art of drawing has changed greatly over the past centuries. If until recently only traditional tools were used to create drawings - paints, brushes, pencils and felt-tip pens, today it has become possible to create colorful compositions with a simple movement of the hand using a compact 3D printer. The device makes it possible not just to draw pictures, but to create quite tangible things. To do this, it is not at all necessary to be a “seasoned” artist or designer. Just download original templates for 3D pens and enjoy the exciting process of drawing with hot plastic.
Before you start, a couple of simple rules
The most common mistake among beginners is to start working on the frame when it is not strengthened. This model turns out to be too fragile and simply ends up breaking from its own weight. To prevent this from happening, strengthen the back side of the frame by painting it over its entire width. Which part it will be is up to you to choose.
You need to separate the paper from the frame, and not vice versa. If you act in the most obvious way, as it seems, and start peeling the craft off the sheet, it may break in the part that is most vulnerable to it. To prevent this, separate the paper from the plastic by lightly pressing one of your fingers on the model from the sheet side, and then everything will work out.
Don't forget about the ability to rotate the frame while working. It is not static and you can rotate it in any way that is convenient for you.
You should “paint” the frame carefully, moving in one direction, and not in a snake. If you started drawing strokes from the top on the right side, then continue to do so until you reach the left end of the model.
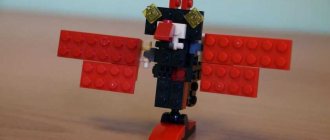
Video tutorial: 3D yellow car with 3D pen
Master class on volumetric modeling with a 3D pen.
Real magic! Watch the video to see how the car levitates and test in the dark!
First experience. Yellow car. We used a ready-made drawing, which you can download and repeat our experience.
Everything you need is in the box with a handle. Additionally, we only bought a set of glowing plastic.
You need to decide right away: will you make the wheels spin?
If yes, then the arches need to be made larger than the diameter of the wheels and what is shown in the drawing.
The wheels need to be made larger and more voluminous.
You will need to think about attaching the axle to the bottom.
For the first time, we decided to make the wheels overhead; in this case, there is no need to make arches, as well as recesses on the bottom.
It is important to carefully read the instructions before use and explain to your child the purpose of the buttons and safety precautions.
The handle is designed for two types of plastic, and each has its own melting point.
Be careful with the hot ceramic pen tip!
Do not clean it with your fingers! The child will get burned!
We took a piece of cotton fabric. You can simply wipe the nose gently on paper.
During free time from work or during a break:
1. The pen must be inserted vertically into the stand.
This protects the plastic inside the handle from possible side leaks and sagging.
2. Be sure to free the handle from the plastic!
If the plastic remains loaded, the pen will warm up the next time you turn it on, but there is a good chance that the feed mechanism will not be able to push the plastic through and it will get stuck.
You'll have to disassemble the handle.
1 step. Select a drawing.
There are many options, but my son, as usual, chose a car - boys 
Step 2. Use the transparent plate from the kit or baking paper.
Both materials performed excellently.
The plastic does not stick to them, and the template is clearly visible.
Step 3. We instruct the child in detail on safety precautions.
It is important to place the pen on the stand in your free time, monitor the amount of plastic and change it on time.
The instructions say that the plastic should not end in the handle itself, it must be pulled out in advance.
Those. a fairly decent piece of plastic remains unused.
It is important not to turn off the pen without removing the loaded plastic. I can tell you from my own experience: we had to disassemble the handle once and take out the plastic. It was a little scary that the handle broke, but it turned out okay
Step 4 Getting started and changing colors.
The plastic is rolled up. Before installing the plastic, you need to turn on the 3D pen and let it warm up to the desired temperature.
The heating temperature depends on the type of plastic you use. We used PLA.
It melts more easily (temperature 180 degrees) and does not produce harmful fumes. Safer for children to use.
When the green light on the handle lights up, it is ready for use.
Step 5 Filling the outline.
First we outlined the frame of the part, then did the internal filling.
It is important to take your time, let the plastic form a confident line, but without sagging, and not rush to draw quickly.
Otherwise you end up with plastic strings.
The desire to change color comes very quickly.
Surprisingly, the process is very simple.
1. Press the reverse button.
2. Remove the old color.
3. We trim the tip of the new wire exactly.
When pulled out, the old color produces a plastic thread. It also needs to be cut off before refilling.
If you try to thread the wire without trimming, the handle may become clogged with plastic and stop working.
4. Thread a wire with the desired color and an even tip into the pen.
5. Press the forward button.
6. Take a piece of paper and squeeze a line of mixed plastic onto it.
7. Wait until the new color becomes clear.
8. That's it, you can draw!
It is better for parents to be nearby during the first time of use.
It is important to make sure that the child handles the pen in a safe way, and it is a real pleasure to watch the process!
In the process of making the first craft, the child gains confidence and enough skills to enjoy the drawing process.
Drawing is very fun!
We draw all the details of the template, and then proceed to assembly
Uneven edges can be easily corrected with scissors
Step 6 Assembly of parts
This is done by coating the edge of their connection with the same plastic. No glue required
The child did not stop until he had finished all 15 meters of plastic from the set
All basic drawings were drawn on the first day of using the pen.
I was especially pleased with the Eiffel Tower.
A master class on a new machine is coming soon, and we are thinking about the technology for creating wheels from a combination of thermal mosaic and thermal pen!
Thank you for reading.
Don't forget to share this master class with your friends and give us a heart for our efforts!
Until new master classes!
Avoid mistakes
One of the most important rules of any instruction on how to make a craft from a 3D pen will say that you should not rush.
By quickly moving the device over the stencil of a piece of paper, plastic will begin to accumulate on the nozzle, creating a curved line instead of a straight line. Wait for the handle to warm up, press the feed button and slowly start working.
When connecting different parts of the frame, one or more colors, remember that you should not have empty space at the attachment points. It would seem like a small thing, but if this is not done, the model may fall apart.
"C+" difficulty level.
When the art of creating a frame has been successfully mastered, it becomes possible to give it a special meaning and give it life, literally. So, you have a ready-made ball, or ellipsoid, and you don’t know what to do with it next. The answer is simple - use your imagination and creative thinking, catch associations and think about what or who your workpiece can become.
Level “C+” involves creating a three-dimensional craft with two-dimensional elements drawn using a stencil. Usually, the first thing that comes to mind for our students when they see a ball is the cartoon Smeshariki. And they are thinking in the right direction. The characters from this cartoon are an excellent example and initial template for crafts at this level. However, we do not limit your imagination and always support guys who create their own characters.
Crafts with 3D pen. A frog created in class.
Why a sketch of a future craft?
So, having chosen the hero of the future craft, it won’t hurt to draw a sketch. As you remember, a sketch is needed to convey the dimensions of the future work as accurately as possible. Mark all the important details and just have a visual representation of your character. For the frame it is best to use PLA or SBS plastic. Having painted the frame itself and the individual parts with color, you can begin to connect them together, or to assemble the character. While shading the frame, you also need to divide it into different zones, determine where the front part of the craft is, where the bottom and top are, mark any details (clothes, color, etc.) The details of the figurine include arms, legs, tails, horns, ears, mane, hooves, wings, objects and much more. By combining all the details, the result is an interesting, capricious character to whom you can give a name and come up with your own story.
Watch video lessons of level C/C+ difficulty on creating crafts with a 3D pen here
Stencils for 3D pens with detailed video tutorials and step-by-step instructions here
Figure for beginners
If you are just starting to learn the basics of working with a 3D pen, you should start with the simplest thing, of course, with building a cube. Despite the lightness of the figure, you will acquire the skills you need for more complex work.
Note!
- DIY military crafts step by step: 150 photos of the best craft ideas for children for school or kindergarten
- DIY crafts for May 9 step by step: 150 photos of the best crafts for Victory Day
DIY crafts for February 23rd step by step: master class with photos and descriptions of how to make crafts for Defender of the Fatherland Day
As we know, a cube has six identical sides, for drawing which you will need a stencil. You can print it on a printer or draw it yourself.
Using the prepared stencil, we first form the frame of the square, after which we begin to paint it. Take your time, let the plastic lie flat on the sheet of paper.
Once all six sides are ready, after allowing the plastic to cool, carefully peel the sheet away from them. When connecting the sides, do not forget that the angle should be ninety degrees. To prevent it from falling over, help yourself with a ruler or any other device.
When assembling a cube, remember that the joints should not be empty. As a result, you will get your first work, congratulations.
Perspective is the basis of drawing 3D drawings
The first thing a beginner needs to understand is that the basis of drawing 3D drawings, be they on asphalt, on paper, on city walls, lies in “perspective”, as well as the ability to correctly convey shadows and light.
Before you draw a 3D drawing, you should make the first sketches (we recommend starting with the most basic things: an eraser, a matchbox, a lighter, a tennis ball). First, imagine at what angle you will look at the future drawing. Next, you need to determine the light source that will fall on your “real” object. The realism of the drawing is achieved through the correct supply of light and shadows.
Simple volumetric figures
By “simple three-dimensional figures” we mean full-fledged models assembled from flat frames.
Previously, we made a six-sided cube, but a cube is still classified as an easy craft made from a 3D pen, but a ball is something more complicated.
We will consider two options for modeling it. In the first, we will build on what we already know, but this experience will help us complicate the technique in our second experiment.
ZD pen - reviews from real users
Since the appearance of this interesting new product, its popularity has not waned. Naturally, there are a lot of reviews.
Review of the MyRiwell 3D pen from user Vitaly Kutilin: More details on Onlinetrade:
https://www.onlinetrade.ru/catalogue/3d_ruchki_dlya_risovaniya-c1758/myriwell/3d_ruchka_myriwell_golubaya_rp100a_bl-152958.html
Review of 3Doodler Create by actrise: More details on IRecommend:
https://irecommend.ru/content/ochen-khorosho-no-est-odno-no
Ball design
Draw four circular shapes from the stencil. Based on them we will draw a sphere. Don't expect to be able to do this by hand, as in our experience this is a bad idea.
Note!
DIY airplane craft: the best options for creating an airplane from paper, cardboard and plastic. 120 photo ideas
- DIY crafts for March 8 step by step - a review of the most beautiful crafts for International Women's Day (120 photo ideas)
- Diaper cake for a girl - 180 photos of ideas for original diaper cakes + DIY instructions with examples of finished products
Next, we need to fold our blanks the same way we fold a sheet of paper, that is, in half. To prevent the plastic from cracking, touch the intended bend with a handle and immediately begin bending.
Take two bent circles and connect them together at the top and bottom. After that, repeat the same with the remaining frames.
Next, holding both hemispheres in one hand, connect them at the tops, and then begin to create a frame, passing along the perimeter of the entire ball from top to bottom. At the very beginning, you should not paint over the sphere completely.
When the frame is ready, start painting it. This is already quite easy to do, since we have strengthened the model.
3d hole in the ground
As always, you should start with a sketch of the future hole. The more bends, the more interesting the result looks.
Let's draw:
- The contour should be elongated, since the perceptual angle of the illusion is about 30 degrees, visually the image will look at least a quarter shorter than the true one.
- Draw lines along the entire contour of the hole from top to bottom, outlining the internal “folds” in accordance with the shape of the hole.
- Draw all the lines brighter, eliminating possible flaws along the way.
- Choose where the light will fall from and, accordingly, apply a shadow on the “inner” surface of the hole, emphasizing the roundness of the vertical creases.
- Taking into account the expected lighting, darken the pattern additionally diagonally from bottom to top, from a solid shadow at the bottom to a slight “twilight” at the surface.
- If desired, you can draw the texture of the ground around the hole, add cracks, stones and grass.
- You should look at the finished drawing at an angle, along the internal creases, the dark “bottom” part is closer to the viewer.
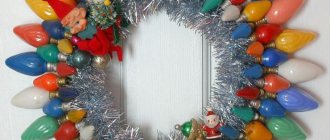
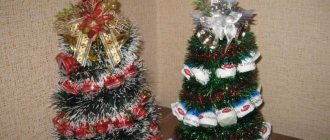
Christmas tree decoration
Why not now try to complicate our technique using the same scheme for creating crafts? Let's create something really useful and interesting. The difference between this technique lies in the construction of the frame, the figure remains the same, but its construction is closer to how various animals or something else are drawn.
For the stencil we will need one circle, but divided into six equal pieces, reminiscent of some kind of pizza. Trace it and let it cool slightly, then remove the sheet of paper from the frame.
Next, take the model with two fingers, and from the center with the pen, draw a line directed upward at an angle of ninety degrees to the frame. To keep things simple, don't disconnect the line from the handle until the plastic has cooled a bit, but even if this happens sooner, don't worry too much. There are many options for fixing the line - you can use your fingers or a pencil, waiting until it cools down.
For further actions we need to know the radius of the circle. It is equal to half the diameter and you can make all measurements on your stencil. Set aside the resulting value from the base of the frame and cut off the “tail”.
Connect the end of the line protruding from the frame with the edge of the circle, helping yourself at the end with either a pen or pencil. As a result, you should get a semicircle, the steps to obtain which will need to be repeated six more times.
Start tracing the resulting semicircle frame with a pen, without trying to draw a tight line. You just need to strengthen the frame.
Next, you need to make a craft with your own hands in the form of a semicircle from a 3D pen by repeating the steps described above and connecting the resulting parts together.
You should now have a finished sphere frame. Choose the same color or use a different one, draw a design such as a Christmas tree, or don't use a design at all. The main thing is not to forget to attach the thread and your Christmas tree toy is ready.
Circuit operation
The diagram of a robotic arm using Arduino is shown in the following figure.
Since the MG995 servomotors operate on a 5V supply voltage, they can be powered from the corresponding connector on the Arduino board. The control contacts of the servomotors are connected to the digital contacts of the Arduino board, on which it is possible to generate PWM (pulse width modulation) signals. The potentiometers are connected to the analog pins of the Arduino board to control the servomotors.
At any given time, we will have only one servomotor moving, so the current consumption will not exceed 150 mA, and therefore the power regulator of the Arduino board can easily withstand such a load. The Arduino board itself in our project was powered via a USB cable from the computer.
After soldering and assembling the components on the perforated board, we have the design shown in the following figure. Additionally, we added a connector to the project design for connecting a battery if power from it is required in the future.
If you have not encountered servomotors before, we recommend reading the article about connecting a servomotor to an Arduino board.
First complex figure
Before this, we always started from simple forms, but now, having mastered the technique of constructing a three-dimensional frame in two ways, it is time to give meaning to the acquired knowledge and breathe life into the model. Before starting work, you can experiment with the ball, for example, by making a snowman, a Smesharik or a frog.
We learned how to make a three-dimensional frame, how to work with a stencil, too, why not now make us a flower.
Prepare all the necessary stencils, we will need drawings of the substrate, which will be represented by a rectangular shape, a circle for the core of the flower and its petals. You can draw them yourself or use templates to create crafts.
Start with where our plant will stand. Since this is a rectangle, it won’t be too difficult for you to make it. Remember that it must be of sufficient size so that the flower does not fall on its side.
Stepping back a little from the end, draw a circle that will form the basis of our stem. We need to move up, drawing circles - at the beginning they are wider, and the higher they go, the thinner they are.
To make the structure stand, make the stem slightly curved towards the long part of the base of the stand. So that our core can hold on better
, slightly increase the radius of the stem towards the end.
Once the stem is ready, start stenciling the core and petals. Use different colors of plastic to get a more vibrant shape in the end.
Attach the finished core to the stem, and then proceed to the flower petals. Don’t worry that they may overlap one another, because in nature there are no ideal forms.
You can finish the job by adding a petal to the middle of the trunk of our plant. You already know how to do this.
Building a butterfly
Crafts from 3D pens for beginners are of course good, but you can quickly go through all the possible options for shapes. To start doing something really difficult, you need to study the anatomy of animals and insects to achieve the best result. Let's try adding a butterfly or moth to our flower petal.
A simpler option is making a butterfly. Using the stencil, create wings for it, then start making the body. Then connect everything together. Add eyes and antennae with legs, remembering that the butterfly has three pairs of legs.
For a moth, everything is a little more complicated, since when folded, the wings seem to overlap one another. The body of the moth is a little fluffy, but using cotton wool you can easily deal with it.
Birthday gift: three-dimensional drawing
As you know, the best gift for a loved one is when it is made with your own hands. And we have already learned how to make 3D drawings on paper and a special pen. I offer paper art or three-dimensional drawings made from paper napkins. It is ideal as a gift for your beloved mother or for the birthday of your beloved or lover.
To do this, a rough sketch of the gift drawing is made on paper. Or you can print it from your computer. Then you need to do the following:
- choose plain or colored napkins;
- then cut these napkins one centimeter wide;
- twist into flagella, moistening lightly with water;
- then we glue them onto paper, creating the image as you intended;
- You can also use plain white napkins if you intend to paint your product;
- let the product dry and then open it with colorless varnish.
Studying anatomy
To prepare for complex three-dimensional figures, we need perseverance and some preparation. Unusual crafts require attention to detail, so try making animal frames in motion first, without trying to waste plastic filling them. You will make mistakes many times, which is completely normal and your task at this stage is to obtain natural forms.
For example, the frame of a cat that is going somewhere or an animal that is just sitting. The frame should always have a fulcrum. There can be either four or two.
Taking this into account, it is not enough to choose the right stencil; you need to think about how the resulting figure will hold up. It’s not for nothing that we mentioned this at the stage of preparing the flower stem.
Modeling complex figures
Having learned how to build volumetric frames and having figured out the fulcrum of the resulting figures, it is time for the last stage. These models will seem like something new to you, since the parts will be built separately from each other, but don’t worry, you can handle everything. You can choose anyone, from an elephant to a person.
The stencil you choose should match the actual sample, preferably a side pattern.
You should start with the head; for simplicity, use a ball as a figure. Then model the neck in proportion to the drawing and connect both parts together.
Next, we proceed to the body, tracing it exactly along the contour of the animal. Don't forget to reinforce the edges of the frame with internal intersecting lines. Detach the outline and start modeling the torso in width, then connect the torso to the neck.
We form the legs in the same way as the torso, first drawing a frame, then a circle as the base of the leg. Having connected everything together, model the upward guides, which you then outline with a thin layer of plastic, after which we attach the resulting result to the body.
The next step is to make the ears and trunk according to the same principle as we did the legs and attach them to the head in the same way. There is no need for any original solutions and reinventing the wheel - this can only do harm.
Start gradually moving from the legs to paint the frame.
The last stage is decoration and stylization, when you highlight the animal’s nails and tusks with white, adding additional decorative elements if necessary.
Letter M
We will need paper, a simple pencil and desire.
- We depict the letter on the entire sheet. We do this so that it looks voluminous. We direct it along the main contour and move on to the second stage.
- Next we start painting the sides. This can be done with a regular pencil or gray. We also shade the plane under it.
- We paint the upper side in gray with a smooth transition to white. All lines should look neat so that the image is as natural as possible.
- Now you can put a sheet of paper on the table and see how beautiful the 3D pencil drawing looks. And no special effort is required.
3D Concave Heart
- On the sheet we depict a large heart, and around it there are horizontal stripes at equal intervals. The main part of the drawing remains untouched.
- Inside the heart you need to make a lot of diagonal lines. Moreover, their ends on both sides must be connected.
- And the next step will be coloring. The outside of the sheet remains the same white, but inside our image is shaded gray.
- We took just a few steps and got a beautiful drawing. Now you can put it on the table and just admire its beauty and naturalness.
Some tips
To make any surface smooth, reduce the plastic feed speed to a minimum and use thin strokes to smooth out the shape. The handle should be at right angles to the frame.
The frame is hollow, which means it does not tolerate excessive finger pressure and large amounts of plastic. Wanting to work out every detail, you may not notice how it simply collapses under the weight of its weight.
If you move the pen too quickly, the line will turn out to be too fragile and thin. If you do this too slowly, you will not be able to make a semicircular line, since the plastic will simply harden before all your manipulations.
New products that you like may be too difficult to implement. To model a person, you need to understand anatomy and monitor the proportionality of the body.
Remember that your frame will have additional thickness in the form of layers of plastic. To avoid getting into trouble, draw it somewhat smaller than it is on your stencil.
What to draw?
Here is a site for DIY projects with a pen where you can find project descriptions and stencils in the public domain. Pinterest dedicated to wire sculpture and products made with a 3D pen.
The Brooklyn Bridge project, stencils for which are publicly available at the link above.
Wire sculpture, which, according to Wikipedia, appeared in Ancient Egypt and received a second wind in the 20th century, is very similar to what can be created with a pen. We found the most interesting works by Frank Plant, an American sculptor living in Barcelona:
The man on the box and the headphones are by Frank Plant.