Recipe with cooking
Below is a method on how to make cold porcelain.
Prepare:
- starch;
- cream;
- glycerol;
- glue.
Preparation:
Before you start working, you need to lubricate your hands with cream; this is done so that the future mixture will come off well. Select dishes for cooking. Glass or Teflon containers are suitable. Aluminum cookware is not suitable for the job.
Turn on the heat (medium) and place the container in which the mixture will be prepared on the stove. Pour in 1 cup of PVA glue and immediately add 1 teaspoon of cream and a teaspoon of glycerin. Stir vigorously until all components are combined.
Gradually add 1 cup of starch. Mix. At first, the mixture may resemble granular cottage cheese, but as it heats up, it will acquire a homogeneous mass and form a single lump.
Take out the mixture and knead it with your hands for a few minutes. If desired, you can add dyes and start making crafts from cold porcelain.
Making the mixture
Mix glue, glycerin, cream in an old saucepan. Put on fire.
As soon as the mass becomes homogeneous, without stopping stirring, add starch. The material is considered ready as soon as it begins to peel off from the walls of the container and gather into a ball.
To make the composition elastic, you need to put it on a wet cloth and pat it down. Wash the dishes immediately (otherwise you will have to throw them away). Knead the resulting mixture until it cools. At the same time you can paint.
Once the modeling mixture is ready, refrigerate for 24 hours. After the deadline, you can begin to bring your idea to life.
Cold porcelain painting
When the product dries, it has a slightly transparent texture; to avoid this, you can tint it with white pigments during preparation.
The following paints can be used for painting:
- powder;
- watercolor;
- acrylic;
- chalk;
- pastel;
- and etc.
Note!
- DIY ottoman: TOP-190 photos of the best diagrams and drawings. Do-it-yourself master class with a full description of the stages of work
Do-it-yourself easel - varieties, drawings with dimensions for creating with your own hands. Step-by-step instructions for beginners
- How to Write a Screenplay: Tips and Best Practices for Writing a Screenplay. Step-by-step master classes for beginners with detailed descriptions of the stages
On the Internet you can find a large number of photos of cold porcelain painted with different techniques.
Once your product is completely dry, you can begin painting. Thanks to its structure, the material allows you to make smooth transitions between colors.
This material is soft and has no rough particles. Therefore, you can easily make thin elements from it (in the form of flower petals, or edging).
Craftswomen mostly make small elements, because the substance can crack. But this is not a problem either, since with the help of glue you can easily restore the part.
Complete drying takes about a day. For parts with a thickness of more than 10 mm. They take much longer and are prone to cracking.
As the mass dries, it loses 10-15% of its volume.
Note!
- DIY medical mask: TOP-140 photos of the best DIY options. Instructions for making a mask at home
- How to make a piggy bank with your own hands - the best ways to make a piggy bank with your own hands. Detailed master class for beginners with photos and videos
Cake decorating: TOP-170 photos of the best ideas for decorating a cake at home + instructions for beginners with simple patterns
Porcelain making process
Classic (professional) porcelain goes through 3 stages of firing. Preparation for manufacturing includes thoroughly mixing the molding mass and filling the prepared mold with it. When the workpiece dries, it is taken out and left to dry for several hours/days.
Next comes cleaning and polishing. Here you can use techniques such as slots and inserts. The handles are glued to the cups by hand. The first firing is carried out - the so-called. "scrap". After it, the product acquires sufficient strength and cannot break right in the hands from light pressure.
Glazing with white or colored (eg cobalt) glaze completes the pre-treatment of the product. A mandatory stage of the technology is washing out the bottom, i.e. the place where the product comes into contact with the surface, cleaning it from the glaze layer.
If this is not done, the product will stick to the plate during firing. After the second firing - the so-called. “watered” - it already takes on a formalized appearance and can be used in everyday life. (The exception is a type such as majolica, which is not glazed).
Decorative design of the glazed semi-finished product may include:
- Painting,
- Laying with gold,
- Applying decals.
To fix the pattern applied by any of the listed methods, a third firing is used - the so-called. "gold". After this, the product can be washed by hand or in the dishwasher and put on sale.
Recipe without cooking
Cold porcelain without cooking, prepared using a microwave oven.
Compound:
- starch;
- PVA;
- glycerol;
- lemon acid;
- water;
- cream and Vaseline.
Step-by-step instructions for beginners:
Step 1. Pour 1 tablespoon of water into a container and add a pinch of citric acid.
Step 2. Add one cup of starch (potato/corn) and 3 tablespoons of glycerin to the mixture.
Step 3. Pour one glass of glue (it is better to use furniture glue). And mix everything very well.
Note!
- How to make a house out of cardboard: 140 best photos of children's crafts with your own hands + step-by-step manufacturing instructions with simple diagrams
- DIY rose lamp - step-by-step instructions for creating a lamp with your own hands + original design ideas with photo reviews
- Furniture decoupage: TOP-140 photos of non-standard decoupage options. Step-by-step instructions for decorating furniture with your own hands
Step 4. Place in the microwave for 30 seconds, remove and mix everything thoroughly. Set it to heat again, but for 60 seconds. Repeat again. Mix everything very well.
Step 5. Then put it back on heat 3 times for 20 seconds.
Step 6. Next, you need to heat the mixture three more times for 10 seconds. The mixture should take on a milky tint.
Step 7. Heat the bowl a few more times, but for 4-7 seconds.
Step 8. Place the surface on the table, greased with cream. Knead the whole mass very well.
Step 9. Let the mixture rest and lubricate with Vaseline. Then wrap in cling film and put in a dark place for 6 hours.
Step 10. After the required time has passed, take out the mass and grease with cream and knead for 5-10 minutes.
Step 11. In order for the material to quickly acquire the required consistency, place it in the microwave several times for 5 seconds, after each time knead it well.
Step 12. It is better to use oil paints for painting.
LiveInternetLiveInternet
Utilities for sculpting II from lolkaolga Utilities for sculpting II
Homemade mold. Production: we glue transparent double-sided tape onto a thick film (we put a printout of a leaf with veins under the film) and glue the threads onto this tape in the right direction, the work is painstaking but the result is not bad, the threads can be taken of different thicknesses and then the texture will be more natural or something. Afterwards you need to open this “mold” several times with varnish so that the tape stops sticking (I opened it 3 times).
Mold: plate, price from 25 rub. Plates of different sizes and shapes with this texture.
Mold: plate, price from 25 rub. Plates of different sizes and shapes with this texture.
Mold: cutting board, price from 50 rub.
Mold: bay leaf (soaked).
The mold is made of corrugated paper, the impression is not deep, but the petals will be more realistic, the only thing is that the corrugation is painted a little better to mold with white corrugation (if such a thing exists in nature, but if not, then it will match the color of the petals or light).
Homemade molds made of plaster and porcelain. Below there are links to the MK of their manufacture.
Various things: 1 - Stack-bamboo knitting needle (No. 4.5, length 20 cm) 2 - 2A - Beads - smooth beads from necessary and unnecessary beads (for rolling out the edges of the petal) 3 - Stack-handle (metal) (for forming cores and rolling out edges petal) 4 — Cosmetic sponge (you can roll out the edges on it and use it to press the HF to the mold so that there are no fingerprints) 5 — Stacks for sculpting (I use it to pry up the rolled petals) 6 — 6A — toothpick and skewer (gives texture to the petal) 7 — 7A - manicure gadgets (for adding texture to petals and leaves, as well as for making foam molds) 8 - Disposable spoons (we dry the petals in them to give shape) 9 - Manicure scissors (mode and cut the edges and not only...)
Curly scissors: a very good thing, makes it easier to cut the edges of leaves (their prices vary, from 45 rubles to 120 rubles)
10.
Cutting knives - a knife (80 rubles) took a long time to choose, thought about how it would slide and cut in the right direction, but a pizza knife (70 rubles) is a good thing, but if the diameter is large, then it’s not very convenient to work with small parts, but if A smaller diameter is more convenient, and a double knife (RUB 150) - the wavy one is also convenient for cutting out leaves + my purchase of a cutting mat (expensive - 230 RUB. A4 size)
11.
Homemade: my dad made me all sorts of buns from ball bearings - it’s a treasure!
12.
Paint for greenery: I bought it to color a water-based emulsion and experimented with painting a samovar HF - I really liked the color - it looks so natural and simply chic. The mass behaves in the same way as when painting with oil paints, it dries faster and the elasticity decreases, but not by much. In the left corner the leaf is already dry and the mass is fresh - as you can see, the color is practically the same!
13.
Oil paint “Sonnet” - “Herbal greens” 3 cm ball added 2 peas of paint
14.
Oil paint “Gamma” - “Swamp dark” No. 528 ball 3 cm added 2 peas of paint
15.
Oil paint “Gamma” - “Glauconite green” No. 510 ball 3 cm added 4 peas of paint
16.
A syringe - it is needed for making thin, even sausages (roots for orchids, curls, for rolling stems, etc.), Yulia P_i_L shows how this works well, there is a link below.
17.
Homemade cutters made from beer cans. Below there is a link to the MK of the author Sveta IvanovNa on the manufacture of cutters.
18.
Store-bought cookie cutters and more, they are much cheaper than professional cutters - although of course they are inferior to them.
I continue the theme of Svetlana (Sveta Ivanovna). Having collected a lot of information, I decided to illustrate everything that had accumulated in my stash - do it yourself!
Everything that was collected here was, so to speak, collected by the world! And I am grateful to everyone who shares such necessary information for those who want to create!
I, like many others, do not have the opportunity to purchase expensive things for creativity - but I love to create!
Svetlana (SVET1301) shows to what state the mass should be cooked,
Links to useful items for sculpting:
About “greenery” and “molds” for modeling and “Cold porcelain”: painting the mass... author Yulia P_i_L
Useful tools for sculpting by Sveta IvanovNa
Making cutters for modeling (MK) by Sveta IvanovNa
Homemade cutters - another idea by Marisabelle
my sculpting tools by Elen
Making molds for leaves and petals:
Girls! Find! Intrigued? come in)))) by Kukushechka
Homemade molds for HF, MK author Reshenskova Ekaterina
Assistant to those who sculpt and Assistant to those who sculpt (continued) by Marina2101
All about my leaf molding by Elen
Flowers for a winter bouquet by Olga M. and Victoria (several ways to preserve plants)
I supplement the information with links to the production of HF (cold porcelain) and the properties of this wonderful material - I express my gratitude to all the authors!!!
Ingredients: It's all in the glue!
Improved recipe for cold porcelain topic author Svetlana SVET1301 (recipe, photo of glue and starch, read the comments, there is a lot of additional useful information)
Glue for cold porcelain by Sveta IvanovNa (recipe, photo of glue and starch)
Cold porcelain. Made by Kukushechka
PVA porcelain with plasticizer, author of the topic: Olga Kosheleva (photo of glue and potato starch from which good HF is obtained)
Experiments with HF author Sveta IvanovNa (read comments, very useful information)
Why pay more???? author Ksyusha25 (comparison of the properties of samovar HF and purchased clays)
HOORAY!!! Here he is my handsome!!! HF! author EM (successful cold porcelain made from Lakra glue)
Links to information about purchased plastic and self-hardening clay, masses and plastics:
Cold porcelain again. Some information by Sputnik
Modeling mass by Verunya
My new plastic surgery by mariya-pryshhikova
Plastic and more. and Self-hardening clays (plastics) by Fittonia
Plastic surgery by Ksyusha25
Modeling mass “Orange Elephant” by Lyudmila Eremeeva
Plasticine, modeling compound, plastic and much more! author Nadezhda NRP
This topic will be replenished and updated!
from the website pages: https://stranamasterov.ru
Operating rules
Making cold porcelain with your own hands requires meeting certain conditions:
- Do not leave the material outdoors for a long time. It sets quickly, and it is no longer possible to return to its original state.
- painted porcelain hardens much faster. Therefore, you should not prepare in reserve.
- When adding chemicals, protect your hands with gloves.
You should not leave the material in a visible place if there are children in the house. A child may confuse it with something and bite off a lot.
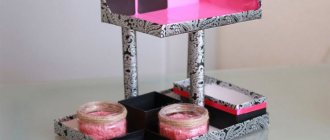
Decoration of photo frames
A photo frame has always been an appropriate gift for any occasion. A stylish craft made with your own hands can become an independent element of a designer interior or simply serve as an item for storing family memories.
Photo frame design options:
- Photo frame in a nautical style, decorated with shells and starfish, made in white and blue tones.
- Children's photo frame with cute figures of cartoon characters and baby items (baby bottles, pacifiers, rattles).
- A stylish interior accessory with large inflorescences of roses, peonies, lilies and hydrangeas.
The availability of ingredients and ease of manufacture makes cold porcelain mass a leader in the arts and crafts. Modeling methods are available to children and craftsmen just starting their creative activity.
Author: Maria Andryukova
Tools
Large investments in tools are not required; the most common devices used for sculpting will do:
- oilcloth to protect the surface;
- set of knives;
- various shapes, stencils.
- decorative elements;
- paint brushes;
- glue (for fastening parts).
Secrets.
After drying, the volume decreases by 20-25%.
To prevent the dried part from cracking after it has been prepared and cooled down, formaldehyde is added. This is a toxic substance, do not forget about precautions.
Do not place the remaining mixture in the refrigerator. And to remove moisture, it’s worth changing the bag.
The better the kneading process, the less likely it is that the finished product will crack.
To prevent fungus from appearing on the surface, the surface can be lubricated with oil.
For a more saturated color after the first coat of paint, the part is held over steam. This allows the cold porcelain to be well saturated with coloring pigments.
Acrylic paints will give more realistic colors. Painting can be done with any paints. It is worth remembering that the painted mass hardens much faster.
To give different shapes and textures, you can use any convenient tools at hand. But the most important tool when working with cold porcelain is your hands.
Organize a place for the finished product to dry.
The products will help dry from 24 hours to a week. It all depends on the thickness of the part.
Flowers made from cold porcelain should be placed in safe places, as the material is very fragile and can easily be damaged.
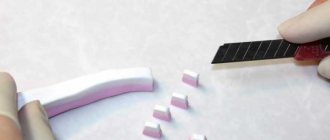
DIY leaves
To add greenery to the product, you will need green dye. The mass can be painted with paints or you can buy ready-made plastic of the desired shade. You can also buy molds for making vegetation in the store. For those who are not looking for easy ways, you can cut the leaves by hand and enjoy the process.
The green mass should be rolled out very thinly. It is optimal if its thickness does not exceed 1 mm. The surface is smeared with cream so that the thinnest layer can be removed from the board without damaging its shape.
Next, using a knife or using a mold, the required contour is squeezed out. If it is difficult to draw a leaf by hand, you can attach a paper pattern, previously cut from wax paper, to the rolled out layer. Some craftswomen use leaves of artificial flowers, which are pressed onto porcelain to obtain a characteristic relief.
Notches and grooves are applied to the leaf with any sharp object. A pin, needle or toothpick coated with cream will do. The stem for the leaf should be wrapped with floral tape. Lubricate the tip with glue and press it into the base of the leaf.
Recipe with added formaldehyde
A recipe for cold porcelain with the addition of formaldehyde helps strengthen the material.
Prepare:
- starch;
- powder chalk;
- vinyl based adhesive;
- petrolatum;
- formalin (formaldehyde).
Step-by-step preparation:
Step 1. Place one cup of chalk and one cup of starch in a bowl. Pour in the glue and check the consistency (you should get thick sour cream).
Stage 2. Add 7-8 drops of formalin. Don't forget about safety precautions.
Stage 3. If the mass has thickened, dilute with a small amount of water.
Stage 4. Mix everything well and put it in a bag.
Cold porcelain modeling
Master class on making a flower.
Prepare for work:
- oil paint (red, white, green, yellow);
- red acrylic paint;
- dry pastel green and red;
- floral wire;
- glue;
- brushes;
- brushes;
- dowel; - scissors and knife.
Preparing cold porcelain
Prepare:
- soda;
- glue;
- petrolatum;
- starch.
Pour two tablespoons of starch into a plate and add Vaseline. Connect the components. Add a pinch of soda and grind everything together.
Add 3 tablespoons of glue in small portions. The dough is ready to use. You need to let it rest for 5-10 minutes.
Completing of the work
Prepare two pieces of wire, no more than 7 centimeters long. On one side the wire must be bent like a hook.
Mix a small amount of porcelain with oil-based white paint. Make a ball with a diameter of approximately 1 cm.
Lubricate the hook with PVA glue and put the ball on it. Make small indentations on top of the ball from four sides to the center. This is necessary to give the heart shape volume.
Make another one like this. The second blank can be made smaller or larger.
Prepare green pastel and paint the base of the bud. In the same way, paint the top only red.
Mix a small amount of the mixture with green pastel and stick around the stem. The wire must be lubricated with glue. For a smoother surface, the stem can be rolled between your fingertips. Leave 1 cm of empty wire at the end. Repeat the same steps with the second bud.
Prepare a ball with a diameter of 2-3 cm. Mix with white and red oil paint. Prepare a petal about 1.5 cm.
To give the petal veins, you can use an impression. Prepare 3 petals. Using a dowel, give the flower a three-dimensional shape. Fold the petals and glue them in the center with a drop of glue. Add the top two petals.
You will need 3 blanks. Prepare a small red lump. Give the mixture a heart shape. And use glue to secure it in the center of the flower.
All that remains is to put all the elements together and the flower is ready.
Master Class
A master class on decorating from cold porcelain will help every needlewoman fill her jewelry box with a magnificent product.
For work you will need the following materials and tools:
- polymer clay - homemade or purchased, for example, Modena Clay, Modern Clay, Fleur;
- latex glue, superglue;
- wire;
- stamens;
- oil paints;
- nail scissors with straight edges;
- corrugated stack;
- sharp stack with small ball;
- base for earrings;
- crystal beads.
The process of making jewelry from cold porcelain for beginners looks like this:
For each color, you need to knead the clay with the addition of the desired colors. For freesia flowers, white paint is used, for leaves and buds - green, for roses - light yellow and violet-pink.
It is important that in a pair of earrings all the flowers are the same size; to do this, you immediately need to roll balls of the required size.
To prevent cold porcelain from weathering and becoming covered with a dry crust, the prepared pieces must be covered with cling film.
Now let's start creating freesia and buds. We take the prepared ball and make a drop out of it: lightly press it on one side and pull it out on the other. The rounded side of the drop should be cut and the edges bent to the sides.
Each bent half should also be cut into three equal parts, and then carefully bend the petals. Using a sharp stick, you need to make strokes on each petal, exactly in the center.
The edges of each petal should be slightly flattened with your hands. Take the stamens, cut the required length (along the length of the drop), connect the bunch with a small ball of polymer clay, coat the middle of the flower with glue and carefully insert the stamen inside.
Such a blank for decoration made of cold porcelain is shown in the photo above.
Freesia buds: take blanks for freesia buds, make drops from each and press them well on both sides to form a petal. All these flower elements must be the same size and thickness.
Fan the petals on top of each other, twist them into an envelope and press the finished bud at the base. The top of the bud should be cut into three parts, the ends of the bud should be joined together.
Roses: Roll petals from prepared clay balls. Take one petal and curl it like an envelope. You should do the same with the second petal, but attach it to the first with an upward shift of 1-2 mm.
All petals are attached to the previous one with an upward shift. Give the outer petals a texture with a wavy stack, coat all elements at the base of the petal with glue.
Assembling the decoration: put the lenses on the wire and twist them, make a drop of prepared green balls for the leaves. Coat the area for the base of the earrings with glue, first glue the leaves.
Among the flowers, the largest one should be glued first, because it is much easier to create a flower arrangement. If desired, all elements on the finished product can be tinted with paint, so they will become brighter and more saturated.
The finished earrings should be left for 12 hours to dry completely.
Tip: all elements of jewelry made of cold porcelain must be made in pairs, then you will get perfectly symmetrical earrings.
Such a decoration made of cold porcelain in this photo: