How to take the insides out of a light bulb?
But first you need to understand how to clean a light bulb from its contents. To disassemble the product you need:
- Screwdriver
- Pliers
- A box or several sheets of paper - since the glass will break, you need to take care of the bedding under it in advance
IMPORTANT: You should also get thick rubber gloves and goggles.
You can start:
- First of all, you need to find the contact - it is located at the bottom of the base. Using pliers the contact is loosened until the wiring becomes audible.
First, you need to remove the contact from the light bulb
- Next you need to start working on the base insulator . The glass in the indicated place is quite thick, so the light bulb must be held firmly. You may have to cut at different angles. The contact must then be removed.
Now it's time to work on the light bulb base
- Now you can take a screwdriver - it’s most convenient to loosen the remaining inner part of the light bulb. You can remove it using pliers.
A screwdriver helps rid a light bulb of its contents
IMPORTANT: The lamp leg is made of glass, so you should exercise maximum caution.
The glass stem of a light bulb looks like this
- Electrodes, filament body, holders - all this must be removed.
- to wipe of the lamp with a napkin at the end of the procedure .
Wiping the inside of a light bulb
DIY crafts from light bulbs, Christmas tree toys: master class, photo
You can make a stunning balloon for your Christmas tree from a light bulb, for which you will need:
- Bulb
- Glue
- Thick rope
- Thin fabric or colored paper
- Sequins
- Beautiful elastic band
- Cap from a regular plastic bottle
- Acrylic paint
- Clear nail polish
- Awl
IMPORTANT: The awl should be chosen thicker.
Work process:
- First of all, you need to cut out flaps from the fabric. The width is not so important, but the length should correspond to the distance from the top to the bottom of the light bulb.
It is preferable that the pieces of fabric for the light bulb toy be different in texture, color
- Now the fabric pieces should be glued to the light bulb. The edges need to be coated with glue especially carefully.
Gluing fabric pieces onto a light bulb
- Then the ball must be given time to dry.
- Meanwhile, glitter is added to the paint or varnish; the bottle cap should be covered with this mixture.
- The lids should also dry.
Bottle caps for light bulb toys should look something like this
- Then 4 holes are made with an awl.
Making holes in the lid while making a light bulb toy
- Now you should cut 2 pieces from the rope , each of which, in theory, can be tied around a light bulb three times.
- From the first piece you need to form a loop.
IMPORTANT: There should be pieces of rope of the same length on the sides of the loop.
- Next, the rope is applied to the ball so that the loop is at the top and the ends are located on the sides. The rope needs to be secured with glue.
The rope needs to be attached to the toy like this
- Then take the second piece of rope. An ordinary nodule is formed from it , but it does not tighten. This knot must be put on the loop and secured . The ends of the rope also need to be placed on the sides of the toy.
Attaching the second rope to the light bulb
- base is covered with paint.
Painting the top of a light bulb
- The ends of the ropes located at the base should be tied with an elastic band.
Tying strings on a light bulb with an elastic band
- Now all that remains is to pull out the ends of the ropes and secure them in the lid.
By the way, you can put passengers in the lids of toys
Light bulbs make such elegant balloons
Original ideas for decor
If you want to learn how to make a light bulb craft with your own hands and surprise your child, then the option with funny bees will help you. To do this, you do not need to disassemble the lamp; the bulb is used together with the base, which is painted black.
The glass is painted with yellow and black stripes and will represent the abdomen of an insect. To keep the lines straight, use thin rubber bands. You can make antennae out of paper by first twisting the tip at the top. You can also use paper or a loop of thick rope as wings. Small eyes are also glued to the base.
Paint the flask or cover it with colored paper, and attach a homemade basket to the bottom to create an original balloon. The entire structure is hung from the base or on the tree as a decoration.
By covering the flask with glue and attaching glitter on top, you will create snowman figures. Of course, you will need to glue on hands made from light twigs, as well as beads in the form of buttons.
The figurine is used as a Christmas tree decoration. And if you paint the flask black and white, you will get an original penguin for the New Year tree.
- What does a sword mean to a man?
- A variety of engraver attachments for every taste and color
- A still life with roses will delight you longer than fresh flowers
Ideas and instructions for making crafts vary widely. With their help, you can decorate both the New Year tree and the entire room. A solution of water and glycerin in a ratio of 7:3 with glitter diluted in it is poured into the flask. You will get a funny snow globe. After shaking, its sparkles will fly around the flask in an original way.
Creative and interesting crafts from light bulbs can be made without much effort. Children are also involved in making the product. Original decorations for the Christmas tree will be provided. Crafts can decorate a room and can even be used in the kitchen.
How to make a snowman out of a light bulb: description, photo
To create a snowman from a light bulb you need a frosted light bulb, threads, fabric, acrylic paints, glue
IMPORTANT: You don’t need a lot of fabric – 15 cm is enough.
Operating procedure:
- are cut out of fabric .
These are the triangles needed for a light bulb snowman
- is constructed along their lower edge . It is done simply - the threads are removed from the bottom of the triangle.
Light bulb snowman hat fringe
- Next, the triangles are sewn together in the form of caps and decorated.
Beads, pompoms, rhinestones and even braids are suitable as decor for snowman caps.
- Now you need to make carrot noses , and it is advisable to apply dashes with acrylic paint.
- All that remains is to glue the caps and noses to the light bulbs and use paint to depict the faces.
IMPORTANT: You also need to remember about the loops with which the snowman will be hung on the Christmas tree.
You get such cute light bulb snowmen. You can make snowmen from light bulbs not hats, but scarves
Another example of a snowman made from a lamp made from scrap materials. Personalized snowman lamps
Designer crafts for interior decoration
Beautiful crafts from old light bulbs can be used to enrich the interior and design composition, decorating your home with such products:
- a vase for a bouquet, such vases can be placed on a festive table or used to decorate a garden;
- a perpetual terrarium with small plants and succulents, suitable for a window sill, living room or study;
- An unusual lamp or lamp shade will provide beautiful lighting and complement the high-tech or modernist interior of the room.
It is important to remember that the base cannot be removed from every light bulb, so you will have to prepare several burnt out lamps and use them in different crafts.
We recommend reading:
- Crafts from scrap materials - the most beautiful and interesting crafts from scrap materials (105 photos)
- Hedgehog craft: master class on how to make a hedgehog craft with your own hands (140 photos and videos)
- Crafts from seeds - step-by-step instructions on how to make cool crafts from seeds (125 photos)
How to make a penguin out of a light bulb: description, photo
To create a penguin you need:
- Bulb
- Clay designed specifically for modeling. The fact is that such material can dry out and harden on its own after some time.
- Acrylic paints
- Cardboard
The operating procedure is as follows:
- A foundation is formed from clay , onto which the light bulb should be attached.
This is how the light bulb is attached to the foundation
- A circle with a hole is cut out of cardboard - through it the cardboard is put on the base.
Cardboard is placed on the base of a light bulb
- Then you need to prime with acrylic paint.
IMPORTANT: Everything is primed - both the light bulb itself and the clay, base, cardboard circle.
Light bulb penguin primer
- Next, the cardboard circle on both sides and are completely covered with paint .
Coloring a light bulb penguin hat
- All that remains is to paint the rest of the light bulb - to depict a penguin’s tailcoat, cover the tummy and muzzle with white paint again, and outline the eyes with a beak.
- The base can be decorated with snow motifs.
This is how a penguin can turn out from a light bulb
A little for the base
It is worth focusing on the base. If painting the glass part of a light bulb costs nothing, then the decoration of the base is not a simple thing, it’s ugly, it’s made of steel, it stands out from the overall picture and spoils all the charm of the craft, revealing that an old light bulb is hiding under the Christmas tree decoration. Remember the base, decorate them with hats, braids, cotton wool and bows, depending on the design of the toy itself.
Options for decorating a light bulb can be very diverse, simple and crazy, bright, shiny, voluminous, decorated with bows and felt hats, with the addition of salt dough, sparkles, beads, and paints. Don't be afraid to get creative by inventing new characters to decorate your forest guest.
How to make Santa Claus out of a light bulb: description, photo
Even novice crafters can make Santa Claus out of a light bulb. To do this you need:
- Use a marker the character's face on the light bulb.
- Paint the face , and the rest of the light bulb with white
- Using acrylic paint in black and pink colors, the face is drawn in more detail.
IMPORTANT: You need to paint the base of the light bulb with red paint - this will be the header.
- The top of the cap is decorated with a pompom and a loop. An ordinary piece of cotton wool can serve as a pompom.
This is how Santa Claus is created from a light bulb. Santa Claus can also be made from a light bulb to make a real hat.
Christmas decorations
This is the very first way to use old light bulbs. There are several variations on this theme:
- Funny little rabbit. Paint the surface a light color. Draw a funny face with eyes, nose and antennae. Draw a carrot along the bottom and legs. From a soft white or other color fabric, cut out 2 ears - make them double, sew along the edge, then turn them inside out. Fix with glue to the top part, preferably to the cartridge. To fix the loop, you need to make a hole through the cartridge and thread a beautiful ribbon.
- They also make gnomes in funny hats, which are placed directly on the patron or Santa Claus.
How to make a Snow Maiden from a light bulb: description, photo
The Snow Maiden can be created like Santa Claus from the previous master class.
Or you can paint the light bulb more artistically:
- For example, according to the following sketch:
Sketch of the Snow Maiden and Santa Claus for creating toys from light bulbs
- You can prepare a sketch on thin paper , and then transfer it to a pre-primed light bulb .
- Next comes the most artistic part of the work - coloring.
IMPORTANT: It is best, as in previous cases, to use acrylic paints.
Coloring the Snow Maiden light bulb
This is how you can color the Snow Maiden-lightbulb
You can glue a little cotton wool to the Snow Maiden’s hat - this is fur
The sophistication of decoupage: master class on decoupage of an old light bulb
Of course, the painted faces are too simple and lack some kind of sophisticated work. The decoupage technique will be just right. An exquisite, beautiful Christmas tree toy will be made from simple New Year's napkins and will not require such artistic skills as drawing characters. Simple, quick and very beautiful, especially if you add a little sparkle. Here is a short master class on decoupage:
- Prepare the light bulb for changing it, wipe it with alcohol, this will degrease it and remove dirt. Get some primer and prime the light bulb with a thin layer using a piece of foam rubber.
- After the primer has dried, paint the future toy white with acrylic, although the choice of color is yours, it all depends on your idea. While the acrylic is drying, choose a suitable New Year's motif, a napkin is just right.
- After cutting out the desired piece, use decoupage glue to glue a piece of napkin onto the dried light bulb. If extra wrinkles appear, you can go over the dried bulb with sandpaper.
- The toy already looks festive, but this is not enough, there is not enough background decor. Using a sponge, add a little blue tint to the toy at the bottom and top. Glitter will add a festive touch to the toy; you can use it to outline a picture, an inscription, or draw a snowflake. A pair of large snowflakes and small dots near the base will not harm the toy.
- Secure your piece with glossy acrylic and add a thread. If desired, the base can be masked with an acrylic outline, depicting icicles.
How to make flowers, a bouquet from a light bulb: description, photo
This original bouquet is a selection of flowers in a vacuum. It is noteworthy that with each shake the flowers change their position, which means that the bouquet can look different.
Creating such a miracle is simple:
- To begin with, you just need to fill the light bulb almost completely with distilled water.
- Then glycerin and flowers are added.
- screw the light bulb socket tightly - and the bouquet is ready!
Several options for unique bouquets in a lamp:
A wonderful bouquet in a light bulb in delicate pastel shades. Soft yellow and white tones of bouquets in lamps.
A little spring at any time of the year thanks to a bouquet-lamp. A bouquet in a lamp can be contrasting. A stunning turquoise-colored bouquet in a lamp.
How to make a Christmas tree out of a light bulb: description, photo
To create such a craft you need:
- Bulb
- CD
- Paper
- Scissors, glue
- Star, beads
- Threads
IMPORTANT: It is preferable to use wool threads.
Operating procedure:
- You need to to the widest part . It is preferable to use a special glue gun.
- Next, the same thread needs to be wound in a spiral until you can wrap the entire light bulb. Periodically, the light bulb will have to be flavored with glue.
- While the workpiece is drying , roll it out of paper .
- The roll is inserted into the hole of the disk.
- Next, the roll needs to be cut so that it consists of four parts - they will serve as a stand.
IMPORTANT: The whole part, located on the other side of the disk, will serve as a stump for the Christmas tree.
- placing the Christmas tree on this stump , gluing it.
- All that remains is to decorate the tree.
Christmas tree made from a light bulb
Candle from a lamp
It's easy to make a candle from a burnt out lamp. All you need to do is drill the base, then remove all the insides, place a cotton wick inside, and then fill everything with oil. Just 10 minutes of painstaking work and you have a wonderful candle.
You can also make a paraffin candle. The light bulb needs to be drilled, then the wick must be inserted and paraffin poured in. After the paraffin has hardened, the light bulb is carefully broken and a paraffin candle is obtained.
There are a lot of ideas for creating crafts from light bulbs, just use your imagination and you can create a lot of exciting things with your child. The main thing is not to forget the simple rule - you can’t let kids play with crafts.
How to make a craft with twine out of a light bulb: description, photo
The simplest option is to wrap twine around a light bulb according to the principle described in the previous master class. There is no need to leave gaps. You can attach a twig or a paper tube to create a pear craft.
Pear made from a light bulb and string You can attach leaves to these pears made from light bulbs and string
Terrarium
A cute craft made from a burnt out lamp, a souvenir - a terrarium. Yes, some will say that the craft is completely useless, but still it is quite cute and will complement the interior.
We recommend reading:
Crafts made from epoxy resin - stylish, original and beautiful products and decorations made from epoxy (110 photos)- Crafts from seeds: step-by-step instructions and tips for choosing the most beautiful ideas for crafts
Crafts from airy plasticine - ideas for creating beautiful crafts, the main steps and a description of how to make a craft correctly (100 photos)
Numerous photos of crafts made from light bulbs confirm this - it seems like a cute little thing, created with your own hands, but how perfectly it fits into the interior of a particular room.
The terrarium can be filled with moss, pebbles, toys, cute twigs, shells - whatever you want.
The terrarium is installed on a structure made of wire or on any other stand. The wire should be made of copper, thick - it is flexible and will fit perfectly with the lamp.
How to make a vase from a light bulb: description, photo
Flowers can be placed in the lamp not only completely, but also so that only the stem is inside. The creation algorithm is simple: you just need to pour water , and then place a flower.
But options for stands for a vase ! For example:
- Wire , one end of which is wrapped around the base, and the stand itself is formed from the second
IMPORTANT: The wire chosen for this purpose is thick.
- A chain on which the vase can be hung. In this case, it is necessary to drill holes in the base
- Twine , which should be wrapped around the base or threaded through the hole made there
- An old unnecessary stand that can probably be found on any mezzanine
- Polymer clay or other material onto which the vase can simply be stuck
Wire stand for a vase-lamp. Vase-light on a string. Vase-light on an old stand.
The light bulb vase can be simply placed on the table. if possible to glue it
Advantages of a lamp masterpiece
There are many advantages of toys made from waste materials:
- You give life to burnt out light bulbs. And believe me, very bright and long-lasting.
- The toys you create together with your children will bring a lot of new emotions and impressions.
- If you are excellent at drawing, creating Christmas tree decorations can become not only your hobby, but also your business.
- This will significantly save your budget. Nowadays they mostly use plastic toys. It's cheap and lasts forever. Glass, chic variations are very expensive. And here you kill two birds with one stone: you don’t throw away the glass, and you create masterpieces no worse than factory ones.
How to make a rooster out of a light bulb: description, photo
The procedure for making a rooster from a light bulb is as follows:
- First of all, you need to degrease the light bulb, otherwise the paint may not adhere well to it. Nail polish remover is perfect for this purpose.
- Then you can paint the light bulb with white acrylic paint and let it dry.
IMPORTANT: It is advisable to apply two coats of paint.
- Now you need to paint the cockerel with yellow paint . Here, too, it’s worth creating two layers.
- Now you can sketch out the outlines of the cockerel. To begin with, it is preferable to use a regular simple pencil, and then you can move on to a thin layer of black paint.
- Be sure to coat the workpiece with varnish.
- Since it is preferable to decorate the base, it is worth making, for example, a comb or a New Year's hat. For example, plasticine may be suitable.
- You need to insert a loop into the cap or comb .
IMPORTANT: If you want to paint a hat or comb, you should first coat the plasticine with flour - this way the paint will stick better.
- The cap or comb also needs to be varnished.
This is how you get a cockerel from a light bulb
How to make a terrarium from a light bulb: description, photo
A terrarium made from a light bulb is, at first glance, a masterly work, but it’s not difficult to do:
- After freeing the light bulb from its insides, it must be filled with sand and gravel. If you want to choose gravel, then you need to select the smallest one. Pebbles are also useful for drainage.
- Next, the sand is washed and dried in the oven - this is worth doing for disinfection.
- Now a funnel is made from the paper, through which the filler should fall into the light bulb.
IMPORTANT: Pebbles come first, and then everything else.
- The soil must be laid carefully. Tweezers will help in this matter.
- Then, using the same tweezers, you can lay out moss, bark, and some plants. Plants should in any case be unpretentious - for example, tillandsia is suitable.
- If you want to add a little water rainwater or filtered water will do
- decorate the terrarium with beads, small figures, etc.
- Next you need to attach the base back.
IMPORTANT: It is important to protect the terrarium from direct sunlight and darkness.
Even the simplest terrarium in a light bulb looks amazing
A terrarium can also be bright. Inside a light bulb terrarium there can be some small toy. You can creatively design a stand for a light bulb terrarium. A light bulb terrarium in a marine style
It is better to choose small sand for a light bulb terrarium. Cones and bark are an excellent setting for a light bulb terrarium.
Florarium
Of course, a lush bouquet of cut flowers will decorate any room. But even with the use of special means, it will not live long. Unusual florariums can be an excellent alternative:
- Place a small amount of soil inside the flask. You can also add small pieces of bark and sand. Using tweezers, carefully place them inside the future florarium.
- Use a syringe to water the prepared soil. This way you will avoid splashing.
- Take the tweezers again and place the plant in the soil.
Reference. If you don't have the time or desire to care for a living plant, you can take an artificial composition instead.
How to make a minion out of a light bulb: description, photo
You can create such a toy as follows:
- First, the light bulb is degreased
- Then you need to prime it with white paint.
- Next comes yellow. You can apply it with a regular sponge. It is preferable to create two layers
- Next, the eyes
IMPORTANT: It is recommended not to leave a gap for the eyes when painting with yellow paint, but to paint the eyes in a separate step.
- Now the glasses and mouth are drawn.
- As for the overalls draw that too . Or you can cut out a pattern from paper, try it on felt , and then cut out the blank from felt. The suit is glued with glue.
- If you need to create a hairstyle , you can use ordinary woolen threads.
Light bulb mionion
Openwork joy
If you are good with a ball of thread and a crochet hook, then the idea of decorating light bulbs with lace will not be difficult for you. You can simply crochet them and get a wonderful toy in a hurry. Toys can be diversified with different thread colors, add beads, borders, whatever your imagination suggests.
By the way, with woolen threads you can tie a light bulb tightly, with a pattern or giving it the shape of a strawberry, for example, or a small mushroom.
How to make a snow globe from a light bulb: description, photo
For such a craft you need:
- Lamp
- The jar in which the cream was previously stored
- Styrofoam
- cotton wool
- Acrylic paints or gouache
- Brushes
- Glue
- Glass cutter
- A few small twigs
- Decor
Operating procedure:
- First you need to get rid of the base.
IMPORTANT: For this purpose, use a glass cutter, thick gloves or the services of a special workshop.
- Next, the branches are painted with white acrylic paint.
- While the snow effect on the branches dries, the jar needs to be filled with cotton wool.
- Now the branches need to be stuck into the cotton wool. It is preferable to pour a small amount of PVA onto the cotton wool - it will attach the branches and leave the cotton airy.
This is what twigs should look like in cotton wool for a light bulb ball - like in snow
- Before the glue has had time to dry, it’s worth crumbling some foam plastic.
- Next comes the most interesting part of the work - decor !
- After all the items of interest are placed in the blank, you can cover it with a light bulb.
IMPORTANT: You need to cover it carefully - nothing should be damaged, and nothing should be caught with sharp edges.
- It is advisable to attach the light bulb with super glue.
- Now all that remains is to decorate the base of the ball - and the craft is ready!
The ball from the light bulb ends up looking like this
Simply brilliant: Christmas tree decorations made from old light bulbs
Maximum effect and minimum effort? Of course you can! Having painted the light bulbs in different colors or covered them with glue, sprinkle dry sparkles on the light bulb - it’s a piece of cake; you can decorate them afterwards with ribbons, rhinestones, and more sparkles. This toy cannot be distinguished from a simple Christmas tree toy from the supermarket.
More Photo Ideas:
What kind of craft can be made from spiral, energy-saving, LED light bulbs?
These bulbs make excellent shiny decorations, all you need to make is:
- Light bulbs
- PVA glue
- Sequins
- Cords, tapes
The operating procedure is very simple:
- Light bulbs are coated with glue
Light bulbs need to be covered with glue
- Next, you can start sprinkling the craft with glitter.
IMPORTANT: It is preferable that sparkles and glitter be dry.
Sprinkling glitter on a light bulb
- In order for the light bulb to be covered with sparkles on all sides, you need to twist it in them
Covering a light bulb with glitter
- Next, the workpieces need to be left to dry.
- All that remains is to attach the bow and cord
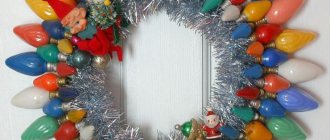
These beautiful balls can be made from spiral, energy-saving, LED light bulbs. If you have a lot of similar light bulbs, you can glue them to the base for a Christmas wreath
Cute winter ball
Everyone is well aware of the transparent balls with sparkles or snowflakes that smoothly fall when shaken in liquid, reminiscent of real winter snow. Such an original gift can be made either for yourself or as a small present for the New Year holidays. It's quite simple:
- You need to cut or carefully twist the cartridge.
- Mix water with glycerin. The proportion can be any - it all depends on what effect you want to get as a result. If you want sparkles or improvised snow to fall to the bottom and rise when shaken, then you need to take 4 parts water and 1 part glycerin. If the glycerol concentration is exceeded, the particles will remain in the liquid layer.
- Fill a container with this mixture. Secure the metal part in place. And arrange a suitable stand.
Such New Year crafts made from light bulbs will not leave anyone indifferent.
What craft can be made from small light bulbs?
If you have accumulated a lot of small light bulbs that were used, for example, in garlands, you can use them in the following ways:
Small light bulbs can be placed in large ones, and also glued to branches - you get original trees. Small light bulbs can be simply painted and placed in a large lamp as an unusual decorative element
We are accustomed to considering burnt out light bulbs to be useless and not very aesthetically pleasing. However, even such a nondescript object can be transformed beyond recognition!
Stylish candle
If you fill the container with liquid oil and fix a sufficiently thick rag wick or, even better, a rope wick in the drilled hole in the cartridge, you will be able to make a candle quickly enough.
It is only recommended in this case to take all precautions so as not to inadvertently violate fire safety precautions. To do this, you need to securely fasten the light bulb to the base to prevent it from falling over and oil spilling out.
Such gizmos can be quickly made without putting in too much effort and without spending additional funds. And the result, as a rule, comes out very cute and elegant. All that is needed is to implement the work carefully.