Plasticine is a universal material for children's and adult creativity and the development of older children. You can use it not only to create crafts in a kindergarten or club, but also gifts for family and friends, and real sculptural masterpieces. A little imagination and patience, and a small shapeless piece of plasticine will turn into a cute animal, flower or other figure.
Plasticine is used in art therapy, sculpture and early childhood development techniques. Modeling is incredibly useful for kids, as they:
- develop the child’s fine motor skills;
- stimulate the baby’s imagination and imagination;
- improve hand coordination;
- prepare the hand for writing;
- contribute to the activation of creative thinking and creativity.
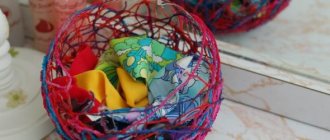
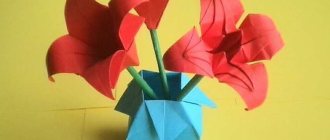
You can also use this material to make small surprises for your family and friends with your own hands. For example, one of the options for a plasticine gift is a vase for real or artificial flowers.
In kindergarten, classes such as plasticine painting are held, this is when plasticine is used to make pictures and panels on paper and glass - from there you can borrow the technique of creating a beautiful vase from a jar and plasticine. And what wonderful decorations you can make from scrap materials! You can cover a jar or bottle with plasticine and decorate it with beautiful leaves, dried flowers, grains and cereals, shells and pebbles; you can even make wonderful decorations for such a vase from buttons or dry pasta. A vase decorated in this way looks very unusual, and even if the young decorator didn’t get exactly what he wanted... or not at all what he wanted, the presentation of such creativity usually goes off with a bang.
There are several options for master classes on how to make a plasticine vase with a child in stages. They involve both the use of only ordinary children's plasticine and the use of improvised means - shells, a plastic or glass jar for the base, beads or leaves.
A little history
The first vases served as vessels for liquid and bulk products. They were made from clay. The finished vase was dried in the sun or fired in a kiln to give the material more strength. As objects of art, these vessels were used to decorate tombs; even then, craftsmen applied various ornaments to Greek amphorae.
First of all, such vases were decorated with historical paintings depicting various important events. By conducting excavations and finding such objects of art, archaeologists can judge entire eras.
Striped plasticine vase
Another option for a plasticine toy is a striped vessel. It can be used in a doll's house, but if you make the vase large enough and use cardboard for the bottom, it will work as a pen and pencil holder.
You need to choose plasticine of four colors: blue, lilac, yellow and red. The material is kneaded and rolled into thin pieces of different lengths. The parts are divided in half. A ring is made from one half, connecting the ends of the blue strip. A larger diameter blank is made from the lilac half. The third part is made of yellow plasticine. The largest ring is made of red material. Four more similar rings are prepared in a similar way.
Master class on creating a vase from plasticine sausages
Another option is to make your own vase and decorate the glass base, decorating the jar with multi-colored plasticine sausages. They can be attached evenly horizontally or vertically, making a striped rainbow vase. You can decorate with small waves, which can be made ribbed using a regular dinner fork.
There are many master classes. For example, such a product can be made multi-colored, single-colored or striped. For example, make your product in a marine style, decorating a jar with blue, white and red stripes.
In order for the plasticine to last for a long time, it is necessary to attach it evenly and firmly to the surface of the jar. To create a vase from a bottle and plasticine, finger movements must be strong and uniform, and the edges of the sausage must be thoroughly smeared.
How to choose plasticine for creativity in a group of children?
To sculpt crafts, it is better to choose high-quality, soft material. It is perfect for decorating glass or creating a separate vase.
It is worth buying classic children's plasticine, which does not have an acidic color or a fruity smell . also not recommended to take too cheap plasticine . It can dry out quickly, turning to stone.
Play dough or super soft material for kids will not be suitable for such crafts either . These materials have a different composition, they dry quickly, shrink, and do not stick to the glass.
Before starting work, it is better to store your material in a warm place. If the pieces are too hard, first knead them with your hands, dividing the piece into several parts. And then they form flagella or sausages.
Decoration for a doll's house
Even kids can make the simplest vase for dolls. To do this, you need to form two balls of different diameters from plasticine and connect them together. The joint is carefully smoothed with your fingers.
Using a pencil, you need to make a hole in the body of the vessel. Next you need to form the neck using your hands. Having made the base, you can move on to the design of the vase. Just show your imagination!
The finished vase will be an excellent decoration for a dollhouse.
How to make a vase from plasticine: classic model
Let's start with the standard option. To perform this work, we will need plasticine and a tube, which, if desired, can be replaced with a regular pencil. You can choose a variety of colors, depending on what idea you will bring to life.
- First of all, let's start making the base of our product - the body. To do this, you need to take a block of plasticine of your chosen color and make a couple of balls of different diameters from it.
- Now we connect the resulting parts so that the transition point from one to another is invisible.
- Next, we form a hole inside the future body, into which we place the tube. We model the neck and margins around the hole from plasticine, making them as wide as possible.
- Having finished making the base of our vase, you can start decorating. To do this, we create a wide variety of decorations from plasticine of different colors - from simple circles to complex ornaments and plants. In addition, using the sharp edge of the stick, you can complement the pattern with neat lines and curves.
How to make a vase from a plastic bottle
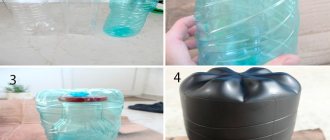
Vases can be made from plastic bottles: take standard or large five-liter ones. Any size and shape will do. For the simplest option, you only need a bottle, scissors and a utility knife:
Openwork
The openwork vase is unusual and original. For this craft from plastic bottles you will need:
- empty plastic bottle;
- marker;
- dye;
- a nail on a wooden base or a regular metal one.
To create an openwork vase, use the following step-by-step instructions:
- Cut off the neck of the bottle and use a marker to apply the pattern you want. It is not necessary to make only round holes - chaotic ones look no less beautiful and unique.
- Heat up a nail or soldering iron and make holes according to the picture. The main thing is not to connect the holes so that you don’t get large holes.
- Paint the vase with spray can or stained glass paints.
- Pour water and place the flowers - the vase is ready.
Floor
A simple, but at the same time very original version of a floor vase made of plastic bottles and a glass jar will fit perfectly into the interior. The height of the finished product is about 95 cm. This item is easy to wash, because the hand can easily pass inside. Here's what you'll need to make a vase like this:
- napkins, toilet paper;
- PVA glue, tape;
- 14 plastic milk bottles;
- 3 liter jar.
Having collected all these simple materials, proceed to making the vase itself:
- Secure the bottles in pairs with tape - 12 bottles bottom to bottom, and 2 bottles with their necks.
- Connect with tape - place a pair connected by the necks in the center, and place the remaining 6 pairs in a circle.
- Place a 3-liter jar on top and secure it to the base with tape.
- Next, decorate the vase using the papier-mâché technique - make the first layer from napkins and undiluted PVA, and the second from toilet paper with the same glue, only half diluted with water.
- Leave the product to dry and cover any unevenness with napkins.
- Use a glue gun to make a pattern, and use it to glue flowers or other accessories.
- Using a stencil, napkin and putty, apply an additional pattern.
- After applying the putty, remove the napkin immediately.
- Dry for 1-2 hours.
- Go over the pattern with sandpaper.
- Spray paint everything.
Small vases
To make small vases, you will need plastic bottles and a few more materials and tools:
- scissors;
- stationery knife;
- tape or glue.
The instructions for making such vases are very simple:
- Wash the bottles, cut off the necks and cut the top into petals.
- Bend the petals outward and attach them to the bottle itself using glue or tape.
- Paint the finished vases with any colors, complement the decor with beads, seed beads or other accessories. You can make holes at the bottom for water to flow out, but then you will need a stand.
Presentation “This Amazing Plasticine”
#1st grade #Labor #School education #Project activity #Presentation
This amazing plasticine. The work was carried out by Sofia Yurchenkova, a 1st grade student at the Aksyonovskaya Secondary School. 2022
Project goals: To study the history of the appearance of plasticine. Get acquainted with the composition of plasticine and types of plasticine. Learn about the meaning of plasticine. Make plasticine with your own hands.
The history of the appearance of plasticine. The first plasticine appeared in England 138 years ago. It consisted of clay, salt and petroleum jelly. Industrial production began in 1900 in Germany.
Types of plasticine Domestic plasticine. (Classic and wax) Foreign plasticine. Ball. Plastic clay. Plastic sand. Floating plasticine. Salty dough.
Edible plasticine Salty and sweet plasticine are produced for kids. In the confectionery industry, mastic is used to decorate cakes.
Composition of plasticine. Domestic plasticine. (Wax and classic) Foreign plasticine. Edible plasticine. Paraffin, chalk, dyes, petroleum jelly, rubber, fats, polyethylene, wax. Vegetable dyes, starch. Flour, vegetable oils, salt.
Types of work with plasticine. Modeling of figures. Connecting parts when working with natural materials. Application. Application to glass. Sculptures. Creation of cartoons.
The meaning of plasticine
Develops fine motor skills, attention, imagination, speech, artistic taste. Instills perseverance, accuracy, promotes memorization and color recognition
Relieves stress, calms.
My research. 10 students were interviewed. They like to work with plasticine 8. 2 students do not like this activity. Out of 7 adults, 5 loved to sculpt (from clay or plasticine) as children.
My art.
DIY plasticine. My plasticine Recipe for making plasticine at home. 1 glass of warm water. 1 tablespoon of vegetable oil. ½ cup salt. Food coloring. 1 cup flour.
Conclusions. Plasticine was invented 138 years ago. I learned the composition of plasticine, types of plasticine. Many people like to work with plasticine and clay. You can perform various works from plasticine. Working with plasticine is very useful.
Used Books. %82%D0%BE%D1%80%D0%B8%D1%8F+%D0%BF%D0%BB%D0%B0%D1%81%D1%82%D0%B8%D0%BB%D0%B8 %D0%BD%D0%B0&gs_l=psy-ab.1.1.0l2j0i22i30l8.3315.15846..17483…1.0..4.429.6687.2-16j3j4……0….1..gws-wiz…..6..0i71j35i39j0i131j0i67j0i 20i263.8rKzkvTaf1M https://www.google.com/webhp?hl=ru&sa=X&ved=0ahUKEwjrsrW8mePeAhVCfywKHWBxAkoQPAgH https://www.google.com/search?source=hp&ei=Huf0W7H
Useful activities
Modeling is one of the types of fine art. It is based on giving plastic materials various shapes and creating compositions. This type of creativity is one of the most tactile, because in the process of work you need to touch the material. Such contact develops fine motor skills of the hands, which contributes to the development of speech. This happens due to the close location of the speech center of the child’s brain with the center responsible for the coordination of hands and fingers.
A child can create a large number of different images from just one piece of plasticine. At the same time, perseverance is developed, attention and memory are trained. By creating something with his own hands, a child not only realizes his creative potential, but also learns aesthetic thinking - the vision of beauty.
How to make a vase for fruits and flowers from plasticine⋆Children's World
Every home is probably full of old and broken children's toys that you no longer play with. Sometimes you feel like you should throw them away to make room for new toys. But don’t do this, but rather turn on your imagination and roll up your sleeves. Every broken toy can be given a new life with the help of ordinary plasticine. We will look at some combinations of plasticine and old toys today.
Technology for making a plasticine fruit vase
Using plasticine, you can sculpt not only toys, but also make various beautiful vases in which you can hold fruits, sweets and cookies. For example, you can sculpt a vase in the shape of a swan, using part of the toys for the neck and head. For example, coat a plastic ball with plasticine, attach a beak, a neck (you can use a thick electrical wire, pierce a hole in the ball. We will also cover the wire with a layer of plasticine). As a bowl in the swan’s body, we use some kind of plastic container, covering it with plasticine inside and out, and simply mold the rest: wings, tail from one plasticine. Of course, you don’t need to immediately put fruits and cookies there after you fashion a plasticine vase.
How to process the walls of a vase
First it needs to be processed in a special way. When your product is completely ready, carefully sprinkle the vase on all sides with potato starch. Potato starch must be dry. Now let your vase sit for a few days. This is necessary so that the plasticine becomes completely fat-free. After this, the starch must be swept away from the vase. Now take a brush and very carefully coat the entire surface of the vase with PVA glue. After the glue dries, your vase will be covered with a thin continuous film. The next step is to paint the vase with white emulsion paint. It is necessary to paint in several layers to ensure a durable surface. Now use your imagination and choose what colors to paint your product with.
You can paint a vase with Khokhloma painting, decorating the vase with ripe berries, green leaves, ornate curls, beautiful flowers, thick grass. Khokhloma painting, in principle, is not that difficult, and even you can handle its application. To make the painting of your vase more elegant and neat, use the thinnest brush for the job. Use gouache as paint. After you have painted the vase and the paint has dried, coat the product with varnish. That's it, your plasticine vase is completely ready, you can show off your work to your friends.
Making a flower vase
Using plasticine in this way, you can make not only vases for sweets, fruits and cookies, but also vases for flowers. To make it easier, use a small children's bucket or a plastic mayonnaise jar as a base. You will also need half a plastic ball and a bowl. Coat all these items with softened plasticine. And add the top, narrow part of the flower vase. Well, you already know what to do next.
You can safely pour water into a plasticine vase made in this way so that the flowers do not quickly wither.
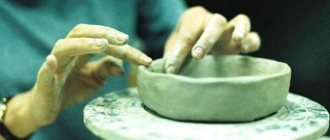
Vase. Vase base
Hello guys! In our last lesson, we got acquainted with the work of enterprises in the porcelain and earthenware industry.
Let's remember that the porcelain and earthenware industry
is a branch of light industry that specializes in the production of porcelain, earthenware and other fine ceramic products.
Faience
- This is one of the varieties of ceramics.
To make earthenware, white clay (kaolin), feldspar and quartz are used. When making soft types of earthenware, chalk is sometimes added.
The process of making faience is quite complex.
Earthenware factories produce a variety of products.
Today we will try to make a vase using earthenware manufacturing technology.
– What will we make such a vase from?
Such a vase can be made from sculptural plasticine or clay.
You and I will use sculptural plasticine
. It has the properties of ordinary plasticine. It holds its shape well, does not stick to your hands, does not leave greasy stains, and does not crack on the folds. You can create small objects from it.
Sculpting clay is most often found in gray, flesh and olive colors.
But to create the shape of our vase we will use a plastic bottle.
Look at the sketch of the vase we will make. It will be decorated with flowers.
So, let's prepare the workplace. First we need sculptural plasticine. A plastic bottle that we will use to create the vase shape. Stack. The board on which we will work with plasticine.
First of all, let’s cut a piece of sculptural plasticine in a stack.
Let's knead the plasticine well on the board.
It is important to know that when preparing plasticine for work, you must not overdo it; if you heat the plasticine too much, the substance that gives the plasticine elasticity will collapse, and the plasticine will become hard and brittle.
Divide the prepared plasticine into four parts so that from three parts we roll out these three strips with which we will cover our bottle, and leave the fourth small piece to later make the bottom.
We begin to fill the surface of the bottle with plasticine. For this we need two previously prepared strips. We wrap a plastic bottle with these strips. At the same time, we try to carefully smear and smooth everything.
Let’s not forget to make the bottom from the piece of plasticine left for this, which we will first roll into a ball and then flatten.
We will also make the neck of the vase from the remaining third strip of plasticine.
After the surface of the bottle is filled with plasticine, you need to trim the edges of the base for the vase with a stack.
Now let's make the preparations for decorating the vase. These are the cores of large and small daisies. We will make them from pieces of pre-softened plasticine, which we first roll into balls and then flatten to form circles of the desired size. We will also form the required number of daisy petals from small pieces of plasticine.
We roll two thin long flagella from small pieces of plasticine, which we then intertwine with each other. Please note that the length of this blank should be such as to completely go around the neck of the vase.
The length of the flagella should be greater than the circumference of the neck of the vase. After all, when twisted, the resulting flagellum will be slightly shorter.
After all the blanks are completed, they must be attached to our base. Then the resulting product must be dried.
Thus, we made the base of the vase. All we have to do is paint it. This can be done with gouache or water-based paint. The vase can also be decorated. Let's get started.
We will need a bowl of flour. Gouache and brushes. PVA glue. A glass of water to rinse brushes.
- Why do we need flour?
Since the vase is made of sculptural plasticine, it must be covered with a thin layer of flour or starch. We will coat our vase with flour using a soft brush. It is important to ensure that the entire surface of the vase is treated.
Now let's prime the vase.
- What does it mean?
Primer
– This is the preparation of a product for painting or other finishing work.
To do this, we will cover the base with a mixture of white gouache and PVA glue. This mixture should have the desired consistency (it should not spread, but it should not be too thick). After this, the workpiece should dry. If there are any unprimed areas left, then you need to cover the vase with the mixture again.
The next step is to paint the vase. First we will apply light colors, and then dark ones.
After painting, our product must be dried.
The last step is to cover the vase with PVA glue. This will make the product and its color more durable.
This is the vase we got.
Your vase can not only be painted, but also decorated, for example, with beads, rhinestones, sequins, and small shells.
Well, that's all, our vase is ready. And now it's time for us to say goodbye. See you in the next lesson, friends!
Technology for making a plasticine fruit vase
Using plasticine, you can sculpt not only toys, but also make various beautiful vases in which you can hold fruits, sweets and cookies. For example, you can sculpt a vase in the shape of a swan, using part of the toys for the neck and head. For example, coat a plastic ball with plasticine, attach a beak, a neck (you can use a thick electrical wire, pierce a hole in the ball. We will also cover the wire with a layer of plasticine). As a bowl in the swan’s body, we use some kind of plastic container, covering it with plasticine inside and out, and simply mold the rest: wings, tail from one plasticine. Of course, you don’t need to immediately put fruits and cookies there after you fashion a plasticine vase.
We make an exquisite craft with step-by-step instructions
In addition to the classic version of making a vase from plasticine, you can make a wonderful souvenir using a bottle. Such a product can act as a wonderful gift, as well as a craft for 4th grade children. The manufacturing process is simple and takes relatively little time. For your convenience, we offer instructions, following which step by step, you will receive a beautiful decoration for your interior.
In the process we will use the following materials:
- Plasticine
- Plastic bottle
- Brushes and paint
- Toothpaste
- We start by clearing the surface of the bottle from the label, washing it and drying it.
- Now that the base of the vase is ready, let's start sculpting. We apply plasticine to the bottle as your imagination requires.
- Next, we are making jewelry, which will be flowers. Using plasticine we create plant petals, stems and cores.
- We fix the resulting parts on the product.
- In order to be able to apply paint to the vase, you need to apply toothpaste over the plasticine and allow it to dry. T
- Now we paint the vase and draw the elements to give the decor the most advantageous look.
The resulting vase can be a creative design solution and add some spice to your home. She will also make a delightful gift, made with all her heart.
You can also use jars as a base for a vase. This product will be more spacious and voluminous. It is done in exactly the same way as when using a bottle - we clean and dry the container. Then we stick layers of plasticine onto the surface of the jar and decorate the top with plasticine flowers. You can also attach beautiful beads that will add originality to your product. Using this technique, you will give your child the opportunity to learn the art of modeling from plasticine, develop fine motor skills and provide hours of exciting work.
Photos of original bottle vases
In addition to the above methods of making and decorating handmade vases, there are many more interesting decorative options.
The design can be applied using a stencil made from ordinary electrical tape, as shown in the photo - you will get a bottle with intricate stripes, both in one direction and in different ones. For children, vases decorated with available bulk materials or pasta, pebbles or shells will be a good practice for fine motor skills. In cases of wrapping with satin ribbons, the option of using rope instead looks very bold. A plasticine vase cannot be called an easy craft, because in this case there is a need to create not only the main one, but also additional small parts. Young children may not be able to cope with such a responsible task on their own. Why responsible? Yes, because, most likely, they will sculpt the vase as a gift to their mother or, or to decorate their loved one. That's why adults should help kids create a beautiful vase from plasticine.
After viewing the modeling lesson below, you will understand that such work will be within the capabilities of schoolchildren. It is better for kids to entrust the choice of shades, kneading the pieces in their hands, rolling out the main ball and additional thin sausages.
To sculpt the vase presented in this lesson, the following were used:
- a set of bright, high-quality plasticine with a fairly dense texture;
- stack;
- match;
- cap from a pen or felt-tip pen.
1. Select high-quality plasticine for work. The bright box itself lifts the children’s spirits and motivates them to accomplish plasticine feats. The stack is present in almost all sets, so there is no need to buy it separately. But still, before buying it is better to look inside.
2. For the main color for sculpting the vase, you can choose absolutely any bright block, for example, red. Roll the elongated piece to resemble a drop.
3. Take a match and stick its head into the sharp part of the drop. Pull the match almost to the base of the vase. This will create the internal cavity of the vessel.
4. The main blank for the vase is ready. Now all that remains is to think about its decoration. To do this, it is better to take some other shade other than red, for example, yellow. First, pull out the thin sausages and attach the rim and base.
5. Next, use the hole in the felt-tip pen cap to apply an arbitrary design, for example, in the form of two rows of round pieces. The child will love this idea of decorating a vase. You can also add yellow dots in parallel.
7. Draw the relief in a stack.
When the plasticine vase is ready, you can freeze it in the refrigerator and play with it: decorate a dollhouse, put paper or bead flowers in it, or give it to your mother or grandmother.
Plasticine frog
Making simple shapes with your own hands is quite simple. Here you need to show your imagination and a little patience. In order to make a frog, it is recommended to prepare several colors of plasticine: green, white, black. A regular toothpick will help you create texture lines.
The process of creating an interesting craft from plasticine is divided into several stages:
- We begin to form the head. To do this you will need a small piece of green. Carefully form a round part using smooth movements;
- Next we move on to the body. Here a piece of larger volume is taken. We place the soft material between the palms and begin to form an oval;
- The legs of a frog consist of long elements. We form sticks of medium thickness from green plasticine. Press one end with your fingers. Use a toothpick to form membranes;
- We carry out the same manipulations with the front legs;
- Let's start designing the muzzle. To do this, take a small piece of white material and give it the shape of a circle. It will help highlight the eye area of the frog. So, we proceed with the next element. The pupils can be made from black plasticine;
- Now we connect all the parts together. We fix the head on the body. We attach the front and hind legs to the frog's body.
We create a multi-colored plasticine vase ourselves in a master class
There is another technique for performing the classic version. Even a child can easily handle such a vase, it’s so simple to make.
- You will need multi-colored plasticine, from each block of which we pinch off a small piece.
- To make it soft and comfortable to sculpt, you need to carefully knead the plasticine in your hands.
- Now let's get to the fun part - making the vase itself. We roll each piece into long sausages so that their size increases depending on the color. The shortest strip will be used as the base and neck.
- We divide each resulting sausage in half and bring its ends together.
- Now we have rings of different diameters. All we have to do is place them on top of each other as their size increases. Then, having reached the maximum ring, we place the same size on it, and then place the parts in descending order of diameter. Attach the smallest ring and the vase is ready
- You can decorate the plasticine toy at your discretion.
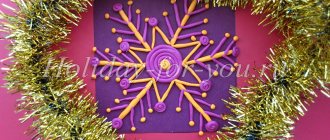
For the holidays:
New Year:
- Star
- Octagonal star
- Classic kusudama
- Kusudama Sakura (Chernova M.V.)
- Garland of balloons
- Christmas balls
- Volumetric paper ball
- How to draw a snowflake
- Volumetric paper lantern
- Lantern pendants
- Paper lanterns
- Garlands of ballerinas and snowflakes
- Felt Christmas decoration
- Learning to draw a Snowman with a letter (Tikhonova N.A.)
- Snowman made from a sock
- Bullfinches on the branches
- Christmas angel
- Christmas stocking
- Learning to draw a New Year's candle (Kurova T.V.)
- Carnival New Year's mask (Goloshumova O.E.)
- Mittens
- How to draw a Christmas tree
- How to draw a fluffy Christmas tree with a pencil or felt-tip pen
- Christmas tree for every day
- Christmas tree on Christmas tree
- Christmas trees made of colored paper
- Christmas tree made of paper
- Making Christmas trees
- DIY Christmas tree
- Volumetric Christmas tree
- Let's make a Christmas tree
- Christmas trees made of strings
- Drawing Christmas trees
- Learning to draw a Christmas tree and Santa Claus (Kurova T.V.)
- Santa Claus (origami)
- Drawing Santa Claus
- Santa Claus from paper-1
- Santa Claus from paper-2
- How to draw Father Frost and Snow Maiden
- Snowflakes-ballerinas
- Volumetric snowflake
- Volumetric paper snowflake
- 3D paper snowflake
- Cutting out snowflakes
- New Year's applique
- Year of the monkey. Draw a monkey
- Do-it-yourself souvenir dog (Kurova T.V.)
- Let's draw a dog - a symbol of the New Year (Fuflygina N.N.)
- Craft “Pig from plastic bottles”
- Drawing the symbol of the year of the pig
- Drawing a pig
- Christmas tree toy “Pig”
Easter:
- Original crafts for Easter
- Crafts for Easter
- Crafts for Easter
- Easter crafts for little ones
- Crafts for Easter from dishes
- Easter crafts from disposable plates
- Making Easter bunnies
- Easter egg (Kneis E.A.)
- Drawing an Easter egg (Sinitsyna I.V.)
- Drawing Easter eggs
- How to draw Easter eggs
- Easter paper bunny
- Drawing the Easter Bunny
- Easter bunny made from plates
- Easter chicken
- Ideas for Easter from plates and napkins
- Easter applique (Sinitsyna I.V.)
Postcards:
- Postcards for February 23
- Greeting card for February 23 (Isaeva A.V.)
- Postcard for daddy (Dulishkovich S.N.)
- Shirt (by February 23)
- Postcards for March 8
- Postcard for March 8 – 1
- Postcard for March 8 – 2
- Postcard “Bouquet of Flowers”
- Postcard for mom – 1
- Postcard for mom – 2
- Cards for mom
- Card using the outline of a child's hand
- Postcard for mommy (Dulishkovich S.N.)
- Making a postcard (mimosa)
- Happy March 8th (Kneis E.A.)
- Butterfly postcard
- Magnet postcard for May 9
- DIY postcards for May 9
- Postcard for May 9th from plasticine
- Plasticine postcard for May 9
- Postcard “Happy Victory Day!”
- Postcard for May 9 – 1
- Postcard for May 9 – 2
- Postcard for May 9 – 3
- Easter cards (chicken) (Sinitsyna I.V.)
- Easter card made from pistachios
- Drawing a New Year's card
- Drawing a New Year's card (Fuflygina N.N.)
- Postcard “Christmas tree” – 1
- Postcard “Christmas tree” – 2
- New Year card “Christmas tree”
- Volumetric postcard “Christmas tree”
- New Year card (origami)
- New Year's card made of paper
- New Year card
- Postcard with a surprise
- Coloring cards for the year of the pig
- Postcard “Doggie”
- The work of an artist in your home. Postcard (Itkim T.V.)
- Invitation to the Birthday
- Postcard for the holiday “Chamomile”
Vase made from a bottle and plasticine. Master Class
Valentina Korobkova
Vase made from a bottle and plasticine. Master Class
Vase made from a bottle and plasticine. Master Class
bottles of Babushkino Lukoshko in my house
(left over from my grandson, it’s a pity to throw it away and I decided to make vases . You can see what we did in the next photo report (if you want to come visit, but now I offer you a master class . For work we will need: a glass bottle from baby juice, plasticine , board for working with plasticine (or oilcloth, napkin.
Take the bottle , remove the label, remove the cap.
Coat the bottle with a thin layer of plasticine of the same color (you can mix different colors)
. We left the ribbed part of the bottle plasticine .
We give the neck the shape of a vase.
Now let’s use our imagination and decorate with elements made of plasticine (you can decorate with cereals: buckwheat, rice, millet, peas, etc.)
. I made a flower, leaves, dots and stripes.
Such a vase will decorate our group, and can be used as a gift for the Eighth of March, Mother's Day, or given to your friends and acquaintances. They will be very pleased!
I will be glad if someone likes my idea!
Master class “Vase of flowers for your beloved mother” 1. For work we will need: plasticine, a board, colored cardboard, a vase template, a pencil, beads. 2. We trace the vase according to the template. 3. Apply.
How to make a cardboard vase with your own hands
For work we stock up:
- cardboard;
- scissors;
- glue;
- paper clips;
- tape;
- coffee beans, nut shells, pistachios (for decoration).
We take any large box, lay it out on the floor or on the table and draw a diagram on it (Fig. 1). Then we cut out the shape and fold the vase out of cardboard, securing the corners with tape. Carefully glue each fold so that the vase does not fall apart. If necessary, cover the outside of the product with paper, wrapping it inside and securing it with paper clips.
It's time for decoration. Of course, it is difficult to calculate how many decorative elements will be needed to decorate a homemade vase, but in the process of work you will figure it out and, if necessary, buy the missing amount of parts. So, smear each piece with glue and, starting from the bottom of the vase, begin to carefully paste it over. At the same time, try to leave as little empty space between elements as possible. The result should be a vase, as in the picture shown.
Do not forget to process the top part of the product from the inside in the same way. That's it, the vase is ready to decorate your home!
DIY cardboard vase: video
To make a vase with your own hands you will need: 1. Corrugated cardboard; 2. Mass of papier-mâché; 3. Masking tape; 4. Hot glue; 5. Acrylic paints and varnish.
If you have a few hours of free time and a desire to create something beautiful with your own hands, read how to make a simple origami paper vase with your own hands.
In fact, you don’t need anything other than double-sided colored paper and strictly following the instructions! In addition, origami is a great way to develop fine motor skills, imagination and logic.
A simple paper vase is useful for storing office supplies, and you can also put a vessel with water and flowers in it.
So, let's get to work. We take a square of colored paper and bend it diagonally, then unfold it and do the same with the opposite diagonal (see Figures 1-3). Then you need to fold the sheet into a diamond shape and smooth the lines with your fingers, along which we will then bend the part (see Fig. 4-6).
Now we bend the left and right corners, turn the part over and repeat the steps with the remaining corners. After this, we unbend the central corner, lowering it to the middle, and bend the left corner. Then you need to turn the workpiece and repeat the manipulations: bend the corners to the center and along the intended lines. The lowest corner is unfolded and unbent: this is necessary for the stability of the vase.
The procedure can be viewed in more detail in the provided step-by-step diagram with images. Experts say that it is unlikely that you will be able to make a beautiful vase using origami the first time, because the work is painstaking and requires some skills, so it is better to try on unnecessary pieces of paper.
If desired, decorate the vase by applying touches of glue to the surface and filling them with colored semolina, sparkles, rhinestones or beads.
In the next collection of pictures you can see how to make a vase from modules - parts from which a decorative product is then assembled. To make the vase bright, use modules of different colors.
This work is considered more complex and requires experience and thoughtfulness: one wrong step and everything will go down the drain.
Video: how to make 1/32 origami modules. Master class for beginners.
Now we will tell you how to make such an unusual and stylish vase for storing small items. Please note that the product is not intended for food!
Take a plastic bottle of any color and hold it over the fire to bend it: this must be done while the plastic is hot. After cooling, take a soldering iron and randomly drill a large number of holes of the same diameter. That's it, our vase is ready!
You can take an ordinary plastic bottle and sew a case on it from felt or an old sweater. This decor is perfect for decorating a country house interior.
A plastic bottle or box of chips can also be transformed beyond recognition by covering the surface with stones or shells.
The most basic way to decorate a plastic bottle is to wrap it in printed tissue paper or colored tape, and then decorate it with a matching bow.
You can also wrap the bottle with colored threads or rope.
Making a flower vase
Using plasticine in this way, you can make not only vases for sweets, fruits and cookies, but also vases for flowers. To make it easier, use a small children's bucket or a plastic mayonnaise jar as a base. You will also need half a plastic ball and a bowl. Coat all these items with softened plasticine. And add the top, narrow part of the flower vase. Well, you already know what to do next.
You can safely pour water into a plasticine vase made in this way so that the flowers do not quickly wither.
Craft from a jar
On International Women's Day, mothers, grandmothers and sisters always receive cards and flowers. Children from the older group of kindergarten or students in first and second grade can create a vase from plasticine with their own hands. For a product using plasticineography technique, you need to prepare:
- an elongated jar with a smooth surface;
- sandy or light brown plasticine;
- green wool thread;
- cereals;
- stack or toothpick.
Gift for mom
An indispensable attribute of the spring holiday on March 8 are fresh flowers. Of course, it is the privilege of adult men to give such gifts to their female half. But students in grades 1-4 are quite capable of pleasing their mothers with an unusual vase. It can be made using the plasticineography technique. This technique is based on applying plasticine to various hard surfaces. We suggest you make a vase from plasticine and jars. To make a vase you will need:
- Glass jar;
- Plasticine;
- Green wool thread;
- Various cereals (peas, rice);
- Toothpick or sharp stick.
It is best to take an elongated jar for a vase. The plasticine should be soft or should be softened first by placing it in a warm place.
First, the prepared jar needs to be covered with a thin, even layer of plasticine.
Next, use a toothpick to draw the selected pattern on the future vase. In this case, it is a bush with daisies.
Line out the outlines of the branches with thread.
Place the daisies from the cereal. Use peas as the yellow center of the flower, and grains of rice will serve as chamomile petals.
Write “March 8th” on the back of the vase.
A wonderful gift for mom is ready. Such a vase will certainly please her, because it is made with love.
How to process the walls of a vase
First it needs to be processed in a special way. When your product is completely ready, carefully sprinkle the vase on all sides with potato starch. Potato starch must be dry. Now let your vase sit for a few days. This is necessary so that the plasticine becomes completely fat-free. After this, the starch must be swept away from the vase. Now take a brush and very carefully coat the entire surface of the vase with PVA glue. After the glue dries, your vase will be covered with a thin continuous film. The next step is to paint the vase with white emulsion paint. It is necessary to paint in several layers to ensure a durable surface. Now use your imagination and choose what colors to paint your product with.
You can paint a vase with Khokhloma painting, decorating the vase with ripe berries, green leaves, ornate curls, beautiful flowers, thick grass. Khokhloma painting, in principle, is not that difficult, and even you can handle its application. To make the painting of your vase more elegant and neat, use the thinnest brush for the job. Use gouache as paint. After you have painted the vase and the paint has dried, coat the product with varnish. That's it, your plasticine vase is completely ready, you can show off your work to your friends.
Bottle decor
Bottles decorated with plasticine and painting look beautiful. Plasticineography technology is not considered easy, so older children can handle it better. To decorate a bottle with plasticine you need:
- plasticine of any color (you can take used one);
- stack;
- glass bottle with smooth edges;
- toothpaste and brush;
- brushes and gouache;
- hairspray or wood surfaces.
The bottle is completely covered with a thin layer of plasticine. A yellow pancake and thin stripes are attached to the top - the sun of the future landscape. A tree is fashioned from strips of different thicknesses and applied to one side of the bottle. On the other side there will be a Christmas tree - plasticine triangles with fringe made in a stack.
Decor of a plasticine bottle or glass vase, decorated with multi-colored material
To make a vase from a glass jar or bottle you will need:
- packaging of multi-colored plasticine;
- base - jar or bottle;
- decor - beads, stones, threads, etc.
First of all, for the master class you need to prepare a glass base. Clear the bottle of labels, wash it well and dry it dry. Then the surface is covered with a uniform thin layer of plasticine. Then they begin to decorate the vase step by step. You can decorate the product with additional decor, flowers made from plasticine or colored polymer clay.
For example, make a half-opened bud of a scarlet rose or a chamomile. Or attach leaves made from green plasticine and vines. To ensure that the decor sticks well, it is recommended to fix it with a thin layer of toothpaste or varnish.
This product would be an excellent gift for Women's Day, Autumn or Teacher's Day. Plasticine crafts go well with bouquets of lush dry leaves, dead wood or bright autumn flowers.