Features of the material
It is very easy to work with gypsum: just mix it with water, pour it into a prepared mold, or sculpt crafts from plaster with your own hands. But we must take into account that the plaster sets quickly, so add as much solution as can be used within a few minutes.
Gypsum, thanks to the fine powder fraction, is able to accurately reproduce all the details of the form. Easy to process. The dry model is pliable to the cutter and chisels. Large sculptures, decors of columns and portals are cast from it, but it is also quite suitable for small products. Crafts made from plaster for home and garden, toys, panels, souvenirs, decorations - there is room for applying creative energy.
To decorate gypsum products, any paints are used; you just need to know the nuances of preparing the surface for this type of painting. With certain skills, you can even disguise the model as a completely different material.
Gypsum is environmentally friendly, relatively cheap and accessible to everyone.
Unusual shapes
If many people are already tired of standard piggy banks and crafts from a box, then there is always a demand for unusual shapes of products.
Original ideas for creating piggy banks of different shapes include:
- Safe – made of boxes or plaster, it will delight even an adult, especially if it has a lock.
- A house - you can make it out of cardboard, make a slot in the roof for money.
- Owl piggy bank – made of plaster in a special mold.
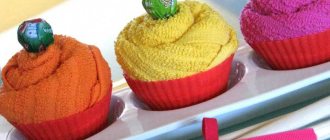
- Cylindrical hat - for work you need a disk and cardboard.
- With a secret - a mirror is placed in a plywood box at an angle, decorative items are mounted under it: when a coin is placed inside, it visually disappears.
Such simple and original ideas will help you create creative piggy banks for any occasion: as a gift or for yourself.
Handmade things always warm you with the warmth of human hands and the soul put into the work.
Useful video
DIY money box
- not only a great idea to save some coins for a childhood dream, but also a wonderful leisure activity for the baby.
Make a piggy bank with your own hands
it can be made from anything, but today we will talk about
their gypsum piggy banks
.
DIY piggy bank made of plaster
- an option that can be implemented with the help of adults, but the process of turning liquid plaster into
a piggy bank with your own hands
will interest any child.
How to paint a hollow plaster blank
The baby can do it on his own!
Sculpt from plaster
not so easy, but if you use our selection of master classes, you will be able to
make a piggy bank with your own hands
not only in the shape of a ball, although a sphere can, if desired, become something interesting, for example, a do-it-
yourself soccer ball piggy bank
.
By the way, limit yourself to a banal piggy bank made of plaster
not necessary either.
Turn a plaster blank
into a kitten, sheep or bear.
Why should
n’t your piggy bank be a lemon, an apple, or a watermelon
made of plaster
with your own hands ?
Flaws
However, with all its advantages, gypsum has a number of disadvantages:
- You need to work very quickly with the prepared solution. Depending on the type of plaster, it hardens in 7 to 30 minutes.
- Repeated stirring, the so-called “remelting”, is impossible.
- Special conditions are required to work with plaster because the process is wet and dusty.
- It is inconvenient to work with gloves, and without them the skin dries out very much.
- Gypsum crafts absorb water well, so they must be varnished. And even a protective coating does not always save you outdoors.
- The products, although rigid, break easily and do not withstand mechanical stress well.
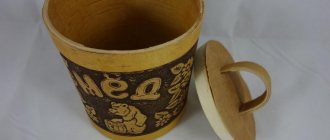
Stone box
If after repairs you still have decorative textured plaster, primer with quartz filler, empty tape reels, do not rush to throw them away, all this can be useful for making a box. First you need to make the base for the box. Materials you will need for this: a reel of adhesive tape, thick cardboard, a simple pencil, scissors, PVA glue.
We outline the outer diameter of the reel with a pencil (in the photo it is indicated by a green dotted line). We carry out this manipulation three times. You will get three identical circles. We will leave one for the bottom of the box. The other two will be useful for the top of the lid of our box. The blue dotted line marks the approximate diameter of the circle, which should be larger than the diameter of the bottom - this is the basis for the lid, the largest circle.
Now we outline the inner diameter to make a circle, which will later be glued to the bottom of the lid. It is needed to ensure that the lid does not slip off the box. And since we will then coat the entire product with plaster, increasing the thickness of the walls, this circle needs to be reduced so that the lid fits freely on the box. The red dotted line shows approximately how much you need to reduce the circumference and cut out the finished part.
All that remains is to work with glue to get the base for the box. In the picture, three identical circles are marked in green, which we received when we traced the outer diameter of the reel - one for the bottom, the other two for the top of the lid. The circle in blue is the one we made when we enlarged the outer diameter of the bobbin to make the base for the lid. In red is a circle that we made by first circling the inner diameter of the reel and then reducing it.
The base for the box is ready. The lid is also glued together - two identical circles are glued on top of the base of the lid one on one for thickness. In the pictures the lid is visible from above and below. In the graphic editor, I showed in color where each circle was pasted.
We coat the base with a special primer containing quartz sand. In this example, the soil is water-soluble, does not smell, and dries quickly. Typically, such soil is sold in special construction stores. They cover walls before applying decorative textured plasters (putties) for better adhesion (adhesion to the surface).
After the soil has dried, decorative plaster can be applied. It usually has the consistency of thick sour cream containing fillers that dry to an uneven, rocky texture. Plaster can be colored by adding special colored tinting pastes, which are sold in hardware stores, or regular acrylic paints. Color pigments from the German brand MIXOL are used in the pictures. The shade was chosen to match the color of the starfish, since that was the original color of the box that was planned.
The plaster is applied with a brush, sequentially, with intermediate drying. First we cover the inside and edges. Then, when dry, apply the mixture to the outer surface and leave to dry upside down. We do the same with the lid - first we process one side, then dry it, then the other.
During the process, it became clear that we needed to add some other shade, to complicate the color of the box. Therefore, color pigments of the same brand were used as before - MIXOL No. 22, this is a brown pigment. It has been added to a clear, semi-gloss waterborne paint that dries to a waterproof film. Construction stores usually sell similar glazing compounds based on acrylic dispersions.
Where to buy plaster for crafts
The easiest way to buy plaster is at a hardware store. In order not to get confused in the variety of its types, you need to be able to read the labeling.
The numbers after the letter “G” indicate compressive and fracture strength and purpose:
- G2...7 – building gypsum (alabaster).
- G13…16 – high-strength molding
- G22…25 – super durable medical
G6...16 is best suited for crafts. Next are the letters indicating the setting time:
- A – quick-hardening, 2 – 15 min.
- B – normal hardening, 6 – 30 min.
- B - slow-hardening, 20 minutes - several hours or days.
Next is the grinding fineness in Arabic or Roman numerals:
- 1 – rough
- 2 – average
- 3 – thin
For example, G-7 A1: gypsum, withstands 70 kgf/cm2, sets quickly, has large particles.
How to Make Cheap, Easy Plaster Molds at Home
Casts, copies, real and replicas.
Casting and mold making are both the subject of specialized artistic and scientific endeavors and the basis of mass production. From fountain heads and amulets to the haunting plaster figures that are now synonymous with this ill-fated city, this month's craft spot is inspired by the use of castings and molds in ancient times to create artifacts.
Casting and mold making can be incredibly complex, but it can also be as simple as brushing with a piece of damp paper pulp or sticking your fingers into a cup filled with silicone. So here I've collected my favorite methods for beginners, all simple, fairly cheap and with a wide range of materials from the craft box, hardware store or specialist suppliers so you can choose what level of effort and experimentation you use. on the. These are not the precise, technical methods you would use for a beautiful lost wax sculpture, but they are quick and easy for beginners of almost any age.
Set everything up to start
You will need:
- A couple of plastic sheets and/or old sheets (whatever you use for messy activities like painting)
- Bucket with water and sponge, as well as a napkin
- Carton boxes
- Painting clothes or apron
- Latex gloves
Silicone cup mold
Silicone cup mold.
Silicone may be the most expensive material listed here, but it's also the easiest to work with: safe on skin, quick to cure, and the molds are very durable, flexible, and capable of casting a variety of different materials.
But here's the first rule. Do not pour the silicone casting into the silicone mold, otherwise it will stick to itself.
materials
- Plastic glasses
- Mixer
- Pinkisil or other two-part silicone mixture (used about $10 for this activity)
- Kitchen scales
- A little clay or plasticine
- A simple object to apply, such as a figurine, a light bulb. Something without holes or porous surfaces.
- Casting material of your choice: wax, crayons, plaster, chocolate
- craft knife
- Insulation tape
Gather your materials.
instructions
STEP 1. Place your item at the base of a disposable cup, in a shallow bed of plasticine or clay. Choose the part that matters less.
Step 1: Place your item in a disposable cup to create a shape.
STEP 2: Mix the silicone thoroughly according to package directions. Pour this into a second cup for additional mixing, as uncured parts may ruin your mold.
STEP 3: Pour the silicone into the cup containing your item and let it dry for 15 minutes.
STEP 3: Pour the silicone into the cup containing your item and let it dry.
STEP 4: Carefully use scissors to release the silicone mold from the plastic cup.
Since we haven't created a technically correct mold by having the proper registration keys for the two pieces, we're going to cheat and cut the piece through the mold in a zigzag direction equal to half to two-thirds of its length. That we can easily remove the impressions without disturbing them.
TIP: You will definitely need a responsible adult for this step.
STEP 5: Place the mold on a flat surface, tape it together, and begin pouring your first cast.
Step 5: Ready, set, toss!
Glove mold with plaster bandages
Bodycasting.
Do you have silicon but want it to last a long time to get maximum value? This technique uses a thin layer of silicon and then makes a support out of plaster casts. This is great for bodycasting small areas such as fingers or feet.
materials
- Plastic glasses
- Stirrers (tongue depressors work really well)
- Pinkisil (or other two-component silicon mixture)
- Kitchen scales
- A paint brush you're ready to ruin
- Plaster casts (or porous fabric for immersion in plaster)
- water
- Your hands/feet or someone else's (even easier!)
Gather your materials.
instructions
STEP 1. Mix a small amount of silicon (about 60 g) according to package instructions. Pour this into a second cup for extra mixing to be safe as uncured bits may ruin your mold. You can always go back and make a second batch if you run out - unless you're using your own hand, in which case doing anything that requires two hands while the silicone is wet is quite a challenge.
Step 1: Mix silicon according to label directions.
STEP 2: Apply your silicon to the surface of your non-dominant hand/fingers as if you were ironing a cake. Continue layering the silicon to achieve an even, thorough coating that is not too brittle or thin. Nails and fingertips will require extra effort as they are prone to blistering and breaking. If there are thin spots after the first coat has cured, reinforce those areas with a little extra silicon.
Step 2: Paint the silicone.
STEP 3: Once the silicon is dry, you can begin applying plaster casts to form a support glove around the silicone mold. Ideally, you want the crystallizer to be able to stand up so that molten liquids can be poured into it. You can also use boxes/cups/newspaper to help with your support structure if needed.
Step 3: Remove dried silicon.
STEP 4. The plaster takes a while to dry as once it starts to harden you may want to disentangle yourself from the mold at some point and leave it on a supported surface as it dries.
Step 4: Apply plaster bandages to support the mold.
Once this is dry you are ready to start pouring the castes.
2-piece plaster mold
This exercise is one of the cheapest methods, but also the most labor-intensive. If you don't choose the right object, use enough lube, you can easily end up with a large piece of plaster stuck to the object.
Csat shell using a two-part plaster mold.
materials
- Vaseline or vegetable oil spray
- Plaster of Paris (about $8/3 kg from hardware stores)
- Clay or plasticine
- Small cardboard box
- A simple small object such as a seashell. The adhesive is not flexible, so choose something that will easily pop out of the mold once it sets.
Gather your materials.
instructions
STEP 1 . Place the object in a cardboard box. Make sure the box is not too big, just big enough for your subject.
Dip your item halfway in plasticine or cheap clay and rub this piece of clay into the base of the box. Make sure there are no cracks or fissures that are not filled with clay where the plaster can grow and end up molding into your object.
Step 1: Place your copy object in the box.
You can use tape around the edges of the box to ensure a seal.
STEP 2: Place some "keys", small indentations, into the clay around the surface of your object using the tip of a brush so that you can create a 2-piece shape interlocking. Vaseline until your clay and your object are very thorough. Plaster will stick to any surface without lubrication (except, of course, plasticine).
Step 3: Create “keys” in your shape by indenting the clay with the end of your brush.
STEP 3 . Pour the mixed plaster into the box. Sit to the side to dry off.
Step 3: Pour the mixed plaster into the box. Sit to the side to dry off.
STEP 4: Tip or tear off the box to remove the plaster mold.
Step 4: Tip or tear off the box to remove the plaster mold.
STEP 5. Let the plaster dry completely. Place the plaster mold in the bottom of the box (if you destroyed your box, rebuild another one to fit) and replace the object.
Step 5: Place the plaster mold in the bottom of the box and replace the item.
STEP 6. Add a clay spout to this side of the object and add more Vaseline to cover the mold and object (if this is not done properly you will end up with a large piece of plaster instead of a mold!). If the underside of the object has holes and complex undercuts, fill it with clay so you have a simple/smooth surface for the mold.
Step 6: Coat the object and sprout with lubricant.
STEP 7: Pour more plaster on top and let it dry completely (this may take a day or so).
Step 7: Pour more plaster on top and let it dry completely.
STEP 8: Cut the box and carefully lift the mold to remove the item. You may have to break off the edge with a tool to open it up first.
STEP 9. Grease the pan again. Place the two sides together and you are ready to start casting.
Cheats using the paper casting method
Paper casting.
materials
- Undyed napkins or handmade paper pulp
- plump brush
- Simple object - eg. plastic mannequin, decorative frame, nameplate, silicone mold
- Water in the tray
Gather your materials.
How to dilute plaster for crafts
Depending on the task, the solution can be of different thicknesses:
- Liquid – 1 kg of gypsum per 0.7 liters of water.
- Normal - 1.5 kg per 1 liter of water.
- Thick – 2 kg per 1 liter of water.
To prepare the solution, you need to take a suitable container. Fill with water first - this will reduce dust. Then slowly add the powder, stirring constantly. It is convenient to mix large quantities with a drill and whisk. There should be no lumps in the solution.
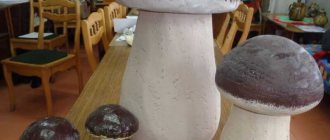
Master class on plaster crafts
If you have no experience working with plaster, then it is better to start simple. For example, for a personal plot, cast an entire family of mushrooms. To do this you will need the following materials and devices:
- Gypsum
- Plastic bottles
- Plate
- Food film
- Acrylic paints
- Varnish
Making a mushroom stem:
- The bottom is cut off from a plastic bottle (perfect for milk). Place the bottle on the table with the lid down.
- First pour in a small portion of a solution of medium consistency.
- To facilitate the construction, foam or cardboard is inserted into the center of the bottle.
- Add plaster.
- After about an hour, when the solution is already solid and very warm, the plastic is cut and carefully torn off along the bias.
Now the hat:
- Take a plate that looks as much like a hemisphere as possible.
- The bottom is covered with cling film
- Pour in the solution.
- As soon as the plaster begins to set, insert the stem of the mushroom into the center of the plate to form a monolith.
- After drying, the product is removed and the film is removed.
Until the model is completely dry, it is very easy and convenient to remove sagging and burrs with a stationery knife or just with your hands. Small defects can be covered with plaster or putty. The dry product sands beautifully.
After a day, having made sure that the mushroom looks good enough, is white in color and rings when you click on it, you can start decorating. First you need to prime it. Construction primers or simply diluted PVA are suitable for this.
It is better to paint in 2-3 layers, because gypsum is very porous, and the paint will still dry out. The finished model is coated with varnish for exterior use.
By selecting bottles and plates of different sizes, you can cast different types of mushrooms.
Step-by-step paper production
The most affordable option for making a piggy bank is to make it from paper. Improvised means can also be used for work.
Cardboard options involve designing a box with a hole on top.
In this master class we will look at making using the papier-mâché technique:
- To work you will need an inflatable ball, a cardboard egg box, newspaper, glue, scissors, a needle, paints and decorative brushes.
- The finished piggy bank will be shaped like a pig, so to create it, inflate the balloon to the required size.
- Begin to cover the ball with finely torn newspapers, first moistening them generously with glue. There should be a total of 3 layers of newsprint to ensure the work is strong.
- Leave a hole on top for coins; the pig's paws will protrude from the cardboard egg cells.
- When the entire ball is covered, leave it to dry completely. After this, take a needle, pierce the ball - it will deflate.
- At the last stage, you need to decorate the pig as desired.
As you can see, the manufacturing technology is so simple that even a child can handle it.
Important! For the last layer, it is better to use not newsprint paper, but tissue paper or one that will give the final smoothness to the product.
The finished piggy bank will decorate the interior of a child’s room well and instill in the child a sense of saving.
Children's creativity
Young children enjoy working with plaster. There are many molds for sand, snow, and baked goods in which you can cast plaster crafts for kindergarten.
The technology is simple enough even for a child:
- The mold is first lubricated with a mixture of liquid soap, vegetable oil and water in a ratio of 2:1:5 to make it easier to remove the finished product.
- Pour in the solution. You can mix it with the addition of any color.
- Use a ruler or spatula to run along the edges of the mold, cutting off excess.
- If you plan to hang the toy, then stick a cocktail straw into the right place.
- If the figurine has two front sides, another identical one is cast, so that later they can be glued together with the back sides.
PVA glue, liquid nails, “Titan”, “Moment” are suitable. The joint area is sanded. If necessary, lubricate. Coloring is limited only by the child's imagination.
DIY piggy bank
Good afternoon, dear needlewomen!
How to save money for a vacation, for a phone, for a computer, for a fur coat? We need to put it off. And where to? To the piggy bank! If you don’t have a piggy bank, this is a good reason to make one yourself!
A DIY piggy bank is a useful investment, and also very budget-friendly. A piggy bank is also a very worthwhile birthday or wedding gift for newlyweds.
How to make a piggy bank with your own hands
Before making a piggy bank, choose a style and shape, think about how to design the piggy bank, what you will save for, perhaps make the inscription “At sea”, “For a fur coat”... Select a suitable container without flaws and dents, check that the lid is tight was closing. Having decided on the container and design, sketch out a sketch of the finished product - how you want it to look, where the decorative materials and inscriptions will be located.
If you make a piggy bank from a shoe box using the decoupage technique, it will be different from the same technique, but on a glass jar. In any case, first prepare the base for coating - clean the box of labels, wash the jar, degrease with alcohol, make holes in the right places.
DIY piggy bank from a glass jar
One of the lightest models of piggy banks. First, choose a beautiful jar, maybe a regular two- or three-liter one. The lid of the jar should be tin; it will be easiest to make a hole in it.
We make a slot for the lid according to the size of the bills or coins that you will store in it.
First, we clean and degrease the jar, and decorate it according to our design. You can leave the jar unpainted and watch how capital accumulates. Another option is to paint the piggy bank with paints. We can paste pictures onto the jar using the decoupage technique, decorate the jar with lace or beads, fabric, and we can knit a cover for the jar with crochet or knitting needles.
DIY cardboard piggy bank
We choose the appropriate cardboard box, perfect for storing shoes. We already had an article on decorating a cardboard box - a casket, but by making a hole in the lid, any box can be turned into a casket.
So, take any shoebox or make your own. First prime the surface with white acrylic paint or PVA glue.
We cut out a hole for money and process the edges. The box can be decorated with fabric, newspapers, cut-out paper bills, leather, velvet, photographs...
We offer a master class on making a piggy bank from cardboard. (master class from TheVovkacom channel)
Cut out the base for the piggy bank from cardboard.
We make holes for the lace.
We collect the box.
We thread the lace into the holes made by the nail.
The box is simple to make and requires little investment in terms of budget and time.
How to make a piggy bank from cardboard video
Piggy bank from a toy
This is a simple and original idea; such a piggy bank from an old toy can be given to a child or teenager, he will save for a phone, a bicycle or a computer. Or for a new toy.
How to make it? Very simple. You need to remove the filler from the body of the toy, insert a plastic jar with a lid into the toy, and make a hole in the lid. We fill the empty spaces with padding polyester and sew up the toy.
Piggy bank from a toy
Piggy bank from a plastic bottle
We will make a piggy bank of a traditional shape from a plastic bottle - this is a pig. (Master class of the Domino Show channel). The bottle cap will serve as a snout.
piggy bank from a plastic bottle
- We clean the surface of the plastic bottle, cut out a strip of fabric the size of this bottle.
- Glue a strip of fabric to the jar.
- Take small lids, for example, from juice - these will be the legs. Place them symmetrically around the piglet’s body so that the piggy bank becomes stable.
- Glue the lids onto the piggy bank.
- Cut out pig ears from cardboard.
- Cut the same ones from fabric.
- Cover the cardboard on both sides with fabric, forming ears.
- We place the ears on the head.
- Don't forget to make black eyes and a slot in the piggy bank.
- This is such a cute piggy bank made from a plastic bottle!
- Also watch the video tutorial on how to make a piggy bank from a plastic bottle with your own hands.
Simple and tasteful
A wonderful gift for women would be a plaster model in the shape of a hand on which you can hang jewelry. To do this, you will need a thick rubber glove - it holds its shape better:
- The bottom is cut off from a five-liter plastic bottle.
- The glove is inserted into the neck with the edges turned outward. The neck is wrapped with an elastic band so that the glove is securely fastened.
- The solution is poured into a hanging glove. Slowly so that the air has time to escape from the fingers.
- After pouring is finished, you need to shake the glove again by sticking your hand into the bottle through the bottom.
- After 1 - 2 hours, the model is removed, the rubber is cut off and cleaned.
- After complete drying, the hand is painted and decorated with decoupage.
- Having glued it to a suitable base, hang the beads, string rings, etc.
With a little practice, you can move on to more complex forms: sculptures, vases, piggy banks. But even without skills, New Year’s crafts from plaster or hearts for Valentine’s Day will be easy to come by. It all depends on the desire and imagination that everyone has.
Piggy bank from a bottle and jar
Since ancient times, people have used jars to store and save money. It is very convenient to pour coins out of the jar; in addition, it is transparent and you can immediately see how many coins have already accumulated.
Note! To make a version from a bottle, both a plastic and a glass bottle are useful.
You should not take a larger container if the product is intended for a child.
It is better to take a liter jar or a 750 milliliter bottle:
| Stage | Job |
| Select the material: take a small glass jar or plastic liter bottle, paints, decor, a knife | For children you can make a pig piggy bank, for adults you can style the jar as a hobby |
| Forming a piggy bank | Paint the jar, draw the necessary patterns, make inscriptions. Paint the bottle pink, glue 2 eyes at the neck, and also fix the pig’s “paws” along the body |
| Hole | For the jar, a regular nylon lid is used, where a slot is made. Cut a hole in the bottle on the back of the pig with a knife. |
| Final stage | Decorate the completed work at your discretion: glue ribbons, rhinestones, buttons |