Craft options for younger students
In autumn, it’s not difficult to find natural materials on the street or in the park and stock up on them for future masterpieces.
Autumn pleases with colorful colors on the trees and in the gardens: green, red, yellow leaves from the tree, chestnuts, Christmas tree cones.
This is a simple and free material for future products, with which children work with great interest and pleasure, making crafts for elementary school.
Crafts for elementary school students don't have to be complicated. Children are just beginning to learn new skills and develop their imagination and creativity.
This type of creative activity allows us to develop aesthetic qualities and creative thinking in younger schoolchildren, and also improves mental development.
We recommend reading:
Crafts from plasticine: the best master class for children at school or kindergarten. 90 photos of the best ideas for creating plasticine figuresFelt crafts - the best patterns and templates. Step-by-step instructions and master class for beginners (130 photo ideas)
- DIY crafts from egg trays - the best step-by-step master class, with description. TOP 100 photos of original ideas for crafts
Decide on ideas in advance and choose beautiful and simple options. It’s better to start with the simplest things: cards, appliques, simple toys and decorations.
The material for production should also be simple: cardboard and paper, glue stick, scissors, pencils and felt-tip pens.
How to make paper rosettes step by step:
And from semi-sockets you can make a very beautiful garland
To decorate your festive interior, you can make different voluminous fruits out of paper. In this master class you can see how to make tangerines or pumpkins, whichever you prefer. Using the same principle, you can make other fruits, for example: a pear or an apple, the main thing is to choose the right colors and make the proportions look like real fruits.
You can take paper in different orange shades. And green for leaves.
The paper needs to be cut into strips 4 cm wide and 18 cm long - 2 pcs, 23 cm - 4 pcs, 28 cm - 4 pcs. You should get 10 strips.
Each strip must be bent in the form of an accordion or fan.
Next, the paired strips must be glued together and closed into a ring.
There should be 5 pieces.
Then you need to glue the middle of each ring.
We collect all the rosettes together with glue.
And as a final touch we glue on the twig and leaves. The tangerines turned out to be a sight for sore eyes.)
Fruits or vegetables can also be prepared in another way.
For example, this children's paper craft “carrot”.
Or "apple".
Flat applications
Flat applications of animal and plant themes made of colored paper. To simplify, you can print the picture on a printer and supplement it with an image of an animal or insect cut out of colored cardboard.
You can add convex elements to flat appliqués by doing the bulk of the work from pieces of paper. This technique is ideal for creating greeting cards.
Volumetric works
Volumetric works surprise with their multi-layeredness and originality. They are performed using origami and other techniques, creating a composition from many individual elements.
We recommend reading:
- DIY crafts from Kinder surprise eggs - 125 photos of exclusive options with step-by-step instructions, master class and video
Crafts made from twine - an overview of original design solutions. More than 100 photos of new products + step-by-step instructions for creating crafts with your own hands
- DIY crafts from candy wrappers: 150 photos of the best ideas from craftswomen. Simple instructions, master class, diagrams and video tutorials on creating crafts from candy wrappers
Craft options for School Day
Educational institutions also have birthdays, and it is called School Day. In this work, each student wants to prove himself a jack of all trades and make the most beautiful souvenir.
Help your child complete this difficult task: look for photos of school crafts on the Internet and purchase all the necessary things.
Remember, your child needs your support and understanding to complete their DIY school day crafts.
Original stationery
We have collected the best ideas with master classes, with the help of which you can make original pens, pencils, notebook covers, notepads and other stationery with your own hands. Do you want to stand out at school, college or work? Do you have a child who loves bright stationery? This article will appeal to all lovers of cute, original little things!
Even a novice master can repeat the master classes. Even a school-age child can make an unusual pen or pencil. Step-by-step instructions and training videos will help you with this.
Brilliant office
The master class will be appreciated by lovers of bright and shiny things. With its help, you will make an original notebook with your own hands, from an ordinary pen - a very beautiful, amazing pencil in the shape of a rainbow. Very creative! It is unlikely that anyone else will have such unusual shiny school supplies.
For the notebook you will need:
- cardboard;
- wrapping paper.
For the handle:
- fluffy threads;
- cardboard;
- nail file;
- clear nail polish.
Rainbow pencil:
- plasticine;
- wax crayons.
For each master class you will need glitter and PVA glue. Watch this video in which the author talks in detail about how to assemble an unusual office. You will spend no more than 15 minutes on each master class. As a result, you will get a fantastically beautiful school set from a notebook, pen and colored pencils. By the way, they can be a great gift.
Paper decorations
The easiest way to decorate a school office with your own hands is to use paper or cardboard. All ideas can be easily repeated at home. The result will be bright, non-standard little things that will brighten up your school days.
Additionally, you will only need what every schoolchild or student always has on hand:
- cardboard;
- colored paper;
- felt;
- markers;
- glue gun
Check out this glue gun - a bestseller on AliExpress! High quality, reliable, easy to use. And it costs less than in regular stores.
In this master class you will learn how to make pencil tips in the shape of stars or cat paws, funny rulers in the shape of a cactus or flamingo, and an adorable bookmark with a unicorn. The author of the video gives step-by-step instructions for creating such an office.
You definitely won’t get bored with such things! And the most important thing is that you can come up with many more variations on the theme of similar paper crafts for school. Take any stencils for pencil attachments, come up with non-standard rulers, decorate bookmarks with any characters! The implementation of each idea will require a minimum of effort.
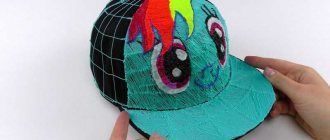
Stationery in Kawaii style
You can make a very beautiful stationery in Kawaii style from ordinary school supplies. A little imagination - and the simplest pencils, paper clips, bookmarks or anything else will become very cute. Of course, you can look for original “kawaii” stationery in stores, but making it yourself is much better - it’s unlikely that anyone else will have one. And it will take a little time.
For a homemade stationery in Kawaii style you will need:
- glitter;
- permanent markers;
- acrylic paints, clear varnish;
- decorative tape;
- colored paper;
- sponge;
- scotch.
You will find step-by-step instructions in the training video. The master offers to make beautiful versions of school supplies from the simplest materials and clearly shows the process. Complete these ideas with your own to create even more funky pencils, pens, clipboards, or bookmarks for school. It is enough to purchase a basic set for decoration, and everything else will come on its own.
Office for girls
These ideas will appeal to schoolgirls and students, as well as women who love beautiful stationery. Most of the crafts will look like cosmetics, but in reality they are pencils, folders, pens or something else. A great way to be fashionable in everything - even regular school supplies.
The video contains 11 master classes with instructions. We'll tell you what you'll need so you can figure out what you'll be doing in advance.
- Notebook in the form of an iPhone: any factory notebook with a hard cover, acrylic paints, self-adhesive, cutter.
- “Musical” pencil case: foamiran, fleece, double-sided tape, zipper.
- Container for paper clips: joystick, paper clips, superglue.
- Album in the form of a tablet: any sketchbook, self-adhesive, printout.
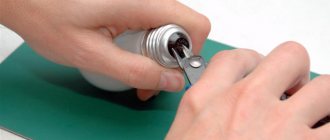
- Text highlighter: nail polish bottle, clear glue, glitter.
- Unusual ruler: wooden comb, acrylic paint.
- Original “hairspray” pencil case: tube, acrylic, labels from old hairspray.
- “Cosmetic” folder for notebooks: regular folder, double-sided tape, printouts.
- Non-standard putty: ready-made corrector-touch, empty eyeliner jar.
- Bright pencil: lip gloss bottle, superglue.
- Shadow eraser: eraser, cardboard, glue, permanent marker.
Check out this fun video for school stationery repurpose ideas. It will definitely inspire you.
You no longer need to throw away tubes or jars of cosmetics - as you can see, you may still need them. It will make not only a non-standard stationery, but also an excellent joke.
Kawaii office
Another great selection of master classes! With their help, you will make a stationery for school in a kawaii style with your own hands. This DIY is all about repurposing regular pencils, pens, rulers and other little things into cute accessories. Girls will especially like it.
We'll tell you what you need to prepare for each master class:
- Cat pen: regular pen, thread, scraps, hot glue.
- Donut pencil: isolon tube, acrylic paint, plastic cup.
- Cute pizza pencil case: colored felt, zipper, glue.
- Stickers in the form of a cloud: colored foamiran, mini-pompons, colored stickers.
- Non-standard buttons in the form of cacti: airy plasticine, button.
- Fun watermelon corrector: spool of white tape, acrylic.
- Soft notebook + squishies: a simple notebook, padding polyester, foamiran, terry towel, beads.
- The most unusual folder for papers: colored foamiran, plastic folder.
- Keychain “unicorn”: old watch, acrylic paint, hot glue, glitter, outline, ring for the keychain.
- Box for ice cream pencils: box, paints, colored paper, ruler.
- Pencil with a face: self-hardening plasticine, fluffy threads, a flower.
- Fluffy bookmark: colored wool, picture, satin ribbon, paints.
- Original paper clip “cupcake”: colored paper, clip, flowers, mini pompoms.
You will spend no more than 15 minutes on each craft. It is very easy to do the entire office. Watch this video tutorial in which the author shows everything in detail.
We hope you enjoyed these video tutorials. In total there are more than 30 different ideas that can easily be supplemented with something else. Even a child of primary school age can easily make almost all of this original stationery with his own hands. We wish you success!
See also: original homemade popsockets
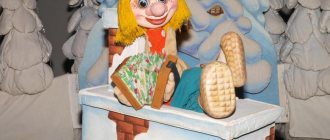
School layout made from small boxes
To make it, you will need a base on which boxes and additional decoration items (trees, benches, people) cut out of colored paper or cardboard will be attached.
Bouquet
A beautiful bouquet of dry leaves collected in the park, and sprigs of viburnum or rowan in a beautiful vase.
We recommend reading:
- Crafts flowers - 125 photos of the best ideas from craftswomen. Instructions on how to make it yourself from A to Z. Simple and complex options for crafts + video tutorial
- DIY crafts: TOP-200 photos of the best ideas. Schemes, master classes, modern design, new products, instructions with descriptions
- Crafts from plaster - 120 photos of the best ideas for creating original crafts with your own hands. Master class for beginners with examples and video lessons
Winter-themed crafts
During the white season, long winter evenings are conducive to creative activities with children. With the onset of winter, the time comes to come up with winter crafts for school, show your imagination and make winter masterpieces.
Since in winter there are few natural materials for work, except maybe pine cones, stationery materials will be needed for winter-themed products.
Home cooking as a business
If you're looking for ways to make money at home, look no further than home cooking. Home cooking as a business is a labor-intensive but rewarding endeavor. She owes her popularity to her passion for a healthy lifestyle and love for natural products. Ready-made food from stores cannot replace homemade food. But the modern rhythm of life dictates its own rules. Those who have little time to cook are happy to buy someone else's culinary delights.
The main disadvantage of home cooking as a business is the speed of product sales. Food spoils quickly and does not last long. Therefore, the best option is to work to order.
Homemade baking as a way to earn money
Do you know how to use an oven and often spoil your family with your pies? Then our advice is home baking as a way to earn money. Pies, cookies, muffins, cupcakes and muffins are not a complete menu for orders. To attract customers, try doing something unique. For example, painted gingerbread cookies or fortune cookies.
In addition, you can bake homemade bread. Many people try to avoid store-bought ones because they are not sure of its composition. Therefore, we are ready to buy handmade bread. Your starting investment is a bread machine and hours of practice.
Candy bar
The candy bar is especially popular as a holiday element. From English the concept can be translated as “candy table”. Speaking in Russian, a candy bar is an advanced version of the “sweet table”. It is often ordered for parties and corporate events. To prepare your candy bar, you'll need to bake a lot of cupcakes, muffins, brownies, and macarons. And then beautifully set the table for snacks.
Cakes to order
Custom-made cakes are wildly popular. However, they require great skill from the author. And also good taste. Moreover, we are talking not only about the taste of the product. Its decor also matters. A cake is a festive pastry. Therefore, customers expect a stylish and modern presentation. Especially when it comes to wedding cakes.
You can earn quite a decent amount of money from cakes with your own hands. But don’t forget about the initial investment! Firstly, this is the purchase of not only ingredients, but also baking equipment and decor. Secondly, you better take training courses. Even if you are preparing divine cakes for the birthday of your household. As we have already written, custom-made cakes are not only about taste, but also about decor. Learn to beat the competition.
Homemade dumplings, dumplings, manti
Making money with your own hands by selling semi-finished products is another profitable idea. The work-home-work schedule does not always leave time and energy for cooking. Therefore, in the freezer of every second Russian you can find a pack of dumplings. However, no one has canceled a healthy lifestyle. Preservatives, flavor enhancers, monosodium glutamates and other harmful words in the composition scare off those who care about their health. So homemade dumplings, dumplings and manti are a good solution to their problem.
New Year's decorations on the Christmas tree
Every educational institution holds matinees on New Year's Eve, where the main decoration of the holiday is a green tree.
Students are entrusted with decorating it with their own homemade toys, and each child wants to contribute by hanging a homemade craft on the Christmas tree.
How to make money on handicrafts
The classic way to make money at home is to make money from handicrafts. It was different before, of course. Do you want something new? Be so kind as to sew it yourself. Now custom tailoring is an indicator of status and money. Therefore, everything related to clothing brings good income. Think about how you can turn your craft into a business. And we will give three ready-made options.
Sewing at home
When talking about handicrafts, people first think about sewing. Sewing at home is a very common part-time job. Typically this includes taking the client's measurements and preparing custom clothing. In addition, you can repair and alter things. Sewing curtains is another profitable service. Such work takes little time, but in the end you get a lot of money.
Taking orders for children's outfits for matinees will also bring in a lot of money. Who knows, maybe your parents will like your work so much that they will ask for something for themselves?
Dog clothes
Don't forget that providing unique services is profitable. Take on work that is not normally done in a workshop. For example, focus on tailoring costumes for dogs. Dressing up pets is very fashionable now. However, there is also a practical meaning here. If you live in a cold region, warm winter clothing is a necessity for many breeds. Including large ones. Pet stores sell products only for small dogs the size of a Chihuahua. Offer custom tailoring for large dogs, and in the fall there will be no end to orders.
Christmas balls
The variety of round toys made from improvised materials is amazing. The basis for them can be: knitting threads or twine, burnt out light bulbs, the tops of plastic bottles, disposable paper cups, Christmas tree cones, pasta, ice cream sticks, clothespins, etc.
Snowflakes
Snowflakes are made not only from paper and flat, they can be voluminous from a variety of materials that any schoolchild can handle: a snowflake made of wire, from beads of different sizes, from fabric, from felt, knitted lace snowflakes, from popsicle sticks.
Wooden souvenirs
Wood will be an excellent material for creating cute souvenirs. It is distinguished by its natural beauty, regal fragrance, warmth of texture, and ease of processing.
Of course, to get smooth surfaces you will have to ask an adult man for help, although modern electric jigsaws will help a woman cut wood into even pieces.
Spili
Saw cuts are thin circles from a tree trunk; they can have completely different sizes, depending on what part they were cut from.
The simplest but most cozy souvenirs will be all kinds of frames made from such circles. Frames can be designed:
- photographs and paintings;
- mirrors;
- kitchen coasters for hot dishes or for utensils;
- home key holders.
All this will just require cutting the wood into circles of equal height, varnishing them, and gluing them onto a prepared base.
For people who have artistic talent, it will be quite easy to make unusual Christmas tree decorations by simply painting a piece of wood.
With a little experience, you can make entire panels by gluing the cuts together with edges.
Branches
Tree branches are suitable for creating unusual:
- candlesticks;
- vases;
- lampshades;
- hot trays;
- screen for batteries.
Charming baskets are woven from soft branches or vines. They can be presented to lovers of embroidery and knitting, they are suitable as a gift for gardeners or lovers of picnics in nature, and the tiny baskets will become wonderful candy dishes.
A do-it-yourself Easter souvenir for children for a competition can be made from a wicker nest with yellow pom-pom chickens sitting inside.
Boards
Small boards will help you make the most unusual shelves or cutting utensils for cooking. And to give the souvenir an unusual look, the surface can be decorated using the decoupage technique: applying a finished picture to the surface. Such decoration will definitely become a completely unusual gift, and a varied selection of pictures will help make it suitable for any event.
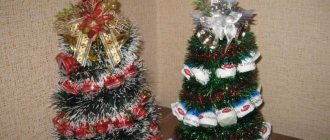
Christmas tree made from improvised materials
The most common New Year's homemade item is the Christmas tree, which can be useful not only for display in a kindergarten or school, but also for decorating your home.
And the material can be completely unexpected things: plastic forks and spoons, pasta, feathers, satin ribbons (kanzashi technique), cotton swabs and makeup remover discs, small shells brought from the sea, newsprint tubes, etc.
Whatever the task before you, the main thing is to spend interesting and useful time with your child, develop his creative potential and give him an extra hour of parental attention and love.
Craft from recycled materials
Recyclable materials include newspaper, paper or plastic utensils, beverage cans, egg trays, plastic yogurt cups, and cardboard food packaging.
What kind of craft can be made from recycled materials for school? Plastic or paper cups make a great snowman. The cups must be connected to each other to assemble the ball. For a snowman you will need 2 balls. Then the balls are fastened together, a nose, eyes, a headdress, a scarf and other accessories are added as desired.
You can make tubes out of newspapers. And then use it to weave baskets, like from a willow vine. Following your imagination, you can weave not only a basket, but also a cup and saucer, an owl, and a vase.
The finished creation can be painted and varnished. Another way to decorate wickerwork is to make decoupage using paper napkins with a beautiful pattern.
Photos of crafts for school
Did you like the article?
0
DIY pendant
This interesting handmade pendant is as beautiful as jewelry. Moreover, it will be unique, since you will embody all your fantasies in it.
To get started, you need to decide what kind of pendant you would like. Because there are more than enough materials, such as metal, wood, fabric, thread, wire, leather and others.
We will look at how many ideas you have, and you will choose which one you like.
dream Catcher
The pendant with ethnic motifs looks fabulous and bewitching.
This pendant will effectively dilute your image and bring a charming mood to it.
And so, when everything is prepared for work. For this we need glue, thread, scissors, a ring (the base for the pendant), ribbon or thread, and decor.
We can proceed directly to weaving the web. The base for such a pendant can be wrapped in fabric or cord.
We fasten the end of the thread at the base and make a loop at a distance of 0.5 cm. Turning it around the base, we make all the other loops.
We weave all subsequent ones in a spiral, in a similar way, only we attach the loops to the middle of the loop of the first row. At the end we cut the edge of the thread and tie it in a knot.
Then we attach the fastener to the decor or simply tie it to the base with a thread.
We can also add interesting pendants or beads. We attach a ring at the top edge and thread a lace through it.
Pendant with stones
We get an unusual pendant by combining wire with stone.
Having made a wire frame and inserted a stone into it, we will get an original pendant.
For work we will need: wire, wire cutters, chain or lace, and of course stones.
To avoid damaging the stone while working, wrap it with adhesive tape. To begin, take the pliers, draw wire around the wide part of them and make a loop.
We twist the wire 2 times to secure the loop.
Next, we place the stone on top of the wire and intertwine it so that it holds securely.
We can also find a ready-made base for the pendant, such as ready-made frames for stones. They will also look interesting. After the pendant is ready, we thread a cord or chain through the loop and attach a lock to the edge.
The tree of Life
This pendant looks extraordinary and solemn.
Try it and you will definitely like it. For it you will need: A round base, 0.4 mm wire, round nose pliers and beads or seed beads.
First, take the wire, 8 pieces of 27 cm each. We thread it through our base ring, make 2 more turns, and then twist it, making a spiral-shaped trunk with each piece. So we attached the tree to the base, now we twist all the segments together into the spiral trunk of our tree. We make the trunk at 2/3 of the height of your base, after which we separate our branches. To do this, we divide the wires into 2-3 pieces and twist them in the same way as the barrel. This is how we get our branches, scroll them 0.5 cm long. When the branches are formed, we string beads onto the ends of the wire. Now we fasten the edge of the wire by circling it twice around the base of our pendant. We cut off the end of the wire by 0.3 cm, we twist the remaining edge at the end of the branch around the base. Thus, we form all the branches. Now we will proceed to assembling the pendant, thread a small ring through the base of the pendant, and thread a chain into it.
bottle pendant
A bottle pendant is truly an extraordinary decoration.
Their cost is low, and there is no limit to creativity. Anything can be a filler for such bottles, it all depends on your imagination.
Don't miss: Gold embroidery: 10 gimp embroidery techniques
For such a pendant we will need: a bottle, wire, chain and pliers.
Let's get to work, open the bottle, make a hole in the cap, thread a wire through it and make small loops at both ends with pliers. We thread a small ring into the loop, into which the chain is threaded.
After that, we fill our bottle and close it. We thread the chain. And our pendant is ready.