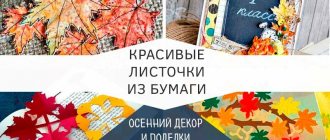
New Year's motive
The most significant and anticipated event of the winter period is the New Year holidays. The presenter suggests crocheting a heating pad, which will be an indispensable addition to a family tea party and will be an ideal New Year and Christmas gift for friends, colleagues, and relatives. The base is made of burgundy yarn, the connecting element under the eye is a loop and a beautiful button to match. Fans of strict design can leave the blank in this form, but a white openwork snowflake attached on top of the base will turn the product into an elegant winter accessory. Beads added during the sewing process will create a glitter effect.
Another option
A pattern more saturated with double crochets will make it possible to understand how to crochet a circle using the growing wedge technique. Starting with one loop and adding one in each subsequent row, you can use a simple circle to create a stunningly beautiful napkin for the table (or a tablecloth, if you make a large product).
It is difficult to get confused in this pattern, since it is almost the same along the entire diameter - half a wedge, the middle of two air loops and the second half in a mirror image. Usually there are no additional loops between the wedges, but if during knitting it is noticed that the pattern is tightening the circle, then you can add one air loop between each (!) wedge. In the last row, when the product is almost ready, do not forget to make a “pique” of three air loops, connecting them into a ring at the edge of each wedge.
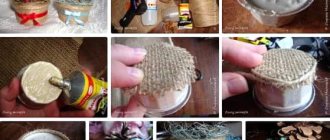
Felt Pikachu on a mug
Pikachu is a Pokémon whose popularity has not waned over the years. Having first appeared in a computer game, the character eventually became recognizable to people far from games and anime cartoons. The video shows the creation of a set (case and stand) imitating your favorite hero. You will need yellow felt and a heat gun. All parts are glued together, which allows people who do not have sewing skills to acquire a set. The craft is practical (protects hands, protects the table cover from drops and thermal effects), and children will like its funny appearance.
In shades of pink
The original warmers of delicate colors stand out against the background of the usual knitted products. The basic rectangle is decorated with a composition of multi-colored hearts and a funny little owl. All parts are cut out of felt and sewn onto the base, with Velcro as a fastener. The video is not a master class, but the technology is so simple that it won’t be difficult to repeat. The components of the decor are easy to draw by hand; if you wish, you can come up with your own composition, vary the colors, using the author’s idea and maintaining the general principles of tailoring.
Forming a circle
A small circle of rags crocheted is quite easy for beginners to make. But it is important to further observe the peculiarities of the technology. Otherwise, the product will turn into a long pipe and not a rug. To prevent this from happening, it is important to read this section carefully.
So, after the knitter has completed the steps indicated in the previous paragraph, the resulting circle should be tied with simple stitches. In the next row, make single crochets.
Next we alternate two rows:
- In the first, we knit two simple stitches from each loop of the previous row.
- In the second, we tie the circle with single crochets.
We continue, moving in a spiral, until the rug reaches the desired size.
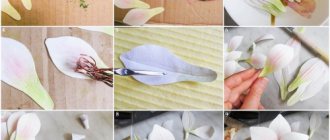
Floral motifs
Evgeniya shares an easy-to-follow idea suitable for beginning needlewomen. You need a hook and a thread of two shades - light for the main fabric, dark for the binding. The author took acrylic and matched the button to the harness. The final stage is decorating with tied flowers. Eugene gives the sequence of creating the core and petals in the second part of the video. Using this principle, you can make any number of elements, experiment with colors, and add a bead while sewing.
"Stars"
The winter two-color “Stars” pattern, proposed by Svetlana, will make any mug, glass, bottle elegant (you need to tie the neck with an elastic band). The motif is formed by interlacing air chains, blue and white. Distinctive feature: the heating pad is knitted in a circle, starting from the bottom. Using technology, it is convenient to make expansion in the lower rows - an option for cups that taper towards the bottom. Svetlana created the most detailed sequential master class, demonstrating and commenting on each action. This allows, despite the average complexity of the work, to be repeated by beginners. The rich colors of the yarn give the motif brightness and expressiveness.
Gradient mat
A huge number of beginners are wondering how to properly crochet a round rug. However, professional knitters are convinced that the technology is not difficult.
In fact, to make an original product, you just need to prepare a hook of a suitable size and cut the unnecessary clothes into strips. Then knit the center part of the rug, and then alternate rows of double crochets and single crochets. That is, the essence of the whole process is the same. But there are so many variations of execution that it’s impossible to list them. For example, the model shown in the photo is very popular.
To perform it, you need to prepare strips of fabric of related colors. Or arrange the “yarn” in such a way as to create a harmonious transition from one color to another. The following shades are used in the photo: pale orange, beige, yellow and carrot.
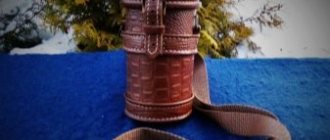
Mug case “Braid”
Master class for those who prefer knitting needles. A scarf for a mug with a simple braided pattern will be a great idea for experienced craftswomen, and a step-by-step master class will help beginners follow the lead. The work will take about an hour. You need to choose thick yarn, knitting needles one size smaller than recommended - this way the pattern will be denser and more prominent. For those who are better at following diagrams, Zhanna gives a sketch at the beginning of the video; you can pause the video, redraw it on paper, and keep it before your eyes during the manufacturing process. The result is a snow-white case with a voluminous “Pigtail” in the center - it looks elegant, helps keep your drink warm longer, and protects your hands.
Materials for sewing a cover
If sewing is not your hobby, check out how to decorate a cup with polymer clay. Or try the tutorial on knitting a cover for a tea mug. We will not leave you without handicrafts!
Materials used for this master class :
- textiles for patchwork with small floral patterns (pink, purple tones);
- soft pink felt;
- foamiran purple;
- beige or pale yellow textiles;
- white cotton;
- small white button;
- large black beads – 2 pcs.;
- pink rhinestones – 2 pcs.;
- small pompoms – 5 pcs (you can make them yourself).;
- purple and brown sewing threads;
- decorative twine – 8-10 cm;
- Velcro for textiles;
- pink polka dot ribbon – 10-12 cm;
- white guipure ribbon – 10-12 cm.
To sew a mug cover, you will need the following tools :
- iron;
- needle;
- scissors;
- hot glue gun.
Step-by-step instructions with photos
Measure the mug you want to decorate. It is advisable to choose a high and level one. Cut a rectangle of soft pink felt with a margin of about 2-3 cm for the fastener. The distance from the edge of the cup should be about 1.5 cm so that you can drink without touching the cover.
Cut out a figure in the form of half a pig's head with ears from white textile. You can make a paper template and then trace it onto fabric and cut it out.
Cut out an oval for the patch from pink felt. Make decorative stitches using brown thread.
Glue the pig silhouette to the left side of the felt piece. Glue on a snout, nostrils made of beads, eyes made of rhinestones.
Cut out letters from purple foamiran to spell the word “happy.” If you wish, you can make up your own word, for example, a name or a wish. If this is a New Year's gift, then the numbers for the coming year will do. Use hot glue to secure the letters above the pig's head.
Cut a rectangle of colored fabric for the second part of the mug cover. Count on extra hem allowance.
Form hems on three sides (except for the one closest to the pig). Iron.
Make a small rectangle (3 x 6 cm) from white fabric. Similar to the previous step, tuck all edges and iron. Embroider decorative stitches and words using two colors of thread.
Tie a bow from twine, securing it with brown thread. Make a cross of purple thread on a white button.
Cut out a small heart from pink felt. Complete it with a decorative stitch. Glue the heart onto the textile sign. Paste the decor onto the floral background.
- Glue the floral fabric onto the felt.
- Attach a piece of guipure ribbon.
Glue on a piece of satin ribbon with polka dots. Roll a small semicircle of beige fabric into a cone shape. Fix with glue and trim. Glue to the mug cover. Stick three pompoms in the shape of an ice cream cone.
- Use a drop of glue to secure a rope bow next to the ice cream.
- Place a piece of Velcro on the edge for the fastener.
- Add large purple decorative stitches around the perimeter of the cover.
- This decorative case for a tea or coffee mug was the result of some nice handicraft.
Such little things are ideal for gifts to friends and colleagues. We also recommend making a magnet from foamiran with a pig, a stand for a mug from a disk and felt, and an oven mitt for pots and pans with cross stitch.
A master class on making a cover for a tea mug with your own hands was prepared by our regular needlewoman Svetlana Filippova. Have a good mood and creative success!
Source: https://zhenskie-uvlecheniya.ru/narjadnyj-chehol-na-kruzhku-svoimi-rukami-iz-fetra-i-tekstilja.html