Specifics of making flowers from satin ribbons
Making flowers from satin ribbons with your own hands is a painstaking but fascinating task.
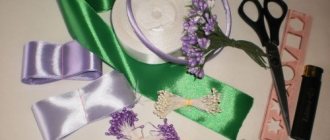
The main tools for making jewelry are:
- Satin ribbons of suitable width. The color and texture are to the taste of the craftswoman.
- Sewing kit. It must contain threads, needles, and scissors.
- Glue gun. For fixing petals to the base or for decoration. If you don't have it, you can use superglue.
- Additional decorative elements. Beads, bead buttons, sequins, rhinestones.
- Fire (matches, lighter, candle). Necessary for melting and securing the petals. Also, cuts of tapes are treated with fire so that they do not “crumble.”
With proper use of available materials, the flowers come out strong and of good quality. They can be attached to elastic bands, hairpins, headbands, or arranged into bouquets.
An exciting activity or a magical hobby
People began to create things similar to the creations of nature a long time ago. The hands of the craftswomen tried many methods and manufacturing techniques to achieve similarity with natural flowers.
To make the petals convex, they used starch, gelatin, and squeezed them out with special tools, giving them the desired shape.
The easiest and fastest way to make fabric flowers with your own hands for beginners is to create buds by sewing strips of fabric or ribbons together.
Types of petals
Satin ribbon flowers are collected from petals of different shapes. The main ones are sharp and round. Any type of petal can be made with your own hands. The sharp shapes of the petals are suitable for making flowers such as aster, chamomile, dandelion, sunflower, bluebell and others.
The varieties of sharp petals are:
- spicy double (triple);
- sharp with a curl in the center;
- sharp convex (convex).
Round-shaped petals are used to create flowers such as roses, lilacs, ranunculus, peony and others.
The varieties of round petals are as follows:
- two-color round (double);
- round for rose;
- round inverted;
- round flat;
- round narrow;
- round with a heart.
A basket of flowers
The idea is extremely simple: make as many flowers as possible using the technique you like and fill the basket with them. The craft is suitable as a decoration for a children's party. Especially if it is held in the style of the fairy tale “The Twelve Months”.
Also, a basket of snowdrops or roses will diversify the interior at a wedding or corporate event.
Master class for beginners: a simple flower in 5 minutes
A satin ribbon can turn into a flower in just 5 minutes. From this you can calculate that, for example, a hairpin with your own hands will be done within 7-10 minutes. It is necessary to strictly follow the instructions.
Step 1. Preparation of necessary materials:
- scissors;
- tweezers;
- needle and thread;
- candle;
- bead;
- pieces of satin ribbon 5x5 cm.
Step 2. Preparing petals . To do this you will need:
- fold a square of satin ribbon diagonally, marking the sharp ends with the numbers 1 and 2;
- combine ends 1 and 2. In the resulting triangle, mark the new acute angles with numbers 3 and 4;
- fold ends 3 and 4, resulting in a sharp petal;
- cut off excess material (cut a right angle parallel to the folded side and an acute angle parallel to the fold);
- solder the cut edges with a candle or lighter, fixing the petal with tweezers for convenience.
Step 3. Flower formation. The bases of the petals need to be connected with a thread like beads, tightened and decorated with a flower. Then you should glue the petals together for a more reliable fixation.
Step 4. Decoration. The middle of the flower must be decorated with a bead or button (optional). It is possible to add rhinestones or small stones to the center of the petals.
Garland
What you will need:
- scissors;
- needle;
- thread;
- long satin ribbon;
- colored fabrics with New Year's prints;
- cardboard.
Step 1:
To ensure that the flags on the garland are the same size, it is recommended to cut a triangle out of cardboard.
Step 2:
So, we put our triangle on colored fabric, outline its edges and, according to the drawing, cut a flag from the fabric. We do this with all fabrics. We got colored flags.
Step 3:
We take a satin ribbon and sew our flags to it with the triangles down. The New Year's garland is ready!
Flower made of satin ribbons 2.5 cm - step by step instructions
A 2.5 cm wide satin ribbon is perfect for creating lush flowers with your own hands. When finished, they resemble a bush rose. The technique is simple.
Step 1. Preparation of necessary materials:
- pieces of tape 2.5 cm wide and 7 cm long;
- needle and thread;
- fire;
- scissors.
Step 2. Preparation of petals. You need to melt the cut edges of the tape, bend the tape on each side so that you get a trapezoid, and additionally melt it to secure it. Then you need to do the same with all the tapes.
Step 3. Flower formation. It is necessary to sweep each petal blank along the bottom edge, pull the thread and fasten it, then sew the bases of the petals so that you get a flower.
To add volume, you can attach 3 more petals on top or leave the flower in a single layer.
Step 4. Decoration. Beads glued in the center, imitating the core of a flower, will look harmonious.
For the rim
Any flowers are suitable for decorating the headband, such as large and lush roses, peonies, chrysanthemums, zinnias, as well as small roses, jasmine, and bells.
To make a headband with a jasmine branch, you will need:
- a headband wrapped in a satin ribbon the color of the first green;
- a strip of rounded felt 2x16 cm of the same color;
- yellow plastic stamens - 1 bunch;
- pieces of white satin ribbon 5×5 – 25 pcs.;
- pieces of green satin ribbon 2.5x3 cm - 25-30 pcs.;
- thread, needle, scissors, glue.
Jasmine flowers form very simply. It is necessary to sweep a diamond shape on a white piece with white thread, then tighten the thread, insert a plastic stamen inside and sew it up. It takes 3 to 5 minutes to make 1 jasmine flower.
Important! When basting, the thread should not be interrupted, otherwise it will be impossible to form a flower.
To make a sheet from a green piece of satin ribbon, you need to fold it in half and round it off on one side with scissors. Then you should melt the edges and, while they are soft, slightly deform them in the manner of a jasmine leaf, gather the lower edges and melt them.
The finished elements are glued evenly onto a strip of felt to create a jasmine branch. You need to let it set and glue the finished composition directly to the rim.
For hairpins
To decorate hairpins, small flowers of light weight are often chosen, otherwise the hairpin will not hold the hair well and will slip off. Ideal options are small roses, one small chamomile, and aster. A very fast and beautiful flower is obtained from only 3 petals. A satin ribbon 5 cm wide is cut into 5 cm pieces. You need to make circles from the resulting squares.
You need to fold them in half and sweep them in an arc, tighten them, forming a petal with your fingers. Then you need to sew 3 petals together and glue a bead in the center. The resulting flower is glued to the hairpin. Note. If the flower is not large enough, you can increase the number of petals to 5-7. However, it is necessary to select a larger core size.
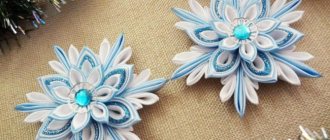
Snowdrops for the rim
Materials and accessories
To work you need to prepare:
- white satin ribbon – width 5 cm, length 2 m;
- green satin ribbon – width 2.5 cm, length 1.5 m;
- green satin ribbon – width 5-6 mm, length 2 m;
- white plastic rim – width at least 10 mm;
- ready-made yellow stamens – 3 pcs. on a flower;
- felt that matches the tone of the green satin ribbons (needed if the width of the headband is less than 10 mm) - 2 by 7 cm;
- heat gun and rods;
- lighter (can be replaced with a candle);
- needle, scissors.
Description
We cut at least 30 squares of 5 by 5 cm from white tape. We singe the edges of the cuts. Then we sew the square with white thread using basting stitches - see photo. The thread should remain on the wrong side. Temporarily we put aside the part.
We put three stamens into a bundle, which we bend in half. We twist the lower end into a spiral and fix it with hot glue.
Place the stamens in the prepared square in the center and tighten the thread.
We make several turns of the thread around the base of the flower, tightening the thread tightly. To secure, make a few stitches and cut the thread.
Using this technology we make several more flowers. Now let's start making leaves. From a green ribbon 25 mm wide, cut into pieces 4-5 cm long. Fold each of them in half, cut out the leaves. We process the edges with fire. We make small folds at the base of the leaves, fixing them with fire. The next step will be decorating the headband. Cut two 1 cm pieces from a narrow (5 mm) green ribbon. Glue them to the edges of the corner.
Fix the tip of the tape with glue. We wrap the entire rim, making overlapping turns with the tape. You can place flowers along the length of the rim in any order, if desired. First we glue the leaf at a distance of 8 cm from the edge of the rim, then the first flower. We hide the lower part of the flower under the leaves. To do this, glue 2 more leaves.
We glue the next two flowers on the sides of the first, trying to do it as tightly as possible.
This way we fill the entire area on the rim intended for flowers.
If your rim width is less than 10 mm, cut out an oval (length 12 cm) from felt and glue it to the rim. Next we proceed according to the description given above.
Ribbon roses
There are at least 5 techniques for making roses from satin ribbons.
For beginners, the following option is suitable:
- A ribbon 6 cm wide and about a meter long is folded in half lengthwise.
- The folded tape is swept along its entire length. It is necessary to start and end at an angle of 40-50° to give more volume to the flower.
- Assemble the resulting workpiece.
- A bud is formed, securing it with threads.
- Wrap the ribbon around the bud, forming a flower. Periodically secure the layers at the base so that the rose does not fall apart.
- The final stitches should go through the entire flower, while being invisible. The thread should be the same color as the ribbon.
Necessary materials
To get started with ribbons, you will need:
- The main material is tapes.
To implement each idea, material is selected individually. Experienced craftswomen can come up with a model from available ribbons;
- Sharp scissors with straight ends and small ones with rounded ends;
- Pencil and ruler;
- Threads of different colors. They are selected for each product - according to color, quality and thickness;
- Set of sewing needles;
- PVA glue;
- Candle or lighter;
- Small tweezers.
Depending on the manufacturing technique, purpose and design of the craft, you may need additional materials - photo frames, notepads, cardboard, wire for the frame.
Kanzashi chamomile
To make chamomile you will need:
- white satin squares with a side of 5 cm;
- glue gun;
- fire (candle, lighter);
- tweezers;
- scissors;
- decor
First you need to prepare the petals. To do this, the atlas square is folded diagonally, then the sharp corners are folded towards the center. The resulting petal is folded in half. The tip is cut off and scorched with fire. Then fix it with tweezers on the other side and cut off the base parallel to the fold. They are scorched with fire so that the ends are soldered together. 15 such petals are prepared.
Carefully glue the petals at the base, forming a daisy. Glue a yellow button or a circle of yellow felt in the center. Kanzashi chamomile can be used to decorate a hairpin, a child’s handbag or a headband.
Automatic hairpin using Kanzashi technique
You will need: a 10 cm long automatic hairpin, red, white and green satin ribbons, scissors, a glue gun, green felt, a ruler, a soldering iron, a thread with a needle, a silver cord, white half-beads, 3 decorative small flowers.
Master Class
- Prepare 6 pieces of green tape measuring 2.5x10cm.
- Fold a piece of green tape in half, then run the heated soldering iron diagonally to form 2 right triangles. Unfold the halves, glue or sew them together to form a sheet, as shown in the photo instructions. Make all the leaves this way.
- Prepare 24 red pieces measuring 4x4cm.
- Model sharp petals from 24 red squares measuring 4x4cm in this way: bend the square diagonally, then in half, glue the corners or secure with fire or a soldering iron.
- Connect 8 petals in a circle, sew or glue to form a flower. Make 3 red flowers in total.
- Glue a decorative flower and white half-beads to the center of each flower.
- Prepare 9 pieces of red ribbon measuring 5x5cm and 9 pieces of white ribbon measuring 4x4cm.
- Fold the square of white and red tape diagonally, then in half, join them together, placing the white piece on top of the red one and glue the corners. Form 9 red and white petals in this way.
- Connect 9 petals in a circle, sew or glue to form a flower.
- Glue a smaller red flower onto the red and white flower.
- Prepare 2 pieces of white ribbon measuring 5x5cm and 2 pieces of red ribbon measuring 4x4cm. Fold the square of white and red tape diagonally, then in half, join them together, placing the red piece on top of the white one and glue the corners. Form 2 white and red blanks.
- Prepare a strip of green felt measuring 11x2.5cm.
- Glue the hairpin onto the felt strip and secure it by gluing a felt square in the center.
- Glue green sheets on the felt around the circumference so that there are no gaps.
- Form 3 loops of silver cord and glue them as shown in the image.
- Glue a large flower in the center and small ones on the sides.
- Glue 2 white and red blanks from step 11 at the bottom of the large flower.
The automatic hairpin using the Kanzashi technique is ready! It is wonderfully suitable for a female representative of any age.
Kanzashi box as a gift / Box made from a tape reel / Kanzashi Box
Lush flower made of satin ribbon
A lush flower is formed from round petals singed along the entire perimeter. They are carefully glued layer by layer to the base. There should be at least 10-12 petals. They can be either the same color or different.
The set of tools is similar:
- satin squares with a side of at least 5 cm;
- scissors;
- fire;
- stamens – 3-5 pcs.;
- glue gun
Kanzashi
Japanese technique for creating flowers and bows. Often used in the manufacture of panels, hair decorations, voluminous swans and Christmas trees.
Thanks to delicate lines and well-chosen shades, the products look lively and interesting.
Aster
To make an aster you will need the following supplies:
- pieces of satin ribbon 2.5×5 cm;
- tweezers;
- scissors,
- fire;
- glue gun;
- several circles of felt.
For a medium-sized flower, 30-40 petals are needed. It all depends on the desired number of layers and the diameter of the aster. The petal is made in two stages.
- Stage 1 . A strip of satin is folded in half lengthwise and clamped with tweezers. The edge is cut at an acute angle and sealed with fire.
- Stage 2 . From the opposite edge, the strip is folded like an envelope, clamped with tweezers and fixed with fire.
Petals are glued onto the felt circle along the very edge. The next layer is glued closer to the center. The petals are placed visually between the petals of the first layer. The same is done with all layers. The number of petals in each subsequent level decreases. The finished flower is decorated with a bead core. You can also combine the colors of the petals.
Bell
When making a bell, the following materials are needed:
- pieces of satin ribbon 5x5 cm - 5 pieces;
- fire;
- tweezers;
- scissors;
- stamens – 1 bunch;
- glue gun
Bell petals are ordinary sharp petals, with the seam turned inward. One stamen is glued to each petal at the base. Then you need to glue their sides together, forming the flower itself.
The leaves of the bell are made in the same way as the petals, only the ribbon must be smaller in width. They should be secured with a glue gun under the flower so that they stick out slightly.
Hibiscus
To make hibiscus you will need:
- satin ribbon cut into squares 5 cm wide;
- fire;
- scissors;
- tweezers;
- stamens;
- decorative wire;
- glue gun
You need to cut teardrop-shaped petals from the squares. Before assembling the flower, you need to corrugate them. To do this, the petal is folded like an accordion into 4 rows, then twisted into a rope and carried over the fire for several seconds. The cooled petal is unrolled.
A wire is glued to half of the petal on the wrong side. There should be at least 7 such petals. It all depends on the desired volume of hibiscus. Several stamens are twisted together and a bud of petals is formed around them. Then the petals are slightly leveled and arched.
Roses for gift decoration
To make beautiful gift wrapping for New Year 2022 or some other holiday, you will need roses from ribbons. Since creating a craft with your own hands will take time, the work must be done in stages.
To do this you will need:
- Tapes;
- Threads;
- Scissors;
- Glue.
Progress:
- You need to form roses from red ribbons with your own hands.
- Each leaf must be secured with glue or thread. This craft is perfect for decorating a holiday box for the New Year 2022, as well as for decorating a room.
Narcissus
To make one daffodil you need:
- scissors;
- fire;
- tweezers;
- glue;
- 5 squares of white satin ribbon 5x5 cm;
- 3 yellow squares 4x4 cm.
The petal is made like this:
- A square of white satin is folded diagonally twice. Sharp corners must be folded like an accordion into 1 row on each side, then clamped with tweezers, cut off the excess and soldered with fire. You should get a petal with two folds inside.
- The upper edge of the petal is clamped in the middle with tweezers and melted with fire. It has a slightly pointed shape.
The stamen is made in a similar way, only the upper edge is not pointed.
Assembling a flower involves sequential gluing of all elements. The resulting daffodil is practically indistinguishable from the real thing.
Poinsettia
Even beginners can make a poinsettia flower from satin ribbons with their own hands.
The required materials are:
- pieces of tape 5 cm wide and of different lengths;
- scissors;
- fire;
- glue;
- large stamens;
- wire.
The petals need to be cut out. To do this, pieces of tape are folded diagonally and cut out to form a petal. On top of the edges, 2 cuts are made on each side. The blanks are melted over a fire and the edges are slightly deformed. In total, you need 3 petals 5 cm long, 5 petals 6 cm long and 5 petals 7 cm long. Leaves are made in the same way - from pieces of 5x7 cm.
Assembling a flower begins with sequentially gluing together petals of equal length. The first layer of small petals is glued to the stamen, then the next layer is of larger petals, and the largest ones are glued last. The petals must be arranged in a checkerboard pattern.
You need to glue the wire to the leaves on the back side. They are attached to the flower by wrapping the stamen with wire.
Standard set of materials needed for needlework
- Ribbon. There are a huge number of ribbons made from different materials and different shades.
- Soldering iron. Necessary for gluing or cutting tape using the kanzashi technique.
- Threads. Only high-quality and strong threads should be used in the work.
- Glue. An important factor when choosing is the transparency of the glue. The more transparent it is, the less visible it is.
- Scissors. An indispensable tool for any type of needlework.
- Tweezers. For safety when burning the petals.
Dandelion Kanzashi
To make a dandelion you need:
- ribbon 0.6 cm wide in yellow and green colors;
- scissors;
- fire;
- glue gun;
- felt circle with a diameter of 4-5 cm;
- tweezers.
The technique is as follows:
- The tape must be cut into strips 7 cm long. Fold each in half and solder the ends. These will be dandelion petals. Green ones need at least 25 pcs., yellow ones at least 27 pcs.
- Green petals are glued around the perimeter of the felt circle using a glue gun. The second layer is also glued in a checkerboard pattern from green petals.
- All subsequent layers are glued with yellow petals. This way you get a voluminous chamomile, which is perfect for decorating headbands and hairpins.
Decorations
There are a large number of options for using flowers for decorations:
- Brooch and pendant. Flowers in such decorations are attached to a solid base.
- Earrings and rings. A miniature flower can be a wonderful decoration for this species.
- Jewelry for children. Beautiful, well-attached flowers will be an excellent decoration for a baby’s hairpin, bracelet or elastic band.
- DIY decorations. Professional craftsmen make flowers to order that are very difficult to distinguish from real ones. Such a bouquet, installed in a vase, can be placed in a sideboard or chest of drawers so that it pleases the eye.
Sunflower
Any type of sharp petal, such as an aster's, is suitable for making a sunflower. A two-layer flower will require at least 26 petals. The petals are glued to a felt circle with a diameter of 5 cm along the very edge. A little closer to the center you need to glue the second layer in a checkerboard pattern.
The middle can be made of a circle of even felt or dermantine with a diameter of 4–4.5 cm. Beads or large black beads are glued onto it. The middle is glued to the flower, and the sunflower can be considered ready. If desired, you can add decor in the form of a butterfly or bug.
Advantages
As photographs of crafts made from ribbons show, such things have the following advantages:
- Low cost.
- Aesthetics.
- Durability.
- Relatively low consumption during operation.
- There is no need to use special tools or skills.
- Excellent compatibility with other decor, be it beads, beads or rhinestones.
- Simplicity of the accessory manufacturing process.
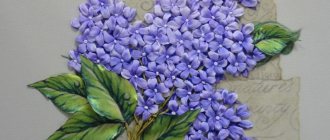
Lilac
To make a lilac branch you need:
- lilac ribbon 1 cm wide;
- beads;
- beading wire;
- fire;
- scissors;
- needle with thread;
- green floral ribbon.
The tape must be cut into strips 1.5 cm long. At least 60 pieces will be required. Flowers are made from them in the same way as jasmine flowers. Just before tightening the thread, you need to stick a wire with a bead strung on it into the center of a piece of ribbon. The result is a lilac flower on a stalk.
When all the flowers are ready, you need to form mini-branches of 3 each from them. and secure with one of the wire legs. A lilac branch is formed from these twigs and wrapped with floral tape.
Unique decor yourself: step-by-step instructions
Rosette brooch
Making a flower from fabric is easy. First, let's master the classic technology of decorating in the form of a brooch. Used for evening dress, belt, bag decor, cosmetic bag, hair clip.
You will need: a 60 cm long scrap, a small amount of felt, textile glue and sewing supplies.
Ranunculus
To make a ranunculus you will need a standard kit:
- scissors;
- candles;
- tweezers;
- satin ribbon of different widths;
- glue gun;
- beads.
To make the petals, you need pieces of satin:
- 2×2 cm – 18 pcs.;
- 2.5×2.5 cm – 18 pcs.;
- 3×3 cm – 14 pcs.;
- 3.5×3.5 cm – 24 pcs.
You need to cut out round petals from them, like a peony, trim the base, melt it over the fire, fold the base like an accordion, hold it with tweezers and secure it with fire. The core of the ranunculus is made from a 5x5 cm piece of satin, into which a wad of cotton wool is sewn. It turns out to be a ball on which the petals will be attached.
Assembling the flower must begin with the smallest petals, pasting them over the stamen ball. Thus, you get a very beautiful flower that will suit any decoration as a decoration.
Christmas tree ball
What you will need:
- old smooth ball;
- ribbons;
- glue gun;
- beads.
Even a beginner can make such a ball. We evenly wrap a beautiful ribbon (gold or silver) around the old unnecessary ball, periodically securing it with glue. Then we glue a red satin ribbon diagonally. If desired, you can glue beads. Ready!
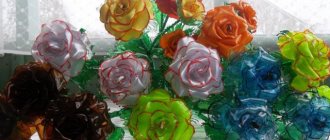
Wedding bouquet of ribbons
Over the past few years, wedding bouquets made from satin ribbons have become very popular. It's unusual and beautiful. Such a bouquet will please the eye for a long time, because it will not wither.
Handmade flowers made from satin ribbons for a wedding bouquet will become a unique symbol of family happiness.
By combining various flowers from satin ribbons, you can create decorations for hairpins or headbands, as well as themed bouquets with your own hands.
To complete it, you need to make a suitable number of flowers from ribbons (roses are most often chosen) and stick them on a foam ball with a handle. For greater strength and beauty, you can stick a needle with a stone at the end into the middle of each flower. The handle must be wrapped with a strong satin ribbon. As additional decor, you can use rhinestones and pearl beads.
Flowers made from satin ribbons are an effective way to decorate accessories, household items, children's items, and even make a wedding bouquet.
Areas of use
It is customary to highlight several areas of use for crafts made from ribbons. You can create such beautiful things together with your child.
According to pediatricians, children who do handicrafts have a higher level of development and activity. This is explained by the fact that when creating a certain craft, it is necessary to complete quite a few related tasks.
It turns out that when you teach a child to sew, you teach him to make decisions on his own. In addition, needlework develops fine motor skills, as well as accuracy, patience, attentiveness and perseverance. By making accessories from ribbons, children learn how to use a needle, and this skill will definitely be useful to them in later life.
Speaking of adults, fake ribbons can be used to decorate not only clothes, but also interiors for the holiday. This will not require significant financial expenditure, but such things always look original and stylish.
In addition, accessories made from satin ribbons can serve as a wonderful gift for family and friends.