What you need for work:
- A piece of fiberboard, or you can use thicker cardboard or glue several layers of thin cardboard together
- Toothpicks
- PVA glue and any other for decoupage
- A skein of delicately colored threads, in this case we will use pink
- Various elements for decoration, which can be, for example: beads, seed beads, sequins, rhinestones, buttons, and so on
Step number 1.
Download a heart template from the Internet, or Draw it yourself on prepared fiberboard
Step number 2.
Cut out the heart using a jigsaw, knife, or hacksaw.
Step number 3.
Step back about half a centimeter from the edges of the cut out heart. And at an equal distance, somewhere through every centimeter, make holes with an awl, or use a nail and a hammer.
Step number 4.
Take toothpicks and after applying PVA glue to one end, insert them into the holes made in the heart.
Step number 5.
Take the prepared threads and tie one end of the threads to one of the toothpicks.
We braid each toothpick with threads, as shown in the photo. It is necessary to alternate the thread from toothpick to toothpick, now inside, now outside.
On a note!
If the toothpicks are visible through the thread, then they can be painted the same color as the threads.
Step number 6.
Thread the toothpick threads all the way to the edge, and then secure the end of the thread to the toothpick inside the box.
Step number 7.
Now all that remains is to decorate our box with various materials. In this case, we glued a chain made of rhinestones to the bottom and top of the box.
In the middle of the box, pearl beads were glued to each toothpick.
DIY toothpick crafts. Simple instructions for beginners.
For many of us, a toothpick is just a hygiene item that can be used to tidy up the oral cavity after a hearty and tasty lunch. In fact, you can make a lot of interesting crafts for your home from these thin wooden sticks.
But I would like to say right away that crafts made from toothpicks require quite strong concentration and perseverance, so it will be better if you start getting acquainted with this type of creativity from the simplest and easiest objects.
DIY thread organizer
If you sew often and a lot, you have probably wondered how and where to store spools of thread. You can buy special spool holders, but why waste the money? Make a convenient thread organizer with your own hands! The spools will be stored in a certain order, the threads will not get tangled, and finding the right color will be easy. Order and organization of a needlewoman’s workplace is the key to success and good mood! We offer several ideas for storing spools and two master classes on how to make an organizer and a box for threads.
The general idea is that it is most convenient to store spools of thread on pins driven in horizontally, vertically or at an angle. Of course, you can put the spools in boxes and boxes with compartments, but it will take more time to find the ones you need.
What can be made from toothpicks: photo
Craft No. 1 Craft No. 2 Craft No. 3 Craft No. 4 Craft No. 5
Toothpicks are an excellent material for home creativity. Creative people use them to create a huge number of original items that become home decorations. In addition, the process of creating such crafts is an excellent alternative to passive relaxation in front of the TV. In this case, you will also be able to normalize your moral state. But in addition to relaxing, in the end you will make something with your own hands that can become a wonderful gift for one of your family.
Moreover, such a pastime can be a wonderful family activity that will help you bond with your child. As for what can be made from toothpicks, it all depends solely on how patient and diligent you are. If you wish, you can even make a large dollhouse and all the furniture in it from this material.
In addition, you can use toothpicks to make:
- Decorative flowers
- Animals
- Helicopter
- Christmas decorations
- Boxes
- Gift boxes
- Educational material for children
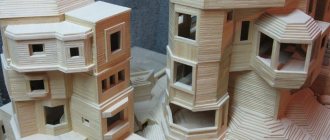
How to make a house out of toothpicks?
Recommendations for making a house from toothpicks
If you want the house to turn out right the first time, then before you start creating it, first draw the most accurate sketch of what you want to get in the end. If you are planning to make a multi-story building with a balcony and many windows, then estimate their sizes in advance and use a sharp knife to cut them to the required toothpick size.
Also at this stage you can paint over the part of the material that will be used to create the roof, windows and doors. In addition, do not forget to take care of the base on which your craft will stand. It will be better if it is made of very thick cardboard or any other dense material.
So:
- When the base is ready, take an awl and make holes in it, into which we will subsequently insert the transverse posts of the future structure.
- First, they will need to be lubricated with glue and only then lowered into the resulting holes. As soon as the glue dries, we can begin to build the walls of our house.
- To do this, take “logs” and carefully glue them to well-fixed transverse ones. Fix 5-6 toothpicks at one time, and then give the glue time to dry.
- Continue building the walls of the house, taking into account the window and door openings, and when this is finished, start assembling the roof.
- To do this, make two rectangles of equal size from toothpicks, and then use the same glue to glue them together.
Materials and tools
For any kind of work, it is very important how you need to prepare. You can find everything you need to produce this item for us on your farm. The following items will be required:
- Thick cardboard for the base.
- Threads. You can use different leftover yarn.
- Toothpicks.
- Decorative elements: beads, sequins, lace and so on.
- Scissors and PVA glue.
Advice! For work, choose a surface with sufficient lighting, because very small parts are used in the process.
If there is not enough light, it will lead to eye strain. To prevent this from happening, you can use an additional source, for example, a table lamp.
How to make a toy out of toothpicks?
Recommendations for making a well from toothpicks
If you want to please your child, then invite him to make a well from toothpicks. To make such a toy you will need glue, a piece of rope and, of course, the toothpicks themselves.
- Take four toothpicks, lay them out into a square and secure everything with glue.
- Next, we form the second square in the same way and fix them together
- We continue in the same spirit until we have the base of the well
- While it is drying, we make a roof, a rotor and supports from toothpicks on which all this will be attached
- To create supports, glue three toothpicks together, and for the brace, you will need to glue at least two
- To create a roof, we first form two small rectangles and then fasten them together
- Next, we fix the brace on the supports, wind a rope around it and use glue to fix it all to the base
- When these parts are well fixed, we attach the roof to them.
How to make a box out of toothpicks?
Rules for making a box
A box made from toothpicks can become a decoration for your bedroom or hallway. To create this craft, you will need to show a little patience and use all your imagination. As for the shape of such a product, it can be different. You can make it round, square or rectangular if you wish.
But no matter what the finished craft looks like, always remember that only the right decor will make it beautiful. In view of this, it will be better if you try to decorate the box with an interesting pattern of small rhinestones or simply multi-colored beads and satin ribbons.
Manufacturing rules:
- Cut out the base to the desired shape
- We make holes along the edge of the workpiece and insert toothpicks into them.
- We fix them with glue for reliability
- At the next stage, take a thread or thin ribbon and begin to twist its toothpicks
- If desired, a number of threads can be replaced with beads
- In this way we close the entire height of the toothpicks and carefully fix the end of the decorative material
- At the next stage we begin decorating the box
- Take decorative tape and attach it to glue along the edge of the bottom and top of the craft
Carrying out the box
Cardboard is used in the product to make the base, in other words, the bottom of the box. Let's imagine the box is square in shape.
You can choose a variety of shapes and create an unusual box shape.
After this, along the perimeter, actually next to the very edge, it is necessary to make alternate holes for toothpicks. For this you need to take, for example, a large needle. The holes are made in increments of a centimeter here and there. All that remains is to put toothpicks there and secure it with glue.
When everything has dried and strengthened, they begin to use threads that go around the toothpicks on one side or the other. As a result, the threads seem to run like a snake across the entire perimeter, so one row is formed. It is necessary to create quite a lot of such rows in order for thread walls to appear.
The rows should not be too compacted in order for the system to maintain a pleasant texture, but there is also no need to wrap the threads around the toothpicks very loosely. Still, it is necessary to obtain specifically dense walls for the box, where various items can be stored.
Crafts from toothpicks and skewers
Frame made of toothpicks
Toothpicks and skewers are decorative materials from which you can make many interesting things for your home. For example, you can make an original frame for family photos from this simple material. To create this craft you will need thick cardboard, glue, toothpicks or skewers, acrylic varnish and ribbon for decoration.
First of all, you will need to estimate how many toothpicks you will need to create your masterpiece, and then paint them with acrylic varnish. If you want the finished product to look as impressive as possible, then apply varnish in 2-3 layers. Yes, and this must be done before you start assembling the frame. It will be more difficult to do this efficiently at the very end, as the glue will interfere with uniform coloring of the material.
So:
- At the first stage, you need to cut the skewers to the desired length and file them as carefully as possible. Then we take thick cardboard and form a base for the frame from it.
- When the preparatory work is completed, take the skewers and begin to fix them on the base using transparent glue.
- After all the skewers are glued, we take a decorative tape and fix it along the inner and outer edges of our frame.
Making a box for storing spools and other sewing items
I think many needlewomen who actively sew have encountered the problem of storing spools of thread; we all want a compact and convenient storage place where everything will be neatly arranged, without confusion, in quick accessibility and visibility.
I had such a creative mess in my iron box, the threads constantly got tangled and fell out 
After watching a bunch of various master classes and gleaning bits and pieces from the world, I came up with the idea of such a miracle with 117 standard size spools, and a small compartment for other little things.
To work you will need the following materials and tools:
- a box of A4 paper (any other can be used) for the base;
- a sheet of cardboard or another larger box for the lid and bottom;
- two types of fabric, fleece - 2 cuts measuring 50*35 cm and 105*15 cm, viscose - 2 cuts 80*40cm and 100*20;
— padding polyester — 2 cuts 80*10 and 20*30;
— lace ribbon 1 m;
— a metal plate with A4 format holes;
— bolts of the required length and width suitable for the holes in the amount of 117 pieces;
- regular tape and double-sided tape;
- glue gun;
- stationery knife, ruler and pencil.
Let's get to work.
Step 1. Cut out all the parts from cardboard.
Since my box is very deep, I cut it and the height became 10 cm.
We don’t throw away the cut parts; I made a second layer of walls from them for greater strength and sealed them with tape.
Now we make the lid and bottom with the back wall.
You should get 3 parts, a lid measuring 23*31 cm, the inside of the lid measuring 19*27 cm and a bottom with a side measuring 31*33.
At the bottom from the edge with a length of 33 cm, measure 10 cm for the side and bend it.
It should look like this:
Step 2. We make and decorate the inside of the box.
We glue double-sided tape on all sides along the outer edge of the box.
Next, we sew a piece of fleece measuring 105*15 cm and glue it onto the prepared tape with the seam facing inward.
We also glue the tape along the inside, along the bottom of the box and fix the material.
Now let's move on to the main structure of the box, these are our spool holders.
To be neat, it is better to wipe all metal parts well with a damp cloth.
We take a metal plate and use it to cut out a fleece piece with hem allowances.
We glue double-sided tape to the plate to secure the material, and to the hem on the reverse side.
For additional fixation, I also sewed the corners with thread.
Now we take our screws and a stationery knife.
From the inside, we push our bolt into the hole so that the fabric rises a little and carefully cut the fabric on the bolt a little, and pull the bolt into the resulting hole.
To make it convenient and prevent the bolts from falling out, I secured them on the inside with tape.
In this way we fill the entire required area of the plate, I got 117 holders, you can make more or less, depending on your desire.
If you noticed, on the inside I additionally secured the edges along the entire perimeter with thread so that when inserted into the box the edges would not turn out.
The result is the following internal part:
3. We make and decorate the outer part of the box.
Now we need a glue gun, fabrics and the rest of the cardboard parts.
Let's start with simple details.
We make a soft side for the box, for this we take a padding polyester measuring 80*10 and a piece of viscose measuring 100*20.
We lay the padding polyester on the fabric with allowances on all sides, then fold one side and iron it along the edge to fix it.
We make the bottom and lid of the box.
We glue double-sided tape around the perimeter of the lid and fix a piece of padding polyester measuring 20*30 cm onto it.
We lay out a piece of viscose 80*40 cm on the table and place our cardboard parts on it.
Glue a piece of fabric to the joint between the lid and the bottom.
We bend all the edges inward and fix them with glue.
It turns out this is the folder:
Now let's assemble our box.
Take the lace ribbon and cut it into 4 equal pieces, these will be our ties.
We glue tapes on the inside of the lid and glue the inside of the fleece lid.
We also glue our side, first along the top edge and attach it to the fleece, don’t forget about the ties, we get three soft sides, the face and the sides, only the edges go onto the back wall for fixing. Then we bend and glue the lower fabric allowances under the bottom of our box.
Now we coat the bottom well with glue and insert the main part, then we also coat the back wall and glue it.
That's it, our miracle box is ready.
I really hope that I have described everything clearly and correctly, but if you have any questions, I will be happy to explain all the points.
I wish everyone a good mood and creative success.
Thank you for your attention, with respect Olga Balashova.
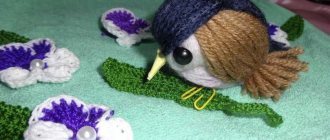
Crafts from toothpicks and plasticine
Spider made from plasticine and toothpicks Hedgehog made from plasticine and toothpicks
If you think that a craft made from plasticine cannot be beautiful, then you are deeply mistaken. Using this pliable material, you can create many attractive toys that your children will definitely love. The simplest craft made from plasticine and toothpicks is a spider. To create this product, you will need to form the body of a spider from plasticine, and then make its legs from toothpicks.
To make them as realistic as possible, do them in two stages. First, stick a whole toothpick into the body, and then cover its end with a plasticine ball and fix a smaller piece of toothpick into it. If you do everything correctly, you will end up with a spider that can stand on its own.
Using the same principle, you can make a hedgehog. You will also need to start making crafts by creating the body, and when it is ready, using toothpicks you will make needles for this cute animal.
We are building a house
Creating a toothpick house is considered a complex and careful job (by the way, it can also be created from matches).
You shouldn’t start working with the material right away. Beforehand, scroll through your head about what specific house you want and draw a sketch of it. If you are planning a high-rise house with a veranda or balcony, then you should consider the length of matches or toothpicks, maybe even cutting them to the appropriate size. When planning a roof from a separate material, you can prepare and paint the roof in a suitable color in advance. You also need to do the same with the windows and door. The fundamental point is to prepare the base for the entire structure. To do this, choose either thick cardboard or another material that can hold the composition even when suspended.
- Having prepared the base, use an awl to make holes on it for the cross posts of the future house.
- Lubricate the racks with glue and insert them into the holes. Wait for the glue to dry.
- Build walls from individual pillars, painstakingly and carefully “planting” them with glue that is used to lubricate the pillars.
Crafts made from toothpicks and paper
Paper flags Decoration for cupcakes Decoration for cupcakes
If you are planning to arrange a themed party for your guests, where they can taste dishes from different countries of the world, then you can try to make flags for this holiday, telling those present what dishes of the country they are eating.
If you don’t want to bother, then find templates on the Internet, print them, cut them out and simply glue them onto a skewer. If you are willing to spend a little more time, then paint them by hand and further decorate them. It’s just that in this case the standard flag can be replaced with a flower, a heart or some kind of animal.
Crafts from toothpicks and matches
Chair from toothpicks
Now we will tell you how, using matches or toothpicks, you can make a rather cute doll chair, which, despite its miniature size, will not differ in any way from a standard product.
So:
- First of all, place two matches on a flat surface (they should lie parallel to each other).
- Then take a toothpick, cut it in half and place the two parts between two matches.
- Then we cut another piece of toothpick and place it exactly in the middle of the matches.
- Next, we form the base for the seat and the front legs of our chair from matches.
- When all the parts are ready, we begin to assemble our craft.
- At the last stage we make the seat, fix it to the base and the chair is ready.
Crafts made from toothpicks and foam plastic
Dandelions from toothpicks
You can make pretty cute dandelions from toothpicks and foam plastic, which will become an original decoration for the kitchen or living room. You can adjust the size of this decorative dandelion using the length of a toothpick. The smaller the craft you want to end up with, the smaller the pieces you will need to cut the wooden skewer into.
- Cut toothpicks into pieces and paint them in the desired color (if you wish, you can make them multi-colored)
- If you want the dandelion to be brighter, then be sure to paint the foam ball yellow, beige or lemon color
- Next, take toothpicks and start sticking them into the foam
- We try to arrange them in such a way that there is a minimum distance between them
- Continue these steps until the toothpicks cover the entire surface of the foam ball.
- Next, take a wooden twig or a thin bamboo stick and also stick it into the ball
- For greater realism, you can attach paper or fabric leaves to the twig.
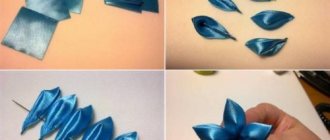
Crafts from toothpicks and threads
Mandala from toothpicks and colored threads
You can make your own mandala from threads and toothpicks that will help you fulfill your cherished desire. All that will be required of you in this case is to choose the right color scheme for the craft and, when creating it, think only about what you want to get with its help. If your goal is love and passion, then use all shades of red to create it.
If you want to bring happiness and joy into your home, then dilute the main color with yellow and green shades. To make this craft, you will need standard toothpicks and thick threads. At the initial stage, you will need to cross two toothpicks, secure them together with thread and wrap it around the protruding parts of the product at least 10 times.
If you did everything correctly, you should end up with a perfect diamond shape in the center of the crossed toothpicks. In this way, we make another similar blank, and then we put them on top of each other and twist them together with threads.
How to make a craft for children from toothpicks on March 8?
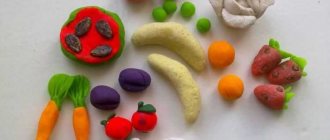
Hedgehog made from fruits
Using toothpicks you can create not only a toy or a decorative ornament, but also a completely edible craft that will become a real decoration for the holiday table for the youngest representatives of the fair sex. Now we will tell you how to make an edible hedgehog, which you can eat for dessert at the end of the holiday.
To make it you will need:
- Banana or pear
- Toothpicks
- Grape
- Mint leaves
So:
- Take the pear and trim it slightly on one side (this should be done for stability)
- Find the smallest grape, place it on a toothpick and fix this blank on the narrowest part of the fruit
- Next, start preparing the needles. To do this, take toothpicks and string grapes on them
- We take the needles and stick them into the pear one by one
- Place the finished hedgehog on a plate and garnish with mint leaves.
Individual finishing crafts
The interesting thing about this box for us is that on one side the walls are quite dense, but at the same time there remains a certain feeling of airiness and lightness. When the walls are completed, additional decoration and processing of the bottom is done.
The cardboard can be treated with colored paper or you just need to glue the bottom part with threads. Various decorative elements are placed on top. For example, beads or something similar can be placed on the top of each toothpick. Fabrics can also be used (The structure of tissues of living organisms is studied by the science of histology)
or pieces with fringe
The box turns out to be open, but that’s the point, because the walls are beautiful both from the inside and the outside. In order to add aesthetics, you can use different colors of threads, if toothpicks are missing, you can also take cotton swabs, which actually do not differ in any way. If there is a need to create the hardest walls and give the craft additional strength, they (the walls) can be lightly varnished.
How to make a craft for children from toothpicks on February 23?
Construction set made from toothpicks and plasticine
If you are a little strapped for money, but still want to give your son a gift, you can try making him a very interesting construction set from toothpicks and plasticine. To create this original gift you will need plasticine, toothpicks, and a bright box where you can put it all.
Next, you will need to take plasticine and make perfectly round balls and triangles out of it. All these blanks will need to be put in a gift box, toothpicks should be rinsed here and the gift will be ready. All you have to do is show your child what figures can be made from the elements he has.
How to make a craft for children from toothpicks on May 9?
Recommendations for making a helicopter
Recommendations for making a boat
In our country, the holiday of May 9 is considered special, so gifts on this day should be as memorable as possible. Of course, in this case, it is better not to give flowers, boxes or toy furniture as a gift. If you want your child to treat this holiday with the same warmth and respect as you do, then try making a helicopter for him, for example.
This craft will look especially original if you paint it in the colors of your country’s flag. If you already have such a product, then you can make a boat and decorate it with decorative flags. We told you how to do them correctly at the beginning of our article.
Decorating the box
Decoration can be done in one of the following ways.
- Color it with a design drawing of your own idea.
- Cover with varnish or regular paint.
- Decorate using decoupage technique, pasting over elements cut from napkins and covering them with varnish.
- Decorate with additional elements: buttons, rhinestones, beads, etc. You can change the image and artificially age the product.
Make a box according to your preferences, don’t be afraid to fantasize and use your imagination. This item will become indispensable for a housewife, and can also be an excellent gift for friends.
How to wash flannelette blankets?
Stock yarn - what is it?