Specifics of making flowers from satin ribbons
Making flowers from satin ribbons with your own hands is a painstaking but fascinating task.
The main tools for making jewelry are:
- Satin ribbons of suitable width. The color and texture are to the taste of the craftswoman.
- Sewing kit. It must contain threads, needles, and scissors.
- Glue gun. For fixing petals to the base or for decoration. If you don't have it, you can use superglue.
- Additional decorative elements. Beads, bead buttons, sequins, rhinestones.
- Fire (matches, lighter, candle). Necessary for melting and securing the petals. Also, cuts of tapes are treated with fire so that they do not “crumble.”
With proper use of available materials, the flowers come out strong and of good quality. They can be attached to elastic bands, hairpins, headbands, or arranged into bouquets.
DIY kanzashi technique (for beginners)
Beautiful flowers made from ribbons using the kanzashi technique can become the basis for exclusive accessories. Most often these are hair clips (elastic bands, hairpins, headbands, headbands, clips, combs, etc.). In addition, using fabric and ribbon details as a basis, you can create all kinds of souvenirs and decorative elements for belts, jewelry, handbags, boxes, cosmetic bags, wallets, hats, shoes, and so on.
Kanzashi craftswomen know how to handle ribbon, namely, fold pieces of a certain shape and size into petals and leaves of different flowers. Petals can be modeled from ribbons of different colors and assembled in an unusual way into wonderful products. Traditional accessories for kanzashi are satin ribbons; they can be of different sizes, colors, plain or decorated with polka dots, flowers and other ornaments. In second place in popularity are organza, grosgrain ribbon, silk, lurex fabric, and lace. Since satin ribbon is available and cheap, it is used as the main material for making products, all others are usually used as an addition.
This lesson provides the basic tools that you cannot do without when it comes to creating kanzashi products. Additional elements are shown that make the finished jewelry elegant and complete. A step-by-step diagram for assembling is described , and examples of finished flowers are shown.
Tools for making jewelry using the kanzashi technique
If you plan to engage in such interesting handicrafts for your own pleasure or produce products for sale, you need to stock up on the following tools (photo 1):
- ruler and scissors - the tape needs to be measured and cut;
- strong thread with a needle - some petals are collected into a flower using thread;
- with a lighter - on a cut of any fabric (and especially satin) protruding threads are always visible, they can be quickly and imperceptibly eliminated with a flame;
- a glue gun and glue to it - to make a decoration, it is glued to the base, and hairpins or pins are also attached using glue;
- tweezers - this tool is needed for ease of work, especially when it comes to complex petals;
- with a wood burner (or soldering iron) - hot metal also allows you to cut satin, like scissors, only the cut is neat, and in some cases, even soldered in half.
Hair Accessories Basics
Flowers, bouquets, leaves, insects (butterflies and dragonflies), made from ribbons, can be attached to various bases: hairbands, hoops (plastic or pre-braided with ribbon), elastic bands, clips, crabs, combs, pins, and so on (photo 2).
Additional decorative elements
To form the centers of flowers or to decorate petals and leaves, all kinds of buttons, half-beads and centers are used. They should be selected depending on the purpose of the hairpin, color scheme and size (photo 3).
Also popular are cartoon hearts with funny faces, insects, and mushrooms (photo 4).
They are suitable exclusively for children's products. You can decorate a flower using bead huggers of different shapes (photo 5).
Elegant centers allow you to instantly elevate the appearance of products and disguise flaws. In addition to satin ribbon, I sometimes use brocade ribbon to make petals, which looks solemn and makes the decorations brighter and more elegant (photo 6).
Types of petals
Satin ribbon flowers are collected from petals of different shapes. The main ones are sharp and round. Any type of petal can be made with your own hands. The sharp shapes of the petals are suitable for making flowers such as aster, chamomile, dandelion, sunflower, bluebell and others.
The varieties of sharp petals are:
- spicy double (triple);
- sharp with a curl in the center;
- sharp convex (convex).
Round-shaped petals are used to create flowers such as roses, lilacs, ranunculus, peony and others.
The varieties of round petals are as follows:
- two-color round (double);
- round for rose;
- round inverted;
- round flat;
- round narrow;
- round with a heart.
Kanzashi products
The petals shown are basic. Taking into account the technique of their manufacture, combining individual parts and colors, you can experiment and create more and more new options (photo 30, 31).
With some skill, you can simulate satin analogues of flowers of different varieties: asters, chrysanthemums, roses, sunflowers and others.
From the shown petals, by assembling them with thread or glue, elegant flowers are obtained. All that remains is to come up with options for decoration: stamens, buttons or centers, and also take care of the base of the decoration, for example, a hair clip (photo 32).
Collect flowers from petals and glue them to green leaves (photo 33).
Glue the pieces together into a bouquet and glue them to the clip.
The finished flower fantasy is modeled from the kanzashi petals presented to your attention.
Did you make beautiful flowers? Then look at how you can attach them to elastic bands and hairpins - 5 options:
Master class for beginners: a simple flower in 5 minutes
A satin ribbon can turn into a flower in just 5 minutes. From this you can calculate that, for example, a hairpin with your own hands will be done within 7-10 minutes. It is necessary to strictly follow the instructions.
Step 1. Preparation of necessary materials:
- scissors;
- tweezers;
- needle and thread;
- candle;
- bead;
- pieces of satin ribbon 5x5 cm.
Step 2. Preparing petals . To do this you will need:
- fold a square of satin ribbon diagonally, marking the sharp ends with the numbers 1 and 2;
- combine ends 1 and 2. In the resulting triangle, mark the new acute angles with numbers 3 and 4;
- fold ends 3 and 4, resulting in a sharp petal;
- cut off excess material (cut a right angle parallel to the folded side and an acute angle parallel to the fold);
- solder the cut edges with a candle or lighter, fixing the petal with tweezers for convenience.
Step 3. Flower formation. The bases of the petals need to be connected with a thread like beads, tightened and decorated with a flower. Then you should glue the petals together for a more reliable fixation.
Step 4. Decoration. The middle of the flower must be decorated with a bead or button (optional). It is possible to add rhinestones or small stones to the center of the petals.
Materials for creating kanzashi petals
Products made from ribbons for the first time do not always turn out flawlessly and delicately. For beginner craftsmen, you will have to work a little and get better at it. If you are patient and strive to make the ribbon leaves the right way, then you are sure to end up with an exquisite DIY decoration. And visible flaws can be easily hidden with satin ribbons or beaded thread.
Before starting your activity, you need to prepare the appropriate material and tools:
- material made from satin ribbons of different sizes. Organza, silk or simple fabric are also suitable. For beginners, it will be better to work with tapes;
- Scissors are useful for cutting ribbons. If you have a soldering iron, cut the tape by placing an old cutting board under the tool;
- glue gun with clear glue. It does not leave traces of stains after the elements of the craft are connected;
- needle and thread. With their help, kanzashi petals will be collected;
- a candle or lighter will be needed to singe the edges of the satin ribbon. This technology will prevent threads from shedding;
- Tweezers are not necessary, but they are more convenient for holding the sliding bands than holding them with your own hands.
The first stage of creating all types of petals begins the same way. The ribbons are cut into equal squares and neatly folded. This method is reminiscent of the art of origami. The rectangular element is folded in half diagonally, and then again in the same way. You should get a triangle resembling a small book. This basic blank is the primary component of all types of petals. Let's look at them in more detail.
Flower made of satin ribbons 2.5 cm - step by step instructions
A 2.5 cm wide satin ribbon is perfect for creating lush flowers with your own hands. When finished, they resemble a bush rose. The technique is simple.
Step 1. Preparation of necessary materials:
- pieces of tape 2.5 cm wide and 7 cm long;
- needle and thread;
- fire;
- scissors.
Step 2. Preparation of petals. You need to melt the cut edges of the tape, bend the tape on each side so that you get a trapezoid, and additionally melt it to secure it. Then you need to do the same with all the tapes.
Step 3. Flower formation. It is necessary to sweep each petal blank along the bottom edge, pull the thread and fasten it, then sew the bases of the petals so that you get a flower.
To add volume, you can attach 3 more petals on top or leave the flower in a single layer.
Step 4. Decoration. Beads glued in the center, imitating the core of a flower, will look harmonious.
For the rim
Any flowers are suitable for decorating the headband, such as large and lush roses, peonies, chrysanthemums, zinnias, as well as small roses, jasmine, and bells.
To make a headband with a jasmine branch, you will need:
- a headband wrapped in a satin ribbon the color of the first green;
- a strip of rounded felt 2x16 cm of the same color;
- yellow plastic stamens - 1 bunch;
- pieces of white satin ribbon 5×5 – 25 pcs.;
- pieces of green satin ribbon 2.5x3 cm - 25-30 pcs.;
- thread, needle, scissors, glue.
Jasmine flowers form very simply. It is necessary to sweep a diamond shape on a white piece with white thread, then tighten the thread, insert a plastic stamen inside and sew it up. It takes 3 to 5 minutes to make 1 jasmine flower.
Important! When basting, the thread should not be interrupted, otherwise it will be impossible to form a flower.
To make a sheet from a green piece of satin ribbon, you need to fold it in half and round it off on one side with scissors. Then you should melt the edges and, while they are soft, slightly deform them in the manner of a jasmine leaf, gather the lower edges and melt them.
The finished elements are glued evenly onto a strip of felt to create a jasmine branch. You need to let it set and glue the finished composition directly to the rim.
For hairpins
To decorate hairpins, small flowers of light weight are often chosen, otherwise the hairpin will not hold the hair well and will slip off. Ideal options are small roses, one small chamomile, and aster. A very fast and beautiful flower is obtained from only 3 petals. A satin ribbon 5 cm wide is cut into 5 cm pieces. You need to make circles from the resulting squares.
You need to fold them in half and sweep them in an arc, tighten them, forming a petal with your fingers. Then you need to sew 3 petals together and glue a bead in the center. The resulting flower is glued to the hairpin. Note. If the flower is not large enough, you can increase the number of petals to 5-7. However, it is necessary to select a larger core size.
Master class 5. Poinsettia with leaves
It's time to tell you how to make poinsettias from ribbons, which can be used to decorate anything, for example, an autumn wreath as in the photo below.
What you will need:
- Ribbon 4-6 cm wide in red, cream or any other desired shade;
- Green ribbon (for leaves) 2-3 cm wide;
- Scissors;
- A needle and thread to match the ribbon for the petals or thin copper wire (jewelry);
- Beads;
- Hot glue.
How to make a poinsettia from ribbons:
Step 1. Cut three pieces of equal length from the ribbon. How long should the segments be? It depends on what size flower you need. If you want to make a flower with a diameter of 12 cm, then the segments should be exactly this length.
Step 2. Give the resulting rectangles a diamond shape. You can do this in the following way: stack the pieces on top of each other, fold the stack in half, then give the resulting square a triangle shape by cutting off the excess on the sides. Voila, you've got diamonds!
Step 3. Pinch each diamond in the middle and tie the folds with thread (you can do a couple of stitches) or jewelry wire.
Step 4. Place all three pieces next to each other, then tie them with thread or jewelry wire to create a flower. Adjust the petals if necessary.
Step 5. Glue several stamen beads into the center of the flower.
Step 6. Now let's work on the leaves. Cut two lengths of 6-9 cm from the green ribbon (the length of the pieces should be approximately three times the width of your green ribbon). Place one of the rectangles on the table, wrong side up. Bend its right side downwards along the bias so that the workpiece takes on an L-shape (see photo). Now fold your letter G in half to create a house-shaped piece with a roof. Gather the bottom of the “house” with a couple of stitches or glue.
Step 7. Now the leaves can be glued/sewn to the back of the poinsettia, to a felt round base (if you have one) or directly to a decorative object (headband, pillow, etc.).
Ribbon roses
There are at least 5 techniques for making roses from satin ribbons.
For beginners, the following option is suitable:
- A ribbon 6 cm wide and about a meter long is folded in half lengthwise.
- The folded tape is swept along its entire length. It is necessary to start and end at an angle of 40-50° to give more volume to the flower.
- Assemble the resulting workpiece.
- A bud is formed, securing it with threads.
- Wrap the ribbon around the bud, forming a flower. Periodically secure the layers at the base so that the rose does not fall apart.
- The final stitches should go through the entire flower, while being invisible. The thread should be the same color as the ribbon.
Classic bauble made of two ribbons
You will need: satin ribbons of two colors of the same width, 1 meter long.
Master Class
- Connect 2 ribbons, step back 10 cm from the edge and tie a knot.
- Fold the edge of one ribbon and wrap it with the other ribbon.
- Tighten the knot.
- Fold the loose ribbon into a loop, then thread it through the completed first loop.
- Pull up the first loop (the second loop should become larger).
- Fold the first ribbon and thread it into the second.
- Tighten the loop.
- Repeat the weaving process until the desired length of the bauble.
- Tie a knot.
The classic bauble of two ribbons is ready!
Kanzashi chamomile
To make chamomile you will need:
- white satin squares with a side of 5 cm;
- glue gun;
- fire (candle, lighter);
- tweezers;
- scissors;
- decor
First you need to prepare the petals. To do this, the atlas square is folded diagonally, then the sharp corners are folded towards the center. The resulting petal is folded in half. The tip is cut off and scorched with fire. Then fix it with tweezers on the other side and cut off the base parallel to the fold. They are scorched with fire so that the ends are soldered together. 15 such petals are prepared.
Carefully glue the petals at the base, forming a daisy. Glue a yellow button or a circle of yellow felt in the center. Kanzashi chamomile can be used to decorate a hairpin, a child’s handbag or a headband.
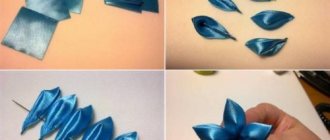
How to make a voluminous rounded petal from ribbon
The basis of the rounded satin petals of kanzashi, from which daisies are modeled, is also a square (photo 15).
The square is bent diagonally (photo 16).
And then you need to unfold the resulting triangle at a right angle downwards, bend the two sharp corners symmetrically downwards and join them at the central corner (photo 17).
When gluing the ends of the triangular blank, take care to form a rounded petal, shaped like a droplet (photo 18).
The lower part of the petal should also be cut off and singed for neatness and to give a more suitable shape (photo 19).
This is how you should get a rounded volumetric petal (photo 20).
Lush flower made of satin ribbon
A lush flower is formed from round petals singed along the entire perimeter. They are carefully glued layer by layer to the base. There should be at least 10-12 petals. They can be either the same color or different.
The set of tools is similar:
- satin squares with a side of at least 5 cm;
- scissors;
- fire;
- stamens – 3-5 pcs.;
- glue gun
Tips for beginners to get kanzashi-style products right the first time
Instructions for Beginners
To get kanzashi-style products right the first time, you need to follow some tips :
- Start your experience in kanzashi made from lightweight fabrics
- It is better to make the round petals of your first product not from satin, but from silk - it bends better
- Make your first products from dark fabric - light material can darken when cauterized, so only experienced craftswomen work with it
- When making sharp petals, bend them all in one direction, otherwise you won’t get the resemblance of a living flower.
- To make kanzashi flowers, choose a thick satin ribbon rather than a thin one
Aster
To make an aster you will need the following supplies:
- pieces of satin ribbon 2.5×5 cm;
- tweezers;
- scissors,
- fire;
- glue gun;
- several circles of felt.
For a medium-sized flower, 30-40 petals are needed. It all depends on the desired number of layers and the diameter of the aster. The petal is made in two stages.
- Stage 1 . A strip of satin is folded in half lengthwise and clamped with tweezers. The edge is cut at an acute angle and sealed with fire.
- Stage 2 . From the opposite edge, the strip is folded like an envelope, clamped with tweezers and fixed with fire.
Petals are glued onto the felt circle along the very edge. The next layer is glued closer to the center. The petals are placed visually between the petals of the first layer. The same is done with all layers. The number of petals in each subsequent level decreases. The finished flower is decorated with a bead core. You can also combine the colors of the petals.
Weaving the headband with ribbons - 3 detailed photos of the master class
Each needlewoman strives to make her product flawless and it often happens that when making a decoration for a headband, its color does not match the product. However, there is a way out, and more than one. Today we will devote our master class to how to weave a headband to match the product, make it multi-colored, or weave a bauble to decorate it.
Headbands 1 cm wide can be braided with two, three or even four ribbons. For headbands 1 cm wide or less, I recommend using ribbons 0.6 cm wide. Very thin headbands can simply be wrapped. It is better to braid wide models 4 - 5 cm with 4 ribbons, because they widen towards the center and narrow towards the edge, and therefore it is difficult to braid with 2 12 mm ribbons evenly.
As for the cloves, there is no need to cut them off; on the contrary, I prefer rims with cloves. They stay on your head better and stay more secure when braided into a ribbon. If a child complains that the teeth are pressing on the head, then they can first be covered with an additional layer of tape to soften the teeth.
Braiding the headband using the “Zigzag” method
Let's consider braiding the rim with ribbons 12 mm wide. I use contrasting colors for clarity. Let's take pieces 80 cm long and a rim 12 mm wide.
To begin with, we will paste the edges with pieces of tape and melt the protruding ends of the tape with a lighter.
Place the ribbons crosswise on the edge of the headband and secure with a clip. We will leave one edge of the tape a little longer so that we can wrap it around the tip. So, we have two ribbons - left and right.
We insert the top ribbon, which is on the right (black), under the bottom of the rim and bring it under the ribbon on the left (red). We lift the red ribbon and put a black one under it on the rim.
Now we again have ribbons on the left and right sides.
- We put the red ribbon under the rim and bring it out under the black one, which we lift and put the red ribbon under it and again draw it under the rim.
We continue to repeat the steps. We pass the top ribbon (black) under the rim, and the red one on its front side.
We make sure that the ribbons, being on the same side, are parallel to each other. And the corners of the picture were even.
Having finished braiding, we cut one ribbon and glue it. We leave the second one to wrap the edge. We leave the exact color of the ribbon that we left at the beginning.
Checkerboard pattern
For kanzashi jewelry, weaving the headband with a checkerboard pattern is suitable. For this, we will need 3 ribbons 0.6 mm wide, 1 satin and 2 brocade. You can use any. Brocade ones are the length of the headband plus 2 cm, and satin ones are about 2 meters.
Glue the brocade ribbons to the back of the headband at the edge. Glue a satin ribbon at an angle of 90 degrees. Apply a drop of glue on the outside of the headband and glue the brocade.
We wrap the edge with a satin ribbon, also fixing it with glue. The ribbon is located on the left, lift the nearest brocade ribbon and draw the satin one under it. Wrap around the rim.
In the second pass, we place the satin ribbon on the first brocade ribbon and draw it under the second one. Then again under the rim. We continue to alternate the braiding to the desired length. When finished, glue the brocade ribbons to the back of the headband and wrap the edge with satin ribbon.
Ribbon bauble for headband
To make the headband colored to match the decoration, simply cover it with ribbon. But if you want to make a beautiful decor, then weave a bauble from narrow 0.6 cm ribbons and glue it to the headband. You will need approximately 3 meters of tape. Fold it in half and make a loop on the left. On the right we make a second loop and thread it through the first. Tighten the knot.
- There remains a loop on the left, into which we will thread a loop made from the ribbon on the right and slightly tighten the left ribbon.
Now we have a loop on the right, which means we will thread the loop into it that we will make on the left. And let's tighten the ribbon again. We repeat these actions, alternately left and right, until the length of the bauble is not enough to cover the rim.
To finish the weaving, cut and glue the ends of the tape. All that remains is to glue it to the rim.
Source: https://kanzashi.club/dlya-nachinayushhih/kak-oplesti-obodok.html
Bell
When making a bell, the following materials are needed:
- pieces of satin ribbon 5x5 cm - 5 pieces;
- fire;
- tweezers;
- scissors;
- stamens – 1 bunch;
- glue gun
Bell petals are ordinary sharp petals, with the seam turned inward. One stamen is glued to each petal at the base. Then you need to glue their sides together, forming the flower itself.
The leaves of the bell are made in the same way as the petals, only the ribbon must be smaller in width. They should be secured with a glue gun under the flower so that they stick out slightly.
Necessary materials for work
Despite the abundance of trends and proprietary techniques, the materials and sets of tools used are approximately the same:
- Satin ribbons of various shades. To create flowers, you should take ribbons that are wide enough so that you can form beautiful petals and inflorescences.
- Scissors, threads, needles.
- Glue, glue sticks.
- Several tweezers.
- Decorative elements (beads, fishing line, sequins).
- A table lamp with a fairly bright light.
And, of course, stock up on detailed diagrams for work.
Hibiscus
To make hibiscus you will need:
- satin ribbon cut into squares 5 cm wide;
- fire;
- scissors;
- tweezers;
- stamens;
- decorative wire;
- glue gun
You need to cut teardrop-shaped petals from the squares. Before assembling the flower, you need to corrugate them. To do this, the petal is folded like an accordion into 4 rows, then twisted into a rope and carried over the fire for several seconds. The cooled petal is unrolled.
A wire is glued to half of the petal on the wrong side. There should be at least 7 such petals. It all depends on the desired volume of hibiscus. Several stamens are twisted together and a bud of petals is formed around them. Then the petals are slightly leveled and arched.
Volumetric curl flower
Materials and accessories
We will need:
- satin ribbon – width 25 mm;
- satin ribbon of the same color for the base - width 4 cm;
- finished bead center (optional);
- glue gun;
- thread, needle, scissors.
Description
We prepare pieces from the tape, as shown in the photo.
Place the ribbon face down. We turn the right end at a right angle.
Fold the left edge in half. Fold the left edge down. We wrap the right edge into the middle and seal the edge with fire.
This is how we prepare all the petals. Now you can start assembling. From a wide ribbon we cut out a circle with a diameter of 4 cm. We glue the first row of petals onto it.
Then the second row. Glue the third row on top. For the fourth row, we glue the petals separately.
Once connected, glue them into the center of the flower.
You can decorate the center of the flower by gluing the finished center.
The second option is to make another, fifth row of eight petals. We roll them up. It turns out something like a slightly blossoming bud.
Glue it to the center of the flower.
Narcissus
To make one daffodil you need:
- scissors;
- fire;
- tweezers;
- glue;
- 5 squares of white satin ribbon 5x5 cm;
- 3 yellow squares 4x4 cm.
The petal is made like this:
- A square of white satin is folded diagonally twice. Sharp corners must be folded like an accordion into 1 row on each side, then clamped with tweezers, cut off the excess and soldered with fire. You should get a petal with two folds inside.
- The upper edge of the petal is clamped in the middle with tweezers and melted with fire. It has a slightly pointed shape.
The stamen is made in a similar way, only the upper edge is not pointed.
Assembling a flower involves sequential gluing of all elements. The resulting daffodil is practically indistinguishable from the real thing.
creative craft
You will need: a foam circle, a glue gun, a wide black satin ribbon, a thin orange satin ribbon, decorative spiders, scissors.
Master Class
- Wrap the foam circle with black tape and secure with glue.
- Prepare 8 pieces of orange tape larger than the diameter of the circle.
- Glue the pieces of orange tape to the black circle so that they intersect in the center and resemble a snowflake.
- Prepare pieces of orange tape and glue them to form a web as shown in the image.
- Glue the spiders to the web.
A creative craft made from satin ribbons is ready!
Poinsettia
Even beginners can make a poinsettia flower from satin ribbons with their own hands.
The required materials are:
- pieces of tape 5 cm wide and of different lengths;
- scissors;
- fire;
- glue;
- large stamens;
- wire.
The petals need to be cut out. To do this, pieces of tape are folded diagonally and cut out to form a petal. On top of the edges, 2 cuts are made on each side. The blanks are melted over a fire and the edges are slightly deformed. In total, you need 3 petals 5 cm long, 5 petals 6 cm long and 5 petals 7 cm long. Leaves are made in the same way - from pieces of 5x7 cm.
Assembling a flower begins with sequentially gluing together petals of equal length. The first layer of small petals is glued to the stamen, then the next layer is of larger petals, and the largest ones are glued last. The petals must be arranged in a checkerboard pattern.
You need to glue the wire to the leaves on the back side. They are attached to the flower by wrapping the stamen with wire.
Kanzashi leaf with folds
Cut off one melted edge of the workpiece and cut the base to create an open part.
We process the edges with a lighter and pull them out a little, resulting in a slight waviness. At the base we also melt the tape with fire.
We make several folds, first on one side, then on the other. We melt the bottom of the leaf and “flatten it” with our fingers so that the base is flat. These leaves look great with strawberries.
The next master class is dedicated to rose leaves, I will make them double using glue and wire.
Dandelion Kanzashi
To make a dandelion you need:
- ribbon 0.6 cm wide in yellow and green colors;
- scissors;
- fire;
- glue gun;
- felt circle with a diameter of 4-5 cm;
- tweezers.
The technique is as follows:
- The tape must be cut into strips 7 cm long. Fold each in half and solder the ends. These will be dandelion petals. Green ones need at least 25 pcs., yellow ones at least 27 pcs.
- Green petals are glued around the perimeter of the felt circle using a glue gun. The second layer is also glued in a checkerboard pattern from green petals.
- All subsequent layers are glued with yellow petals. This way you get a voluminous chamomile, which is perfect for decorating headbands and hairpins.
Various crafts made from kanzashi flowers
There are a lot of ideas for decorating with kanzashi flowers. Crafts using the kanzashi technique will go with almost anything. It is possible to attach original flowers to any craft or painting.
You can make entire paintings on canvas using the kanzashi technique. Various decorative swans or cockerels, as well as all animals, can be collected and made in the kanzashi style.
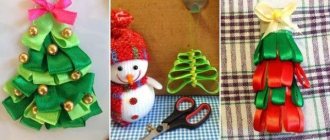
For the upcoming holiday, if you wish, you can make a beautiful card for your loved ones with flowers from kanzashi and beads. And for the New Year, a cute Christmas tree made from green kanzashi.
In the same way you can make eggs using the kanzashi technique. In order to transform the room, you can add a decorative bird for kanzashi curtains. You can create as many decorative products from kanzashi and imagination as you like.
Photos of the kanzashi technique can be viewed on any handicraft website. On the Internet you can see in detail how various products are made. Don't just start with a difficult task. It is important to understand the features of the technology and the stages of work. All this will ultimately bring great satisfaction.
Sunflower
Any type of sharp petal, such as an aster's, is suitable for making a sunflower. A two-layer flower will require at least 26 petals. The petals are glued to a felt circle with a diameter of 5 cm along the very edge. A little closer to the center you need to glue the second layer in a checkerboard pattern.
The middle can be made of a circle of even felt or dermantine with a diameter of 4–4.5 cm. Beads or large black beads are glued onto it. The middle is glued to the flower, and the sunflower can be considered ready. If desired, you can add decor in the form of a butterfly or bug.
Options for creating leaves for kanzashi flowers
The sharp green petals are made from pieces of green ribbon (but other colors are possible). For example, rectangles measuring 2.5 cm by 10 cm are suitable. The strips are folded in half, then the resulting double triangle is cut diagonally with a soldering iron. The result is two blanks: quadrangular and bag-like. Both parts are suitable for decorating flowers. Sepals are also suitable for attaching unopened buds (photo 28).
Round petals with wavy edges turn out beautiful and graceful, and they are made from rectangular blanks, cut in the shape of domes on one side. To create a beautiful wave, use a lighter. After singeing the edges with a flame, the hot satin should be stretched with your fingers so that the fabric is deformed. It is advisable to gather the lower (flat) side of the leaves into folds so that the details are voluminous (photo 29).
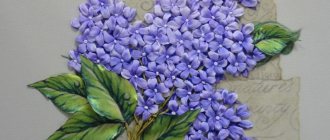
Lilac
To make a lilac branch you need:
- lilac ribbon 1 cm wide;
- beads;
- beading wire;
- fire;
- scissors;
- needle with thread;
- green floral ribbon.
The tape must be cut into strips 1.5 cm long. At least 60 pieces will be required. Flowers are made from them in the same way as jasmine flowers. Just before tightening the thread, you need to stick a wire with a bead strung on it into the center of a piece of ribbon. The result is a lilac flower on a stalk.
When all the flowers are ready, you need to form mini-branches of 3 each from them. and secure with one of the wire legs. A lilac branch is formed from these twigs and wrapped with floral tape.
How to make flowers using the kanzashi technique with sharp petals?
Making a flower using the kanzashi technique with sharp petals:
- Cut out 8 squares 5*5 cm.
- Fold each square in half along its diameter.
- Then cut in half again.
- Once again.
- We cut off the resulting ends a little.
- We singe the ends over a lighter so that they stick together.
- We make 8 sharp petals, sew them together - a bead in the middle, and the flower is ready.
Scheme for making an acute-angled petal using the kanzashi technique
Finished products with sharp-angled petals using the kanzashi technique
Ranunculus
To make a ranunculus you will need a standard kit:
- scissors;
- candles;
- tweezers;
- satin ribbon of different widths;
- glue gun;
- beads.
To make the petals, you need pieces of satin:
- 2×2 cm – 18 pcs.;
- 2.5×2.5 cm – 18 pcs.;
- 3×3 cm – 14 pcs.;
- 3.5×3.5 cm – 24 pcs.
You need to cut out round petals from them, like a peony, trim the base, melt it over the fire, fold the base like an accordion, hold it with tweezers and secure it with fire. The core of the ranunculus is made from a 5x5 cm piece of satin, into which a wad of cotton wool is sewn. It turns out to be a ball on which the petals will be attached.
Assembling the flower must begin with the smallest petals, pasting them over the stamen ball. Thus, you get a very beautiful flower that will suit any decoration as a decoration.
Spiral petals
Spiral petals can be made in different ways, I will show 3 of them. We use 2 pieces of 5x5 cm, put them on top of each other. We clamp 3 ribbons with thin tweezers, leave the very first one, and twist them into a spiral. You can fix it with glue or pierce it with a needle so that the spiral holds well and does not lose its shape, we bring the edges of the tape into a sharp petal. We cut off the excess and melt all the cuts.
The second version of the petal with a spiral. We use the same tapes. Glue tape to the right edge to hold the spiral securely. We grab this edge with thin tweezers and twist it before reaching the middle.
Apply glue again. We bend the left edge of the tape back and wrap it around the spiral.
We cut and melt the “tail” and cut off the excess tape from below, but do not melt it with fire yet. Let's make a two-color sharp petal and glue a part with a spiral into it.
We wrap the folded triangles around the twisted petal, and for reliability we glue it with Moment glue.
Cut off the lower part of the petal along with the twisted part and process it with a lighter.
The third new kanzashi petal with a spiral also consists of two pieces of 5x5 cm. We fold two pieces diagonally, wrap the right side of the blue one in pink. We twist the right edge into a tube with thin tweezers, making just a couple of turns.
Fix with glue, let the glue set. We bend the right part with the tube back and turn the part towards us.
All that remains is to fold the sharp petal and process it, cutting off the excess tape and melting it.
Wedding bouquet of ribbons
Over the past few years, wedding bouquets made from satin ribbons have become very popular. It's unusual and beautiful. Such a bouquet will please the eye for a long time, because it will not wither.
Handmade flowers made from satin ribbons for a wedding bouquet will become a unique symbol of family happiness.
By combining various flowers from satin ribbons, you can create decorations for hairpins or headbands, as well as themed bouquets with your own hands.
To complete it, you need to make a suitable number of flowers from ribbons (roses are most often chosen) and stick them on a foam ball with a handle. For greater strength and beauty, you can stick a needle with a stone at the end into the middle of each flower. The handle must be wrapped with a strong satin ribbon. As additional decor, you can use rhinestones and pearl beads.
Flowers made from satin ribbons are an effective way to decorate accessories, household items, children's items, and even make a wedding bouquet.
White aster on the rim - master class (step by step)
You can make this beautiful white hairband with your own hands in one evening. We will definitely walk you through the braiding of the headband step by step during this master class. You will learn how to decorate and how to make a kanzashi headband.
To work you will need:
- Satin ribbon 2.5 cm wide.
- Headband.
- Center (brooch, button or circle embroidered with beads).
- Scissors, tweezers, candle.
- Glue Moment Crystal.
- Felt - circles with a diameter of 3 cm - 2 pcs.
- Narrow ribbon - to make a braided rim.
- We cut the tape like this: 2.5 / 7 cm - 14 pcs.,
- 2.5 / 6 cm - 14 pcs., 2.5 / 5 cm - 7 pcs.
We cut it from a tape 2.5 cm wide. 14 rectangles of 7 cm each - these are the largest petals of our flower. Fold the rectangle in half.
Next, we cut off the sharp corner of the workpiece with scissors, as in the photo.
We burn the end of the petal with a lighter or a candle flame. We burn the corner so that it melts and does not come apart in the future. Petals made in this way hold their shape well. Next, we need to turn this corner out. This way we will hide the ugly melted cut.
They turned it right out. The leaf should be boat shaped. Each leaf should face down. We fold the opposite end of the petal, clamp it with tongs or scissors and also cauterize it.
Here in this photo you can clearly see what the leaf should be like, first we burn the top, turn it inside out, fold the bottom and singe the cut.
We made 14 large petals, the next ones are medium ones. We cut 14 blanks 2.5/6 cm. We make exactly the same petals as the previous ones. Finally, burn the bottom cut of the leaf. Then the very last leaves - 7 blanks 2.5/5 cm. We also make kanzashi leaves from them.
Then we need to make 3 circles of felt or thick fabric of a suitable color with a diameter of 3 cm. Now we will glue the leaves of our flower to the first circle.
Take Moment glue or a hot-melt gun and start gluing the large leaves one at a time. Waiting for it to dry. Then we glue the middle leaves.
And at the very end we glue the smallest ones. We got this flower. But it's not finished yet. In the middle we glue a decoration, a button, or a button covered with satin. You can decorate with beads or beads.
- In order to secure the flower to the rim, we need another circle.
- We apply the flower to the rim like this, and seal it with another circle on top.
Now the headband with the white flower is ready. Next we will do the braiding of the rim.
The braiding of the headband can be one, two or four ribbons. We will analyze and try 2 options: with two and four ribbons. We will need a narrow tape 0.5 cm wide. The consumption of the tape depends on the width of the rim.
To braid with two ribbons you need:
If the rim is 1.2 cm, and the width of the tape itself is 0.5 cm, then you need 2 tapes of 2 meters each. If the tape is 1 cm, it will take 2 tapes of 1 meter each. If the width of the rim is 2.5 cm, then 2 tapes of 1.8 m each will be needed.
Take 2 ribbons 0.5 cm wide. Place the ribbons on top of each other and on the rim. The ends of the ribbons stick out to the sides of the rim. Secure the ribbons with any type of clip, such as a clothespin.
Weave: we wrap the blue ribbon around the rim and bring it to the front side parallel to the turn. Next, we draw the white tape around the rim and bring it out, placing it parallel to the first turn.
The blue ribbon should be between the turns of the white one.
And so we continue braiding. During operation, it is convenient to lift the non-working end of the tape slightly upward and lay the turn of the working tape close to the previous turn. At the end of the work, coat the tip of the tape with glue and press it with a clamp for a while. We cut off the end and glue it.
- To braid with four ribbons you need:
If the bezel has a width of 0.5 cm, then it will take 4 ribbons of 60 cm, but if it is 1.2 cm, it will take 4 ribbons of 80 cm.
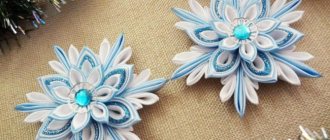
Magic kanzashi snowflake on the headband - step by step
DIY magical snowflake of extraordinary beauty for hair. It can be glued to a headband or a bandage. Made from satin and brocade. Decorated with beads and slightly painted. An excellent decoration for the New Year and Christmas holidays.
On video: headband with kanzashi roses, master class.
Kanzashi master class on how to make a headband with flowers from satin ribbons, petal “ears”, roses
Source: https://StranaHandmade.net/dekor/obodok-iz-atlasnyh-lent
Daisies
Materials and accessories
To make such simple but cute daisies you will need:
- narrow tape;
- glue;
- button;
- thread, needle, scissors.
Description
Cut pieces of ribbon twice as long as the diameter of the finished flower. For one flower you need 6-8 blanks.
Apply a small amount of glue to the center of each tape. We fold the free ends to the center and glue them. We collect a lush flower from several petals. We fix them with glue or a few stitches. We decorate the center with a button. If desired, the button can be covered with a satin ribbon.
Made from polypropylene tape
Most of the master classes in this material discussed methods for creating roses, daisies and chrysanthemums. Separately, I would like to touch on the topic of cornflowers - these are beautiful wildflowers of a blue hue, striking with their splendor and simplicity at the same time. Cornflowers can be made from polypropylene tape, which is used today as packaging material.
Polypropylene tape
For work, prepare:
- blue polypropylene tape;
- scissors;
- lighter;
- glue gun;
- wire for the stem;
- green polypropylene tape;
- stamens for decorating the core.
You will also need green cardboard, from which you need to cut out a round base in advance to fix the petals. Polypropylene material is characterized by increased strength, so it is more convenient to work with it than with the textile type. The flower turns out tough, but does not lose its attractiveness.
The work begins with cutting out a petal: cut out a drop on one piece of material - this will be a petal. Turn on the candle and process the edges of the polypropylene on each side, forming small bends. The cornflower petals will turn out a little torn.
At the next stage, take the prepared cardboard base and make a cut on it on one side. Bend the piece inward and secure it with glue to form a cone. You need to stick all the cornflower petals you have learned on this cone.
This material can make a gorgeous wedding bouquet
When the flower formation is complete, place the stamens in the center, carefully securing them inside with glue. Next, make the leaves: cut out elements of the desired shape from the tape to fix them on the wire stem. Our cornflower is ready, it will become an excellent detail of the interior composition.
From braid
Zigzag braid is used today for finishing women's dresses and blouses. It is also widely used to decorate folk costumes. The cost of this material is affordable, so if you don’t have any skills in needlework, try making a bud from braid: two options will be presented below.
Using braid
Daisy made from zigzag braid
To make a beautiful daisy from the specified material, you will need 20 cm of braid in your favorite color. If you want to reliably convey the texture of a chamomile, take a white shade, and prepare a yellow bead or cabochon for the middle. The procedure is so simple that it won’t take 10 minutes, so it’s easy to do chamomile during a break:
- Connect the ends of the cut braid and sew them together so that the edges are firmly fixed.
- Start stitching the braid along its entire length, stitching only on the downward part of the zigzag.
- When all the braid is stitched, gently pull the thread and the flower will come together into a single whole.
- All that remains is to make the middle: to do this, sew a bead in the center or glue a cabochon.
The material is affordable
This daisy will be a good addition to a hairpin for a little girl. The flower can be used for a country-style interior in the kitchen by fixing it on a curtain tieback.
Ribbon flower
Master Class
Miniature rose made from finishing braid
Another simple method of creating a rose is making a bud from zigzag braid . In this work you will need several shades of material at once; it is better to take contrasting ones. A good combination is white and red, but if you only have a plain braid at home, feel free to take it.
- Fold the braid in the form of an accordion: to do this, weave a zigzag together. Sew the braid along the entire length with threads by hand or using a sewing machine.
- Take either end of the ribbon and begin twisting the bud. Make sure that the petals fit snugly against each other.
- Sew the second edge to the bottom of the product to avoid frayed threads. It can also be glued using a glue gun.
- All petals must be straightened to give the rose splendor. Then take a thick green fabric and cut a circle out of it. Its diameter should match the size of the rose. Glue the flower to the base, secure with a hairpin or elastic if desired.
Zigzag braid is often used for finishing women's dresses and blouses
The longer the braid, the more magnificent the rose will be. If you take a wide braid, the flower will come out tall.
By adding felt leaves to roses, you can get a nice headband decoration for a girl. It is appropriate to decorate bracelets and textile beads with these flowers, as well as make brooches and hairpins.
From lace ribbon
A lush red flower, which can be quickly made from lace, will be a memorable fabric souvenir. This accessory will complement an elastic band or hair clip. With the help of a lace bud you can harmoniously decorate the curtains in the living room, and to make it you will need basic sewing skills.
Elegant flower
In your home you want to have only the most beautiful things. Therefore, people strive to diversify the interior with homemade items that emphasize the individuality of style. To make a lush aster from lace, prepare:
- 2 meters of lace of the color that best suits the interior of the room;
- Felt circle with a diameter of 5 cm, color matching the shade of the lace;
- Thread with a needle.
Using lace
If the bud will be used to decorate your hair in the future, choose an appropriate base. Clips, elastic bands, and hairpins can be purchased in the creativity departments. When the materials are prepared, we proceed to the procedure:
- Thread a double thread into the needle, fixing a knot at its end. The thread must match the color of the lace.
- Lace usually has 2 edges: decorative and regular. Using thread, stitch the regular edge using a needle-forward stitch.
- As soon as the edge is sewn, try to pull it a little: before your eyes, the flower begins to form on its own.
- Take a felt circle and sew the gathered bud to it, evenly distributing it over the soft base.
This accessory will complement an elastic band or hair clip.
Astra is ready and it took no more than 10 minutes. The master class does not use glue, so you can do the work together with your child, additionally teaching him the basics of sewing.
From lace ribbon
Master Class
Advice It is better to decorate the core of the aster with a glossy bead or cabochon.