At the New Year's party, everything sparkles and shimmers, the center of attention is an elegant Christmas tree decorated with balls and garlands, and around it cute snowflakes and bunnies - boys and girls - dance in a circle. How children like to dress up for the New Year. Mothers think through a carnival costume with special trepidation, especially when it comes to girls. Hair should also be decorated in a special way - using suitable winter accessories. For girls, such a charming snowflake , which will decorate a hair clip or elastic band. But we should also not forget about the youngest fashionistas, who do not yet have luxurious curls on their heads, but they are already beginning to understand what the New Year is, and that on this day they just need to sparkle. For such little ones, a comfortable elastic bandage decorated with the same snowflake will become a decoration. To make your own accessory, follow our step-by-step tutorial. (Let me remind you that the basics of the kanzashi technique can be found here.)
Snowflake made of satin ribbons using the kanzashi technique
The Japanese kanzashi technique allows you to create unique jewelry from fabric.
A kanzashi snowflake is non-standard, beautiful and quite easy to implement. Products made from satin ribbons look gentle and noble. They are great for Christmas tree decorations.
Such snowflakes are so elegant that they are quite suitable as hair accessories. Delicate blue jewelry can become elegant elastic bands or hair clips, a detail for decorating a headband or headband.
You can attach a pin to the back of the snowflake, then it will become an excellent New Year's brooch, which can easily be attached to a fluffy dress.
If you set yourself the goal of making New Year's paraphernalia with your own hands, then the given master class will help you.
Snowflake using the kanzashi technique - the result of the work
Snowflake crown made of plastic bottle and lace – MK with photo
If you get creative, even an ordinary plastic bottle will make a beautiful crown for Snowflake. Prepare in advance:
- plastic bottle;
- lace or any other beautiful material;
- scissors;
- glue gun
An even cylinder is cut from the bottle. Its upper part is cut into thin strips. They should reach approximately the center of the workpiece. The edges of the strips are given a pointed shape. The blank is covered with lace and decorated with beads, which are attached with a glue gun.
Necessary materials
For convenience, here is a calculation of fittings for 1 product.
Prepare the following for one kanzashi snowflake:
- square-shaped satin blanks in soft blue and white colors. The side of all squares is 5 cm. The number of parts is 12 and 6 pieces of the first and second colors, respectively;
- square-shaped brocade blanks - silver with the inclusion of blue lurex thread. The side of the squares is 4 cm. The number of parts is 6 pieces;
- square-shaped satin blanks in soft blue and white. The side of the squares in this series is 2.5 cm. The number of parts is 7 and 37 pieces, respectively;
- round bead hugger with a diameter of 1.5 cm;
- blue half bead with a diameter of 0.8 cm;
- a felt circle of white or blue color, the diameter of which is 3.5 cm;
- needle and thread, glue - for collecting flowers and attaching parts.
To make a New Year's product, you need to model several parts:
- main flower of 6 four-layer sharp kanzashi petals;
- small flower of 7 double sharp petals;
- 6 branches, consisting of one central blue petal and four lateral white petals.
DIY Snowflake Crown made of beads
Even if you have never worked with beads before, you can make a golden crown for your Snowflake for the holiday. You will need to be patient, because the work ahead will be painstaking. You will need:
- round beads and golden beads;
- wire with a diameter of 0.3 and 1 mm;
- wire cutters;
- pliers.
First, make a bezel: put beads on a wire with a diameter of 1 mm, connect the ends and twist them to form a circle. Petals are woven from the cutting, as shown in the diagram. Their number depends on the size of the crown. The petals are screwed to the hoop. The crown is attached to the head using a hoop or elastic band.
MK "Snowflake of Kanzashi"
1. Prepare blue and white squares with a side of 5 cm and a shiny square of 4 cm for one sharp petal.
2. Bend all three parts in the same way - diagonally.
3. Next, fold it again, align the white triangle with the blue one, and place the sparkling brocade piece on top.
4. Fold two corners and fasten. The right corner of the former triangular piece will become the sharp end of the triple petal of the kanzashi. The side and bottom of the part should be cut off.
5. To turn the resulting petal into a more elegant one, make it four-layered. For this you will need small white petals. They are made according to the same scenario, but from a white satin ribbon measuring 2.5 cm.
6. You also need to prepare 6 small elements. The same parts in the amount of 24 pieces will be used in the future for branches. Insert sharp petals into the center of large blanks.
7. Cut baby blue and white 2.5cm satin ribbon into 7 squares each. Make double pointed petals so that the white part is inside the blue one. Assemble the flower using thread and needle.
8. Prepare narrow, sharp petals for the branches. Blue squares with a side of 5 cm will be used to make them.
9. Such details will be one color. The squares are folded twice.
10. Also, after forming the petal, the cut should be soldered, pressing it on the sides with your fingers.
11. Prepare 6 identical petals.
12. Gather the main flower onto a thread. Also decorate the small flower with a bright blue half bead and a hugger.
13. Stick one layer on top of the other in the form of a pyramid. Cut out a 3.5cm felt circle.
14. Make designs from long blue petals and small white petals, combining them into snowflake rays.
15. Glue rays into the spaces between the petals of the main flower to turn it into a snowflake.
16. All that remains is to glue the product onto a felt base to use as an accessory or decoration.
As a result, we received dazzling hand-made kanzashi snowflakes.
DIY paper snowflake crown - MK
Even children can make a simple crown from shiny cardboard. For work, prepare:
- blue cardboard;
- ready-made stars of golden and silver color (you can make them yourself);
- scissors;
- scotch;
- PVA glue.
Cut out 2 strips from blue cardboard. They are connected to form a circle and secured with tape. Triangles are cut out of blue cardboard. They are glued to the base from the inside. The crown is decorated with silver and golden stars.
Snowflakes made of satin ribbons
On the eve of the festive celebration, we carefully choose a beautiful outfit, trying to stand out from the crowd.
But to create a memorable image, one dress is not enough. A mandatory addition that can change your appearance beyond recognition will be stylish accessories. This is especially true for young beauties. The best thing for them will be an original hair decoration, created by the hands of a caring mother. This could be a metal clip, a plastic headband, an elastic band or a bandage. Or decorated with an unusual snowflake made using the kanzashi technique.
Even a beginner can cope with this work. It is enough to have a desire, show imagination and spend a little free time. Let's take a closer look at what this technique is and how to make a voluminous snowflake from satin ribbons with your own hands.
Bow
What's New Year without gifts? What is the most important thing in a gift? Well, of course attention and packaging! A beautifully wrapped trinket will bring much more pleasure! A chic bow, which you can make yourself from ordinary ribbons, will help complete the gift wrapping.
#1 Christmas ribbon bow
A variation of the classic Christmas bow made from thin ribbons. This bow will be a great addition to any gift. How to tie a Christmas bow from ribbons, see the photo instructions.
#2 Double ribbon bow for gift wrapping
Or here is another original version of a double bow. It’s quite simple to tie, but it makes a lasting impression! You will find a step-by-step MK below.
#3 Bow flower
A delicate bow in the shape of a flower will be an excellent addition to a gift for a loved one: mother, sister, best friend. You will need a satin ribbon, a needle and thread and a bead for the core. See below for how to make a bow.
#4 Large ribbon bow
And here is a big bow to decorate a massive gift. This bow can be used to decorate absolutely any gift, for example, for a loved one or a work colleague. It looks cool and is very easy to do. Step-by-step photo instructions are given below.
#5 Flower bow made from narrow ribbon
You can make a charming flower bow from a narrow ribbon using glue and a button. The perfect addition to a gift for your best friend, sister or daughter.
#6 DIY voluminous bow
Here is a version of a universal bow that can be used to decorate any gift. You will need tape and our master class.
#7 How to tie a simple bow
#8 How to tie a fancy ribbon bow
You will also like New Year's packaging ideas:
What is unique about the kanzashi technique?
This technique came to us from the east. It is the art of creating figures by folding material. But unlike the similar origami, kanzashi uses small squares of fabric . The most commonly used forms are:
- rounded;
- oblong;
- sharp petals.
Subsequently, beautiful flowers, snowflakes, twigs, and so on are collected from these elements. Images created using the kanzashi technique can be not only flat, but also three-dimensional.
Hair jewelry is mainly made using this method . But recently, this type of creativity has become widely used in the form of decoration. Unusual earrings and necklaces are made from satin ribbon . Handbags are decorated with created flowers and twigs . Such details are even used to decorate interior items. For example, a panel made in the form of a painting.
What is the kanzashi technique?
Kanzashi was not originally a craft technique. This was the name of the flowers that Japanese geisha girls used to decorate their hair. These flowers were made from fabric and various bright scraps to match the color of the kimono and eyes. These flowers were and are the only decoration for Japanese women, because they cannot wear any earrings, rings, brooches or rings.
In addition, kanzashi indicated the social status of the woman or girl who decorated her hair with them. The more flowers a lady has on her head, the richer she is. However, if a woman got married, then she was no longer allowed to wear a lot of jewelry on her head. She could attach a maximum of two flowers to her hair to complete her look.
At first, when kanzashi first came into fashion in Japan, they were ordinary simple combinations of fabric that looked like daisies. Only at the beginning of the 19th century a new style of kanzashi appeared - “tsunami”, thanks to which the flowers became multi-tiered, voluminous and more beautiful.
Kanzashi-tsunami were made only from handmade Chinese natural silk. The Japanese themselves already dyed silk in the colors they needed, using natural dyes.
In the middle of the 19th century, the Japanese even began to open workshops in which professional fabric flowers were made for all seasons. For example, in the spring, they create yellow kanzashi:
- Daffodils
- Peonies
- Peach flowers
These same flowers are green in summer and red in autumn.
Europeans picked up the idea of kanzashi at the end of the 19th century and began to use it not only to create flowers, but also many other shapes. As a needlework technique, in Russia kanzashi began to be used to make hairpins decorated with flowers. Petals can be made in two forms:
- Round
- Acute
In exactly the same way, you can make kanzashi snowflakes from ribbons . We will present a detailed master class on making one of these snowflakes in the next section.
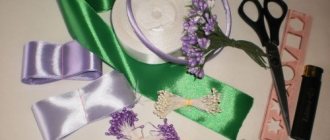
Materials and tools for making snowflakes
Before starting the work process, you need to prepare materials and tools. For this you can
The following items will be required.
- Tapes of various widths . The material used is mainly satin, but brocade, silk stripes and bows can also be used. Blanks are cut from them in the form of squares of the required size.
- Open flame source: lighter or lit candle . A device for burning can also be used in this capacity .
- Tweezers . This tool makes it easier to hold small parts over the fire without damaging the skin.
- Scissors and safety pins . The latter will be required for temporary fixation of parts.
- The basis . It can be wire covered with tape, felt in color, or another thing on which it is convenient to assemble the product.
- PVA glue or Moment-gel.
Decorative elements may also be required . These can be beads of different sizes, rhinestones, sequins, lace and so on. Whatever your imagination is enough to bring your idea to life.
Attention! For an ideal final result, before starting work, carefully consider your product and prepare the base for mounting.
For example, for a hairpin it could be a metal clothespin blank.
How to make a Snowflake crown from beads and wire
Against the background of white, blue, and silver crowns, a red tiara will look bright and original. It's easy to do. Required:
- 20 and 30 gauge wire;
- beads and beads of any shape and size;
- wire cutters;
- pliers;
- round nose pliers.
The frame of the tiara is made from wire: 20-gauge wire is folded into several layers, twisting them, and giving it a semicircular shape. Vertical wave-like shapes are formed from 30 gauge wire. All that remains is to decorate the frame: string beads and beads in random order onto a thin wire and braid them around the tiara.
Step-by-step instructions for making a snowflake
A charming snowflake made in this manner can be used in many ways. Using it as a pendant, you will get an unusual necklace or earrings. Attach to a headband, hairpin or elastic band, and your little one will go crazy for such a gift. Decorate a knitted handbag with it and get an original accessory that will make you stand out from the crowd.
Now let's take a closer look at the process of creating a beautiful snowflake.
Materials and tools
To implement this you will need to prepare the following.
- White satin ribbon from 5 cm to 30 cm wide, from 2.5 cm to 117 cm wide.
- Pale blue satin ribbon from 4 cm to 24 cm wide.
- White felt.
- Pale blue heart shaped bead.
- Scissors, glue, lighter, tweezers.
Work process
- Cut the 5cm wide white ribbon into six pieces. The result should be 4 squares with sides of 5 cm.
- From a ribbon of the same color, 2.5 cm wide, make six pieces of 2.5 cm each and 18 pieces. 4 cm each.
- Next, cut six squares from the blue stripe.
- Cut a round base with a diameter of 3.5 cm from felt.
- Make sharp petals from the blue blank.
- From squares of white tape (2.5x2.5) we make a round petal.
- We place the round blank into the sharp petal. Then we place the resulting part in a sharp petal made of a 5x5 cm square.
- Trim the inner corner.
- We solder the corner over the fire.
- We cut off the bottom and burn it a little so that the workpiece does not unravel.
- In this way we make six petals.
- Then we make twelve round petals from a piece of 2.5x2.5 cm.
- Next, take a white blank with sides 2.5x4 cm, fold it in half and form a fan.
- We perform 12 parts in the same way.
- From the last elements we form the outer circle from those fans.
- Using glue, we assemble a flower of six blue and white petals.
- Between the two petals we glue a blank of three fans.
- Then we add round petals between the fans.
- At the back in the center we fix it on a felt base.
- Glue the middle element to the front.
Our charming snowflake is ready. Now you can decorate any item with it: a hairpin, an elastic band, a handbag and much more.
Reference! For the youngest representatives of the fairer sex, this exquisite decor can be attached to a headband.
Shiny snowflake crown made of foamiran and tulle on a hairpin
A stylish and elegant crown made of shiny foamiran and tulle is suitable for any look. To create it you will need:
- double-sided foarmin pink;
- black tulle;
- black felt;
- barrette;
- black satin ribbon;
- threads;
- lighter (for processing the edges of the satin ribbon);
- black beads;
- universal glue;
- heat gun;
- crown template.
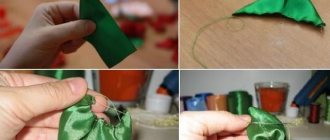
The necessary parts are cut out from foamiran and felt using ready-made templates. A “skirt” is made from tulle: a piece of fabric, 1 cm from the edge, is threaded onto a needle and thread with wide stitches and pulled together in the center to form a circle. A round piece of felt is glued to the tulle skirt in the center on one side, and from formin to the other. A metal pin is attached to the felt circle with a glue gun. It is preliminarily covered with black satin ribbon. The foamiran crown blank is glued together, and when it dries, it is attached to the base of the hairpin. The crown is decorated with black beads.
Making a snowflake from satin ribbon using the kanzashi technique
On the eve of the New Year's bustle, I am giving you a master class on making snowflakes using the kanzashi technique. This snowflake can be used both for a carnival costume and for decorating, say, a winter hat.
So, we need:
- white tape (50 mm) – 185 cm;
- silver ribbon (25 mm) – 45 cm;
- blue ribbon (50 mm) – 30 cm;
- white tape (12 mm) – 36 cm;
- rhinestone (button, half bead).
And from the tools:
We need to produce
- 12 sharp petals made of white ribbon,
- 6 round petals made of white ribbon,
- 6 sharp petals made of white and silver ribbons,
6 sharp petals made of white, silver and blue ribbons,
6 complex petals.
Now you can start collecting snowflakes.
We collect 2 sharp white petals and a sharp silver-white petal in three. We fasten it with a drop of glue (as we did with the silver petals that are inside the complex one). The result was tridents.
Glue the complex petals together in pairs.
Glue together pairs of complex petals.
This method, in my experience, allows you to make a more even inflorescence. Some people prefer to collect by thread. Try it, if it’s more convenient, write in the comments.
Glue sharp petals from 3 ribbons onto a square of white tape so that they stand at the edges of the square and form an even circle.
Glue round white petals between them. This will be the skeleton of our snowflake. I covered the inside of the resulting circle with a layer of glue to make the base denser.
Lubricate the underside of the inflorescences of complex petals with glue and glue them to the base so that tricolor petals peek out between the complex petals.
We cut the thin white ribbon into 3 equal parts (about 12 cm each).
We glue the ribbons to the bottom of the base so that they form a continuation of the line of complex petals.
We glue our tridents onto the rays of ribbons as tightly as possible to the round petals.
We bend the excess tape and glue it. Why don't we cut it off? A double layer of glued tape will hold the rays of our snowflake tighter and they will not come loose.
Now the most mysterious part: we select the middle to suit our taste and glue the fittings.
Thank you for your attention! I wish you creative success.
If you have any questions, ask them without hesitation. I'll be glad to help you!
Let's start creating
The process of creating kanzashi snowflakes with your own hands at first glance does not seem so simple. But in fact, there is nothing complicated about it: you just have to follow the instructions - and you will get an excellent result, no different from snowflakes made by experienced craftsmen. We present to you a master class of kanzashi snowflakes, consisting of several stages.
At the first stage, you need to take the prepared fabric and cut out several small squares from it . The size of these squares will depend on how large the snowflake you want to get. Standard parameters are 3 by 3 cm . In this instruction we will talk about the process of creating snowflakes of a standard shape, but this does not mean that you cannot experiment. The number of cut squares should be determined based on the shape of your future snowflake; in our case, you need to cut 42 such blanks.
Photo of Kanzashi snowflakes
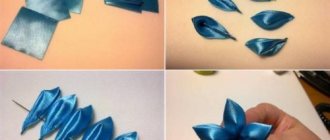
Using the cut out squares we will make small petals . Small squares are folded diagonally: this procedure is repeated three times, and in the end you should end up with a triangle consisting of several layers. The two outer corners of such a triangle must be folded towards the center so that your triangle has a rounded shape.
To make folding such figures more convenient, hold the fabric with tweezers or a clamp.
After the triangle is folded, you need to secure the corners . To do this, the edges of the future petal must be melted and squeezed together until the fabric cools. As a result, you will have a finished petal.
These are the petals that make up the basis of a snowflake
This procedure must be repeated with 11 squares. The resulting petals will be placed on the inside of your future snowflake.
As for external elements, they are created in a similar way. After carrying out the procedures we have described, you should still have 30 squares left, which must be folded in the same way, but skip the step of giving the triangles a rounded shape. That is, you will melt triangles with sharp corners.
[ads-mob-3][ads-pc-3]
The next stage is creating the center of the kanzashi snowflake . Take a needle and thread and thread it through the six rounded petals. At the end, fasten the thread so that these petals form a round flower.
Using the kanzashi technique you can make not only snowflakes, but also twigs and flowers
To form the rays of the future snowflake emanating from its central part, you will need glue. Take two sharp triangles and glue them together. If you don't have glue or are worried about it leaving marks on the fabric, this procedure can be done with a needle and thread. Connect 12 more triangular petals in the same way.
The petals do not need to be completely glued together; you only need to connect one of the corners.
When the double petals are ready, glue (or sew) the third petal between the two adjacent ones. As a result, you will receive an element consisting of three interconnected petals. In the same way, attach the petals to 12 more finished elements.
As a result, you have 12 parts consisting of three petals. Now you need to connect them in pairs: sew one element over the other and repeat this procedure for the remaining ten figures. You can make the rays longer or give them a non-standard shape: it all depends on your imagination.
The next stage is creating the basis for the snowflake . To do this, you need to take thick cardboard (or paper) and cut out a small circle from it. The size of this circle should be slightly smaller than the size of the central flower for your snowflake. Then take the fabric and cut out a circle from it, the diameter of which coincides with the central flower.
It is not necessary to use these exact materials: you can choose any fabric and any dense material for fastening, since these elements will be located on the back side of the snowflake.
Also, consider how large the string on which your snowflake will hang. Measure the required length, sufficient to hang the snowflake. As a rule, this is done in the form of a loop.
New Year's Kanzashi snowflakes will make your Christmas tree irresistible
Place the cardboard circle inside the fabric circle, and then gather it with a thread so that after tightening you have a small bag with a solid base. You need to sew two edges of the lace to it to make a snowflake pendant .
Then start assembling the kanzashi snowflake : to do this, you need to glue its central part and the prepared rays.
You need to glue the rays on the wrong side of the snowflake, so first turn it over to the other side.
After the glue has dried, glue or sew the prepared part with a loop on the same side. As you can see, the process of making such snowflakes is not at all difficult, and even small children will enjoy this procedure, so do not forget to invite them to participate in this process. The resulting snowflake can be decorated with beads, beads or sparkles.
By the way, Anastasia Kulikova’s video about creating kanzashi snowflakes will allow you to more clearly study the technology of manufacturing parts and their assembly:
[ads-mob-4][ads-pc-4]
Snowflake Kanzashi Master class
Beautiful snowflakes in kanzashi style can be used as a Christmas tree decoration. A master class with step-by-step photos and videos will help you make an openwork snowflake from satin ribbons with your own hands in an hour. And it, in turn, serves as the basis for creating a kanzashi snowflake crown or a voluminous brooch. The snowflake can be attached to a hair tie, headband or hairpin; it will also decorate a bracelet. Use your imagination! Even for beginners it will not be difficult to make a Christmas snowflake!
For a snowflake using the tsumami kanzashi technique you will need:
white satin ribbon 4 cm wide 1.1 m
How to attach a clip to the back of a Kanzashi Snowflake hairpin
(either attach a snowflake to a headband, or attach a snowflake to a hair tie - the principle is the same)
Watch Alina Boloban’s video “New Year’s Kanzashi snowflake on a universal mount”:
Watch MK “Herringbone Kanzashi”
You might be interested in this post
Headband “New Year's snowflake kanzashi (Cristmas snowflake)”
If you have learned how to create snowflakes using the kanzashi technique, then it will be easy for you to make a beautiful headband.
How to attach a snowflake to a headband:
- From a ribbon 5 cm wide, cut a circle with a diameter of 5 cm
- Melt the edge of the mug with a candle or lighter so that the edges do not crumble
- We gather the fabric along the edge with a thread and tighten it slightly.
- Cut out a circle of slightly smaller diameter from cardboard. Approximately 4.5 cm
- We put a cardboard circle in the middle of the fabric circle.
- Glue a cardboard circle covered with fabric to the underside of the snowflake.
- Glue the finished snowflake to the rim.
Snowflake crown made of tinsel and wire
Make a real snow crown from gimp. It will resemble tree branches covered with fluffy snow or frost. For work you will need the following materials:
- headband;
- wire;
- tinsel;
- white threads.
Making such a crown is easy. The wire is used to form a frame for the future snowflake. It is placed on the rim. Wrap the frame with tinsel, securing it with white threads. The sparkling crown for little Snowflake is ready.