Many owners of suburban areas and summer cottages are faced with the fact that by the end of the season they accumulate a lot of unnecessary canisters and plastic bottles.
Such things should not be thrown away : from them you can create a wide variety of crafts for the garden, cottage or garage, which can perform both practical and decorative functions.
Most of these items can be built with minimal effort in 10-20 minutes, and they can make the area more interesting and original .
What canisters are suitable for crafts?
Depending on the characteristics, such containers are classified according to the following parameters :
- Volume – from 1-2 to 50-80 liters.
- Form. Canisters can be flat or rounded, oval, rectangular or square in cross-section, and have a handle with a lid.
- Color. Plastic products are most often white or translucent; there are also canisters in green, blue, red and other shades.
Containers for food products, water, fuels and lubricants, fertilizers, and other liquid products are suitable for creating decorative items and practical devices
Before you start making a craft, it is advisable to inspect the canister for damage, thoroughly clean and degrease it.
Crafts from lids
Crafts made from plastic bottle caps are not so popular. But this material will also find its use by a skilled owner or needlewoman.
The covers can become the basis for a massage mat or interior curtain. A large number of caps will help to decorate a fence or walls in an unusual way, laying out a mosaic picture that will certainly make the dacha stand out.
Making crafts from plastic bottles will be a fun pastime for any family. Such creations can occupy a rainy summer day or a cold winter evening, filling the home workshop with the warmth of loved ones engaged in a common cause.
How to make a washbasin?
A 5-liter plastic container is optimal for creating a country or camping device for washing .
The filling hole of the canister will be used to fill it with water, and in the bottom you need to make a hole and insert a tap or valve.
To do this, you need to use a pair of seals in the form of rubber gaskets and a fastening nut so that water does not leak out and the tap is firmly fixed.
A finished washbasin or washstand can be hung on a crossbar , a hook, or attached to a vertical surface with a belt or even tape. You can insert a funnel into the filler hole for convenience: this way, when filling the canister, water will not spill onto the ground.
If you install a simple tap, you can adjust the pressure by turning the handle.
Self-watering flower pot.
To create a self-watering flower pot, simply first cut off the top of the bottle, then the middle part, so that the top part fits in without touching the bottom. Then we carefully make a hole in the cork and thread a thread through it. The thread should extend 5 centimeters from both sides of the cork. Now that everything is ready, pour water and insert the top part that looks like a funnel. Now we fill in the soil, not forgetting to wet it. The plant will absorb the required amount of liquid, this will simplify plant care.
Tip: You can add fertilizer to the tank.
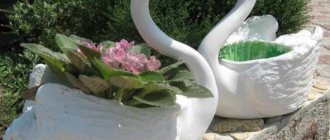
Master class on creating a swan
Bird sculptures for decorating suburban areas are often made of plastic. We present to your attention a small master class on making a swan from an old canister.
For this purpose you will need 5 liter containers . It is necessary to cut the product so that the body, tail and long neck are immediately cut out.
Then you need to prepare the wings from thick cardboard.
The neck should be covered with newspapers and tape , then do the same for the entire workpiece.
Afterwards you need to apply a layer of simple napkins and coat the future sculpture with plaster mortar.
As the surfaces dry, they are sanded, painted and decorated with additional elements (for example, the eyes of a bird can be made from colored stones or glass).
Flowerbed for the garden
Many owners arrange flower beds in the garden or front garden, and plastic canisters can be used for two purposes :
- Container for planting flowers . You will need to cut the product, turning it into two halves, and dig it into the ground, then pour the prepared soil with fertilizers inside and sow flowers. The canisters themselves can be decorated with colored paper, paint, or other methods if desired. In addition, the mini-flower beds themselves can be raised above the ground , as shown in the photo below: this is especially true if the soil is initially not suitable for specific varieties or is too wet.
- Fencing for a finished flower bed. This option is great for large flower plantings: canisters are dug in around the perimeter, blocking the plants. This design is more of a decorative nature . It is better to use colored containers of the same shade or alternate 2-3, then the fence will look aesthetically pleasing.
Crafts for the garden
Crafts made from plastic bottles for the dacha represent the largest possible field for realizing the master’s imagination.
Such crafts include:
- Fences for flower beds or paths. In this case, the bottles can be buried in the ground with the neck up or down, painted in all the colors of the rainbow or left transparent.
- Small greenhouses made from large bottles will cover the seedlings during the frost period.
- Cute pigs or kittens will create unusual flower beds.
- Bottles with a hole cut into the side will become custom planters for vertical gardening. They can be hung on the fence or wall of the house. Even strawberries can be grown in fairly large bottles this way.
- Square bottles will be a good imitation of a train heading to distant lands. You can also cut holes in them, fill the soil inside and plant plants. And the bright color of such a craft will add elegance to the area in early spring or cool autumn.
- Cute fly agaric mushrooms made from small bottles will make a wonderful decoration for boring garden beds or a playground. To do this, cut off the bottom of one bottle, paint it with red paint with white spots and glue it to the neck of another bottle. Small pebbles or sand should be poured inside for stability.
- A donkey made from plastic bottles harnessed to a cart will decorate the entrance area or the recreation area of a country plot.
- An old unnecessary tire and bottles will create a wonderful steering wheel that will decorate the deck of a “real” ship, and the bottoms of bottles painted blue can become water.
From a large number of plastic bottles you can make an unsinkable raft or boat, a children's playhouse or a carport.
Plastic scoop
If the canister is small in size (1.5-2 liters), it can be used to make a scoop for cleaning or garden work .
You will need to mark the future product on the surface and cut it out; the handle matches the handle of the container. The bow can be made either triangular or square.
In the first case, the scoop is convenient to use for digging up plants with a small root system from soft soil, and in the second, for collecting debris.
Bird feeders
Everyone loves to feed birds, and making a good bird feeder with your own hands is as easy as shelling pears. You just need to cut out windows in the walls of the canister, then holes into which to insert the poles. Color, pour food and wait for guests.
1 option
Option 2
Sprayer
A large capacity (10-30 liters) can be used for spraying plants with chemicals that protect plantings from pests.
The canister is equipped with a manual or electric pump for easy spraying. For carrying, you can attach a handle or straps to carry it on your back.
The hose, spray nozzles and boom can be purchased at any hardware or plumbing store.
A rubber nipple can be used to install the valve.
This sprayer is suitable for processing small vegetable gardens and front gardens; for larger areas an extension cord may be required.
Most often, a device made from a plastic canister is used to spray chemicals against pests, cabbage beetles, as well as mold and mildew. You can also use products prepared according to folk recipes, from soap solution to urea.
Classification and purpose
Organizers for tools differ in design, purpose, and mobility (they can be portable or stationary). Experienced professionals recommend combining different types of organizers when organizing your workspace. Highlight:
- Portable organizers;
- Compact stands;
- Cabinets with drawers-containers, including mobile ones (on wheels);
- Hanging organizers;
- Wall panels.
All of them are used to accommodate cutters, drills, attachments, hand tools, as well as electrical, hydraulic and electro-hydraulic equipment. They are made of fabric (for bags), wood, metal, plastic, fiberglass, textolite. The designs allow for the presence of magnets, rollers, and moving elements. The use of organizers pursues three main goals:
- Workspace optimization;
- Facilitation (acceleration) of work;
- Simplification of transportation.
Tool box for garage
To create such a device, you can use canisters of different sizes; the choice depends on how many things you plan to put inside.
The most commonly used containers are 10-20 liters for water, food, chemical, and flammable products. The shape should be rectangular, with a handle in the middle at the top.
Manufacturing instructions:
- make a vertical cut on the side of the neck and handle, leaving the wall of the narrow part of the canister intact;
- bend the resulting “door”, opening the container. Inside you can place sections of plastic cups or boxes, or any other fasteners. In such a box you can store small items (nails, screws, paper clips, electrical tape, etc.) or tools directly (hammer, pliers, pliers, etc.).
To make the tool box more durable and airtight, the sides can be reinforced with metal plates , for this the walls will need to be drilled and secured with bolts and nuts.
Details
Review of crafts for the garden
Making a washbasin
A 5-liter plastic container is ideal for creating a camping or even country washing device. The filling hole at the canister will be used to fill it with water, and at the bottom you will need to make a hole and insert a valve or tap. To do this, it is important to use a couple of insulation in the form of rubber gaskets and a fastening nut so that the liquid does not leak out and the tap is well secured. The finished washstand can be hung on a crossbar, a hook, or attached to a vertical surface using tape or a strap. You can put a funnel in the filler hole for convenience - this way, when filling the canister, water will not spill onto the ground. If you install a regular faucet, you can adjust the pressure by unscrewing the handle.
MK on creating a swan
Bird figurines for decorating a country house are often made of plastic. We present to your attention a small workshop for making a swan from old cans. For this you need a 5 liter container. It is required to cut the product in such a way that the tail, body and neck length are immediately cut. Next, you need to prepare the wings from thick cardboard. It is important to cover the neck with tape and newspapers, and then do the same for the workpiece as a whole. Then apply a layer of regular napkins and coat the future figurine with plaster mortar. As the surface dries, it is important to sand it, paint it and decorate it with other elements (for example, the eyes of a bird can be made of glass or stones).
garden flower bed
Most owners try to arrange flower beds in the garden/front garden, and plastic canisters can be used for two purposes:
- Container for planting flowers - you need to cut the product, turning it into two halves, and dig it into the ground, and then sprinkle the prepared soil with fertilizers inside and sow the flowers. But the canisters can, if desired, be decorated with paint, colored paper, or other methods. Moreover, the miniature flower beds themselves can be raised above the ground, as shown in the photo - this is extremely important if the soil is initially not suitable for certain varieties or it is very wet.
- A fence for a finished flower bed - this option is perfect for large plantings of flowers - canisters should be dug in around the entire perimeter, blocking the plants. This design will be more of a decorative nature; it is better to use colored containers in one shade or alternate two or three, and then the fence will look beautiful.
Let's look at another subject.
Garage Crafts
Plastic scoop
DIY craft from canisters for the garden with a volume of 1.5-2 liters; you can use it to make a scoop for cleaning or garden work. You need to place your product on the surface and cut it out, with the handle matching the handle. The bow can be made either square or triangular. In this case, the scoop is convenient to use for digging up plants with a small root system from soft soil, and in the second for collecting debris.
Sprayer
A huge capacity of 10-30 liters can be used to spray greenery with chemicals that protect plantings from harmful organisms. Equip the canister with a manual or even electric pump for convenient spraying. For carrying, you can attach a handle or straps to carry it on your back. Nozzles, a spray hose and a rod can be purchased at any hardware or plumbing store. To install the valve, you can use a rubber nipple. This sprayer is suitable for treating small front gardens and vegetable gardens; larger areas may require carrying. Most often, a canister product is used to spray chemicals against pests, cabbage worms, as well as fungal colonies and mold. You can also use compositions made according to folk recipes, from urea to soap solution.
Garage Tool Box
In order to make such a device, you can use canisters with different volumes; the choice will depend on how many things you plan to put inside. Most often, containers of 10-20 liters are used for water, chemical, food and flammable products. The shape should be rectangular, and in the middle at the top there will be a handle. Creation instructions:
Make a vertical cut on the side of the handle and neck, leaving the wall of the narrow part of the canister intact.- Bend the resulting “door”, revealing the container. Inside you can place sections of cups from plastic boxes or cups, or any other fastenings. In such a box you can store small items (screws, nails, electrical tape, paper clips, etc.) or the tools themselves (pliers, hammer, pliers, etc.).
To make the toolbox stronger and more airtight, the side panels can be reinforced with metal plastic, and for this the walls must be drilled and secured with nuts and bolts.
Watering can
For such a product, it is optimal to take a canister of detergent or other products that has a slightly flattened shape and a comfortable handle .
It is necessary to thoroughly wash the internal parts from any remaining liquid, then drill thin holes in the lid. The optimal size is 1-1.5 mm. Just above the handle you need to make a larger hole for air supply: if this is not done, watering the beds will be more difficult due to the pressure difference.
If necessary, you can equip the watering can with a plastic tube, which can be purchased at hardware or plumbing stores: it will increase the spray range.
Filling the water is done through a plug; for this it is convenient to use a funnel or hose so that the liquid does not spill.
You can also cut a wider lid, then using a funnel when filling with a regular bucket is not necessary. However, in this case, you should ensure that when watering the plants, water from the watering can does not flow onto the ground through the lid.
Device with valve
A washbasin made from a 5L bottle is easy to upgrade. I recommend purchasing a special spout for the traditional model at a hardware store. The price of the part is much cheaper than a ready-made hand washing design. I insert the pin into a hole in the cork, which I create in advance with a hot nail. If you touch the element with your fingers, water flows from under the part.
Instead of a plunger, I advise you to use a disposable 5 cc plastic syringe. I drill a hole in the bottle cap that matches the diameter of the medical instrument. The structure should fit easily into the hole without any liquid spilling out. At the device, I use a construction knife to cut off an area with a place for a needle. I carefully clean the edge from burrs and irregularities.
Source zen.yandex.com
I squeeze the syringe into the cork. The piston of the medical instrument should enter and leave the frame without effort. I make the washbasin body from a five-liter bottle. I remove the bottom of a plastic eggplant. I fix the device to a post or tree trunk using a self-tapping screw. To prevent the structure from moving, it is important to tighten the screw tightly.
I screw the stopper with the syringe in a spiral onto the neck of the container. If the entire piston is outside the bottle, then the water does not flow. All you have to do is lightly push the device inside the eggplant and the liquid will flow out. To completely block access to moisture, you need to pull the device all the way.
Source cozy-home-ideas.com
The role of the valve can be played by a nail or screw with a wide head. I insert the part into the hole of the cork, which I then screw onto the neck of the container. The disadvantage of the design is the lack of tightness, water drips or leaks. To seal the product, I string the steel element onto silicone. An elastic spacer will reduce the gap between the hole and the metal without affecting the mobility of the piston.
Instead of a valve, I recommend using a small rubber syringe. To increase weight, I additionally add fine river sand to the medical instrument. I insert the device into the eggplant through the cut bottom. I take my nose out through my throat, so I don’t need a lid.
Source sdelaysam-svoimirukami.ru
Creating a flowerpot
Hanging or stationary flower pots can also be made from plastic containers.
The canister can be cut in half horizontally , then process the edge with a medium so that it is not sharp: grinding will be required. After this, holes are made 0.5-1 cm from the edge into which a cord or rope of small thickness is inserted, fastened together, making an allowance of 20-40 cm (the size depends on what plant the pots will be used for).
Then a single suspension is formed; it can be made in the form of a loop. Flowerpots can be hung on hooks, wire, or nails.
If you plan to place the products on a stand, it is not necessary to make holes for fastening .
In any case, small cuts are needed in the bottom: they allow you to create a proper soil microclimate and remove excess moisture.
The surface of the finished flowerpots can be woven into knitted covers, decorated with applique or painted - an example of such a craft is shown in the photo below.
Bottle broom
From several one and a half liter bottles we make a simple and extremely durable broom . This broom is convenient for sweeping floors and fleecy surfaces. The hardness of the broom depends on the number of pieces cut.
Manufacturing.
First, we make preparations. We cut off the neck and bottom, spread the middle into flaps to the middle, no wider than two centimeters. You will need 4 of these, and leave another one with the top and neck. Now we put everything together, and cut off the top from the next bottle, put it on what happened and squeeze it. We take a strong wire and thread it through all the bottles along the edges. We put everything on the handle through the cork and secure it with wire. For reliability, we drive a nail through the neck into the handle.
Tip: Use copper stranded wire.
Fishing box
For this purpose, you can use 20-liter oil cans; side pockets, if necessary, are made from smaller containers.
The canister is cut, leaving a height at which the fisherman can sit comfortably for a long time , and the cut is reinforced with an aluminum strip fastened with rivets.
Inside you need to place a partition made of thick plastic: it not only divides the item into compartments, but also serves as an auxiliary stiffener and prevents the lid from deforming.
The lid is cut out of a thick plywood sheet and attached to hinges. The upper part is usually covered with soft material for comfort .
A strap is attached to the sides of the canister so that you can carry the fishing box on your shoulder. The internal compartment for tools can be divided into smaller segments (for equipment, rods, donks, circles, etc.).
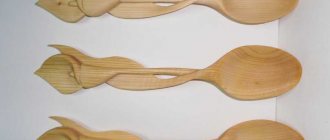
Spoon from a bottle
Having arrived in nature, you forgot your cutlery and have nothing to catch it with. To save the situation, a bottle, a knife, and a lighter are enough. Cut out one of the five parts of the bottom and a little of the top in one piece after burning the edges with a lighter. You can use this spoon to eat and prepare food.
Tip: After firing, rinse the device.
Drinking bowl for chickens
A device for providing poultry with fresh water can also be made from a 20-30 liter canister.
You will need to prepare a wide tray that does not allow moisture to pass through. Make slits in the bottom, then place the canister in the tray, leaving a gap of 1-2 cm between it and the bottom (for this you can make stands along the edge under the container).
The structure should be secured so that the water container does not overturn from an accidental push.
After filling, the liquid will flow evenly into the tray , from where the chickens can drink.
This drinking bowl for chickens is good not only for its simplicity, but also for the absence of the need to manually regulate the water flow.
Mug made from a plastic bottle
If we don’t have a mug , you can easily make one from a bottle . First, cut off the top, then use a knife or scissors to cut out a square, retreating 2-3 centimeters from the top cut. We cut it evenly and with the expectation that the width of the remaining jumper will be the handle. Turn the top ring inside out and push through the bottom. Now we have a mug that can help us out in nature.
Tip: Without cutting out a large square, you can fold the middle section and put a cork ring on it.
Flowerpots
It is very easy to make such products: just cut off the top part and make holes in the bottom to drain excess moisture. The canisters are placed on stands, soil is poured inside and seeds or flower seedlings are planted.
Such flowerpots can be decorated or treated with moisture-resistant paint, or decorated with appliqué.
Most often they are placed on terraces and in gazebos, turning the resting place into a paradise filled with living greenery.
Stand for stationery.
Every time you lose office supplies , you have to look for them, you need to make an easy-to-make stand . In addition to the bottle, you will need a bolt and nut. You need to cut off the top and bottom, then drill a hole in the plug and bottom and connect it with a bolt and nut. It will be convenient to use this since it turns out to be 2 sections. The upper compartment will accommodate pens and pencils, and the lower compartment will hold paper clips, buttons, graters, and you won’t have to take out your pens for small things.
Advice. Tighten the bolt and nut loosely, then the top will be able to rotate.
Raft of empty containers
This design is suitable for crossing a river, fishing, and mobile bridges on a pond.
The frame of the raft is made from a 3-mm board, knocked down using nails or self-tapping screws .
A raft is made from empty canisters with a volume of 40-50 liters, they are attached to the frame with packing tape or a special darkened film.
The second option is interesting because it protects plastic surfaces from fading under the rays of the sun. The frame must first be coated with antifungal agents and varnish to protect it from rotting when in contact with water.
The finished structure can be equipped with the following equipment :
- mooring ladder;
- feeders for luring fish;
- seats, loungers;
- shelter from the sun;
- anchor.
Separate the yolk from the white using a bottle
In the process of preparing dishes, the white or yolk of an egg is required separately . But they are not easy to separate, the yolk is very fragile and if you puncture it, it will mix with the white. You can cheat with a bottle. Crack the egg onto a plate, squeeze the bottle and bring it to the yolk. By unclenching, we will draw the yolk into it without damaging it. The method is suitable for preparing dishes whose recipe includes a lot of eggs, for example, the common French meringue dessert “Meringue”.
Tip: Rinse the bottle before use.
Shower for the cottage
The procedure for creating such a design includes the following steps:
- Creating a pen . To do this, you can use a simple rope, passing it through the handle of the container and tying it around a tree or other structure where the shower will be attached.
- Installation of the nozzle . You should make many small holes in the lid, blow them out, then insert it into the container tap. The joint should be sealed to prevent moisture from leaking.
- Creating a shut-off valve that regulates water pressure. This product can be found in the plumbing department. Rubber seals will be required for installation.
- Arranging a lid where water will be poured. It is better to make it closed so that dirt, leaves and insects do not get into the canister.
- The side parts are covered with black electrical tape so that the water inside warms up faster: black walls absorb ultraviolet radiation better.