How to make a craft tank
The tank is the king of the ground forces. With its simple design and small size, it can help develop hand technique at an early stage of creativity. Craft military equipment in the form of a tank is made from matchboxes, cardboard or plywood. The main thing is that the event takes place in several stages:
- Drawing of the future product for correct visual perception;
- Drawing drawing;
- Creating a tower, body, wheels and barrel separately;
- Fastening the parts in a certain sequence - a tower with a barrel, a body with wheels, a finished tower and a body with each other.
The wheels used are corks or bottle caps, cut out cardboard circles, as well as the chassis of worn out cars. The barrel can be made from a ballpoint pen, a plastic tube, a juice straw or newspaper. Often the tank tower is made from a plastic bottle or beer can. These and other materials are suitable for painting to give the tank a camouflage pattern.
To school
Schools annually hold craft competitions for the holidays. Younger schoolchildren take part in them with pleasure and enthusiastically make original crafts with their own hands for February 23rd. Schoolchildren's favorite materials for crafts are colored paper, cardboard, and plasticine.
Here are some craft ideas for Defender of the Fatherland Day for school:
- Airplane made of colored cardboard.
- Postcards with a sailboat.
- Ammunition truck.
- Military vehicle fleet
Crafts for children in grades 1-2
Students in grades 1-2 can be asked to make their own crafts for February 23rd from unusual materials: paper, matches and pasta. With them you can take part in exhibitions of works by young masters and artists.
From paper
- Tie with stickers.
- Postcards with warships. Cut out the figures to decorate the postcard according to the template.
- Volume cards are a more interesting gift option for February 23rd.
- Mug with the image of the flag.
- Helicopter made of corrugated paper.
- Volumetric stars.
- A simple “Soldier” craft for first graders.
To choose an idea for a craft with elementary school students, you can show the children a presentation with a photo. Let first-graders decide for themselves which version of the toy they like best.
From matches
Matches are a material that always evokes sympathy among schoolchildren. Using neat sticks, making crafts on any theme is easy and fun.
- Unusual postcard made of matches and paper.
- A tank with powerful tracks.
- All-terrain vehicle.
- Military helicopter.
- Boat with oars
Before starting creative work, be sure to sort the matches by length and width. The heads with sulfur can be carefully ground off with a utility knife or left in place. You can glue matches thoroughly using PVA.
From pasta
They started using pasta products for crafts in schools and kindergartens quite recently. But there are plenty of ideas for gifts for dads using noodles of various shapes on the Internet. Choose any option to your liking.
- A fleet of long noodles.
- Machine guns.
- Aircraft.
- Composition on a military theme.
You need to glue the pasta together with a gun, squeezing out a thin stream of liquid. If you don’t have a gun, you can use Moment glue. But it leaves sloppy yellow marks.
Crafts for children in grades 3-4
In grades 3-4, students have great potential. They no longer need to offer ideas for creativity; they can handle it on their own. But if you want to control the process, in technology and art lessons with children 9-10 years old, make the following original crafts for Defender of the Fatherland Day:
- Photo frame.
- Paper boats.
- Composition using quilling technique.
- Cap applique.
- Tank on a stand.
- Decoration for a felt mug.
- Khaki style toys.
From salt dough:
- Toy soldiers
- Orders.
How to make a machine gun
Only hand weapons are made simpler than a tank. In particular, we are talking about the layout of the assault rifle. To create it you will have to:
- Lay out a large cardboard box;
- Draw a sketch of the weapon;
- Enlarge the sketch 2-4.5 times and transfer it through a stencil onto cardboard;
- Cut out a section of the layout;
- Attach the first piece to solid cardboard to cut out the second or third pieces;
- Glue the pieces with PVA glue and tie with tape.
The finished model made of corrugated cardboard is light and safe. To give a natural look, the machine can be painted and varnished. Such a military craft will not be suitable for kindergarten, but for home and outdoors it is a completely different matter.
Toy soldiers - ancient toys
The history of the soldier goes back more than 4 thousand years. The oldest of them were found in the tombs of ancient Egyptian pharaohs. Made of wood, the figurines represented the guards protecting the deceased ruler in the afterlife.
The terracotta guard from the mausoleum of the ancient Chinese emperor Qin Shi Huang is known throughout the world. The full-length figures of his bodyguards are made with the highest detail, and the face of each is so individual that there is not the slightest doubt about the portrait resemblance.
In the Middle Ages, European kings and nobles became interested in playing soldiers. This was perhaps the only social stratum that could afford such pleasure, because the material for making figurines was most often precious metals. The games themselves had tactical and strategic aspects - in them, future commanders learned the basics of controlling military units.
In the XVII – XVIII centuries. More than one self-respecting royal court could not do without a collection of miniature warriors. And at the beginning of the 19th century, toy soldiers finally became available to the general consumer and reached the masses. This is connected, oddly enough, with the spread of cheap earthenware. Before this, most European tableware was cast from tin. But earthenware technology turned out to be much more economical, and tin foundries simply could not stand the competition. In search of a new market, they turned to the production of tin figurines. And so the textbook tin soldier was born. This happened in the German city of Nuremberg, and the first soldiers among collectors are called that: Nuremberg miniature.
Remember, Andersen: from one tin spoon - 25 soldiers? If you compare it with the products of modern factories, you will be surprised at the size of the spoons of that time. But surprise will be premature: the spoons of that time were no larger than the spoons of today. But the soldiers, on the contrary, were inferior in parameters to their descendants at the beginning of the 21st century. The Nuremberg figures were flat, no thicker than 3 mm, and the height of the foot soldier was approximately 30 mm. So it's no surprise that one spoon yielded two dozen tin-resistant ones.
Subsequently, three-dimensional figures appeared, more interesting, but also more expensive, and the most expensive among mass products were made completely collapsible. Russian artist of the turn of the 19th – 20th centuries. Alexander Benois recalled that he perceived the appearance of just such collapsible soldiers as a real holiday.
In the twentieth century, the range of raw materials for the production of toy soldiers expanded significantly due to polymer materials. After World War II, toy soldiers became one of the most popular items on the toy market. During the same period, military-historical wargames (military-tactical games with soldiers) were gaining popularity. Unlike similar games of the Middle Ages and Modern times, they are now dedicated to specific events in military history, be it the Spartacus uprising or the Battle of Stalingrad. The main contingent of wargamers are not children, but young people aged sixteen and older.
At the same time, collecting soldiers is also developing - both ancient ones from a hundred and two hundred years ago, and modern ones, produced specifically for collectors.
Be that as it may, the spirit of Andersen’s soldier did not burn out in the flame of the stove, but continues to warm the hearts of millions of “soldiers” around the world.
Kononko Yulia
How to make an eternal flame
The eternal flame is a very symbolic craft that adults will definitely appreciate. Moreover, girls can safely make this product. Making an eternal flame takes a little effort, time and consumables:
- A star with five ends and ten edges is drawn on a white sheet of paper;
- The drawing is transferred through a stencil onto a sheet of red or silver thin cardboard;
- The star is cut out and bent in different places;
- An orange napkin rolled into a tube is glued to the center of the star;
- The tube is trimmed in some places and unfolded to imitate a torch;
- The star is glued to a cardboard square and, if desired, decorated with green branches, St. George's ribbon, and various inscriptions.
Instead of an orange napkin, you can use a piece of cardboard that imitates a torch. But it will have to be painted in characteristic colors.
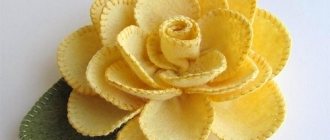
Felt crafts
Do-it-yourself works made from this material look very unusual and original. To complete them you will need:
- pieces of multi-colored fabric of different thicknesses,
- zigzag scissors,
- needle,
- thread,
- office glue,
- green wire,
- cardboard.
Master Class:
- Cut circles from red or pink felt. For one flower you need 4-6 circles with a diameter of approximately 10 centimeters.
- Gather each circle into a thread in the center.
- Sew four pieces together. For a more magnificent bud, take more circles.
- Cut out the base of the flower in the shape of a star from green felt.
- Cut a piece about 25 centimeters long from the green wire.
- On the last one, make a loop on top, onto which to string the bud and its base. To ensure reliability of the structure, glue the base to the petals with glue.
For greater expressiveness, the bouquet is tied with St. George's ribbon.
For example, for a postcard you need: two multi-colored stars of different sizes, a St. George ribbon, the words “May 9”, a middle circle, a white rectangle, a base. All elements are glued to a white rectangle, and it is sewn or glued to the base. With the first method, an additional layer is glued or sewn inside the card to hide the stitches.
Armed with these ideas, you can easily and simply prepare crafts for any significant date.
How to make budenovka
Although the main attention of the target audience is focused on technology, do-it-yourself military crafts are also outfits, including budenovka. In a lightweight version, it does not require fabric. You only need scissors, glue, red and green sheets of paper measuring 500x600 mm. Paper budenovka is made as follows:
- The green leaf is folded in half;
- The upper part of the sheet is folded into a triangle on both sides;
- The triangle is bent in the opposite direction so that eventually its upper edge protrudes above the side with a width of 50-60 mm;
- On the reverse side, the sheet is folded into a triangle thanks to ready-made folds; which unfold outward;
- The side is folded up, the product is folded in half vertically.
The finished budenovka unfolds conveniently and is suitable for decoration with a red star, which is cut out separately.
DIY airplane
You can make a military aircraft with your own hands from simple paper. To perform origami you will need a regular sheet of white paper. You can receive a beautiful gift model according to the following instructions.
- Take a sheet of A4 paper and fold it in half lengthwise.
- Fold the top corners inside the paper.
- Fold the top over and then fold in the top corners.
- Raise the corners up, bend the halves of the central corners inward again.
- Fold the resulting model in half.
- Bend the side sheets in the shape of airplane wings.
How to make a craft machine gun "Maxim"
The popular machine gun is made on the same principle as an artillery howitzer. True, the barrel will have to be made of a larger diameter. Rolled corrugated cardboard will help you meet this requirement. Its reliefs are very similar to the cartridge compartments of the Maxim machine gun. You can also draw lines on a regular sheet of paper rolled into a tube. It is better to roll the sheet around a AA battery. A sting from the handle shaft is attached to the end of the finished chamber.
One more question: how to make a military craft “Maxim” with cartridges? The answer is simple - you need to glue a thread with black beads to the body.
The wheels for the themed machine gun also come in black and have holes. Therefore, it is better to make the chassis from cardboard circles that cut well. It is not necessary to supplement the finished craft with frames, but it is advisable. The main thing is that the machine gun is green.
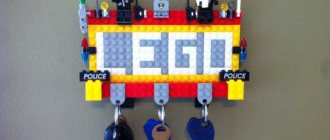
Army made of cardboard tubes
You can make an entire army of warriors out of toilet paper rolls or kitchen napkins. The shape of the crafts remains unchanged, cylindrical; variety is introduced by small details of the costume and changes in the appearance of the hussars.
It’s easy to make soldiers at home using the model that can be seen in the photo above. These are old hussars in tunics with cross belts and medals made of colored paper with appliqué. People differ not only in the colors of their uniforms, but also in their age. Some only have a mustache, while others have a long gray beard. It’s also interesting to fantasize about the high cockades on the shako.
How to make Katyusha
Children love to draw, and therefore they often have short pencils. They can be used as missiles for the famous Katyusha rocket. But first you need to create the rocket launcher itself:
- Thick cardboard is cut into two sheets - 60-100 mm and 80x120 mm;
- A matchbox is glued to the edge of a large sheet;
- Lids or plugs are glued to the bottom of the sheet with the “cabin”;
- A short sheet is placed on the edge and box of the truck;
- 4-6 pencils are glued to the edge of a short sheet.
Note!
- Crafts for February 23: master class on creating interesting DIY crafts for Defender of the Fatherland Day
- DIY crafts for February 14th step by step: a master class for beginners, with a description of how to make a craft for St. Valentine's Day. Valentina (140 photos)
- Crafts made from jute: 100 photos of beautiful options. Easy instructions with photos and descriptions on how to make a craft with your own hands
Other rectangular-shaped objects are suitable for making a “booth”. To make the craft as similar as possible to the Katyusha, it is recommended to draw windows, doors, camouflage, etc. in the finished design.
How to make a craft airplane
A modern attack aircraft is created from cardboard by cutting a pair of wings and a tail into the body. Next, pencils are attached to the wings, which perfectly imitate rockets. Such a design will have to be drawn and drawn first. When finished, it is hung on the ceiling, as shown in the photo of air force military crafts.
It is better to make a propeller plane from a plastic bottle. The fact is that the wings easily crash into it. At the end of the container itself there is a cone, to which it is very easy to attach a homemade propeller. The latter is made from a bottle cap ring and foil, which is attached to this ring.
Airplane made from a plastic bottle
Parents often resort to military crafts made from cardboard. To make the next product you will need cardboard for packaging, green plastic bottles, and glue. In the absence of toys, a plane made of cardboard will take your child anywhere.
You need to cut two oval-shaped holes in the bottle on one side and the other. Then place a rolled up cardboard tube into these holes. This is how wings are made.
Dream Island - a place for a family holiday- Gas burners for heating metal: where to buy on the most favorable terms?
- Gazelle. Why is she so popular?
To make a tail, you need to cut three notches in the neck of the container. The nose part of the flying vehicle can also be made from a lid, securing it to the bottom with a special glue gun.
The article offers easier options for military-themed crafts. You can add decorative elements to any of them, for example: emblems, stars and much more.
When doing crafts at home, you need to make sure that you have all the necessary materials on hand. When fantasies of mastery arise, make them come true. Good luck with your creativity!
How to make a craft helicopter
For a helicopter, you will definitely have to have a bottle with a capacity of 0.35-0.5 liters on hand. Its third with a neck is cut and glued to cardboard in the shape of a spoon. The tapered edge of the cardboard is complemented by a rear wing with a hole for a screw. The rotating element for the helicopter tail is created selectively from the following items:
- Paper circle with holes;
- Folded foil in the match slots;
- Cover with internal holes.
A large screw is created from flat thin sticks. A hole is made in them for the neck of the bottle. So that the screw can rotate, the threads on the neck are smoothed with a file, and the neck itself is closed with a lid loosely.
- Since the chassis of a real helicopter is often hidden inside the body, it is recommended to install the themed craft on a wire sleigh.