For a real housewife, nothing is wasted. She tries to use even the most unnecessary little things at first glance - plastic and glass bottles, scratched discs, caps, etc.
Many people simply throw away unnecessary things, without even realizing how much benefit can be derived from this material. Surely, you have already seen beautiful fences decorated with plastic bottle caps. It's time to take a closer look at the process of creating crafts from this material along with our detailed master classes.
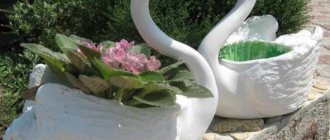
Charming flower
This little flower will be a great addition to your garden or lawn. You can make this craft with your own hands from beer caps and part of a tin can. Simply bend the bottle caps to make petals and attach them all to the prepared tin can lid. To create a truly unique flower, use caps of different colors or choose materials of the same shade.
Crafts from plastic bottles
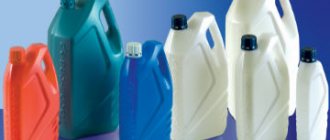
In addition to corks, plastic containers themselves can be used for creativity. There are so many beautiful things you can create. For example, a butterfly - with your own hands. To do this take:
- light, transparent plastic bottle;
- stencil;
- outline marker;
- scissors;
- PVA glue or moment;
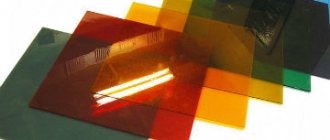
- glass paint;
- acrylic paints;
- fishing line or wire;
- beads or beads.
Technology:
- A part of the bottle is cut to the size of the stencil, on which the design is recreated.
Stencil for making a butterfly from bottles - Cut out a shape along the outline of the drawing.
- Coloring is done with paints; if desired, you can decorate the wings with beads.
- The wings need to be folded, with the outline on top.
- Create an outline on the inside of the wings.
- By stringing beads on a wire, you will get the body of a butterfly. Antennae are made from fishing line.
- All parts of the butterfly are secured with glue.
This is a great gift that can be used to decorate packaging or flowers. And by gluing a magnet to the butterfly, we get a decoration for the refrigerator. Make a fun craft with your child - a frog. Would need:
- two two-liter green plastic containers;
- scotch;
- stationery knife;
- awl;
- tailor's meter;
- marker;
- rag lock;
- threads with a needle;
- wine stopper;
- brush;
- paints;
- glue.
Technology:
- Wrap the bottles with tape at a height from the bottom that you intend to make the box in terms of capacity, just remember that the parts of the frog should be disproportionate. The top is made smaller in height. Using a utility knife or scissors, cut the bottom along the edge of the tape.
- On both parts, using a meter and a felt-tip pen, we make marks that should be 5 cm from the edge. The distance between marks is 1 cm.
- Using an awl, we make holes along all the marks; for this, use a napkin or a small block. The bottle will not bend and you will not get hurt. The tape must be removed as soon as all the holes are ready.
- Then we apply the fastened zipper to one part of the future frog and sew it with stitches along the prepared holes.
Step-by-step making of a frog from plastic bottles - We do the same actions with the second part, only with the zipper unzipped.
- Cut the wine cork in half - these will be the eyes of the frog. We paint parts of the cork green and glue them onto the frog's head. Once the glue has dried, you can add the pupils.
The frog is ready. All these simple crafts, made together with children, will take their rightful place, at home or on a summer cottage, and will delight you. Video selection of various crafts made from plastic bottles and caps.
Wind chimes made from beer caps
Another very creative craft from caps is the creation of wind chimes. To make an impressive craft, you will need about 70 caps. You will need to make a couple of small holes on the sides of the lid and thread the wire through them. All you need are lids, strong metal wire, a base, and a hole-punching tool.
Aquarium
You will need: blue plastic lids, colored paper, a sheet of blue cardboard, PVA glue, plastic eyes, glitter, white paint or line, scissors.
Master Class
- Cut out triangles from colored paper to represent fish tails.
- Glue them to a sheet of cardboard.
- Glue the lids and eyes.
- Decorate the fish with glitter.
- Draw the bubbles in white.
- Cut out seaweed from green paper and glue it on.
The aquarium is ready!
Large clock made from lids
Frames and coasters aren't the only things you can make from beer caps. You can turn old caps into great watches for beer lovers. Or you can use drink caps instead of beer caps. To make this beer cap craft, you will need a clock mechanism, dial, hands, and a glue gun or an old clock that you don't mind repurposing.
Advantages of working with plastic lids
The obvious advantages of creating crafts from plastic lids include:
- Availability and low cost of caps. In every owner’s utility room there is always a large number of old bottles, and along with them, caps.
- Creating crafts from caps from plastic bottles does not require any skills or abilities from the master. In addition, to create most crafts, you only need a thick needle, copper or aluminum wire, glue, and a plastic or fabric blank for rugs.
- Sufficient number of applications. Crafts made from bottle caps are used in the home, in the kitchen and bathroom, in gardens, in summer houses and gazebos.
- Plastic is quite durable and therefore does not collapse from exposure to moisture, rainwater, or melting snow. PVC is resistant to changes in air temperature (except for excessively hot objects). These properties of the material allow it to be successfully used in garden areas, in the bathroom, and in the hallway.
Crafts made from plastic lids are completely unpretentious in care and withstand the effects of chemical detergents and disinfectants. Of course, the covers are not without certain disadvantages (a large number of small crevices where dirt can accumulate), but these disadvantages are much smaller than the advantages.
Decorations
You can turn bottle caps into great pendant necklaces or bracelets. And these are perfect gifts for kids and teens, especially if you use the caps from their favorite sodas. For these crafts, in addition to the lids themselves, you will need small pictures, necklace bases, jewelry pliers and small nails.
Transforming robots
Boys will be especially happy to see the robot. A creative idea that evokes only happy emotions. Moreover, it is easy and simple. For example, look at photos on the Internet and you will be surprised. The process looks like this:
- Stock up on wire that will serve as a base.
- Place the lids onto the base.
- Put it all together, together.
- For novelty, attach all sorts of weapons, antennas, wheels.
- Use boxes and jars.
- Your robot is ready!
Small candles from lids
If you need another original idea for what to make from beer caps, then try making small candles. Small lids make a great base for tiny candles. You just need to place a short wick in the lid and pour some wax into it. These crafts are great for decorating weddings or simply creating a special atmosphere in your home. They are also ideal for creating scenes with floating candles. Since the bottle caps are so lightweight, they will float well and create great lighting at the same time.
Is it possible to make crafts with young children?
Complex compositions, of course, will not be possible for them, but classes on mixed appliqué will be ideal. Let's make a funny zoo:
Glue the lids onto 10x15 size cardboard cards of different shades. For further work you will need: a marker of any color and eyes, they can be: beads or match heads, any small material.
Colored paper will be needed to create additional elements.
Quirky vintage earrings
You've already seen beautiful necklaces made from beer caps, now it's time for earrings. If you have some matching bottle caps, you can create these lovely and truly quirky DIY earrings. To make them you will need jewelry tools, some beads and wire. They are well suited as a gift for children and teenagers.
Preparing consumables
Covers should be prepared before starting independent work:
- All parts must be washed thoroughly in hot water and soap. As an alternative, any disinfectant solution can be used. Pathogenic microorganisms may remain in small cells or channels and should therefore be removed.
- To assemble appliques or a beautiful rug, it is better to use clean lids. For this purpose, it is necessary to use a solvent, with which all inscriptions and pictures are removed from the surface of the plastic.
To make the master’s work easier, you can sort all available lids in advance. Sorting is done by size or color.
Decoration for birdhouse
Kids will love helping create a small birdhouse with a roof decorated with bottle caps. The craft will be colorful and fun, and to make it you will need a wooden birdhouse and old bottle caps. Just let the kids glue or nail (if the kids decide to work with a hammer and nails, help them out) the lids to the top of the birdhouse and you'll have a really cute home for your feathered friends and a great addition to your garden.
Consider a product related to animals
With a child who is studying in primary school, start creating mixed applications. To do this, you just need to glue a few caps to the cardboard and come up with decorations for them. There are even interesting options:
- Birds;
- Wild and domestic animals;
- Insects;
- Pets;
- Fish.
Thread the lids onto ropes, threads, fishing lines, and then make three-dimensional figures of various animals out of them. They gain the ability to move, and playing with such toys clearly becomes more fun and interesting.
Unique pincushion
You can use a bottle cap to create a unique pin cushion ring. This is a nice thing to have on hand when sewing, especially if you don't have an extra pair of hands. The best thing about this craft is that it will take no more than five minutes to create, but it will save you time on the sewing machine. You can see what this wonderful beer cap craft looks like in the photo.
Palette for a young artist
Drawing lovers will love this homemade palette made from plastic lids. To work you will need a sheet of plywood, a jigsaw, and several self-tapping screws.
Instructions on how to make an original craft at home:
- First of all, you will need to find and print a template for the future palette.
- The next step is to transfer the sketch to the surface of the plywood.
- The workpiece is cut using an electric jigsaw. Small holes are cut around the perimeter for paint cells. It is important to take measurements in advance so that the lids fit perfectly in diameter. The second method is often used, in which the cell covers are attached using self-tapping screws to the plywood.
- The lids are cleaned of debris and accumulated dirt.
The covers are attached to the underlying base in either of two ways. The palette itself should be polished and then decorated with original painting using acrylic paints or gouache.
Additional opening of the surface with acrylic varnish will protect the homemade palette from moisture (liquid paints) and rapid deterioration.
Miniature frames made from beer caps
Small black and white photos look great inside bottle caps that you can turn into magnets or buttons. They are very easy to make: you just need to cut out a circle with a picture of the required size and glue it inside the lid, and attach a button or magnet on the other side. Such souvenirs are a wonderful gift for grandparents.
How to make a garden path and flowerbed border from corks
The path requires a large supply of traffic jams - about 1200 per 1 sq. m. m. Therefore, it’s easier not to save them, but to order new ones, having previously estimated the area that you will decorate. A cork walkway will last a long time if you prepare a solid concrete base for it.
How to do it:
- Mark the length of the path and dig a trench along it about 10 cm deep (the width is equal to the future path).
- Drive pegs along the edges of the trench and pull string or fishing line.
- Place crushed stone or broken brick at the bottom - this will be a drainage layer.
- Prepare a cement mortar (cement, sand, tile adhesive in a ratio of 4:1:1).
- Fill a small transverse strip of the trench with the solution, immediately, before it sets, lay out the plugs (so that the convex part looks up).
- Wait for the cement to dry, clean off any excess, if any, with a stiff brush.
- Continue along the entire length of the path.
You can decorate the border of a flower bed in a similar way.
Patterns for garden paths: how to lay out traffic jams - photo gallery
A panel in the form of scales is not the most complex pattern; you can lay it out without having any experience in garden decor
Before laying out the plugs on the cement, practice on the ground - you should have a clear idea of what the pattern will be
Before laying out the panel, sort the corks and make sure you have enough corks of each color
Massage Mat
What will you need?
- First of all, perseverance and patience. It is worth noting that it is necessary to understand the technique of making this product.
- The lids themselves, strong fishing line and an awl.
We make holes on the side of the lids. Holes are made at four points in the likeness of a cross.
We lay out the lids the way we want, that is, we make a certain pattern. Let's take a photo of our display. Be sure to display the covers of rows 1, 2, 3 and further in their entirety. We place the laid out lids on the fishing line one after another.
Take a closer look at the picture. Take the caps from the first row and put them on the line in the opposite rows. It is important to keep the lids in order according to the pattern.
After one row, we move on to the next and so on until we have done everything. And then we tie the knots. Initially, we save about 20 cm of thread for them.
Read here - Sketchbook - how to make a beautiful individual sketchbook with your own hands (110 photos and videos)
It is important to realize the intended shape of the rug! And the ends of the fishing line can simply be set on fire and broken off.
Manufacturing scheme
You will need a ready-made template, according to which further production of the craft will begin.
Don’t be upset if you don’t have one, a little imagination and everything will work out:
- Use two caps for each figure: body and head;
- Glue the lids tightly onto the rubber;
- For Little Red Riding Hood we will need arms, legs, a basket and hats. Consider the color scheme - this is a girl;
- For Sergo the wolf you need: paws, tail and ears;
- All elements are glued according to proportions to the corresponding figure, tightly;
- The design is ready
Conclusion
To all that has been said, all that remains to be added is that lids are not waste or garbage. This is a universal material that can be reused, creating unusual and useful things , while protecting nature from pollution. These colorful caps can be used to create baby toys and rattles, garden furniture and interior decoration.
After reading this article, you learned how to use caps from PET bottles for the garden and cottage, making a variety of crafts and decorations with your own hands.
Beer caps
Beer caps can be used to make Wind Music talismans. Wind chimes (or wind chimes, or Chinese bells) are talismans widely used in feng shui practice that help attract money, luck and prosperity to the owner. In Feng Shui, of course, everything is very complicated, it depends on where the talisman hangs and how many singing elements it contains. But they have already made their way into our lives simply as a pleasant design element that also makes melodious sounds. From the wind or from some device that sets it in motion. Of course, all this is more acceptable where there is sea and wind and open spaces... Well, there you go! Wind chimes from bottle caps:
But you can hang it in the countryside too! And even if the ringing is not so melodious, it will certainly add joy to those around you. You just need to fasten the lids with small rings (such rings are sold in handicraft stores in the “everything for jewelry making” departments) and attach them to some base. It could be a small saucepan, or a tin can, or anything at all, some kind of stick.
In the harsh Russian autumn, such a brutal wind chime would even be appropriate.
Even more information on how to use beer caps to make talismans can be found in our article Wind Chimes
Decorate
Faceless blanks are not beautiful, let's finish the design:
- On the lid of the wolf we will make a separate spout, in the form of an oval shape - glue it on;
- Draw the nose and mouth;
- Glue on the eyes, is it cute?;
- Next, we’ll make spots on the body of the second cover by gluing several elements;
- Let's decorate the paws - the wolf is ready.
Bright panel on the wall
From the lids you can make a panel composition on the wall of a house, barn, fence on a children's playground. Instructions for creating crafts from plastic bottle caps:
- You will first need a sketch according to which you need to make a diagram.
- The patterns are calculated like a Japanese crossword or mosaic, where each row contains a strictly limited number of elements of the same color.
- Based on the selected image, the lids are attached to the underlying base (strong glue is used).
A chain of plastic plugs made in the same color scheme is laid along the contour of the panel image.