Useful tips
You can make a paper house together with your children; it will not only be very interesting, but also useful for the children themselves.
There are many options for houses, and you will find the most interesting ones here, including New Year's houses.
On our website you will also find:
- Interesting DIY gifts
- How to make a box with your own hands
- How to make a frame with your own hands
- How to make a box with your own hands
- How to make a vase with your own hands
How to make a Christmas tree toy house from cardboard
Until now, we have mainly considered creating different compositions for decorating windows and rooms, but you can make a very small house as a Christmas tree decoration. Watch the manufacturing process in Tatyana Abramenkova's video. The principle is similar to the master class described in the first section of the article.
So, we have a lot of house templates, we know how to make a New Year’s fairy tale with them, so let’s get creative! Good luck to you and pleasant pre-holiday efforts!
- DIY New Year's toys - the best ideas
- Crafts for the New Year: the most interesting and easy
- Making tigers by 2022 from different materials
- DIY snowmen
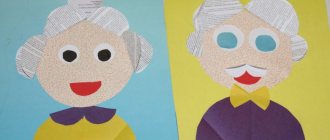
“Technology” 2nd grade or how my grandson and I did our homework...
This week my grandson called me, he is 8 years old and is in second grade. And with tears, they say, because of his work, he needs to embroider a bag. I didn’t understand anything, but asked to bring the textbook for the weekend. Almost all Saturday, Ilya sewed with his tongue hanging out. No, not like that... SHIL!!! We can say that this was his first experience with a needle (not counting the fact that we once learned to sew buttons with him).
Here's a tutorial. If my grandson hadn’t told me, I wouldn’t have guessed from the title that it was a textbook on labor. Although everything is detailed inside... Well, that's for me. But what about an 8-year-old boy?
Shown how to make a pattern for a “bag for all sorts of things”
And, accordingly, it is described how to sew and decorate such a bag with embroidery. I think that my grandson is right in asking for my help. He himself (given his experience with a needle) could not have done this task. “...Sew the painting with a seam...” I had to study for myself what this “painting” seam is
The grandson made the pattern himself. And the drawing - I already showed him how buttons with flowers can be placed...
This is the bag we got. The embroidery is very small; buttons with beads are sewn on it.
Back side of the bag.
These are such crooked stitches flavored with tears, snot, drool...
This is an external seam, although it is small, it took a lot of time - how will it be visible... Well, I had to thread the ribbon onto the tie myself.
While Ilya was struggling with a needle and thread, I sewed him this pincushion hat from a baby food cap and decorated it to match the bag.
What pride was written on the grandson’s face when the bag was ready. - Now they’ll give me a 5 plus! - my modest little one declared categorically, putting the needle case into a bag.
stranamasterov.ru
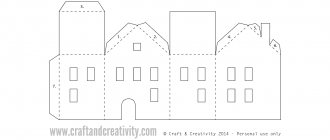
Templates for New Year's houses
In the previous example, it was necessary to glue a house from separate parts, but you can use diagrams in which the entire house is drawn in expanded form.
Using them, you should cut out the workpiece, bend it along the marked lines and glue it in the right places according to the allowances - we will immediately get a 3D craft that can be painted with colored paints (or done in advance before cutting) or left as is, white, because when using backlighting, everything is a fairy tale will be equally provided.
You will need to work a little more to make a beautiful carved house, like Olga Kachurovskaya’s. If its size is small, you can even hang it on a Christmas tree.
Volumetric composition
A more complex version of the implementation, if you follow the instructions, will not seem like something impossible. You will need two sheets of paper, the sizes are selected individually, but it is better not to take too large ones. You need to prepare inventory:
- Ruler.
- Pencil.
- Knife.
- Scotch.
It is better to take a blank of one color for the roof, and another color for the walls, then the craft will not look monochromatic and will take on a natural appearance. The square must be marked according to the diagram and the walls of the future house must be bent, then the cut points must be secured with tape. The upper part will remain empty, but it will be covered by the roof and this space will not be visible.
The ceiling can be made single-pitch or gable at will, both options look as impressive as possible. Such paper origami in the form of a house for beginners will help you understand the basic principle of folding elements and more complex compositions will be easy. Do not forget about the tightness of the parts being fastened together; the roof should not be blown away by the wind from the window or from opening the front door.
An important point will be the design of decorative elements; for this you can use paints or felt-tip pens. Having drawn the windows and doors with a simple pencil, they just need to be filled with shades, parents can start highlighting the frame, and the children will finish the job.
The chimney looks very impressive; to make it, you can take existing elements or make it out of paper, following the instructions for constructing the walls of a three-dimensional house.
How to make a New Year's house out of cardboard with your own hands
Step-by-step instructions from the author of the My Crafts DIY channel will help you understand how you can make a house in principle and how to further decorate it to make it especially beautiful.
The following drawings were used to make this craft:
We prepare templates based on them.
Next, we transfer the silhouette of the house onto a sheet of cardboard, cut out the front and rear facades.
Then we cut out two rectangles for the walls and two squares for the roof.
Let's make windows on the template, outline them on the front of the house and remove the cardboard in these places using a utility knife.
Now we assemble the house, attaching the parts with hot glue.
Irregularities and unsightly joints can be repaired with putty.
We cover the surface of the roof with it and draw tiles.
After drying, the surface should be rubbed with fine sandpaper to remove excess roughness.
If desired, you can make decor: cut and glue columns and other elements.
You also need to make frames for the windows (about 2 mm wide).
Finally, we cover the house with acrylic paints.
Similarly, you can make smaller structures for composition.
We place our crafts on a beautiful stand or just on the windowsill, and put a battery-powered garland inside.
City park layout | Country of Masters
Content
We made this model of a city park of culture and recreation for a school competition. Nowadays, project activities of schoolchildren (according to new educational standards) are becoming very relevant. So we were offered to take part in the creation of a project on an environmental theme.
One of the main conditions for participation in the creation of a project is a creative approach to work. Therefore, we decided to make a model of a dream park, which we hope will appear in our new microdistrict in the near future.
Layout dimensions 70cm by 70cm.
The trees were made from colored paper (4 pieces were glued together, the trunks were painted with gouache).
The alleys are made of corrugated cardboard. Benches, lanterns, gazebo, sandbox, swings - made of ordinary cardboard.
The lawn is made of finely chopped corrugated paper.
The base of the flowerbed is a tube made of corrugated paper, flowers and leaves are made of colored tinted paper.
The fountain is made of foil cardboard in three tiers.
I will be glad if someone finds our idea useful!
stranamasterov.ru
Square layout | Country of Masters
They invited me to participate in the competition “Project for improvement of the territory adjacent to the Alley of Miners’ Glory” in our city. It was assumed that these would be sketches, drawings, well, in general, planar images. But since it’s easier for me to work with other materials with my hands, and I’m not very good at drawing, I decided to make a model.) The organizers weren’t against it. The model will be presented to city residents today (City Day), but you will see it earlier. This is the result of my three-day mental, physical and creative work.)) A piece of land that they want to improve in the future has the shape of an isosceles triangle. This dictated the shape of my layout. Next to the park there is already a children's playground equipped with swings and various slides. On the other side of the square there is a stage area for concerts. A system of existing facilities and a planned park for family recreation would provide residents of the city with a complete and varied recreation and would become one of the architectural decorations of our city. I took a picture with the numbers when I was photographing the object to describe it by sector. I think the numbers won’t hurt you when watching.)) Sector No. 1 – “Lovers’ Corner”. Sector No. 2, 3, 4, 5 – “Flower beds”. Sector No. 6 – “Workout area”. Sector No. 10 – “A platform for rollerbladers and skaters. Sector No. 7, 8 – “Recreation area” Sector No. 9 – “Table tennis area”. Sector No. 13 – “Recreation area” Sector No. 11, 12 – “Glade of fairy tales”. Object No. 14 – Fountain and mini-river. Then everything will be closer. Enjoy watching!))) (lots of photos)
This structure should be iron and strong, like true love.)) And this is where lovers (well, I would like) should hang their locks. Mine is already hanging there!)))
stranamasterov.ru