The simplest envelope can be made from a square sheet of paper, folding the corners towards the center. To do this, you will need a square sheet of paper of the desired size, a ruler and a pencil.
1) Mark the very center of the sheet with a dot, measuring the distance to it using a ruler.
2) Fold the left and right sides inward so that the corners touch the center point .
3) Then fold the bottom side up so that it covers the center and can be glued to the two already folded corners .
4) Apply glue to the bottom sides of the envelope as shown in the photo. You can also use double-sided tape .
5) Fold the top corner down. The envelope is ready! This envelope can be made in just a couple of minutes. It is based on the simple principle of adding angles. Here are a few more schemes for making envelopes from sheets of different shapes:
Diamond envelope
Envelope from the heart
Envelope with a square
Envelope templates
Using this template you can make envelopes from colored cardboard :
By adding a ribbon, you will get envelopes for different occasions : for greeting cards, money, invitations, etc.
Long envelope template :
Envelope template on A4 sheet :
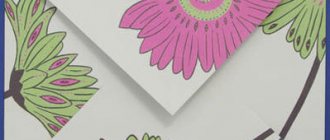
You can decorate envelopes with colored lace or appliqués :
You can use beads and threads to close the envelope:
Envelopes are sometimes decorated with various paper details made using various techniques: origami, quilling, scrapbooking, etc.
DIY money envelopes
What could be more banal than a gift in the form of money , but sometimes it is the only thing that comes to mind. To make your gift unique, you can place it in a handmade envelope . The envelope can be beautifully decorated and signed like a postcard.
Money envelopes are usually made of cardboard and have an elongated shape so that the entire bill can fit inside it . You can draw the templates yourself or use ready-made templates:
Layouts for wedding invitations
Before you create a design and print text, you should let someone else look at it
A “fresh look” will highlight typos, inaccuracies in the information presented, or draw attention to other possible deficiencies
This video presents a master class
How to make wedding invitations with your own hands:
You can also print a few test copies. The correction will not be as severe a consequence as the confiscation of the entire circulation
Of course, when developing the design and printing of wedding invitation cards, you will need the help of a specialist, because beautiful invitations are a great first impression and an additional incentive to participate in a very important celebration in the life of a young couple
Preparing for a wedding is always a troublesome and responsible undertaking, in which it is important to take into account a large number of details and nuances. In addition to choosing outfits, a venue, and a wedding cake, the happy couple needs to make invitations for their guests
Many couples choose standard cards indicating the key moments of the celebration. You can diversify your holiday and make it original with the help of cards you make yourself. DIY wedding invitations
can be made quite easily and quite simply. To be creative, you need to stock up on a minimum amount of materials for decoration and free time.
Invitations that you make yourself have a special energy. They convey care and sincerity while showing their personality. In addition, the entire preparation process will bring a lot of positive emotions and will help organize the wedding in one key. Options for making wedding invitations with your own hands are easy to find - there are quite a lot of them. You can come up with something yourself, and some ideas can be gleaned from the World Wide Web or wedding magazines. To start designing cards, you need to decide on the theme of the invitations. These invitations can be fun and funny, or gentle and elegant. It is advisable to select the style according to the atmosphere of the main celebration.
Wedding invitations. Templates and options
There are quite a lot of design options, since wedding invitations, templates for which you can order from a printing house or find yourself, are an important part of any wedding.
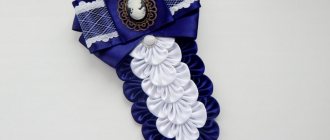
DIY wedding envelope
The best wedding gift is money that can be placed in a beautiful handmade envelope .
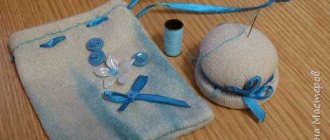
To work you will need:
— A sheet of white thick A4 paper
— Light-colored colored paper
— Decorative cord
— Lace ribbon
— A piece of thin translucent fabric
— Details for jewelry (flowers made of fabric or paper, pendant in the form of a key, beads, etc.)
- Double sided tape
- Ruler and pencil
— Sewing machine and thread
- Glue
— Scissors (regular and curly)
Let's get started:
1) If the colored paper you have is not very thick, stick it A4 paper
2) Using the proposed template or any other template, draw the outlines of the future envelope and make a pattern. The folds are indicated by the blue dotted line.
3) Cut out the pattern. You can use curly scissors .
4) Fold all edges of the pattern inward. Glue a strip of lace , folding the edges inward. After that, glue the bottom cover to the sides using double-sided tape .
17 by 8.5 centimeters from white thick paper .
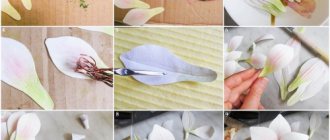
6) Cut a piece of paper to make this triangular shape :
7) Wrap the piece of paper in translucent fabric , secure it on the back side with tape and machine sew it on the front side with a zigzag seam.
 Prepare all the decorations : tie ribbons and cords with a bow, make a flower from transparent fabric, attach a cord to the key-shaped part.
9) Glue the lace ribbon at the top of the part, grabbing the lace that will wrap around the envelope, so leave a suitable length for this. Glue decorations to the bottom triangular edge of the piece.
10) To be secure, run a stitch along the glued lace ribbon .
11) Glue the piece to the outside of the envelope lid.
12) The wedding envelope for money is ready ! Inside it will look like this:
Adviсe
To create an unusual wedding envelope, you must take into account recommendations from professionals.
To make an envelope, it is better to choose paper and cardboard in light colors. Patterns can be applied to the surface of the product using ink, paint or gel paste. With a hole punch you can make figures of angels, butterflies, flowers and others. They should be knocked out from decorative paper. They are fixed on the front side of the product with a glue gun in any order. In order for the upper opening part of the envelope to acquire its original shape, you need to use decorative scissors with a wavy edge or a border. Lace patterns are also obtained through the use of designer scissors. To decorate the front of the envelope, you can use photos of the newlyweds, their relatives and friends.
It is important that the photographs are printed on regular paper and not photo paper. The latter will make it difficult to decorate photographs.
Money in an envelope: original ideas
Using the envelope design, you can place the money inside in different ways . Here are some ideas to help you make original envelopes. For example, you can use a postcard , inside which you paste a small envelope with money. You can write wishes on the card, and when you look inside, the recipient will find a cash gift .
Another option is to make the envelope also in the form of a postcard, and attach satin ribbons inside that will hold the bills .
A book made from envelopes . This original idea will appeal to those who would like to learn how to save money. You can make some simple envelopes and sign them, indicating the purpose for which the money is stored in them and the time when it can be spent.
Romantic invitation
You will have to make an envelope again. But first, prepare and print the text of the invitation (if you are writing it by hand), and use curly scissors to cut it into the shape of a card of the required size. And make a hole in the top center. A hole punch is useful for this.
Now you can start decorating the envelopes. Mark rectangles on the cardboard with allowances of up to half a centimeter from each side of the template and add the same amount for the folds and fastenings. Do the same for the other half of the envelope. Trace the templates with a simple pencil and cut out.
From the wrong side, you can draw a metal ruler along the fold lines. Now all that remains is to make a cutout on the front part of the envelope in the shape of a semicircle or triangle, on the other part - punch a hole at the top, as in the card, and bend all the parts. Glue the envelopes along the fold lines and decorate the front side with lace.
Once the card is placed in the envelope and the holes are aligned, tie a thin satin ribbon, threaded through both the card and the envelope, into a knot. A bow made from a wide ribbon attached to a narrow one will be a real decoration.
How to give invitations and when
Invitations are supposed to be given 1.5-2 months before the wedding. This is the optimal period of time that an invited guest needs to think about the gift, his image at the celebration and adjusting his plans.
No later than two weeks before the celebration, invitees must confirm their arrival, because The newlyweds need to decide in advance on the guest list, order a banquet and alcohol for the wedding based on the number of guests. And make changes to the wedding budget.
It is advisable to place the wedding invitation in an envelope. But the envelope must be signed officially, indicating the names and initials of the invited guests.
It is best to present invitations in person, but you can also send them by mail. If you want the guest to confirm his presence at the celebration, do not forget to include an envelope for his message.
Making your own wedding invitations is fun. Involve your significant other in this activity. Handicrafts bring you closer together and at the same time reveal talents that you never knew you had. Who knows, maybe deep down you are a designer, poet or folk craftsman. And your guests will keep the wedding invitation you made both as a memory and as a unique work.
Here are some more ideas for inspiration! Create and enjoy the creativity, as well as the result!
Our website presents other wedding-themed master classes:
how to decorate wedding glasses
how to decorate wedding champagne
alcohol calculator will help you calculate how much alcoholic drinks you need to buy for your wedding