For children's games, it is interesting to make a large three-dimensional tree out of cardboard with your own hands. This can be a product made of corrugated material, compressed paper, fabric, or balloons. We’ll also fantasize about this topic, teach you how to cut out a template and assemble trees that can be placed in the middle of the room. We also recommend decorating the walls or playroom of your home or kindergarten with as large a tree as possible.
Children can decorate a large tree with leaves and flowers, plant birds on branches and install birdhouses. We will show you how you can decorate the crown of a tree. There are also decorative samples. They can decorate entrance or interior doors. For such a do-it-yourself three-dimensional cardboard tree, you will need many additional elements.
Required tools and materials
An applique of palms (from colored paper) is easy to make, the main thing is to have all the necessary materials for this:
- paper, preferably with a large number of shades;
- covers of old notebooks and colorful magazines;
- glue, the best option is PVA, they also use dextrin adhesive and paste (made from flour or starch);
- pencil with medium hard lead;
- soft elastic;
- sharpened scissors;
- oilcloth as a bedding on the work surface;
- cardboard or whatman paper for the base;
- glue stick;
- corrugated paper for additional parts;
- markers;
- marker;
- material for decoration (beads, sparkles, ribbons);
- brush for applying glue;
- wooden skewers.
Accessories
Before you start making the craft, prepare the following:
- Thick and multi-colored paper;
- Scissors with a rounded cutting edge;
- Paste or silicate glue;
- Vatu;
- Wallpaper;
- Marker and felt-tip pens;
- Cotton pads;
- Drawing supplies.
Useful tips
Useful tips to consider when designing applications:
- on thick colored paper, glue residues will not be as visible as on thin raw materials;
- It is recommended to cut out the details slowly, clearly following the drawn contours, then the craft will turn out neat;
- on matte sheets, fingerprints and traces of adhesive are not noticeable, as opposed to gloss;
- textured material emphasizes the appliqué elements;
- when using self-adhesive raw materials, glue is not required;
- drawing paper is suitable for forming a template;
- for the background it is best to take whatman paper or cardboard;
- It is best to trace your palm on paper with a felt-tip pen or pencil;
- if the child is small, then you should tell him how best to position the pens on the paper so that several elements can be placed;
- the outline of the hand is applied to the sheet repeatedly, using different shades. You can also make a template once and then transfer it to a piece of paper;
- Animals, birds, inflorescences and various figures are created from multi-colored handprints.
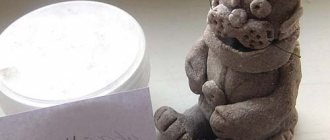
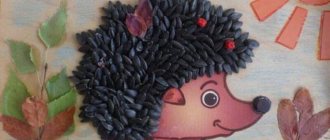
Hedgehog
Simple application.
A spectacular hedgehog is made according to the method below:
- Trace a child's hand on black cardboard with white chalk, then cut out the blank.
- For the craft you will need 4 such parts; they are laid in the shape of a fan. If the elements differ in size, then it is advisable to arrange them so that the overall outline resembles a back with spines. Glue the parts together.
- From dark cardboard, make the body of an animal in the form of a belly and a head with a nose.
- Glue the torso onto the needle-shaped back.
- Draw a mouth on the face using acrylic paint or gouache.
- Make an eye out of a white sheet of paper, fix it in the right place, and draw a pupil inside with a marker.
- Decorate the hedgehog with an apple and a leaf cut out of green paper.
- Form a boletus mushroom from brown fiber and attach it to the needles.
- Cut out the legs from black cardboard and attach them to the bottom of the body.
First option
A tree with photographs on the wall can be an interesting way to decorate your home.
When creating such a tree, you can use ready-made tree templates or vinyl stickers. Or you can draw a tree yourself.
For the tree you will need: sticker, frames, photographs, nails, hammer.
To begin with, select the location where the tree will be located. Good quality photographs are then selected and printed. If the store does not have the desired sticker, you can order it.
We glue the sticker to the wall and mark the places for the frames on the finished tree. We nail the frames with photographs and admire how the finished family tree fits perfectly into the interior!
Swan
Making a craft in the shape of a swan is quite simple, the main thing is to follow the instructions.
It is as follows:
- Place the child’s palm on a white sheet of paper, outline it, and then cut it out.
- To create a bird you will need approximately 15 such blanks, the number of which will determine the splendor of the plumage.
- Using the same raw materials, form the head and neck of a swan, and then glue them onto a cardboard base.
- The beak is made white and then painted or made from yellow paper.
- Draw the eye with a marker.
- Next, feather palms are attached, they are placed so that the fingers point in the opposite direction from the direction of the head.
2nd manufacturing option:
- The bird is also performed with only 1 palm.
- To do this, you need to cut a blank from a white sheet so that the thumb is slightly protruding - this will be the head.
- Glue the part onto blue cardboard.
- Make some blue paper waves, make the crown yellow and the beak red. Glue the elements to the swan.
Fifth option
A family tree made of beads looks very beautiful. It will decorate any home.
This tree would be a great wedding gift. Or you can make it a themed 30th anniversary gift by adding pearls.
For production you will need:
- pearl beads;
- white beads;
- wire of different thicknesses;
- leaves - sequins;
- scissors, wire cutters and pliers;
- coins;
- stone for the base of the tree;
- floral tape and masking tape;
- acrylic paints: bronze, brown, varnish;
- gold glitter;
- wood slices;
- photos.
First, we decide on the location of the photographs on the tree. Then we create its detailed diagram.
For the future tree we make branches from thin wire and pearl beads, as shown in the pictures.
After 1-2 cm, we put a loop of white beads on one end of the wire.
We also repeat from both ends of the wire.
Add a leaf and form a branch.
We connect three such branches into one thick branch and weave the number of branches required for the volume.
We braid the branches with thick wire and floral tape.
We form a tree trunk from very thick wire that does not bend easily and attach it to the stone.
Add branches to the base.
For thickness, we wrap the tree with even thicker wire and masking tape, and paint it.
You can use a glue gun to add roots to the tree.
We glue photographs onto wooden sections of birch and make small holes.
We paint the trunk, roots and branches with bronze paint, and coat the top with varnish.
We decorate the finished tree with coins, gold sand, rhinestones and swan figurines.
Beauty is ready!
Autumn tree
Applications of palms made of colored paper, made by children together with adults, will help to spend family leisure time usefully.
Application of palms made of colored paper - autumn tree.
Master class on decorating an autumn tree:
- On a regular A4 sheet of paper, paint the trunk and branches of a tree. The main thing is that the main branches are visible; small ones can be left out. If there are no paints, then the base of a perennial plant is made from palms.
- Prepare colored paper in warm shades (red, orange and yellow), trace the child’s hands on it, then cut out the details.
- Glue multi-colored elements to the wood, filling the voids. Apply glue only to the lower part of the palm; let the upper part remain slightly raised to create volume.
- If desired, acorns or nuts are painted on the crown.
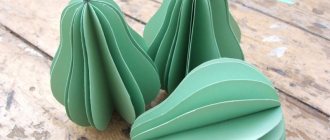
Corrugated cardboard sample
To create such a branched tree, you will need a piece of corrugated cardboard, a simple pencil and large scissors or a sharp knife. You need to divide the sheet into two equal parts. On one side they draw a trunk, a wide stand at the bottom and several branches. All this is cut along the contour with scissors. Then the cut out template must be attached to the second half and outlined with a pencil. The barrel and stand must match exactly. Branches may be different.
In order for a three-dimensional cardboard tree to stand stably, you need to draw a line in the middle on one part with your own hands. The trunk is cut along it from top to center. On the other part, on the contrary, along the drawn line, a cut is made from below to the center. In order for the two parts to connect freely, the cut lines should be equal to the thickness of the cardboard, approximately 0.5 cm.
All that remains is to put the parts together by putting one part on top of the other. From below, all stands must be at the same level so that the product stands firmly and does not wobble. When the main part of the work is prepared, you can start decorating the branches. The guys will do this.
Sun
Summer sunshine is easy to create with your little ones.
Procedure:
- On the back side of bright yellow paper you need to outline 3-5 children's hands, while it is advisable to spread the fingers, then cut out the details.
- Do the same on an orange piece of paper.
- Next, make a circle of yellow sheet with a diameter of 8-10 cm.
- Make a circle of the same size from a cardboard base.
- Glue the prepared palms along the edge of the round cardboard piece, alternating colors.
- Glue a yellow disk in the center and draw a cheerful face on it with felt-tip pens.
Type of execution
There are all sorts of ways to do it, not limited to just multi-colored paper. You can glue all sorts of raw materials you like. Let's say cotton wool, cotton balls or other materials. In this case, the result will be completely different. Try and introduce your child to arts and crafts. This will help you develop an authentic approach to creating beautiful things.
Butterfly
To captivate your child with creativity, it is recommended to make a bright butterfly.
Step-by-step master class:
- Place the child’s palm on the colored material, trace it and then carefully cut out the parts along the contour with scissors.
- You will need 2 blanks of different colors.
- Make the body of the insect in the shape of an oval, make the head round, and connect them together. Beige cardboard is suitable for the base.
- Next, you need to arrange all the parts the way they will look when finished, and then apply glue to them.
- 2 wings are attached to the upper part of the body with the fingers up, and 2 to the bottom so that they touch each other with the wrists. The wings need to be glued under the body of the insect.
- Make thin cardboard antennae.
- Finally, the craft is decorated with ribbons, plasticine, watercolors, felt-tip pens or multi-colored paper figures attached to the wings.
Cockerel
The application in the shape of a cockerel will turn out to be large, so to decorate it you will need a canvas consisting of 6 glued album sheets.
Registration procedure:
- Design about 25 multi-colored palms.
- The yellow blank will serve as the head; it needs to be smeared in the center with glue and attached to the base.
- For the crest and neck, red and yellow details are suitable. They are laid out on the canvas, slightly lifting the fingers of the previously glued palms.
- The 2nd level after the neck consists of 3 elements, 2 of them are green.
- The 2nd tier contains 4 handles.
- Next, it is recommended to arrange the fragments according to the pattern. The main thing is to correctly highlight the tail and body of the bird.
- It is recommended to finish long tail feathers with black blanks.
- Separately make a beak, earrings and paws with spurs from a red paper sheet.
- Make the eye in black and white from 3 parts.
Chick
A charming craft in the shape of a chicken is made in the following sequence:
- On a white sheet of paper, draw a template in the shape of an egg, cut it out and transfer it to bright yellow cardboard, then trace and prepare an egg-shaped blank.
- From golden corrugated paper, cut into squares measuring 1x1 or 2x2, depending on the age of the child.
- Roll each square tightly into a ball.
- Apply PVA glue to the prepared cardboard form and attach corrugated twisted balls to it.
- For the wings, take yellow cardboard and trace children's hands on it.
- Next, glue them to the formed egg-shaped part.
- Make a beak in the shape of a triangle and paws from red paper.
- For the eyes, cut out 2 circles from white paper material, and 2 circles of smaller diameter from a black sheet. Glue the dark elements on top of the light blanks.
Glue the manufactured components onto the chicken so that a face is formed.
Peacock
Kids make hand appliques from colored paper. This technique involves cutting out paper elements and fixing them with glue to the base.
Procedure:
- Make colored blanks in the shape of children's hands from paper material. The more of them you get, the more magnificent and brighter the peacock’s tail will be.
- Make a cardboard base for the head, neck and torso.
- Next, you need to glue multi-colored palms behind the body in the form of a fan. It is recommended to place them in several tiers.
- Cut out the paws and crest of the head from yellow paper, and make a beak from a red sheet.
- The eyes are made round, with a black circle of smaller diameter glued onto a white circle, slightly larger in size.
- If desired, decorate the peacock with sparkles or ribbons. The body can be decorated with small flowers or dots.
Balloon tree
This kind of decoration tree, made with your own hands from cardboard, can be placed in the form of a picture on the wall. First, they make a background and glue on a simple, even tree trunk. Grass grows below the tree. It is cut into strips and decorated with large flowers. The free space of the blue sky can be filled with flying birds or butterflies.
The tree itself is given volume by a crown made of balls of different colors. If this is an autumn tree made of paper and cardboard, then add a small amount of yellow or orange to the green balls.
Penguin
Necessary materials to make a penguin:
| Name | Quantity |
| Cardboard | 1 blue and 1 white piece |
| Cotton pads | 2 pcs. |
| Self-adhesive plastic eyes | Two pairs |
| Decor | Optional bows, stars, sparkles |
Step-by-step creation technology:
- Glue snowdrifts cut in waves from white material onto blue cardboard.
- Outline the child's hands twice on black paper with a pencil, cut them out along the lines and place them on the snowdrifts, fingers down.
- Attach cotton pads with glue in the middle of the palms, this will be the stomach.
- Next, glue on the eyes, a red mouth made in the shape of a red diamond.
- Decorate one penguin with a bow.
- If desired, decorate the blue background with stars and sparkles.
- You can make a New Year theme, decorate the craft with snowflakes and small Christmas trees.
Topiary made of artificial flowers
This artificial flower tree is a wonderful decoration for a mantelpiece, dining table, or coffee table.
- Clay pot;
- Base ball (10 cm in diameter);
- Foam rubber roller brush;
- Artificial hydrangea flower – 2 pcs. (or other flowers);
- Cotton ribbon in contrasting colors;
- An awl or stationery knife;
- Pencil or branch;
- Glue gun;
- Acrylic paint;
- Nippers or side cutter.
Scheme of work at home:
- We paint the ball to match the color of the flowers and let it dry;
- We separate the flowers “from the stems”: using a side cutter or wire cutters, leave the tails 2 cm long. If the flowers are without wire, cut off the “stems” at the root. In the future, such products can simply be glued;
- On the ball we will allocate a place for the stem part, glue the flowers with the same space between them. The petals should seem to be layered on top of each other in such a way that the ball under them is invisible;
- Use a knife (or awl) to make a hole in the ball for the barrel, fill it with glue, and attach the base according to the recommendations of the 3rd step of the Basic Instructions. Then we glue one or more leaves to the base of the crown (photo below). You can secure the hydrangea leaf with a pin. Afterwards we decorate the empty space around the trunk with flowers;
- Place the tree of happiness in the fixing mixture (Basic instructions - Step 4) and “mask the soil”;
- We make a bow from a cotton ribbon and tie it on the trunk right under the crown.
Pigeon
An easy craft in the form of a Dove of Peace is made using the following technology:
- Take a thick sheet of white paper and trace your palm with your fingers outstretched.
- Draw a red beak on the thumb and cut out the detail.
- Using a figured hole punch, shape a light green twig and attach it to the beak.
- Attach a long wooden skewer to the back.
- If desired, make several of these birds and place them in a vase, tying them with ribbon at the base.
Sunflower
An applique of colored paper palms develops fine motor skills in children and also introduces them to various plants and their characteristics. For example, during the making of a sunflower.
Execution order:
- For the base, prepare ½ part of whatman paper.
- Trace the palms on orange and yellow paper sheets, then cut them out.
- Use green paper to form a stem and leaves, then glue them to the base.
- Find the middle of the inflorescence, draw a small circle, around which glue multi-colored blanks in the form of sunflower petals.
- Roll small balls from black paper material and fill the middle with them to represent small seeds.
From coffee
We will also make a coffee tree with our own hands. To make topiary from coffee beans you will need:
- base (plastic ball, foam ball - sold in craft stores);
- trunk (branch, stick, tube);
- a pot or something instead (I had a beautiful clay jar last time, but now I have an ordinary glass);
- coffee beans (you shouldn’t skimp – good coffee has an indescribable bright aroma);
- solution for fixing (I use regular putty, plaster, alabaster, or even cement will also work);
- brown acrylic paint;
- glue gun and glue sticks;
- newspaper or scrap paper;
- burlap or other characteristic fabric;
- decor for decorating a coffee topiary with your own hands.
How to make a coffee tree:
Step 1. Connect the base of the crown (ball) and the trunk (stick or tube).
Step 2. Cover everything with paper or newspaper, paint it brown and dry it.
Step 3. While the acrylic is drying, you need to prepare the pot - either simply clean it or cover it with burlap if necessary; in this case, a regular glass was used.
Step 4. Let's move on to the most exciting activity - we cover the coffee topiary with our own hands with coffee beans, I advise you to be patient.
Step 5. After the entire topiary is covered with grains, you need to dry it.
Step 6. Pour the mixture into the pot and install the topiary.
Step 7. Once the mixture has dried, decorate it with coffee beans.
Step 8. Move on to decoration - see how you can decorate the topiary with your own hands in the photo.
Clown
Step-by-step technology for creating a bright clown:
- Lay out your palms on colored sheets, trace along the outline, then cut out. You should get about 15 blanks.
- From loose cardboard, prepare parts in the form of hair, boots, a hat and a butterfly. Color in appropriate colors.
- Coat the parts with glue and fix them in the right places.
- The next step involves shaping the colored palms into a suit and arms, then attaching them to the base with adhesive.
- Finally, use felt-tip pens to draw facial features and glue on a butterfly.
- If desired, decorate the clown costume with sparkles and ribbons.
Octopus
This simple octopus craft is fun and cute.
Step-by-step production:
- To make a picture from several mollusks, you will need a cardboard blank of A5 or A4 format.
- Place a child's brush on a colored paper sheet, trace it and cut out the resulting shape.
- Glue your palm onto the cardboard blank so that your fingers point down; these will be the tentacles of an octopus.
- Create eyes from a white sheet, and pupils from a black sheet.
- A pinkish or red paper strip will serve as a smile.
- If desired, decorate the animal with a bow, beads or hat.
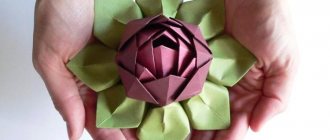
Bouquet of daisies
Delicate flowers are suitable as a gift for mother on Women's Day; it is advisable to place the finished version in a frame.
Master class on making an applique:
- For the base, use cardboard or A4 paper.
- From a colored leaf, cut out 3 thin stems for a bouquet and elongated serrated leaves characteristic of chamomile. It is better to make the stems in a curved form and of different sizes so that they look interesting on the applique.
- Glue the greenery to the selected base. It is advisable to place the leaves at the bottom, and the stems so that the flower buds are located at a distance from one another and do not intersect. Gather the stems at one point below.
- Next, outline the child’s palm on the white source material and cut it out.
- Form an applique by placing the prepared pieces in any direction: down or up with your fingers.
Make cores from yellow corrugated paper or cardboard and glue them to the center of the inflorescence. It is recommended to place the centers on the wrists.
Children can make colored appliques from palms not only in kindergarten, but also during home crafts. Colored paper makes bright and beautiful crafts that will be a good gift option for mom or other family members, as well as a reminder of how a baby learns about the world around him with his tiny hands.
Christmas tree
For such a voluminous tree made of cardboard with your own hands, the template that you see in the photo below is quite simple to build. The tree is made in the same way as the previous tree. But the pattern shows the lines of the central cuts for assembling the structure. This is the general principle for making three-dimensional crafts. After all, in this way you can make a whole forest of spruce and deciduous trees, for example, for board games or for showing a puppet theater. Children love such entertainment very much. Small products can be made from thick cardboard. The crown can be represented by a simple circle.
If you have made such a voluminous tree for the New Year's holiday decoration of a kindergarten group, then you need to cover it with green colored paper; each child can make a Christmas tree toy and hang it on the branches using a paper clip. This is an excellent replacement for store-bought balls and living beauty. Needles will not fall on the floor, and children will learn from childhood to take care of wildlife and not spoil trees.
To ensure that the tree stands firmly on the floor surface, do not forget to add a stand at the bottom of the template, expanding the trunk at an angle.