What is colored sand used for?
- Colored kinetic sand was invented in Sweden for therapeutic purposes for children. One of the important functions of a color invention is the development of hand motor skills. This is very important in childhood, as well as in case of any injuries.
- The second, no less important detail is the relaxing therapy from playing with sand. Kneading the soft bulk material in his hands, the child immerses his body in relaxation. This is very useful in general for children and adults, as well as for those who suffer from stress.
- Thirdly, when a child sculpts or draws with sand, he develops his imagination, fantasizes, and comes up with something unusual.
- Fourthly, playing with sand develops accuracy, perseverance and attentiveness in the child.
Colored sand can be used as molding, it can be used to draw, paint, decorate or decorate.
How to make colored sand for creativity with your own hands?
- Kinetic sand is a rather expensive product, but smart mothers have long come up with a way out of the situation. They created their own homemade version of colored sand, which is not inferior to its counterpart.
- Swedish modeling material consists of a natural component, silicone and dye. Thanks to silicone, it has the property of ductility. This component can be easily replaced with corn starch.
- A large percentage of the composition of the wonder is sand - 98%, in some cases this figure may decrease. The sand used is purified and fine. An alternative is regular sand, sifted through a sieve and fried in the oven at high temperature. This will allow the sand to be free of harmful germs in case your child wants to put it in their mouth.
- The dye in kinetic sand is natural; it can be replaced with regular food pigment. The variety of flowers in supermarkets is replete, so your imagination has plenty of room to run wild.
Clay crafts
Blinyaeva Ksenia Gennadievna , city of Cheboksary.
32. Craft from clay “Tiger”.
Blinyaeva Tatyana Nikolaevna , teacher at MBDOU kindergarten No. 201 “Island of Childhood”, Cheboksary. 33. Crafts made from clay “Dymkovo toy” .
34.
35.
36.
37.
***
38. Belarusian clay whistle.
Rachitsky Yuri Dmitrievich , 11 years old, exemplary ceramics studio “Fairytale Clay”, Kruglopolova Svetlana Mikhailovna – director. Republic of Belarus, Grodno.
***
39. Dymkovo toy Rachitsky Yuri , exemplary ceramics studio “Fairytale Clay”, Svetlana Mikhailovna Kruglopolova - curator. Belarus, Grodno.
***
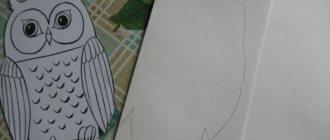
40. The work was done by Ivan Kiryukhin , 11 years old.
The presented work is made of clay, the costume is made of fabric, and the hat is made of paper. I called my work “ Wise Owl ”.
***
41. Dubrovkin Matvey (Orel). "Sea Sea…"
***
42. Budilova Daria , 8 years old, Ufa MBOU Secondary School No. 137 Underwater world. I used river sand, shells, flowers. Salted dough fish.
***
43. Teterina Marina Anatolyevna:
I am a teacher in a special school, working with children who are receiving individual instruction at home. I would like to present the work of my student Alimov Alexander “Little Man”, made from pebbles collected at the sea in the summer.
***
44. I, Volvak Svetlana Viktorovna, teacher of the State Educational Institution of Regional Educational Institution of the VIII type boarding school No. 16, work experience 23 years. by Detochka Anna studying individually at home . The craft is made from river stones, shells and nut shells. Anna independently chose the plot of the craft and, with the help of the teacher, connected the details of the craft with the base. Anna also independently distributed the details of the craft on the base and suggested the name of the craft “ Seabed ”.
In order not to forget the address of the page and share with friends, add it to your social networks: Do you want to know news about competitions or master classes?
Tags: Garden crafts
Attention! It is better to write urgent questions in the comments on the website (form at the bottom of the page) or, better yet, directly by email. There are no notifications about comments from the VKontakte form! This form is more for feedback. 
Discussion: there is 1 comment
- Albina Nikolaevna:
September 19, 2015 at 12:12 pmIn this category today I would like to highlight Galina Chirkova’s work “Turtle on a Waterfall.” The competition requirement for creating a composition from natural material was met. Thank you and good luck in the competition.
Answer
How to make colored sand from real sand?
Colored sand is a new trend in creativity. This material is perfect for luring children into the playroom or will decorate a vase in your apartment in an original way. It won't be difficult to do it. Materials:
- sand;
- food coloring;
- dilution container;
- drying paper.
Procedure:
- Sift the sand through a fine sieve and place in the oven for an hour at 200°C.
- Cool the material.
- Dilute the dye in a container and add sand, stir until every particle is colored.
- Transfer the colored material to paper and wait until it dries.
DIY colored sand from semolina and vodka: photo instructions
You can use colored semolina to decorate interior items. This is a fairly budget option to improve the style of the apartment. You will need:
- semolina;
- alcohol/vodka;
- capacity;
- dye;
- paper.
Progress:
- Place the cereal in a container.
- Add some dye.
- Add alcohol little by little and stir.
- Lay it out on paper.
- Once dry, transfer to a container.
The use of alcohol is necessary so that the cereal does not swell from collision with liquid, as happens with water. And the alcohol-based liquid does not have time to be absorbed into the grains, which makes it easy to color and dry the product.
DIY colored sand from salt
A good alternative to sand and no less relevant is colored salt. Salt is a fairly cheap raw material and is found in every home. Table salt has very fine particles, which is good for decorating objects, painting and drawing.
Take:
- salt;
- gouache;
- container;
- paper.
Execution process:
- Place salt in a deep container.
- Combine with gouache.
- Mix the ingredients.
- Transfer to paper to dry.
Bottle with salt: colored mound with colored salt - master class
First, let's prepare a bottle into which we will pour colored salt. To do this, soak the labels by immersing the bottle in a bowl of warm water. Perhaps over time the paper elements will come off on their own, but the glue with which they were attached often does not come off so easily. And if you got a bottle like this:
its surface must be wiped with a cotton pad soaked in alcohol or solvent until the surface acquires a clean and even shine.
Now let's start making colored salt. To do this, sprinkle a little sea salt on a sheet of white paper.
Apply chalk and roll it over the salt, like a rolling pin.
The more intense the desired shade, the longer you need to roll. That is why you need to pour salt onto a sheet of paper in small portions. Convenient to lay a path.
You can paint the salt and then form a mound, or you can paint it as you go and not bother with saucers - whatever suits you.
Let's move on to forming the mound. Roll a piece of paper into a cone so that there is a small hole in the narrow part. You can use a ready-made funnel, but a paper one is more convenient, since it can be positioned the way we need, while a ready-made one will strive to stay in the center.
We will need to position the funnel so that its hole is directed towards one of the walls of the bottle - then we will get the necessary mounds. So, we position the funnel as convenient for us and add some of the colored salt.
Then we move the hole of the funnel to another wall and pour in salt of a different color. I think the principle of operation is clear. The main thing is not to shake the bottle, otherwise there will be a fuzzy line at the junction of the 2 colors.
Thus, by tinting the salt and pouring it into the bottle using a funnel, we fill the entire container to the end. Now we compact the top layer with a spoon and add more salt - the bottle should be filled flush with the top edge of the neck.
Let's close the bottle with a lid - now you can shake it and rearrange it. If you have compacted the contents tightly enough, there is simply nowhere for the colored salt to spill.
If you are not satisfied with the color of the cap, you can paint it with acrylic paints, choosing a color that matches one of the colors of the contents of the bottle.
Recipe for colored sand from children's crayons
Colored sand can be made from scrap materials, especially if there are small children living in the house. Families with children always have crayons for drawing on the asphalt. And this is an idea for coloring sand.
You need:
- salt;
- crayons;
- capacity.
Procedure:
- Rub the crayons on a grater.
- Pour salt into a container and combine with chalk shavings.
- Mix everything well and start drawing.
So, to make a bottle of colored salt, you will need:
finely ground sea salt, dry;
glass transparent bottle;
colored chalks for drawing on asphalt (it is important that they are round in cross-section, and preferably large in diameter);
several sheets of white paper;
saucers for pouring colored salt;
favorite essential oil (we took bergamot oil);
colored organza ribbon;
wooden beads to match the ribbon;
acrylic paints for painting the lid (optional).
What can be made from colored sand?
Creativity is a place where there are no rules and no limits, so people come up with different types of activities, entertainment and hobbies. Colored sand is an example of how you can transform the ordinary into something cheerful and rainbow-colored, how to make a gloomy day happier and brighter.
Colored sand activities:
- Drawing on a table, a special illuminated table or paper;
- Making frescoes;
- Modeling of different figures;
- Manufacturing of florariums;
- Decorating vases and other containers;
- Making crafts;
- Coloring stencils.
Birth of a painting
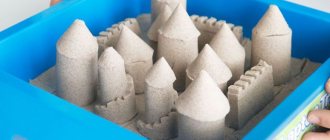
The technology for making a sand painting is very simple. Sand of different colors is poured layer by layer into a beautifully shaped transparent glass bottle using a special funnel. The sequence, thickness and shape of these sand slides depends on your artistic intent. The sand mounds inside the glass vessel are carefully compacted with a thick metal wire, with the help of which a picture is formed. To begin with, you can try to create a simple picture using a few primary colors, for example, simply pouring multi-colored layers of sand into smooth waves. After training, you can begin to create more complex plots.
Sleight of hand, imagination and colored sand - that's all you need to create such a picture. When the bottle is filled, it should be sealed with a cloth tied in a knot, previously soaked in glue.
And one more thing: paintings made of colored sand in bottles require very careful handling: shaking the bottle may damage the design.
If you want to learn this original art, try, create, without fear that something will not work out the first time. Imagine how pleasant and interesting it is to create beauty with your own hands from ordinary sand. Such an unusual souvenir will certainly take its rightful place both in the home and in the heart of the person to whom you give it.
Source
Stencils for colored sand
Smart people come up with new entertainment for every generation of children. At the end of the 20th century, these were carved toys and wood carvings. And in XXI - colored sand and a variety of games with it. If earlier they painted with colored pencils and felt-tip pens, now they have been replaced by sand.
- Current sand stencils appear on store shelves, which come in a set with colored sand. A stencil is an image with an adhesive backing.
- The protective film is removed from the image, and sand must be poured onto the adhesive surface, painting the picture in different colors.
If it is not possible to purchase a ready-made stencil, you can use PVA glue and any picture.
Sand drawings in a bottle
Author of the idea: Nelly Fedosenko
I’ve never been to Egypt, but I accidentally saw on the Internet these interesting bottles, inside of which the sand was folded into interesting pictures:
They say this is a popular souvenir for tourists (second most common after papyri). And that every boy in Egypt, from childhood, learns to make similar paintings from sand in bottles.
Every Egyptian master can make a similar picture before your eyes using a special box filled with colored sand (just like a huge box of paints), an empty glass bottle, a funnel and a tube:
And they sell their works of art right here on the street:
(photo from the page osd.ru/txtinf.asp?tx=3195)
I don’t know at what price they are sold in Egypt, but one Vietnamese website states (this handicraft is also common in Vietnam) that such bottles with a sand pattern are sold for 5-15 dollars.
I have never seen such souvenirs at either Russian or Ukrainian resorts (apparently there are no craftsmen).
Of course, to make such three-dimensional sand drawings, you need to study for some time. This way you can learn and then teach others. Organize master classes - and make your own business out of it (if you like doing it, of course).
Below are a few businesses that can be made from this handicraft alone. These directions will be valid for any handicraft business.
Business 1. Training master class on creating sand drawings
As far as I know, there are no master classes in Moscow (not counting traditional needlework) - creating sand paintings on special tables, drawing on water, etc. For any master class, especially such a spectacular and beautiful one, there will be people interested.
And unlike many newfangled master classes, the result of this event can be taken home and given to someone.
Business 2. Corporate events and celebrations
This is also quite a fashionable trend nowadays. Corporate events with a training focus bring the team closer together and help to get to know each other in an unconventional pastime.
And in the wedding ceremony, this simultaneously turns into a kind of symbol of unity (this ritual is very popular in the West):
The same goes for holidays. Organizers of home (or corporate) parties strive to entertain and surprise guests as much as possible. The more unusual the invited master class, the more interest it will arouse.
(photo from funtastic-events.com)
At this children's party, I think they use Chinese bottles with colored sand, with straws already attached (if you want to buy these, go to alibaba.com).
Business 3. Selling finished works as handmade souvenirs
For our region, this is a rather rare and exotic souvenir, especially since, as I read travel blogs, not everyone manages to bring whole bottles from Egypt. It happens that the bottles are preserved, but the design is damaged irrevocably. Moreover, Egyptian (Arab, Vietnamese) bottles contain their own national motifs (camels, dunes, palaces). Our motives they do not. And we have something to show. Especially for various holidays - New Year, February 23, March 8 and others.
But we already have handicraftsmen who are able to come up with their own motifs in bottle sand designs. The picture below shows the work of a resident of Belarus, an accountant by profession, Lyudmila Myslivets:
(photo from the page grodnonews.by/ru/0/10279/news)
Business 4. Making custom souvenir bottles with sand
Just as some craftsmen paint custom-made nesting dolls (with a portrait of the birthday boy), so it will be possible to create sand paintings with a significant plot (well, at least with the number of years reached; or with some characteristic symbol of the profession of the person being congratulated).
Business 5. Creating your own club of handicrafts and supplying them with materials for creativity
I found one Russian online store where you can buy colored sand for creativity for 50 rubles per kilogram - sandmix.ru:
You can buy in bulk (it’s cheaper; I don’t know Russian prices, but on alibaba.com I saw such colored sand at a price of $100 per ton, that is, 3.5 rubles per kilogram) and resell at retail to your club members.
But you can make colored sand yourself. I read recipes for making it on the Internet (take ordinary river sand, thoroughly wash it, sift it, and then paint it with dry inks for printers).
Not every craftsman can prepare such sand for himself. You also need special glass bottles and some other tools (which are also not sold in stores).
The same alibaba sells plastic bottles of different shapes and sizes at a very cheap price.
You can sell both colored sand and bottles for creativity not only to members of your club, but also via the Internet to all other handicrafts.
Both the handicraft site etsy.com and the Russian similar site livemaster.ru have sellers of both sand and sets for wedding ceremonies (they have thousands of sales, despite the presence of the Chinese with their cheap sand).
Here is one such seller, he has more than six thousand sales in 1.5 years:
Business 6. Sale of ready-made creativity kits
One bottle, several colored bags of sand, tools for creating a picture in a bottle, instructions and some nice accessory.
One Australian housewife has created just such a business - she sells art kits for creating art in bottles online (in addition to hosting fun holidays), her website is funandfunky-sandart.com. Moreover, for children. That is, such sets that any child can master independently, without the presence of an instructor:
She uses plastic bottles with a screw cap (they probably cost a pretty penny).
Any child can do this drawing on his own (he will need a funnel and a spoon as tools):
Each set also includes accessories that will make a funny character out of a bottle (and the child, having glued these accessories on himself, will feel, if not God, then a creator):
In my opinion, it is a simple, original and beautiful business. Available to any housewife living near a river (sea, ocean).
Promotion of business on bottles of sand
1. At a minimum - Youtube - where you will post your master classes or their excerpts, as well as examples of performing certain works. Such videos are promoted very well and will promote you and your business.
2. Create your own group on a social network. You can not only talk about your events, post photos of your work and your videos, but also ask your clients (students) to send photos of their completed work. This process of involvement in filling the group will promote it even more.
3. Cooperation with holiday organizers, wedding planners - with all organizations that entertain people.
4. Your own shelf in the gift shop. Selling your works as souvenirs is also simple. Arrange with local gift shops to have your bottles available for sale. If they sell it - good, if they don’t sell it - you won’t lose anything. From my own experience, I know that there is practically nothing original in our souvenir shops. And you can make each of your bottles original, unique, decorated for the nearest holiday.
Such a bottle, despite its apparent fragility, can last for several years or even centuries (the sand in it is compacted and either filled with special glue or sealed very tightly so that the sand does not shake). How the works of American artist Andrei Clemens stood for more than 100 years:
5. Participate in city events (those where you can sell your handicrafts) and exhibitions.
This is the outline of the creation and promotion of any handicraft business. There is nothing complicated about this if you love to create, teach other people and spread beauty around you (and, as they would say in Business Youth, “do irreparable good to the world”).
Russian sand paintings
My sister recently returned from Anapa and also brought Russian sand paintings. Made simply like this in a container in which smoked fish (or nuts) are usually sold:
And they are sold for money. That is, even from such drawings at our resorts, people manage to make money.
Colored sand frescoes
- Creating sand murals is similar to painting with a stencil. There is also an image, a layer of adhesive and colorful material for coloring. Educational games help children develop memory, creative thinking and originality.
- Each child colors the pictures in his own way, giving them a touch of originality and magic.
The only difference between a fresco and a stencil is that a stencil has simply sheets, while a fresco has a frame.
Colored sand for decoration: ideas for use
With the help of colored sand you can create the most unusual things. Its flowability allows it to fit into the narrowest openings. The lightness of the material has a beneficial effect on application to any surface. With sand you can:
- Paste it over the surface of the furniture;
- Finish the photo frame;
- Make a colorful candle stand;
- Build a decorated floor covering;
- Place a small amount into the game ball.
In general, you can make anything from decorative sand, the main thing is to show your imagination.
Colored sand for modeling
- Colored sand is great for sculpting. Its only difference is the presence of a binder; manufacturers of famous brands add silicone. Thanks to this component, sand acquires a viscous property.
- Another big plus is that classes can be done at home at any time of the year. This is very beneficial because children love to play in the sandbox, and in the cold season not everyone has the opportunity to dig in the sand.
- The purchased version does not require a specialized storage space and does not deteriorate from moisture or dryness.
Unfortunately, purchased sand has disadvantages:
- high price;
- small particles are difficult to clean;
- sticks to clothing and other surfaces.
The only drawback of the homemade version of sand is timely drying.
DIY crafts made from colored sand: photo ideas
You can create a lot of interesting things from decorative items: paintings, castles, crafts, decorate florariums and ordinary candlesticks.
- The tradition of the sand ceremony originates in Hawaii, where the wedding ceremony was always held on the ocean shore. It was there that the tradition of joining sand into a single whole arose, just as on this day two souls are joined by marriage.
- According to ancient Hawaiian custom, the bride and groom each had a cup filled with sand of their own color. And when they poured out of their cups into one common one, they united their hearts - thereby swearing an oath of fidelity and love.
The use of colored sand is multifaceted; you can captivate children with it, or you can get carried away with it yourself. The new entertainment was loved by many fans of painting, architecture, entertainment and ordinary women who think outside the box.
Source
Shell crafts
1. Photo frame and sand, shells and sisal.
Eremina Daria , 14 years old, Municipal Educational Institution “Secondary School No. 41”, Saratov.
Recently my family and I went on vacation to the sea. And from this trip I brought a lot of different shells, as well as some “sea” sand. I came home and almost immediately made a frame like this! The base is ordinary cardboard from a box. The sand is glued with double-sided tape and hot glue on the side. In addition to sand and shells, I also used marbles, sisal, twine and beads.
***
2. Oksana Vladimirovna Okolotina , teacher of the preschool educational institution - kindergarten No. 4 “Rodnichok”, the city of Kotovo, Volgograd region.
I present to your attention the craft “Goldfish” . Natural materials were used: pine cone, sea stones and sand, various shells, dill leaves, parsley, carrots.
***
3. Pavlov Danil , 8 years old, Ufa MBOU Secondary School No. 137. Crafts from shells. In the summer I went to the sea and brought back many different shells. From them I made swans, frog friends, turtles, a snail, and a fish. I also used plasticine and rowan.
***
4. Kuzmina Lisa , Krasnoyarsk. Teacher Ponamareva Anna Sergeevna.
"Owl" . The craft is made of shells, branches, rowan berries, and cones.
5. Dodov Bilol , Krasnoyarsk
" Butterfly ". The craft is made from shells and watermelon seeds.
***
6. “Sea fantasies.” Selezneva Olga Petrovna , teacher of additional education MBOU DOD DDT, Osinniki.
Candlesticks with shells:
7. Photo frame (shells, pebbles, pearl beads):
8. Deorditsa Maria , 11 years old, Sevastopol.
The composition “Fish” is made of seashells.
9. “Sea Fantasies.” Dizhak Alena Valerievna , teacher of additional education MBOU DOD DDT, Osinniki (shells, fern leaves, eggshells).
10. Maltseva Lyudmila, 6 years old - “Swan Lake” (shells, dried plants and leaves).
Photos sent by Elena Simakova :
“I work at the Olimp-Plus secondary school, Moscow, deputy. Director for VR and additional education, I lead the “Creativity Workshop” group.
11. Korchinskaya Olesya. "Cheerful Friends"
12. Panchenko Misha. "On the seabed."
13. Panchenko Sasha. “My fish.”
14. Blinda Dartya. "Quampania" .