Creating crafts from natural materials is no longer an activity only for schoolchildren. More and more ideas are emerging about combining man-made objects and elements of natural origin. Do you want to make an exclusive tree from cones? The process is given step by step below. Study the tips, look at the photos. You will definitely get inspired, and you will be able not only to repeat the sample, but also to come up with an original idea yourself.
DIY souvenirs
The fashion for handmade things has ceased to be the preserve of a select few, but has become a trend among everyone. Knitting, embroidery, decoupage, artistic processing of glass, metal - all this has become available to everyone.
Thanks to the abundance of information and numerous opportunities to purchase any creative material, mastering any technique is easy even for a beginner. To create a beautiful thing with your own hands, you just need to be patient, study the instructions, purchase everything you need and start creating.
However, there is one problem. You can buy almost anything, but the price of some art materials is very high. If you want to master a budget technique and make original souvenirs from what is literally lying under your feet, then the best option is crafts from pine cones. Anyone can make a tree, an animal figurine, a photo frame, a basket and much more, without any special artistic skills.
What you need to make topiary
For work you need to prepare the following materials and tools:
- base ball;
- cones;
- stick;
- flower pot;
- filler for him. With its help, the trunk of the tree will stand vertically in the pot;
- glue gun;
- brown acrylic paint;
- brush;
- material for decorating a pot.
The following materials are suitable as filler:
1. Alabaster. This is one of the best options. Alabaster is durable, hardens quickly, does not crack, and is sold in any hardware store.
2. Plaster. The material is fragile and too light. It can be used for small topiaries.
3. Foam plastic. The material is easily deformed. It is only suitable for small topiaries. If you insert a large tree into the foam, the filler will not be able to hold it upright.
4. Floral foam. At its core, it is a porous sponge. Floral foam has the property of crumbling and absorbs moisture well. This is the least successful filler option.
5. Concrete solution. It is made from cement and sand, taken in a ratio of 1:3. This filler is strong, durable, monolithic, but it takes a long time to harden and is too heavy.
Advantages of natural material
Any object that is related to the natural environment is environmentally friendly. It contains no synthetics, chemicals or other industrially produced substances. This is a significant advantage, as it can be used anywhere. This craft can even be placed in a small child’s room.
With its beauty, nature has always inspired people to create. The same applies to natural materials: dried leaves, flowers, collected cones, nuts, twigs. In nature, everything is subject to the laws of harmony and beauty. By adding a little man-made energy to the collected material, you can create, for example, a tree of pine cones of amazing beauty and grace. How to make such a craft will be described below. If you have a rich imagination and your imagination works well, you yourself can come up with as many original souvenirs as you like. And for motivation, it’s worth looking at ready-made examples.
Decorative tree
Making souvenirs is a very exciting process. It's always nice to see the result of your work. In order for a gift not only to please the eye, but also to have some sacred meaning, you need to choose the right object that you will create and give it the appropriate idea.
From this point of view, a miniature tree made of cones can be an excellent souvenir. It's very easy to do step by step. Such an object will symbolize life, happiness and prosperity. If you add decorative elements to the souvenir, such as coins, hearts, bows, you will get a symbolic money tree or a tree of love and good luck, etc.
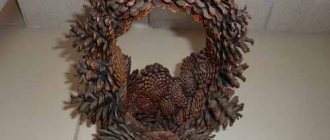
It can be absolutely any form. As a base you need to find a suitable branch or snag. It should be secured to a solid base so that it holds tightly and does not fall even taking into account the future weight of the cones. There may be few of them - it all depends on the size of the souvenir itself. For a desktop, a couple of dozen or less will be enough. It is important to beautifully place the pine cones on the driftwood so that it looks natural. Use the natural color of the elements or paint them gold, silver, white, pink or any other color according to your idea.
The component parts can be glued together, but there is a second option. The wire is taken and cut into pieces of the required length. Each element is fixed in a cone. The branches are woven from the resulting “bouquet”, and the stem is fixed in a solid base. The frame is wrapped with decorative tape, beautiful fabric or paper. The product can be supplemented with beads, bows or anything else.
Types of topiary
This term translated from Latin means “curly pruning”. Initially, the creation of topiaries was carried out by gardeners in Ancient Rome. However, there are opinions that this type of floral design originated in the 9th century BC in Babylon. The Hanging Gardens of the famous Semiramis (according to the descriptions of ancient historians) abounded in plants, which were given bizarre shapes. In Europe, this art reached its peak in the 16th-17th centuries. At that time, only living trees and bushes served as material for the craftsmen’s creativity.
This is also practiced nowadays. However, most often a topiary is an artificial miniature tree in a flower pot, made from a variety of materials. Nuts, acorns, leaves, flowers, coins, even wine bottle caps are used. Topiaries differ not only in the type of material from which they are made, but also in their shape. Most often, trees are made with a spherical crown. But it can also be triangular, abstract or heart-shaped.
Most topiary is a tree with a trunk. However, there are also those who have only a crown.
Topiaries also differ according to the container in which they “grow”. You can use any containers: flower pots, tin cans, bottles, even plastic cups.
What your tree of happiness will look like is up to you to decide. We will tell you how to make a topiary from cones in the classic version - with a spherical crown, with a trunk, in a regular flower pot.
Christmas tree made of pine cones
On New Year's Eve, everyone tries to decorate their office desks with small festive Christmas trees. You can make a New Year's tree from pine cones. How to make it? Very simple.
The process of creating a souvenir will be as follows:
- Make a base from cardboard in the form of a cone with a bottom.
- For stability, fill the inside with crumpled paper and newspapers.
- Place the resulting structure on a solid base and secure it there.
- It is better to paint the frame in the color in which the tree itself will be presented (green, white, silver, gold, brown, if the product retains its natural tone). This is done so that the gaps between the cones are invisible.
- Sort the collected cones and start gluing them in rows. Place the larger ones at the bottom. As you move towards the top, try to choose smaller ones. It is best to attach them to the base using a heat gun. It is a device in which special glue rods melt under the influence of heat. Through the nozzle, the viscous composition is supplied to the junction of two objects. This is a very versatile device. In our case, it is convenient and gives the most reliable results.
So, making a Christmas tree or any other New Year tree from pine cones is very simple step by step. When the structure itself is ready, it can be painted and decorated with beads.
New Year's topiary is the best home decoration
When choosing a gift for your loved ones for the New Year, do not forget that things made with your own hands are most valued. They preserve the warmth and tenderness with which we create. Cone topiary is no exception. It can be decorated with Christmas tree needles, rain, New Year's balls and other elements that give a festive mood.
When choosing a gift for your loved ones for the New Year, do not forget that things made with your own hands are most valued
Cone topiary is no exception. It can be decorated with Christmas tree needles, rain, New Year's balls and other elements that give a festive mood
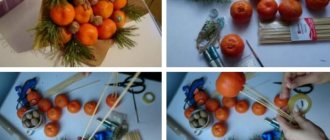
To decorate the composition, do not forget to collect pine cones, prepare white and golden water-dispersion paint, sisal, organza, padding polyester, large pearl beads, toothpicks, scissors, an awl and a tassel
To create a New Year's topiary, prepare in advance a flower pot, unnecessary newspapers, threads, and a plastic tube. There should be two types of glue: PVA and Super (if there is no pistol glue). To secure the structure, choose gypsum plaster or alabaster. To decorate the composition, do not forget to collect pine cones, prepare white and golden water-dispersion paint, sisal, organza, padding polyester, large pearl beads, toothpicks, scissors, an awl and a brush.
New Year's topiary. The cones are bleached, as if dusted with snow
We glue all the cones one by one onto the base ball.
After all the cones are glued, they can be sprayed with a can of white or silver paint
Step-by-step instruction:
- Make a topiary base. Dilute gypsum plaster with water to the consistency of sour cream in a special container. Fill the flower pot with the mixture and insert a plastic tube like a stem. Paint it with gold paint.
- Make a ball out of old newspapers and wrap it tightly with thread to make a ball. Make a hole in the ball for the barrel, add glue there and insert the tube into the newspaper ball.
- Cover the ball with padding polyester and tie tightly at the base.
- Sort the cones, wash, dry and paint with water-dispersion paint. After drying, decorate the cones with golden glitter.
- Make holes at the base of the cones and place them on toothpicks using glue.
- Also secure the pearl beads with glue on toothpicks.
- Cut organza and sisal into square pieces. Roll sisal into balls.
- Start decorating the ball. In a free order, make holes in the ball with an awl and thread cones, elderberries, and sisal balls in turn. Fold organza several times and also use it as decoration.
- Wrap a piece of organza around the pot to hide the plaster filler.
Adults and children will love New Year's topiary as a gift. Especially if you add original elements like candies to it.
Advice! To lift the New Year's mood, add viburnum berries and festive tinsel to the ball.
New Year's topiary in the shape of Christmas trees
Prepare cones, cone base, glue in advance
Decorate the base with fabric. This way the cones will stick better. Glue the cones one by one from bottom to top. Afterwards you can blot them with a sponge and paint.
Master class: topiary from pine cone petals
Topiary in the form of a Christmas tree made of pine cone petals
It is necessary to cut the petals from the cones in advance for future use.
Prepare a cone-shaped base. Paint it brown
Glue one petal to the cone, starting from the bottom row
You will need to be patient
The petals of the cones can be sprayed with a can of paint before or after gluing
After the entire cone is sealed, the tips of the petals can be coated with glue and sprinkled with glitter.
Topiary made of pine cones
Currently, this is a very fashionable souvenir and a nice gift. It is made from ribbons, coffee beans, beads, balls, pebbles, and shells. This object resembles a beautifully trimmed, ball-shaped dwarf thuja in a pot.
It’s also not difficult to create such a decorative tree from pine cones step by step. The sequence of actions will be as follows:
- We need to prepare the groundwork. Take a ready-made ball or make it from pieces of newspaper and PVA.
- Attach a rod, a stick, or a ballpoint pen to it as a barrel. This element can also be wrapped in paper for later application of color or immediately decorative. It is better to secure it by cutting into the sphere and then gluing the joint.
- Paint the base the desired color. There will still be space between the cones and the ball will be visible. If it is plastic, first cover it with paper so that the paint adheres well to the surface.
- Attach pine cones to the base by gluing them to the surface of the sphere or inserting them attached to pins.
- Strengthen the rod in the bottom of the pot.
- Fill the void with gypsum mortar.
- While the composition has not hardened, fill the upper plane with beads, balls, and shells.
This is how you can easily and quickly create an original tree from pine cones. The master class given here will help you implement this idea yourself. By the way, you can first make the entire base and then decorate it. Everyone does what suits them best.
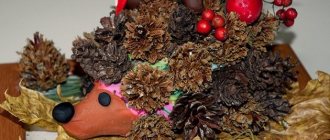
Autumn decor: original ideas
In the fall, you can use many natural materials for crafts and decorations that you can make yourself
The most popular are pine cones, acorns and seasonal dried berries.
To bring some warmth into your home during the colder months, create your own fall topiary.
In the fall, you can use many natural materials for crafts and decorations that you can make yourself. The most popular are pine cones, acorns and seasonal dried berries. To bring some warmth into your home during the cold season, create your own autumn topiary. To do this, follow the step-by-step instructions:
- Prepare materials for work. You will need a straight branch for the trunk, twine, beads, a glue gun, a stand and bronze paint. The main details are acorns with caps and cones.
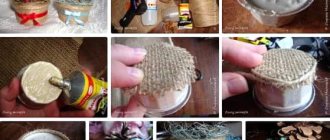
- Make a tree ball out of foam or newsprint.
- To make a trunk, wrap a dry branch with twine.
- Connect the finished newspaper ball and the barrel. Place the structure on the stand.
- Start decorating the tree crown. To do this, glue beautiful cones and whole acorns onto a pre-prepared ball.
- After the glue has dried, treat the decorated ball with bronze paint.
- Place crepe paper in between the acorns and pine cones.
- You can add beads, decorative fruits and autumn berries to the composition.
- You can decorate the top of the pot with dry moss or a beautiful fabric.
Prepare materials for work. You will need a straight branch for the trunk, twine, beads, a glue gun, a stand and bronze paint
Decorate the pot with burlap
Take a base ball or make one from newspapers. Paint with brown paint
Place the ball on the stick
Use glue to glue the pine cones onto the ball.
Attach the topiary stick to the pot using glue. Fill with construction mixture
Pour PVA glue on top
While the glue is still wet, pour beads into it.
Cones can also be decorated with beads
The topiary is ready!
Remember that topiary is called the tree of happiness. It brings peace and prosperity to the home. Therefore, when creating it there should be only bright, good thoughts. A positive attitude charges the jewelry and gives it special power.
Advice! When using acorns to decorate your topiary, be careful not to dry them out. In this case, they will crack and the fake will deteriorate.
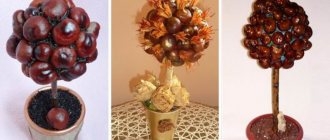
Crafts made from painted pine cones
Such a souvenir will look original, made not only in a single color, but also in a multi-colored version. To do this, you will need to prepare paints and paint the elements in advance. The children will be delighted. They like to create crafts from pine cones. A tree, and a multi-colored one at that, will seem wonderful and fabulous to them. Turn a craft lesson into magic!
If you make a Christmas tree from pine cones, painted specimens can play the role of bright toys. In the case of topiary, you can simply make color transitions by gluing rows of multi-colored elements from bottom to top. The trunk, for example, is white, in the middle there are a couple of shades of pink. A great gift idea for Valentine's Day. This item will look cool if you add it with a cute ribbon, bow or heart.
Creating a New Year's tree of happiness
On the eve of the New Year holidays, owners want to decorate their home with various themed decorative decorations. A small New Year's topiary made from pine cones is perfect for such purposes. To create it you will need:
- pins;
- plastic cup;
- glue;
- scissors;
- tourniquet;
- Styrofoam;
- rowan and cones;
- bast bast, leaves or dried flowers;
- branch;
- crepe paper.
Such topiaries are assembled in 3 stages.
Let's make the base first. To do this, cut out a base from foam plastic, the diameter of which should be equal to the diameter of the plastic cup. Then we insert the workpiece into the vessel. The base can be made from other containers: a tin can, a pot, a cup, etc.
The role of the trunk will be played by a tree branch, only it will need to be wrapped with a rope, secured at each end with glue. Next, use glue to connect the trunk with the base and crown. All that remains is to attach the decorative elements.
Initially, you should wrap the crown with orange paper, tying it at the base with a rope. The same needs to be done with the container where the craft is inserted, only green paper should be used for it. After this, we take rowan berries, string them on pins and hook the resulting blanks into the crown of the tree. You should move clockwise from the middle, leaving no empty space between the berries. It is worth considering that when using fresh berries, after some time they will lose their original appearance, so it is better to take pre-dried rowan. Next we are engaged in attaching leaves, cones and dried flowers. If after this there are still unfilled spaces, you can cover them with the leaves of other trees/flowers, coffee beans, ribbons and pieces of fabric. Finally, you can spray the tree with glitter or spray paint. Photo 2 shows the appearance of the topiary made from cones.
New Year's crafts: pine cones
It is always much easier to work with instructions or a ready-made sample. However, if you use your imagination, the souvenirs can turn out even more original. If you need to make a lot of beautiful gifts and have little time, the easiest way is to use the idea described below.
- Collect the required number of large fir cones.
- Paint them green.
- Make an imitation of white snow on the branches.
- Secure each cone to a solid base.
- Coat the spaces between the scales with glue and sprinkle them with beads, colored grains, and beads.
You can get a lot of small decorative Christmas trees so easily and quickly!
You saw how easy it is to make a tree from pine cones. A master class in the form of tips, supplemented with illustrations, will become your starting point in the creative process. Arm yourself with inspiration, be patient and start creating beauty with your own hands.