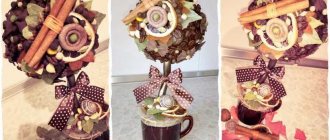
What gift can be given for absolutely any occasion to both a man and a woman? Of course, the one made with your own hands also symbolizes well-being and happiness. A great option would be coffee bean topiary . It is very simple to make, but at the same time it will easily fit into absolutely any interior and will delight the owner with a pleasant coffee aroma! You will learn how to make such a topiary with your own hands in this article.
Topiary made from coffee beans
Green sculpture
First you need to understand - what is it? A medium-sized figurine resembling a plant or shrub is called topiary. This art has come down to us since the times of the Roman Empire.
It was then that the fashion for decorating houses with objects created by nature began. The tops of the bushes were pruned in a certain way, embodying geometric and artistic images.
Nowadays, this art appears in the form of a small tree in a pot, designed to enliven modern homes. It is “grown” from the most accessible things, what is always at hand - change from a wallet, sweets, colored cardboard, satin ribbons - all this can be useful for a future creation.
The process of realizing such beauty is quite painstaking, but it will take no more than 2 hours. But the result will exceed all expectations. Such a homemade product contains a piece of the master’s soul, which he puts into working on it. This makes it attractive and unique and makes it possible as a gift for loved ones.
Having answered the question, what is the name of a craft in the form of a tree in a pot, and what are its functions, it is worth thinking about its use in everyday life.In what rooms is the presence of such an accent acceptable? Is it appropriate to use it in workplace decoration? What decor style does it go with? What can you make such an exclusive thing from so that it fits well into your living space?
Picture of coffee beans. DIY coffee bean paintings
In general, making such decor is relatively easy. Even a schoolchild with minimal motor skills and glue handling skills can handle this, so this can be a good gift for mom or dad. You can produce such a unique work of art in about an hour, although much, of course, depends on the scale and complexity of the project. Alternatively, the base will need time to dry, so it may take a day or even two.
Try to work with either cleanly washed hands or gloves. This way you won’t leave marks on the canvas or stain the grain.
You will need:
- Canvas – This is most often burlap, canvas, art canvas or something similar. You can glue it to cardboard or thick paper, but in general, it doesn’t look so interesting. It is advisable to choose a fabric of a brownish or beige shade. Acid tones look out of place, too bright or dark too. The shade should be combined with dark brown.
- If the color of the canvas is too light, you can dye it with a strong coffee brew. But make sure that there is some kind of contrast, because if everything is the same shade, the picture will not be as interesting.
- Coffee beans. It all depends on the picture. If it is one color, choose the tone you like; if there are different shades, you will have to look for grains. It is important to take the same type of beans for one element, for example, only Arabica or Robusta.
Keep in mind - Arabica is usually larger and slightly more oblong, Robusta is smaller and rounder, and also cheaper, so it may make sense to choose it.
- Glue. PVA is usually suitable, but if you are doing something large-scale, it is better to choose superglue as an option for more reliable fastening, especially on burlap. But in the case of PVA, you should only need one can.
- Black marker, paint or ground coffee. Something to fill the base with. The fact is that almost any painting made from coffee beans involves sticking it flat, in one layer. This means that there will be gaps between the relatively round beans and the base will be visible. To prevent this from happening, you will need to paint over the stencil or apply ground coffee to it, and then glue the beans. This way there will be no gaps that spoil everything.
- Frame. Any picture looks much better in a frame. You can take any color. You can either apply ground coffee to it, or glue grains and spices; in general, this is also room for creativity.
It's best to make a coffee bean painting in one go, so make sure you have everything ready to start creating.
Topiary made of coffee beans as part of the interior
The divine aroma awakens the body, fills it with energy for a new day. A cup of this delicious drink in the morning puts you in a positive mood. It is quite possible to feel not only the taste, but also the smell throughout the day if you place it in your workplace or decorate your living room with such a detail. She has the ability to revive absolutely any home.
Classic, hi-tech or minimalism – it doesn’t matter at all what style the design is in. A coffee tree “grown” with your own hands is perfect for any direction.
Fashion designers are happy to use such an accessory in their decoration - it can emphasize and complement the color scheme of the space in mint tones. The versatility of this element allows it to be used both in residential premises and in offices or cafes.
Note!
- How to make wooden shelves with your own hands - original design options
- Kinusaiga technique for beginners: what is it, a description of creating paintings from threads
How to weave a figurine from rubber bands: how to learn to weave animals, toys and what you can make from rubber bands on a slingshot
Coffee topiary in the interior
The coffee tree can be placed on the desktop in the office, in the kitchen, and on a shelf in the living room - it will look good everywhere and will easily fit into the interior. The product can be as simple as possible or decorated with interesting decorative elements. The crown can have the shape of a traditional ball or a beautiful heart, cone, and so on.
The decor of the coffee topiary can be anything
Some decorate gazebos in the country or even children's rooms with topiaries. Depending on the shape of the crown and how it is decorated, this tree can easily fit into absolutely any conditions.
Beautiful coffee topiary
What you need for work
To make topiary from coffee beans with your own hands, we will need:
Important. When choosing, focus on the quality of the material, and not on the degree of roasting. Only smooth and solid samples are suitable. The size is also not important: both large and small ones will be used.
- bean coffee approximately 250 grams, it all depends on your imagination;
- the base is a ball. Beginners prefer polystyrene foam (you can buy it in hobby hypermarkets). Another type of frame is a plastic hollow ball, or papier-mâché. Choose a ball of small diameters - 10-15 cm - small ones are difficult to work with, large ones are difficult to balance;
- twig, real, possibly curved, about 20 cm in length;
- glue gun;
- brown acrylic paint;
- plaster or alabaster to “plant” the coffee topiary;
- lace, rope, braid;
- small objects: beads, flowers, butterflies, etc.;
- small flower pot or clay mug;
- brush.
Option #3. DIY topiary man
In this section, we suggest that you familiarize yourself with the process of creating an original topiary in the shape of a man. For this you will need the same materials as above, but we will replace the paint with knitting threads, and you will also need some wire and a decorative flower. Here, wire can be used as a trunk, then a stick as a trunk will not be needed. But we still use a regular wooden skewer.
Materials and tools for topiary man
For decoration you will also need red, white and green satin ribbons. Our topiary will also wear a hat, which we will make from cardboard.
Step 1 . Dilute the building plaster so that it is thick enough and fill it with the container in which our topiary will sit.
Wooden skewer inserted into plaster
Step 2 . Place a thin wooden skewer in the middle of the container with plaster and fix it in one position until the plaster hardens completely.
Fix the skewer until the plaster hardens
Step 3 . While the plaster hardens, start creating the crown-head of the topiary. Wrap a round foam ball tightly with regular chocolate-colored knitting threads, replacing the napkins and paint from the previous master class with them.
The ball is wrapped with knitting threads
Step 4 . Cover the ball wrapped in thread with coffee beans using the same glue gun.
The grains stick to the ball
Step 5 . Use the wire to form two handles for the topiary man. You can do it directly with your fingers.
Wire handles
Step 6 . Using satin ribbons and a glue gun, decorate the wire handles by making sleeves and gloves for the man.
Made sleeves and gloves
Step 7 . Now fix the finished handles on the topiary skewer using wire. And wrap the junction of these elements with black satin ribbon.
Connections are wrapped with tape
Step 8 . Wrap the same tape around the trunk of the tree. And near the handles, use glue to attach a white butterfly bow made from ribbon.
White butterfly glued
Step 9 . Next, let's start making a bouquet - what kind of gentleman would be without it? Twist the flower stem from the wire.
Wire flower stem
Step 10 . Attach a regular artificial flower to the top of the stem, and wrap the stem itself with green satin ribbon.
The flower for the man is ready
Step 11 . Carefully secure the flower in the handle of the topiary man.
Flower fixed in hand
Step 12 . Make blanks for a hat for a man out of cardboard. Cut out round fields, as well as a circle and a rectangle to make the crown.
Cardboard blanks for hats
Step 13 . Wrap the brim of the hat with a black satin ribbon, securing it with a glue gun.
The fields are wrapped with black tape
Step 14 . Cover the elements of the crown of the hat with the same black tape.
The hat details are ready
Step 15 . Assemble a topiary hat from individual ready-made elements, connecting its parts to each other with glue.
Topiary hat assembled
Step 16 . Glue or simply place the hat on the topiary.
The man has a headdress
Step 17 . Decorate the plaster or alabaster in a cup with coffee beans on top, gluing them with a glue gun.
Coffee beans glued to plaster
The topiary is ready. This kind of gentleman can decorate a desk or shelf in an apartment. And if instead of a stick you use wire to make the trunk, then you can make a flexible “body” of the topiary, which can be beautifully bent into an original “bow”.
Such a gentleman will be a great decoration- You can make a flexible “body” for a man
How to make a decorative tree with your own hands
- Making the top. The grains are attached to the base with a glue gun. It’s better to start from the top - here they decorate with the most beautiful specimens. Gradually going down to the recess for the barrel, the entire surface of the foam is filled.
- Fastening. Pour a little glue into the hole and install a branch, which is pre-wrapped with twine or braid
- We plant a tree. Dilute the solution to harden according to the instructions and pour into a cup. Insert the free end of the barrel into the solution. With the help of such a building mixture, trees made from coffee beans are fixed in a pot.
- Final touches. Using miniature objects, we decorate the crown and pot. Mini-figurines of birds, animals, dry blades of grass, beads, butterflies - everything you need for the project.
Important. To give better texture and volume, apply a double layer of grains to the base. The first one is glued with the flat side to the ball, and the second one is glued outward.
The choice of decoration items is determined by the purpose of the homemade surprise. For lovely ladies - ribbons and flowers; for the interior of a children's room - sweets and dried fruits; for a work colleague or boss - a topiary made of coffee and coins. Everything is individual.
Topiary made from coins: decorate the pot with your own hands
The next thing this tutorial says to do is a pot. It is difficult to find a flowerpot that is ideal for a souvenir tree. It is clear that it should be the same in decor, that is, golden.
How to make a beautiful pot with your own hands:
- This mini master class consists of simple steps . Take a regular plastic cup, preferably a wide one. Degrease it and paint it with beautiful golden acrylic paint.
- Just painting won't be enough . You can use sparkles, colored salt, small rhinestones and painted buttons. The old-fashioned method, when you make glitter with your own hands by beating Christmas tree decorations, will also work. In general, scroll through the photo gallery, you might want to repeat something, do it your own way.
- Next, you need to fill the pot with plaster , and while the plaster is still wet, stick a table into it, making sure that it is firmly attached. The top layer of plaster must be decorated, otherwise the coin topiary will have a gap in this place. The easiest option is to throw in the same coins or just sprinkle glitter.
You can decorate the pot with gold-painted burlap, decorative lace, artificial pearls or the same coins
Don’t forget to take a photo - if the tree turns out beautiful and graceful, it wouldn’t hurt to show it off. Or you can take a photo master class.
DIY coin topiary (video master class)
Variations on different themes
Handicraft is a dream made into reality on your own.
The craft can be made in any form. Using various techniques you can create pleasant little things for any occasion. When thinking through the idea of creating such a souvenir, it is worth taking into account the character and preferences of the person for whom it is intended. Then he will be appreciated. Various variations on the theme “money tree” are an offering worthy of a real man. It symbolizes wealth and prosperity. Topiary as a souvenir for men is done in the traditional way.
Note!
How to properly make a birdhouse with your own hands from scrap materials: we create an original birdhouse according to sketches
How to make candles with your own hands: instructions for making wax, gel, scented, homemade decorative candles with a wick
- What you can make from foamiran with your own hands: we create flowers, Christmas tree decorations, snowflakes, three-dimensional paintings (photo + video)
The difference is the coins that are attached to the base first. Then the money is framed with a zipper, simulating an open wallet. Only after this, the basic component – grain – is used.
A fragrant composition, decorated with beads and ribbons, will be an excellent alternative to a bouquet for a girl on March 8th. Living plants will fade over time, but the invigorating aroma in the room will remind you of an unusual gift for a long time.
How to make a New Year's coffee tree for serving the holiday table? The frame is a cone, which is easy to make yourself from thick paper. The Christmas tree is decorated with balls, bows and tinsel.
If you make light strokes with white or silver paint, you create a snowy effect. A pine branch or pine cone will add liveliness and color to the decorative element, and fill the atmosphere with the smell of the forest. This Christmas tree will help create a festive mood at the table.
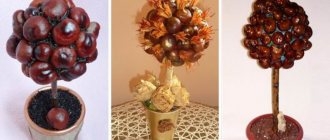
Variety of options
fruit tree
Just add a slice of lemon or decorative mini-fruits, and you will see how your ordinary coffee tree sparkles with new fruity and summer notes. This craft is perfect for setting a summer picnic table.
Related article: How to sew rompers for a newborn with an elastic band with your own hands: pattern and sewing master class
Or the topiary may turn into some new fruit. Look how unusual it is.
Butterflies and birds
If you want to give the tree a spring-autumn mood, then we suggest decorating your coffee topiary with butterflies and birds cut out of pastel-colored paper.
Topiary with flowers
But here comes the idea of a beautiful topiary with flowers blooming on it. This is a great idea to give such a tree to your mother or grandmother as a gift for Women's Day on March 8th.
Coffee tree with photo
This topiary can be given to any person with whom you have many good memories or photographs.
Topiary "Gentleman"
Well, the last, most unique idea for a coffee tree is the “Gentleman” topiary. Just look how beautiful he looks. The detailed process of making all topiaries can be viewed in our video collection.
Craft with a cup
And if you don’t want to make a coffee tree, then we suggest making a craft with a floating cup over a saucer.
Topiary heart made of coffee
A fragrant gift in a romantic style is an unforgettable surprise for lovers on their holiday on February 14th.
For this type of craft, the base or frame is chosen to be heart-shaped. The workpiece can be hollow inside or solid; it is covered with grains and decorated with appropriate paraphernalia.
You should insert your favorite photo into the hollow blank, and you can decorate the solid one with paper hearts and pink ribbons. Small figures of pigeons, comfortably making a nest at the foot of the bed, can add romance. A heart made from coffee beans in this way will be a wonderful sign of attention on Valentine's Day.
Step-by-step master class with photos - heart-shaped topiary
Stage I. Making flowers from ceramic plasticine
Ceramoplasty is an inexpensive and very convenient material for making flowers: it is plastic, dries quickly, and does not require heat treatment. For the topiary heart “On the Wings of Love” we will make 21 roses from ceramic plasticine, using several shades of pink.
We twist the petals using the “cabbage” method. To get a realistic rose, use shades from dark at the core to light at the edges. Identical roses, but purple, were used for the Lavender Sea sea topiary.
It is enough to mix 2 colors - pink and white - to get the necessary gradation of shades of pink.
Stage II. Forming the crown of a tree of happiness from coffee
We paint the foam heart with any brown paint so that when the coffee is glued, the foam does not melt under the hot silicone. It is better to use acrylic: gouache is smeared. Also now it is necessary to strengthen the sanded trunk at the base and paint it in 2 layers with white acrylic.
We cover the entire surface of the heart with coffee beans - in a chaotic order, in sections. After drying, we thickly paint the texture with gold, shade it with brown acrylic and lightly dust it with white paint.
Popular articles Master class: Decoupage plates
Stage III. Crown decor
Compositional - the right half of the heart. We glue dried flowers, alternating with white stamens and pink smooth berries. We glue pearls all over the crown, and on the left half we place an elegant decorative butterfly with a backing - a bow made of satin ribbon with polka dots.
Stage IV. Pouring, filling and decorating the pot
We use a snow-white ceramic cup as a pot: we decorate it with pink lace and a satin polka dot ribbon. To strengthen the heart-shaped toparium, we will use plaster casting. We dilute the thick mixture (gypsum + water) directly in the cup, put pieces of foam plastic so that the alabaster does not split the container when it expands.
The gypsum fill dries in 2-3 hours, but in order for all the moisture to evaporate, we recommend leaving the topiary heart in a ceramic cup overnight. All the secrets on how to strengthen topiary onto alabaster.
We lay pink sisal in a “nest” on the dried plaster surface. On top we glue a feather, 9 roses and pearls and stamens. The composition is completed with a small satin bow, metal pendants - a lock and a heart with an arrow - and a pink rose on a cup.
Stage V. Making wings
We cut out the base for 2 symmetrical wings from the flat bottom of a foam plastic food tray, having previously drawn the outline with a pencil or pen. We seal the wings on both sides as thickly as possible with natural feathers: the foam base should not be visible. Glue the wings symmetrically to the back of the coffee heart.
It is important to use a white foam tray: the base is visible through
A complete collection of topiary ideas from Alena Tikhonova!
Fruit trees of happiness
Making such a decorative element is quite simple: you need to supplement the basic set with dried citrus slices. Cinnamon sticks and star anise inflorescences will enhance the effect. All this will fill the living room with an exquisite aroma and add zest to the festive table setting.
In the absence of natural ingredients, decoration with artificial berries and fruits is allowed.
Craft coffee tree
This is one of the most common topiaries and is believed to bring good luck. Coffee master class step by step. Materials:
- Styrofoam;
- coffee;
- brown paint;
- glue;
- mug, cup or pot;
- wire for the barrel;
- twine or twine;
- textiles, lace;
- gypsum (can be replaced with alabaster);
- brush;
- scissors;
- cotton pads;
- manufacturing stages.
First, we form the crown of the future tree - to do this, cover the foam ball with newspapers and let it dry. Then paint it with gouache and dry it. Let's take care of the trunk - coat the wire with glue and wrap it with twine so that there are no gaps left.
Now, using glue, we fix the grains with the convex side down. We connect the parts - crown and trunk. Fill the pot or mug with plaster and insert our design. It is important that it freezes evenly, so place a support. Place the grains in the pot in two layers. You can use polystyrene foam instead of plaster.
We process the edges at our discretion - you can decorate them with ribbons, beads, organza, spices like star anise and cinnamon sticks, you can wrap the whole thing in burlap and tie it with twine under the base of the trunk.
Coffee bean flowers
As a continuation of the plant orientation of this form of needlework - bouquets of aromatic grains. The work uses the same technique as in the case of the most basic version. The only difference is the frame, consisting of rigid wire.
It is shaped into leaves and inflorescences, then wrapped with a bright ribbon; after which the coffee is fortified. In some places the plant is painted with gold or silver paint - this makes it more luxurious and elegant. This topiary will be a wonderful decoration for a living room or kitchen.
The second way to make an exotic bouquet is as follows: petals made of corrugated paper or bright fabrics are glued to a circle cut out of cardboard along the edge. Then the aromatic grains are placed in the center.
This composition imitates an open bud. The contrasting combination of dark grains, green leaves and bright petals attracts attention for a long time.
Option #2. Coffee bean tree (heart shaped topiary)
You need to cut out 2 hearts from cardboard, wrap the wire in paper
Glued cotton pads are wrapped with thread, painting
The grains are glued, the jar is covered with ice cream sticks
The wires are wrapped with jute thread, the finishing decor is topiary
Homemade creativity
The master class described at the very beginning of the article describes in detail, step by step, the process of making such a craft. This is just a “foundation” on which unique furnishings are built.
Using available raw materials in the process and making a little creative effort, it becomes possible to realize a unique detail that can complement any design.
For experienced craftswomen, this is another way to express attention and congratulate a loved one. Beginners who are encountering the concept of topiary for the first time will be able to easily master such needlework by following step-by-step instructions.
Topiary heart in heart - an unusual design solution
DIY decorative trees are gradually gaining popularity. This is due to the ease of manufacture and the ability to beautifully decorate an apartment without any special financial costs. The trimming technique is especially popular. Thanks to it, you can create interesting compositions, in particular in the shape of a heart.
Trimming is a three-dimensional appliqué based on crepe or corrugated paper. It is quite possible to create an interesting composition from ordinary napkins. It all depends on the person himself.
A topiary made from napkins is the best gift, especially if your financial situation does not allow you to spend money. A heart made of wood is a good way to surprise a person and present him with an interesting gift made with your own hands.
Necessary materials for creating topiary
- Styrofoam.
- Red napkins.
- Wooden skewers.
- Construction gypsum.
- Ribbons.
- Scissors.
- Glue.
It is recommended to create beauty from the ground up. To do this, diluted alabaster is poured into a prepared plastic pot. Then a wooden skewer is inserted into it, and the workpiece is removed to the side until it hardens completely. In the meantime, you need to start creating the heart itself. To do this, the desired shape is cut out of polystyrene foam (using this material will allow you to get a three-dimensional tree). It is recommended to cover the end parts with adhesive tape or paper, this will eliminate looseness.
Popular articles Horse from traffic jams
Next, you need to take napkins and cut them into small pieces. Then, one by one, you need to place a skewer in the center of each square and start scrolling through it. Without removing the shred from the skewer, it must be dipped in glue and attached to the foam blank. This way the entire heart is covered. Then the finished part is attached to the base, the pot is decorated with bright beads, and that’s it, this is where the production ends. The result is an interesting decorative element.
Photo examples of coffee topiary
Please repost
0
How to make topiary from coins using improvised materials
Making topiary is a completely simple process. It is enough to acquire available means. This could be a plastic or foam ball, coins, coffee beans, glue, wire and some decorative elements.
What you need to make decorative wood:
- Wish.
- Savvy.
- Fantasy.
- A little time.
A plastic or foam ball can be immediately decorated with coins. It is pre-wrapped with yarn of any color. Coins and coffee are glued in any order. There are a lot of master classes that involve the use of not only any materials, but also arbitrary decoration of wood.
When the top part is ready, you can begin to base and decorate the pot. The barrel is made of wire, which is decorated with beads, beads, ribbons and fabric. This element is inserted into a pot into which alabaster can be poured for stability. The final step is to decorate the base of the tree with coins, ribbons and beads. You can create such a decorative element in a day.