Now it is difficult to imagine the New Year without a Christmas tree decorated with balls and other toys. This tradition dates back several hundred years. And it originated in Thuringia. The first Christmas tree balls were made there. They were made of glass and decorated with sparkles. Nowadays you can buy Christmas tree decorations in any store. But it’s much more interesting to make them yourself. Any materials are suitable for this - paper, fabric, thread, foamiran, foil, foam. A Christmas tree decorated with Christmas balls made with your own hands will look original and unusual.
Volumetric paper balls
Paper is a wonderful material for crafts. It can be found in any home and is easy to work with. Even if these are ordinary white sheets, you can make many original things from them. Don't think that paper crafts look too simple. The balls turn out to be unusual and original. The only negative is that they are difficult to store. Most paper toys will only last one season.
Simple crafts
Together with your children, you can make New Year's balls from double-sided colored paper. To do this, you will need to cut out 4-6 circles of the same size, fold them in half and glue them together. These balloons turn out bright and festive.
Interesting options are made from paper with a New Year's print. With paper balls you can decorate not only the Christmas tree, but also hang it from the ceiling or window, or make a garland.
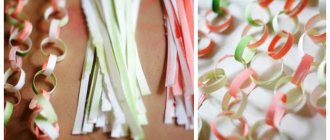
Another option for a simple paper ball is made from paper strips. Children of almost any age can also easily cope with this craft.
Also very simple to make, but no less original, a paper Christmas ball.
The same version of the ball, but in a different design:
How to make a paper ball without glue
Many people made balloons from postcards as children. Over time, they have not lost their popularity. To create such a ball, you only need scissors and paper.
It is better to choose thick paper so that the craft holds its shape.
Flower-shaped figures are cut out of it and cuts are made on the petals. A ball is assembled from the resulting parts, interlocking them with each other.
Or another version of a three-dimensional paper ball, the manufacture of which does not require glue.
Christmas origami balls
From the outside it looks like magic: from a simple sheet of paper, without the help of scissors and glue, intricate figures are obtained. Making origami is fun, and the result will delight you. Christmas balls made using this technique look stylish and original, in no way inferior to ready-made toys sold in stores.
Kusudama Balls
Kusudama has much in common with the origami technique and, in fact, is its variety. Identical module elements are made of paper. It could be a star, a flower, a diamond, or just an intricate figure. The modules are glued together to form a figure.
Kusadama balls look stylish. They can not only decorate the Christmas tree, but also be used as an element of home decor. They perfectly highlight the interior design and create a feeling of mystery and magic.
Christmas balls using quilling technique
New Year's balls using the quilling technique are made elegant and delicate, light and airy. They are made from paper cut into thin strips twisted in a certain way.
The individual elements make up a pattern. They can be glued together to form the desired shape. But it is better to glue it to a base, ready-made or made yourself, otherwise the ball will turn out to be very fragile.
Christmas tree balls made using the quilling technique look truly wintery. Twisted strips of paper look like frosty patterns on window glass. Such decorations create an atmosphere of magic in the house.
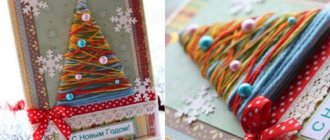
Master class on how to make balls of thread for a Christmas tree
This is a very simple thread idea that will decorate the interior and will serve as an excellent decoration for the New Year's tree. They can be made in different sizes from small to larger.
That is, trees are different, sometimes you need to decorate a school or street “beauty”, but for the street, I would not recommend them, they are light and airy and can easily fly away in a gust of wind.
Source: youtu.be/4zD7YtEuZt8
What you will need:
- Scissors
- Balloons (round)
- White iris threads
- PVA glue
- A glass of sour cream or yogurt
Pour the glue into a glass, it's a plastic yogurt glass. We thread the thread into a needle, it is better to take a “gypsy” one, pierce the bottom of the glass on one and the other side, passing the needle, remove the needle, the thread remains.
We pour about 1 cm of glue into the jar. Therefore, using this chalk as a guide, we pierce the glass at the bottom and thread it through.
Inflate the balloon to the desired size. I tie it with a knot, not a thread, so that the thread doesn’t get in the way later. Then we wind the thread around the ball; you don’t need much, because it won’t be light and airy.
The thread passes through the glue, is completely saturated with it, and sticks to the ball.
Next, we cut off the thread with a reserve, I make a loop from this reserve, and use it to hang the product to dry.
The glue should dry well and harden, only after that we release it from the balloon. We separate it with scissors, piercing it in different places, make sure that the ball is separated from the thread on all sides, and only then can it be pierced and it will burst.
We take out the ball by the tail, they are strong, beautiful and do not deform. It’s better to make small ones, they are then denser and more beautiful. If you want multi-colored ones, then take colored threads.
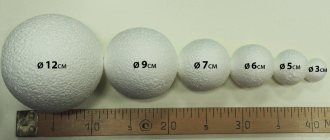
Balls made from foam bases
Styrofoam balls are an excellent basis for New Year's crafts. You can buy them at the store or cut them yourself. Christmas balls made from them are durable. They will not break, will not wrinkle and will last for many years.
Ball using kimekomi technique (patchwork)
If you have small scraps of fabric left over, you can use them to make New Year's balls using the kimekomi technique. It came to us from Japan and attracts us with its originality and ease of execution.
Making a New Year's ball using the kimekomi technique is very simple. A pattern is applied to the foam blank, along the lines of which slots are made. The parts are cut out of the fabric according to the pattern. They should be a little larger in size for the allowance. The fabric parts are applied to the workpiece, tucking the ends of the material into the slots. Using this principle, you can create any, even the most intricate and complex pattern.
Patchwork balls look stylish, especially if you use silk, brocade, or velvet to create them. The drawing, made independently, will not be found anywhere else, and this makes such a toy unique, one of a kind. Christmas tree balls made using the kimekomi technique are suitable not only for decorating a Christmas tree, but will also be a wonderful New Year gift for family, friends and acquaintances.
New Year's balls decorated with sequins
A New Year's ball made from sequins is bright and shiny. They are attached to the foam base with regular pins or simply glued. They try to place the sequins as close to each other as possible, then the ball will shine and look like glass.
Which sequins to choose depends only on your preferences. The ball can be made monochromatic. Bright and shiny sequins will not allow it to get lost among other decorations. You can combine several colors or try to lay out a pattern. Such balls will also look original and will decorate any Christmas tree.
You can also use sequins on ribbon. It will be much faster and easier!
Balls with beads
Instead of sequins, you can use beads. They can also be attached to the base with safety pins. For a stronger fixation, add a drop of glue to the bottom bead.
Or, if you plan to only have one row of beads, they can be placed directly on glue.
Christmas ball with button decoration
Using the same principle, a button ball is made. They are attached to the foam base using pins. Although the buttons do not shine like sequins, they still look unusual and original.
A Christmas ball made of buttons can be made in the traditional New Year's colors - red-green, blue-white. And you can combine everything available in the house, of any colors and sizes. Then the ball will turn out bright, and just looking at it will lift your spirits.
Decor of a foam ball with buttons
The foam base can also be decorated with push pins. Fast and original!
Decoupage a foam ball with napkins
This is a very interesting, exciting and creative process, and it is also very easy. You can purchase a foam ball at a large supermarket or craft store, or alternatively, order it online.
This is decoupage, which depicts a Christmas tree, it is cut out of a napkin, and half beads of different colors serve as balls on our holiday tree. Moreover, they are of different sizes, larger and smaller.
You can cut out figures from a napkin, a snowman, a Snow Maiden, and Santa Claus, and transfer them to a ball; when dry, draw snowflakes with a thin brush dipped in white paint. Or make touches with a brush dipped in white paint. This will create white snow.
Also, use white paint to highlight the outlines of the beard and fur on the hat. But these are already complexities, but as simple as gluing napkins to the craft, we’ll talk about the technique itself below.
To work you will need:
- For decoupage you need acrylic paint in white or any other color to cover the workpiece.
- Three-layer napkins, with different patterns.
- PVA glue and brush. The glue is diluted with water to 3 parts glue part water.
- A sponge to apply paint beautifully.
- A skewer or long stick to hold the workpiece while painting.
- Then, when the work is completed, you can open the balls with varnish.
I use acrylic paint, usually white. You can use any shade depending on what you want. Apply the paint with a sponge using a tapping motion.
Be sure to let the paint dry completely. And then we cover it with a second layer, you can cover it with three layers, but no one has canceled the important rule, each layer must dry very well.
You can sand the ball, if desired. And also, place a long wooden stick in the ball itself, it’s more convenient to hold it.
We dilute the glue with water. We take napkins, you can buy them at a craft store, and cut out the desired fragment. And, I repeat, when the paint on the ball is completely dry, glue the fragment.
An important rule is to start from the middle and move in different directions to the edges. Do not put too much mass on the brush, otherwise the napkin will get very wet and may tear.
If you need to make snow or convex parts (fur parts, snow), dilute semolina with white paint, mix in a container (for example, a lid) and apply to the parts with a thin brush. Let it dry.
Believe me, it’s simple and even a novice master can do it. The main thing is that the ball is white, we apply fragments to it, and everything dries, we cover it with varnish as desired.
We glue lace, snow, beads with hot or super glue, work carefully. Glue the thread and decorate it.
Balls with thread decor
Threads can become the basis for beautiful bright or snow-white New Year's balls. Different techniques are used to create them. In any case, the result will please and impress.
Simple
The easiest way to make a ball of thread is to wrap the finished workpiece, first lubricating it with glue. Additionally, you can decorate the craft with ribbon, sequins or beads, creating a unique pattern.
The combination of jute cord with openwork white lace turns out beautiful. Such balls will fit perfectly into eco-style. They are used not only to decorate the Christmas tree, but also for interior decoration.
Temari
The art of embroidering balls came to us from the East. Bright temari balls with unusual patterns attract attention and are very popular.
Making a temari ball is not difficult, although it requires patience and skill. First, the workpiece is wrapped with thick threads, on which the pattern is then embroidered with thin silk threads, creating a unique ornament.
Temari ball base
This New Year's toy is suitable for a gift. It is believed that it brings wealth and good luck to its owners.
Temari balls are so different and beautiful.
New Year's ball made of thread and glue
Balls of thread and glue are surprisingly light. They can be of any size: hang small ones on the Christmas tree, use large ones as a decorative element. Airy, openwork thread balls will fit into any interior.
The technique for making balls from threads is simple. The balloon is inflated to the desired size, wrapped in cling film and wrapped with threads coated with glue. All you have to do is wait for the workpiece to dry, carefully puncture the balloon and pull it out.
How to make a Christmas ball with modeling elements?
Now, a version of the loya ball for adult craftswomen. A more complex master class than all previous ones.
Let's take:
- ball,
- priming,
- blue acrylic paint,
- self-hardening clay mass,
- whitewash or white acrylic paint,
- wax based patina,
- acrylic lacquer,
- form,
- decor
Apply primer to the ball with a sponge or brush. It needs to be dried. It's faster to do this with a hairdryer.
We take the mold and mass, fill the desired place of the mold with clay. We fill all the veins, and cut off the excess with a stationery knife.
We take out the blanks before they dry out.
When you've finished working with clay, put it in a bag so it doesn't dry out. The number of stucco elements depends on the diameter of the ball. Glue the stucco molding. We coat it with PVA glue and place it on the ball.
We paint the upper part with white acrylic paint in several layers, and paint over the stucco molding.
Using a thin brush, cover the bottom of the product with blue paint.
Fix the surface with acrylic varnish.
For beauty, apply a patina to the stucco with a sponge.
And decorate the craft with bows and beads as desired.
A set of such balloons can act as an independent gift.
Christmas balls made of foamiran
Even beginners can make a New Year's ball from foamiran. This is a very plastic, easy-to-work material. It is very easy to make a Christmas ball from it. Circles are cut out of foamiran, folded and glued together. For New Year's toys, it is better to take glitter foamiran, then the toys will turn out bright and will shimmer beautifully in the light of the garlands. Additionally, they can be decorated with chenille wire and beads.
Or this New Year's ball.
Well, you can make such a Christmas tree ball from foamiran with your own hands.
DIY painted balls for New Year 2022
If you know how to draw well, then the following option will suit you.
You will need round blanks, such as foam. Or buy toys in a solid color. And then show your imagination and paint the product to your liking or according to a template or stencil.
Now I’ll give you some ideas. Well, you will have to create it yourself. By the way, you can draw not only with paints, but also with glue, glitter, and beads.
Simply mesmerizing beauty, don’t you agree?
Felt Christmas tree balls
Original balls can be sewn from felt, and it’s easy to do. It is enough to cut out the details according to the template, decorate them with ribbons, beads, rhinestones, and embroidery. Felt decorations can be voluminous or flat, sewn or made in the form of appliqué. Here, for example, is a Christmas ball made of felt using the applique technique.
Here is an example of embroidered felt balls.
You can come up with the decor for the balloons yourself (alternatively it could be buttons). Then the toy made with your own hands will look original.
As for volumetric balls, they do not have to be stuffed. Here is an example of a Christmas tree decoration made from felt circles.
Or this voluminous ball.
Knitted Christmas tree hangings and crochet patterns
Perhaps there are needlewomen who love to crochet. Then I suggest they make an amigurimi-style Christmas tree toy.
Here are the knitting patterns.
The pattern is repeated.
More options.
A few ideas.
Lace beauty.
To keep the craft in shape, you can stretch it onto a ball, starch it, or coat it with glue.
New Year's foil ball
Glittery foil is perfect for Christmas crafts. She will probably be found at home and is easy to work with. Making a New Year's ball from foil is very easy. You will need a base, such as a foam ball. Flagella are twisted from foil and roses are formed. The resulting flowers are attached to the base. The unusual New Year's ball is ready. Its shine will immediately create a festive mood.
A Christmas ball made of foil is a great idea for a toy for a street tree!
From beads
Balls made of beads will look very beautiful and impressive on the Christmas tree. In this case, the foam spheres of the blanks will be decorated. In addition to the foam blank, you will need beads, pins (sewing needles with heads like those on nails), and ribbon.
The manufacturing method is very simple:
- Thread one bead onto one pin.
- Attach a pin to the foam base.
- Repeat until there is no free space left on the base.
- At the end, attach a ribbon loop for hanging the decoration.
It is advisable to take beads of the same size to avoid empty spaces on the base. The color scheme is chosen both in one tone and in different ones. It all depends on individual preferences and the overall style of decorating the room. Instead of a foam base, you can use plastic factory balls. Only in this case the beads will be attached not with pins, but with hot-melt glue.
Christmas ball decorated with ribbons
Impressive New Year's balls are made from ribbons. They are as beautiful as ready-made toys.
Simple ribbon balls
Even simple ribbon balls look stylish and elegant. Wrap the workpiece with satin or silk ribbons of one or more colors. Even without additional decorations, the Christmas ball will look impressive and stylish.
If we are talking about crafts with kids, make, for example, Ninja Turtles or any other cartoon character.
If you take multi-colored ribbons and add additional decorative elements (for example, beads), you can get this original ball. This MK combines felt and ribbons, but felt can be replaced with other fabric or ribbons.
Balls using the kanzashi technique
New Year's balls in the kanzashi style look graceful and elegant. This is a Japanese technique for creating jewelry from fabric. To make a Christmas tree toy you will need a satin ribbon. It is cut into small pieces, folded in a certain way and the ends are soldered with fire. The resulting petals are formed into flowers and glued to the base.
Additionally, the toy is decorated with beads and rhinestones. It is enough to understand the principle of operation, and then come up with your own patterns.
Christmas balls in artichoke style
The simple but effective artichoke technique came to us from France. It is somewhat reminiscent of the kanzashi technique. To create Christmas balls, small pieces of ribbons, most often satin, are also used. They are folded in a certain way, but the ends are not soldered, but attached to the base with pins. The result is petals that resemble artichoke leaves.
The technique is very simple, but thanks to the combination of different colors, a huge number of patterns are obtained, so that the craft will look original and unique.
How to make paitette balls (an interesting idea for the holidays)
The ball with sequins looks very cool. You can buy small ones and cover them by sprinkling them on a ball on which glue is applied. You can attach embossed sequins in a circle, but it will take a long time; this method is faster and easier.
If you want to get creative, but don’t want to spend a lot of time fiddling around, then this method is for you. You can take different colors, they look very beautiful, shine and sparkle, adding a mysterious and festive atmosphere.
What you will need:
- PVA glue
- Styrofoam ball (can be of different sizes)
- Sequins (can be of any color)
- Pin
- Brush
- Skewer
- Ribbons
- Pliers for attaching a pin
A foam ball can be bought in any size, from the smallest to the largest. To make it easier to work with the ball, pierce it with a skewer.
Apply PVA glue to it, preferably more, and sprinkle glitter on top. Lay down the paper, since the crumbles can be collected again and sprinkled on the ball.
Apply glue on all sides. Use a skewer to rotate the ball to ensure even coating. We put it in a glass to dry, place a long skewer in the glass, and the ball itself remains on the surface.
We insert a pin inside and make a loop. A very simple design, but it looks beautiful, and we play perfectly on the Christmas tree, shimmering and delighting the eye with beauty.
If you like the idea, feel free to bring it to life. This is unusual and very simple, as I tried very hard to collect simple ideas for entry-level craftsmen. As you can see, it is very easy to make at home.
Christmas balls using decoupage technique
The decoupage technique allows you to turn the simplest thing into a real work of art. This does not require special skills. No drawing or modeling skills are needed, because a ready-made picture is used to create such Christmas tree balls.
The essence of the decoupage technique is to attach a picture to a surface on which it is fixed using varnish or transparent glue. To create a New Year's ball, use any blank - glass, wood, plastic, foam, metal. For decoration, choose napkins with the desired pattern, for example, abstract patterns or thematic pictures. The design is cut out, glued to a ball previously coated with a primer, and coated with acrylic varnish. Instead of napkins, you can use photographs printed on a printer. The principle of creation is the same.
creative ball
You will need: double-sided colored paper, ruler, glue, paper clips.
Master Class
- Prepare sheets of paper measuring 10x10 cm.
- Fold the square sheet diagonally.
- Fold the edges of the triangle up to form a diamond, then bend the edges as shown in the animation.
- Apply glue to the sides of the workpiece, then glue them together to form a petal.
- Make 5 petals in the same way and glue the flower.
- Make a total of 12 of these flowers.
- Start assembling the ball: take a flower, apply glue to the middle fold of any petal and glue the second flower, then secure with a paper clip.
- Apply glue to the petal of the 1st and 2nd flowers that are located next to each other, then glue the 3rd flower, forming a triangle.
- Secure the 3rd flower with two paper clips.
- Glue the 4th and 5th flowers in the same way and do not forget to secure with paper clips.
- Apply glue to the petals of 3 flowers that are located next to each other and glue the 6th flower, then secure with 3 paper clips.
- Make the other half of the 6-color ball in the same way.
- Apply glue to each petal and glue the 2 halves of the ball together, then secure with paper clips.
- Wait until dry and remove the staples.
Shabby chic style
Made in an antique style, in calm soft shades, decorated with lace, Christmas tree balls in the shabby chic style are reminiscent of a distant past, steeped in romance. They are ideal for the New Year, a family holiday, they make you remember traditions and customs, and connections between generations. Such jewelry looks refined and sophisticated, creating an atmosphere of special warmth and comfort, tranquility and magic.
Balls in the shabby chic style are decorated in pastel colors, pink, silver, and ash shades. Ribbons, lace, beads and half-beads, outline and buttons are used for decoration.
Paper balls made from small shaped pieces
To create such toys you will need:
- paper;
- scissors;
- glue;
- thread and needle.
The photo below shows several variations of crafts. For example, a New Year's craft can be made from several semicircles.
No less beautiful balls are made from paper accordions.
Flowers with five petals can be excellent starting details - the ball will turn out to be more diverse in volume.
For a large ball:
For the middle ball:
For a small ball:
Toys made from circles folded into triangles will also look quite bright, especially if you choose paper of an unusual color for them.
For a large ball:
For a small ball:
New Year's toys made from rectangles glued together at the corners look very beautiful and stylish. The photographs show the oriental version, but no one bothers to use another color or theme in the same way.
Triangles in a circle, with curved sides glued together - this is a kind of classic. It’s not difficult to make such a ball, but it will delight you with its appearance no worse than factory toys.
For a large ball:
For a small ball:
Ball with photo
A great gift for the New Year is a Christmas ball with a photo. An old childhood photograph, a family photo, or pictures that capture the best moments of the past year will do. Such a souvenir will take its rightful place on the Christmas tree and become a family heirloom.
The simplest option for a Christmas tree ball with a photo is to cut out the photo and glue it onto cardboard, add a ribbon and you can hang it!
The cardboard rim can be additionally decorated with a thematic design or, as in the MK below, miniature pompoms can be glued on.
If you want a more serious toy, then you will need to get a transparent blank and place a photo there. Additionally, you can decorate the ball with artificial snow, an outline, and decorative ribbons.
Beautiful paper balls for the New Year tree
When choosing paper crafts, I chose the easiest ones that anyone can handle. It's simple and it's beautiful. You can use different papers. Even colored ones will do.
It is made from circles, you can cut out 8, as I wrote, or more, then the product will turn out much more magnificent and more beautiful. You can make these, even from newspaper, it will look very cute and original. I once bought paper for creativity, like a music notebook, that’s also interesting.
What you will need:
- Paper
- Glue
- Thread
1. You need to cut out 8 balls of the same diameter. You can take colored paper, or cardboard, you can take designer paper.
2. Fold each circle in half with the right side facing inward.
3. Glue all the halves together, but apply the glue to the wrong side.
4. Take a thread or ribbon and make a loop, measuring a couple of centimeters. Then we need to attach a thread to the seam, and glue it, and glue the two paper ones together, so that we end up with a round ball.
Snow globe on the Christmas tree
When you look at a snow globe, you immediately feel the approach of the New Year, a time of magic and miracles. You can do it yourself. To do this, you will need a glass or plastic Christmas ball, into which small figures will be placed - a Christmas tree, a snowman, Santa Claus, a house or any others.
You can use ready-made ones or make them yourself from polymer clay. Salt, foam chips or glitter are used as snow. This winter magic ball will become a real decoration for the Christmas tree.
New Year's balls crocheted with patterns
And as I promised, I have prepared a selection of knitted items.
Only here and now patterns for crocheting jewelry. Save quickly!
How do you like this handicraft? It will be a little difficult for beginners, but just right for experts.
Christmas balls decorated with beads
Another original option for decorating a Christmas ball is beads. There are many ways: it all depends on your desire and skills in beading. The simplest one is to coat the ball with glue and sprinkle with beads.
By the way, there are no rules here. You can, for example, cover the entire ball or just a part.
In a chaotic manner.
Or lay out a specific pattern.
Of course, beads can be used to make braids for a ball, like a New Year’s cape. In this case, you will need fishing line and a diagram. Here, for example, is a simple diagram for beginners.
Here's another diagram:
And another one.
And like this
Or weave a cape according to this pattern.
In general, those who understand the general principle can come up with their own patterns. In addition, you can use beads of different sizes and shapes, then the “cape” will turn out even more original!
If beading is not your thing, here is another way to make a ball decorated with beads or beads! To do this, in addition to beads or seed beads, you will need fishing line and a balloon.
Ball made of half beads for the New Year 2022 of the Water Tiger
Recently I went to a craft store, there’s everything there, you can create whatever you want. If you make a ball with beads, you need to stick them with needles into the foam, or glue them. If you take the half ones, in my opinion, they are prettier, look more original, and they can be glued with hot glue or instant.
Decorate with a ribbon bow and a beautiful brooch, it will look gorgeous. You can give such a gift, and it will delight you for a long time. And you will be remembered and thanked.
Source: youtu.be/lVMcdfpGwUg
What is necessary:
- Styrofoam ball
- Glue gun
- Half beads
- Ribbon (for loop)
- Ribbons (for bow)
We make a hole in the foam ball and attach a ribbon. We cut off the required amount, tie two together, make a loop at the bottom and secure with glue. Then we cover the entire ball.
The ball can be additionally coated several times with white acrylic paint, so it will look white, and those gaps that remain will be white.
We drip a drop of glue and apply a half bead, glue in rows or as you want, perhaps your imagination will lead you beyond some other boundaries.
Beads can be taken in different sizes, colors and shapes. It looks very gentle and beautiful on the Christmas tree, plays and shimmers.
Christmas ball made from pasta
An original New Year's craft will be a Christmas ball made from pasta. It is made simply, and most importantly, from scrap materials. A craft made from pasta and a balloon will be light and delicate. The pasta is glued together to form a ball, which is then removed.
If you don’t want to mess around, the pasta can be glued to a base, for example, foam or the same balloon.
After gluing is completed, the finished toy can be painted; it is most convenient to use spray paint. But if the ball is on a base, then you can apply the paint with a brush.
Any type of pasta you can find will be suitable for this craft!
How to make a round Mouse (symbol of 2022) for a Christmas tree with children in kindergarten
Now let's make a wonderful mouse out of paper and glue.
Need to:
- water,
- paper,
- balloon,
- PVA glue,
- colored paper,
- white and gray acrylic paints,
- wool thread,
- bow.
Inflate the balloon to the desired size. Pour water into a container and soak pieces of paper in it. The pieces should be medium-sized, not very small and not large.
We cover the first layer with this wet paper.
Next, combine water and glue: 2 tbsp for 50 ml of water. l. glue. You can use less, but I take this for strength. We wet the remaining paper and make another 2-3 layers.
Let the workpiece dry for a day.
Then we burst the ball and take it out.
There is now a hole where he looked out. We make a small cone out of paper and seal the hole.
We cut out the ears and also glue them to the craft.
The workpiece needs to be painted.
We take wool yarn and finely cut the thread, it looks like fur.
We coat the surface of the toy with glue and sprinkle fur on it.
All that remains is to glue the pompom onto the nose. We make eyes and a bow.
It turns out to be an excellent symbol of 2022.
And the mice are just cute.
Christmas ball painting
An ordinary glass or plastic ball can be modernized with hand painting: an inscription or a thematic design.
Acrylic paints are best suited for these purposes. If you don't have any, use a marker, nail polish, stained glass paint, or glitter glue.
As a gift for grandparents and kids, make a Christmas tree decoration with a handprint.
Well, with older kids - Mini Mouse.
Christmas balls for the New Year 2022 in vintage style
This interesting style has always been valued for its sophistication and beauty; I make them “antique”, in keeping with the style of past years.
What do you need:
- Lace
- Ball
- Glue
- White paint
- Brush and scissors
First, you need to cover the workpiece with white acrylic paint and wait until it dries completely. Then cut out small fragments from the lace and glue them to the part.
Glue the lace, cover it with paint, and let it dry well. It is very important. Then we highlight the lace with dark paint, dipping a sponge into the paint, and making strokes and accents, it could well be gold paint or metallic.
Glue a loop, a bow, and cover with a layer of varnish. It is better to take a wooden or plastic workpiece; each layer must also dry very well, I repeat many times so that you do not miss this moment.
Method No. 1
In this version, we will consider making a Christmas tree toy from a transparent blank.
What you will need
To work you need to prepare the following materials:
- Preparation of a plastic ball. A base size of 10 cm is suitable.
- The photo you want to use to decorate the balloons.
- Glue, it is advisable to choose a transparent crystal so that it is not visible on the base after it dries.
- Ribbon for decoration.
- The ribbon on which you will eventually hang the toy.
- Nail polish.
Step-by-step algorithm
- First, the part of the ball that will be behind the photo needs to be painted. To do this, pour a little nail polish into it and turn it so that it spreads evenly. Leave to dry.
- Cut out the photo along the contour of the ball, make it a couple of millimeters larger, so that later it will be convenient to glue it.
- On the transparent half of the ball, carefully apply a thin layer of glue on the edge.
- After applying the glue, carefully attach the cut out photo. Leave to dry.
- If the photo blank looks beyond the edges of the ball, carefully trim the excess with scissors.
- Now that everything is ready, connect the two parts of the ball.
In general, your ball is already ready, but all that remains is to decorate it a little. Measure a small piece of ribbon and make a bow out of it, thread the ribbon through the hole in the ball.
REFERENCE. You can not paint one half of the ball, leave both transparent. Glue two different or identical photographs, at your discretion, and you will get a ball with photos inserted on both sides.