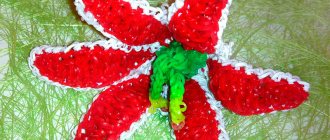
Model "Tail"
An excellent scheme, suitable for beginners. The process lasts depending on the desired length of the bracelet. A beginner will only need his fingers and a lot of rubber things of different colors. For convenience, you can use tools.
To make a decoration, you need to prepare eight rings and put them on your fingers. The bottom side needs to be pulled to the middle by moving both rings up. Repeat everything, but without folding. Raise the bottom part again to the middle and repeat until the desired length.
Note!
- Scrapbooking for Beginners
- What you can do with your own hands
- Crafts made from polyurethane foam
How to weave an owl from rubber bands on a slingshot?
We will perform the weaving of the owl in two stages.
First, let's prepare rubber bands in the form of a pattern for the owl's body and weave it, and then move on to the head.
Let's start with red color. We put the first elastic band in three turns on the right column. Then we put two red ones on two pins.
The first of the three turns will be thrown to the center.
Then release the right column by moving the elastic bands to the left side.
Now let's make an owl's foot. We wrap one orange elastic band four times on the right side of the slingshot. We usually wear two red ones.
We lower the orange one of the four turns onto the elastic bands. From the left column we send the bottom two pairs to the center so that the orange one remains to the right of them.
Again we throw on two red ones,
and send the lower ones to the middle.
Then we will put the second pair of red ones on two columns, and send the lower ones to them.
And we’ll throw the third pair over both parts of the slingshot, dropping the lower ones into the center.
Let's move the rubber bands from the left side to the right.
We insert the hook into the initial elastic band of three turns.
and put it on the left column.
See also: How to weave a carrot on a hook Photo and video tutorials
Now we will weave an owl's belly from white rubber bands. Throwing on the first two white elastic bands,
Let's send a triple rubber band to the middle.
We put on the second white pair in the same way as the previous one and lower the lower white ones from the columns.
We also weave the third and then the fourth pair of rubber bands.
Let's move the white elastic bands from the left side to the right.
Once again, insert the hook inside the initial triple elastic band and put it on the left pin.
We weave again with red rubber bands. Let's put two on both columns.
We will send three turns from the left to the center.
Let's move the left rubber bands to the right, and on the left pin we'll screw 4 turns of the orange rubber band.
We throw on a couple more red ones and lower the orange one from the pin.
From the right column we will throw off the top two pairs of red ones so that the orange one remains on the left.
We’ll also put on two red ones, and send the previous ones to the center.
We put on a pair of red ones again and lower the previous ones from both columns.
We also put on the next pair and drop the previous ones from the columns.
Using the next pair of red rubber bands we will connect everything together i.e. putting a pair on both parts of the slingshot,
We send all the lower elastic bands from the slingshot to the middle of the weaving.
Next we move on to weaving the owl's head. Let's prepare the rubber bands and arrange them in the form of a diagram, as in the photo.
Having put on a pair of red ones in the usual way from the right row of the diagram, we will throw the lower ones in the middle.
Then we'll put on another pair,
and we will send the lower ones again to the center. Let's move the left rubber bands to the right.
Now let's weave the owl's eye. Throw the black rubber band four turns onto the left pin.
Again we will put on the usually red pair and remove the black 4 turns on it.
We will also send both lower pairs from the right side, but so that the black one is on the left.
Let's throw on two more red rubber bands, and send the bottom ones to the middle.
Let's release the left column by moving the elastic bands from it to the right one.
We will insert the hook into the loop from which we started weaving the head and throw two orange ones on the hook. Let's pull it through the loop and put the second part on the hook too.
And already from the hook we lower the orange ones onto the left pin.
We put a pair of red ones on both posts and remove the orange rubber bands on them.
We transfer from the left side of the elastic band to the right.
We insert the hook again into the loop from which we started. We throw a couple of red ones on the hook,
we pull out one side and put the other on the hook.
We lower the rubber bands from the hook to the left column.
Again we put two red rubber bands on both columns. We lower two pairs of red ones on the left into the center of the weaving.
Another interesting master class: How to weave a pumpkin from rubber bands on a slingshot
On the right column we hook the top two elastic bands and transfer them to the left. We put a black single elastic band in four turns on the right side of the slingshot.
Let's put a pair of red ones on both columns and lower the black turns.
Next, we’ll remove all the rubber bands from the left side of the slingshot so that the black one is to the right of them.
Let's continue with red hair. Having put on a pair, we send the previous ones to the middle.
Now we connect all the rubber bands on the slingshot. Let's put one red one on two posts. We will send all the rubber bands from the slingshot to the center.
We transfer one of the rubber bands to the post next door. We lower the lower one to the center. Tighten the loop well.
Now we will make tassels for our owl. Insert the hook into the upper left loop of the head and pull one red one through it.
Let's make a loop using a method already known to you.
We'll do the same on the right side.
Now take scissors and pull out each of the prepared elastic bands and cut off about half.
The owl is ready! Happy weaving!
Weaving on a hook
Having a set of multi-colored rubber bands or irises, as they are commonly called, a novice craftsman wants to begin the process of creating his first creation. But this requires certain skills and tools. What is necessary:
- Regular crochet hook.
- Special slingshot.
- A machine for performing more complex work.
If for many people finding a crochet hook is not a problem , then other devices for such work are purchased in stores, and they are not always in stock. For this reason, many people begin learning how to weave owl rubber bands with the Japanese technique of amigurumi knitting.
To make a souvenir, prepare 500 irises of the main color , 16 white and 26 blue for the eyes, 9 orange for the beak, and wool for stuffing. Set up a workspace with good lighting and begin to follow the step-by-step instructions to weave an owl on a hook from rubber bands.
Scheme for the torso
In order for the craft to turn out quickly and all the parts to be connected correctly, you must follow the weaving instructions:
- They make a magic ring - this is the first row of the future toy. To do this, take seven elastic bands of the main color. The first elastic band is placed on the hook and wrapped around the hook twice in a figure eight. They take the second one and drop the first one on it. The free end of the second is put on the hook and a knot is made by stretching the loop at the end of the hook through the second end of the draped iris. Thread the hook through three rings and put on the third elastic band, then drop the three outer rings onto it, one remains on the hook. Hook up the free end of the elastic band and tighten the knot first through the outermost loop, then through the middle one. Pass the hook through three loops. Perform the final operations with all the remaining rubber bands.
- Prepare 12 irises of the same color for subsequent work. Place two of them on the index finger of your free hand. Insert the hook into the double loop closest to the loop on the hook, and pull one of the irises from the finger through them, using the principle of knitting the first row to make the desired loop. It is marked with a clothespin as the beginning of a row, so that in the future a new row can be started from this place. Then a second elastic band is also knitted. After this, they take two more irises of the color of the future owl and repeat everything until they completely go around the circle to the mark made.
- For the third circle, prepare 18 irises of the selected color. The difference from knitting the previous circle is that one elastic band is knitted into the first loop, and two in the next, and so, alternating one and two, the entire circle is knitted.
- The fourth circle consists of 24 rubber bands. The knitting principle is the same, only the pattern is different. There is one rubber band in the first and second loops, two in the third, and so on all the way around.
- For the next rows you will need 24 elastic bands per row. Some craftsmen make the owl multi-colored, with stripes, so they take irises of other colors. This is all at the discretion of the author. The principle of knitting all subsequent rows is extremely simple: one loop - one elastic band. Even experienced craftsmen use a clamp or lock to mark the first loop of a row, so beginners also remember to do this so as not to get lost in weaving.
- A total of 16 rows are knitted. Then the resulting bag is turned inside out and stuffed with wool. Pull the last loop through the adjacent ones to the right of it and begin to connect the edges of the body. To do this, insert the hook into the nearest paired loops on the left and right sides. Then they put an elastic band on the hook and pull it through these loops and through the loop on the hook. Throw the free end of the iris onto the hook and make a knot by pulling the left loop through the right. Repeat operations until the last loop.
- The next step is to stretch the elastic band inside the figure. To do this, take one iris of the color of the top seam and make a knot out of it, stretching it through the central seams of the connection. An iris of the color of the first row is pulled through it and a knot is made, repeating the same with another iris, pulling it through the previous one. They pierce the figure from below with a hook and pull the outer elastic band through the owl’s body. They hide the end of the iris, bringing it into the loops on the bottom.
For relax
Fans of sewing and knitting will appreciate all kinds of life-size owl pillow patterns. A voluminous item will not only highlight the interior of the room in an original and unique way, but will also become quite practical.
After a difficult day at work, sometimes you just want to come home and lie down on the sofa, and when a soft and fluffy pet is waiting for you, then a trip on public transport will fly by in an instant.
Reading books or magazines will be more convenient if you place a small support in the shape of a bird under your head. To start crafting, you don’t need to buy a mountain of fabric; unnecessary scraps of a suitable shade will come in handy in such works.
Everyone dreams of successfully recycling leftovers and getting a beautiful scops owl pillow with their own hands.
From the large number of proposed options, you can find very modern and cute specimens, for the design of which beads or large beads are used. When experimenting with the front of the owl pillow, it’s worth adding something of your own.
A person’s preferences can be different, whether it’s a decorative camera sandwiched between the wings of a bird or a bright ball, the craft will look cute and fresh.
How to weave from rubber bands: a review of techniques and tools
You can weave a decoration or product from rubber bands using several techniques. We’ll tell you in more detail about each, and you decide which one suits you best.
Finger weaving technique
The easiest way to knit from elastic bands is on your fingers. To do this, you need to choose bright circles and follow all our recommendations.
- Place a figure eight circle between your index and middle fingers.
- Put 2 more rings on top, choose any colors.
- Remove the bottom loop from the index finger and leave it between the phalanges. Carry out similar actions with the lower ring on the middle finger.
- Take the next loop and put it on both fingers without twisting.
- Remove the bottom loop first from the index finger, then from the middle finger. Inside it turns out to be a pigtail.
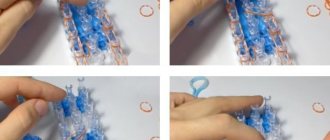
Instructions on how to weave a bracelet from rubber bands using a slingshot
Using a special device - a slingshot, which is sold in stores for needlewomen, and a hook - you can weave a thicker bauble.
- Place the first rubber band in the shape of a figure eight on the slingshot.
- Place two more pieces on top without twisting them.
- Use a hook to pick up the bottom loop and move it to the middle of the slingshot. Perform similar manipulations on the other side.
- Place the following part on the slingshot.
- Continue weaving in the same way until the required length is reached.
How to weave a beautiful bracelet from rubber bands on the Rainbow Loom machine
If you liked the weaving technique and want to do something more complex with your own hands, it’s time to go to the store for a large set of beautiful elastic bands and a special Rainbow Loom machine.
- Take the first part and hook it onto the middle and left pins.
- Hook the next part to the left post on top of the first circle, fasten the second side to the second pin in the middle.
- Tension all parts in the same way.
- After we have secured all the rubber bands, we begin weaving. Take the bottom piece from the middle post with a crochet hook, throw it to the top and swap places with the adjacent loop. Fasten the removed loop to the adjacent post. It should be an eight.
- The work should always be located to the left of the craftswoman.
- At the end of the work, remove the finished product from the machine with a crochet hook.
Step-by-step instructions for weaving with a fork
Another interesting technique for weaving things from rubber bands is using a regular fork. Let's make a heart keychain together.
| Illustration | Description of action |
| Place the white part on the left clove, twist it in a figure eight and hook it onto the right one. | |
| We hook the second red circle to the leftmost and rightmost clove, without twisting it. | |
| Remove the white loop on the left and drag it between the teeth. Remove the red one on the right and transfer it to the left tooth. | |
| Place a red rubber band on the outer teeth without twisting. | |
| Remove the white loop from the right side and release it between the central teeth. From left to right, throw the red one. | |
| Place the white piece on the outer teeth without twisting. | |
| Remove the top red loop, first from the left side, then from the right. | |
| Secure the red part in the same way. Then put on a white elastic band. | |
| Remove the top red part on the left side, then the bottom one, repeat everything on the right side. | |
| One element of the bracelet is ready. Then repeat all steps in the same way until the desired length is woven. |
At the end of the weaving, attach an S-shaped clip to the last 4 loops
Quick weaving on a hook
Using rubber bands, you can use a crochet hook to weave not only an openwork bauble, but also more complex decorations and products. Let's start with a simple bracelet weave. You need to prepare a metal hook, a set of bright circles and an S-shaped clip.
Weaving pattern.
- We squeeze the first yellow circle in the middle with our hands and put a clip on it, after which we put both halves on the hook.
- We put on green details.
- Using your fingers, stretch the green parts so that they catch on the hook, then remove the yellow loop from them.
- We put the green parts on the hook to form a loop with a yellow elastic band in the middle.
- We put on 2 blue parts and repeat the manipulations of steps 3 and 4.
- We repeat similar actions with circles of different colors.
- To complete the work, you need to take the purple circle and put it on the hook.
- Stretch the purple loop and remove the last blue loops onto it.
Loop
Now, so that we have something to attach the animal figurine to the bracelet, we will make a small loop (for purchased figurines, this role is usually performed by metal rings). To do this, take a light pink elastic band and use a hook to thread it through the owl's ear. In order to fix it, you can make a loop by threading this elastic band inside itself, it’s difficult to explain, but I hope you understand what I’m talking about.
Model "Owl"
To make a clear owl appear in 20 minutes, you should:
- Attach three elements to the first strip.
- Attach the sides on two lines, and install three more rings on top, going into other columns.
- From the point in the center, install a ring of a different size for the beak.
- Secure the fourth with edges from the fifth point.
- Then move the center and edges with rings 5 points forward.
- Wrap the ends, and add a couple of other colors for the legs on top of the edges.
- Then carefully touch the owl with the hook to firmly fix the object.
- Form the owl's eyes by attaching circles of a different color and gradually, starting from the head, remove the finished owl.
Wicker fresco with an owl
As in the previous master class, you will need a set of colored elastic bands, a detachable machine and a hook with a comfortable end for gripping.
Step-by-step description of working with a weaving pattern
- Preparatory stage
- Prepare the machine for work: the middle central row of the device should be removed and installed so that the recesses in the pegs are directed to the right. Only after this can you proceed directly to weaving.
- On a checkered sheet of paper, draw a diagram for your future craft using multi-colored markers (gel pens). For the first craft, you can use ready-made calculations, and when you fully understand and master the principle of weaving, you can safely sketch more complex diagrams of various figures (animals, plants, hieroglyphs, etc.).
- Main working stage
- Place yellow rubber bands in pairs on the outer row of the machine.
- Weave them (throw them over) and, following the diagram, weave the first row, vertically throwing elastic bands over the posts of the machine.
- Continue weaving the second and each subsequent row, introducing elastic bands of the color indicated in the diagram.
Important! Each cell corresponds to a working column on the machine
- Final stage
Upon completion of the work, you should move the elastic band with a crochet from the top row to the bottom one and, knitting a row with a chain, make a loop. The finished fresco should be carefully straightened - and you can admire the work.
Owl with wings
You will need: rubber bands of 3 colors, a machine, a hook.
Master Class
- Position the machine so that the open sides of the pegs are facing you and the rows are level.
- Start weaving the owl's wings by throwing on rubber bands, as shown in the picture.
- Make the second wing using the same pattern, braid it and remove it from the loom.
- Weave the owl's head and body in this way: throw on a pair of elastic bands, form eyes, and then a beak.
- Throw the second row along the edges, and one elastic band across.
- Knit the top row and throw it over the loom.
- Throw on elastic bands to form the body of the bird.
- Make an extension on the body, just like on the owl's head.
- Hook the wing blanks.
- Weave the legs, then weave the shape from the end.
- Make a loop, tighten it, remove it from the stack and straighten the owl.
From the history of modern needlework technology
Initially, a loving Malaysian father, Chong Chun Ng, came up with a device for knitting baubles for his little daughters. This item was a small board with small nails driven in at a distance from each other. Over time, the device was improved, and with its help it became possible to weave not only simple baubles, but also various 3D figures and three-dimensional decorations.
Today, the lumigurumi technique is gaining popularity among needlewomen around the world. Small toys made from rubber bands can be bought in many souvenir shops and shops. But it’s much more interesting and entertaining to make such crafts with your own hands. Moreover, to make lumigurumi toys, you just need to stock up on colored rubber bands of various colors, prepare a machine, a slingshot or a fork for weaving. The work may also require decorative elements and various accessories.
Small toys, key rings and pendants are woven from colored rubber bands. The most common among many lovers of handicrafts are owl figurines. We suggest, using detailed master classes and recommendations from more experienced craftswomen, to make an owl that can be hung on a bag, used as a keychain, or simply presented to friends as a small souvenir.
Weaving from rubber bands - modern art
This is an extremely exciting activity, at the end of which you will receive unique jewelry and interesting accessories.
So, before you start weaving from rubber bands, you should acquire these rubber bands themselves, as well as auxiliary tools: a slingshot, a machine, or both. Select the number of rubber bands, and therefore the size of the set, to suit your needs, correctly assessing your enthusiasm.
Decide what exactly you want to weave and find a suitable pattern.
Below is a detailed description of how to make an owl from rubber bands. Subsequently, you can use such a small owl figurine as a keychain, toy, brooch or hairpin by attaching it to the base.
Children play with pleasure with small figures. Many of them will become interested in this type of creativity and begin to develop their abilities in needlework.
Figurine "Cake"
Preparing cakes takes a lot of time, however, if you try to come up with an artificial cake in the form of a decoration or an amulet, you can spend an average of 20-30 minutes.
Instructions to make a beautiful miniature instant cake:
- You need to wrap a circle of one palette three times on the hook.
- We pass one more piece through the loops to make the second part.
- Then put this piece on the point and pull it through the loops.
- Repeat several times and a layer appears.
How to make a cake if the fastening clip is not installed? Install the clip and continue knitting until you can weave a loop.
Continuation of the cake craft:
- The third stripe consists of constant increments of circles from a different palette. First, two pieces are attached, then one, and finally two again.
- It is necessary to periodically bypass the clip.
- Then it is recommended to make the same circle, but of a different shade. As a filling.
- Add another layer to the first cake layer, pushing another piece through the bottom loops.
Now to connect the cakes, it is enough to thread one element through the layers from the inside and secure them to the outside.
Volumetric owl made from rubber bands using the lumigurumi technique
You will need: 500 elastic bands of the primary color of your choice, an iron hook with a long handle, 1 white and 8 black elastic bands for the eyes, 9 orange elastic bands for the beak, a special plastic lock, padding polyester filler.
Master Class
- Make the first row of 6 loops, for this take 7 elastic bands. Throw the first elastic band onto the hook in 3 turns, then throw it onto the next one and throw its 2 ends onto the hook, make a knot and pull its right side through the left without tightening it.
- Thread the hook again through 3 turns, pull through another ring, then put both ends on the hook.
- You get 3 loops, pull the first loop through the next 2. Repeat this process until you have used 7 rubber bands. The result is a chain with 6 loops, and a ring on the side.
- For the second row you need 12 elastic bands, now add 2 new ones to each warp loop.
- Connect the loops together in this way: insert the hook into the first, pull one out in the same way, throw on the second side, pull the first through the second, then through the third.
- Connect the 2 sides of the ring and start using a special plastic lock to mark a new row (when you knit all the rings and reach the lock, a new row begins).
- Knit a second elastic through the same loop and pull out the elastic, then pull the first through the second, then through the third. You can take two at once, it’s more convenient.
- The next step is to insert the hook and continue weaving according to the same pattern.
- In the third row, knit 2 elastic bands into every second link of the previous row. There should be 18 loops. Don't forget to mark the beginning with a padlock. If you are distracted and don’t remember whether you knitted two rings or one, then stretch the product and you will immediately see.
- For row 4, use the 1:1:2 pattern - doubling will occur on every third link. You will notice that the diameter of your circle, which will be the bottom of the owl, will increase.
- Knit in a circle, and in each link of the chain knit only one ring, in this way the “knitted fabric” will rise up.
- Knit as many rows as the height of the owl. However, keep in mind that the size of the owl should be proportional to the size of the bottom.
- Stuff the owl with stuffing and connect the top parts in this way: insert a hook into the two outermost ones from each row, then pull the remaining loop through them. Move on, connecting the two sides. Grab them with your hook and pull the new elastic through them. Make a knot by threading the right end through the left.
- Make sure that the middle part is lowered down so that the owl's ears appear on the sides.
- Weave the eyes this way: start the weave as a base using 8 black elastic bands. Braid it with white elastic bands and bring the black ones to the wrong side so that you can later attach the eye to the toy.
- Weave the beak in this way: wind an orange elastic band in 3 turns, lower the workpiece onto 2 orange ones, hold the second end of the elastic bands in your hand, then pull a couple more elastic bands through one end and throw its side over the hook. Pull another pair through these 2 loops, then through the 8 that are on the hook, place one orange one.
- Attach the eyes and beak using elastic bands.
- Cut a few rubber bands and attach them to the ears.
A voluminous owl made from rubber bands using the lumigurumi technique is ready! I recommend watching the video master class!
Weaving from rubber bands is a fascinating and useful activity. In addition to the owl, you can weave a lot of other figures from rubber bands, which you can find in this article. If you are new to this business, try weaving a small owl, master the principle of weaving and only then create masterpieces with your own hands!
Owl feet
Wrap four turns of 1 yellow elastic band around the free edge. Then string 2 elastic bands of the main color again. Move the yellow rubber band to the middle. Move the bottom pairs here on the left side, it is important that the yellow one remains in the same place.
Weave 3 pairs of pink irises: put 2 of them on the pins, and move the lower ones to the center. Next, move the entire weave to the right. Using a crochet hook, place the first treble loop over the left pin. The second row of the body will be the owl's belly. Place 2 white elastic bands on the slingshot and place the triple rubber band on them on the left side. Do these steps with 5 pairs of white elastic bands.
Place the resulting blank on the right stake. Place the first triple elastic on the left pin again. Attach 2 pink elastic bands to the columns and move the triple one to the center. Transfer everything from the left column to the right and weave the second leg of the owl in the already known way.
After you have transferred the yellow elastic band to 2 pink ones, weave in 3 more pairs of elastic bands of the same color. Combine the entire torso. Put on 2 elastic bands and transfer all the details to the middle.
CANDY (lollipop) from Rainbow Loom Bands. Lesson 99
CANDY (lollipop) from Rainbow Loom Bands. Lesson 99
Keychains and figurines.
User Guest
(you will not be able to edit or delete a comment left).
Post your review or comment on this page:
(*) The user who uploaded this video will be able to delete your comment.
(*) The site administration will be able to delete or edit your comment.
Attention!
All responsibility for the content of the video and descriptions posted on this page, including compliance with copyright and related rights and legal requirements, rests with the user who uploaded this file and description.
The users who published this data bear all responsibility for the content of reviews and comments.
A master class on weaving another chic bracelet is offered by the Maximum Ideas website. The sweet and tasty name of the accessory evokes only positive emotions. And believe me, the appearance of this rubber band bracelet, called Candy, will evoke only positive and bright emotions in its owner!
Bauble made of rubber bands on a three-row machine
Master Class
- Move the middle row of the three-row machine one post.
- Put two rubber bands on the posts.
- Start with the bottom row of the first column, and the second row of the middle column which is offset one to the left.
- Place the elastic on the second row of the first stitch, on the bottom row of the third stitch, on the bottom row of the second stitch, and on the middle row of the third stitch.
- Complete two rows.
- Turn the machine over.
- Place an elastic band, twisted in half, onto the middle outer post.
- Remove the bottom elastic band from the middle outer post.
- Place the elastic on the post on which it is attached on the reverse side.
- Remove all the rubber bands and put them on the posts where they are attached.
- Secure the weave.
- Put on the hook clasp.
I recommend watching this video.
How to make a bracelet from rubber bands. Style Dragon Scales on the Rainbow Loom machine
Watch this video on YouTube
Bracelets made from Rainbow Loom elastic bands have been gaining popularity lately. They can become not only your hobby, but also an original gift idea for a friend. We wish you success!
Go to head
Things get more complicated, but the photos and description should help you out.
Using a hook, pull the top elastic bands on the middle transition peg, pull out the first pair of elastic bands and put them on the corresponding peg, then pull out the next pair of light pink elastic bands and put them on the corresponding peg (middle), repeat for the last third pair of elastic bands.
Next, continue to rehang all the elastic bands in three rows in this way.
The last step at this stage is the ears. Remove two light pink elastic bands from the last peg on the middle row and place them on the last peg on the left row. After this, remove the other two elastic bands from the middle peg and place them on the last one in the right row.
Technique and main types
Today, rubber bling can be created using your fingers. If you attach a fastener, you can create a shape similar to a necklace. There are many techniques, differing in structure and tools. Guys with experience often use:
- Fingers:
- fork;
- machine and more.
If you use a fork or your own fingers, you can create tempting accessories. When you want to use your creativity and create various patterns, you will have to learn how to weave rubber bands onto a slingshot. It’s easier to buy a ready-made machine in a store in one set.
When creating complex structures that involve connecting nodes to each other, you cannot work without columns. It is usually sold in stores, made of plastic. It is advisable to use a platform that includes at least three fasteners.
How to weave a bracelet using a regular dinner fork?
Beginning craftswomen often wonder how to weave a bracelet from rubber bands on a fork. There's nothing complicated about it.
Here is a plan on how to weave a bracelet from rubber bands:
Weaving a bracelet using this method begins by putting an elastic band on each of the four prongs of a fork. Next, we work with each of the rubber bands separately. Let's go back to the first rubber band. It should be put on three teeth on the left side using the figure-of-eight method.
The loops should intersect in the center. As for the second elastic band, it needs to be put on four teeth at once (note that the back of the loop should be slightly stretched). Repeat the same steps with the third rubber band. At the second stage of work you will need a special hook
With its help, you need to try to carefully hook the left loop of the elastic band located below all, then remove it from the teeth and leave it in this position (between the middle rows). Repeat these manipulations with the opposite bottom loop. Further weaving proceeds in a certain sequence. You put the elastic on four teeth at the same time, pull its back part over the next two teeth and alternately pull out the loops on the left and right sides. So you have a fishtail bracelet. However, the work is not finished yet. If you are making a bracelet using a fork, then during the weaving process do not forget to remove part of the finished product from this unusual tool (to do this, hook the outer rubber bands and move upwards). And what we see is that the product is ready. Now you need to find a suitable clasp among the small items for needlework and fasten the edges of the bracelet using a hook. A wonderful bracelet made of rubber bands is ready.
Some craftswomen manage to weave entire figures on a fork, and not just bracelets from rubber bands; on the Internet you can find detailed patterns and methods for such weaving.
Lemur on the handle
To weave a lemur you will need a long loom. All rubber bands, except the first one, are taken in pairs.
- Head. We throw a single elastic band over the two central posts. We fill the head, top with blue, then white elastic bands. We close the set on the central column.
- Neck and body. They will be blue. For the neck you need to take three elastic bands. From the neck, 1 pair to the right, 3 pairs down. We perform the left part symmetrically; we put 4 pairs of elastic bands on the central posts. We close the circle.
- Tail. The tail has alternating blue and white elastic bands. The tail part is made separately on a hook and attached to the weaving on a machine.
- The paws are woven from blue and white elastic bands on the side posts of the machine. A single rubber band is placed over the last column of paws in four turns. The right row will be the front paw. We weave it up to the body and transfer it to the upper columns of the body.
- Strengthening the torso. We throw three blue elastic bands in a triangle from top to bottom.
- Ears. We take blue and white elastic bands and throw them on the first two columns of the right and left rows. We close with an elastic band in four turns and weave.
- Eyes. We take a white elastic band, twist it in half and throw it over the lower columns of the head. We screw black rubber bands onto the same columns 4 turns, put a white rubber band on a triangle, and transfer the black ones to it.
- Lemur assembly. Let's start weaving. First we make the tail, then the hind legs. They must be attached to the lower right column of the body. Next we weave the body and head and tighten the last loop. We remove the lemur from the machine and hide the tail of the loop inside.
INTERESTING: Minecraft heroes made from rubber bands
Volumetric large owl on a machine
To make one 3D owl we need an ordinary machine, hooks and scissors. In addition, we will prepare colored rubber bands and two buttons with a diameter of fifteen millimeters for the eyes of the figure. For needlework we don’t need the central row of machine posts, so we immediately remove it from the structure. We will re-equip the weaving machine so that the posts with their notches are turned in different directions. Then we will prepare the rubber bands and begin needlework, following all the instructions in the attached video lesson. We put elastic bands of the same color on opposite posts, simultaneously twisting them in a figure eight. If you carefully follow all the necessary steps, which are shown in the attached video, you will get exactly the same beautiful and large owl made of multi-colored rubber bands.
Weaving a funny spider on a slingshot
Let's learn the spider weaving technique. You can use the woven spider as a keychain or pendant for a mobile phone or tablet. To weave it, you can use black elastic bands or multi-colored ones if you want the figure to be bright and original.
Step-by-step description of the process:
- Turn the slingshot so that the grooves are directed towards you. Wind the elastic band four turns onto one branch of the slingshot.
- To connect both columns, take an elastic band folded in half and put it on the slingshot.
- Then take your hook and tie the two elastic bands in a knot. You need to make three such weaving elements.
Owl made of rubber bands on a slingshot
With this device you can weave a beautiful and original toy. An owl made in this way is often used as a keychain or decoration. Rubber bands of any color are suitable for work. To make the owl look like a real one, experienced needlewomen advise using gray or brown tones.
Materials required for work
Before weaving an owl on a slingshot, you need to prepare the following materials and tools:
- Slingshot for weaving.
- White elastic bands for weaving the belly of a future owl - 8 pieces.
- Brown elastic bands that will be used as the main color - 44 pieces.
- To create the owl's legs and beak, take 4 orange rubber bands.
- To make the eyes we will use black elastic bands - 2 pieces.
- Hook for removal.
- Scissors.
Sequencing
To understand how to weave an owl on a slingshot from rubber bands, you need to consider two techniques. First of all, the body of the owl is woven, and then the head.
Weaving process:
- Torso. We take a slingshot and throw a brown elastic band on the right column in three turns. After this, we put two more of the same color on the pins. Next, we throw the initial one into the center. In this case, the right column is released and the elastic bands are transferred to the left side.
- Paw. On the right side of the slingshot we wrap the orange elastic band four times. We put on two brown ones, and lower the original orange one onto them. We send the bottom two pairs from the left column to the center. This way the orange one will move and be on the right side of them. Then we throw on two brown ones again, and direct the lower ones to the center. Another pair of browns is put on two columns at once, and the lower ones are moved onto them. We put a third pair on both sides of the slingshot. At the same time, we reset the lower ones to the middle. After you have completed these operations, you need to move the elastic bands from the left side of the slingshot to the right. Insert a hook into the initial orange one and throw it over the left column.
- Abdomen. Move the elastic band with three turns to the center. To do this, we throw two white ones on it. Another pair of white ones is put on similarly. In this case, the lower white ones fall from the posts. Using the same principle, we weave two more pairs. After that, we transfer them to the right side. Again we put the hook inside the initial elastic band and put it on the left column. Having completed these steps, we put two brown ones on both pins. We move the rubber band to the middle with three turns on the left. We move the rubber bands from the left side to the right and wrap the orange ones on the left column in four turns. Then we throw on another pair of brown ones, and lower the orange one from the pin. From the right side we discard the top two pairs of brown ones and leave the orange one on the left side. We put on a pair of brown ones, and move the previous ones to the middle. Next, we again throw on two brown ones and lower the previous ones on both sides. Another pair is put on in the same way. We connect everything with a pair of brown rubber bands.
- Head. We arrange the elastic bands according to the following scheme: we put on the two brown ones on the right side in the usual way, we throw the lower ones in the middle. We repeat the process and move the rubber bands from the left side to the right.
- Eye. We put a black rubber band on the left pin in four turns. Next, we sketch two brown ones and remove the black one on them. We act similarly for both lower pairs on the right, while the black one should remain on the left. After that, we throw on the next pair of brown ones, and send the bottom ones to the center. We transfer all the rubber bands to the right column and release the left one. Insert the hook into the starting loop and place two orange loops on it. The second part is pulled through the loop and is also put on the hook, from which we lower the orange loops. The next step is to put two brown ones on both columns. We move the elastic bands to the right side and insert the hook into the initial loop. We throw a brown pair on it. In this case, we put one side on the hook and pull out the other. We lower the elastic bands onto the left post and put two brown loops on both of them. The pairs of browns on the left fall to the center. We hook the top two on the right column and move them to the left. We put a black rubber band on the right side of the slingshot. A pair of brown ones is put on both columns and the turns of the black one go down. We remove all the rubber bands from the left side of the slingshot. In this case, the black one will be to the right of them. After this, we connect all the elastic bands. To do this, we put the brown one on two columns, and send all the rest to the middle. Tighten the loop.
- Tassels. Insert a hook into the left loop at the top of the head and pull through one brown one. We do the same for the left side. After this, we pull off each of the prepared rubber bands and cut off half.
Rubber band keychain Owl – master class
Let's mark the top fork by throwing an elastic band of a different color (orange) over it. Throw a blue elastic band in a figure eight over the four teeth of the top fork. We put a yellow elastic band on each outer tooth of the same fork, turning it twice in a figure eight (these will be the paws). We put two blue elastic bands on the outer teeth of the upper and lower forks.
Then we throw off the yellow elastic bands and place them in the center of the blue elastic bands.
We put two purple elastic bands on the central teeth of both forks. We discard the blue elastic band that was previously placed on four cloves.
Making an owl's belly. Throw a blue elastic band over the four teeth of the upper fork (horizontally). We put two blue elastic bands on the outer teeth of the forks, and two lilac ones on the central teeth.
We remove the horizontal elastic from the upper and lower forks, and then all the loops of the lower layer.
We repeat the weaving of the tummy two more times. We pull the belly out of the forks from the side so that it does not interfere with the owl's weaving.
Making the owl's neck. We remove the lilac elastic bands from one central prong of the forks, and put them on the other. One center tine on each fork is left free.
Next, add elastic bands of the main color. First, we put a horizontal elastic band on the top fork, then two elastic bands on the outer teeth of both forks, and two elastic bands on the clove with lilac elastic bands. One central clove remains free.
We throw off the horizontal elastic band and the entire bottom row.
We transfer all the elastic bands of the remaining row to the central teeth of the forks.
Making the owl's head. We put two yellow elastic bands on the two central teeth of the forks (this will be the owl's beak). Then we put two blue elastic bands separately on one central prong of the forks.
We discard all the blue elastic bands that are below the yellow elastic band, and transfer the top blue elastic bands to the outer teeth of the forks.
Then we put one blue elastic band on the four teeth of the upper elastic band, and above it, two blue elastic bands on the outer teeth of the forks and one on the two central teeth.
We take off the bottom elastic bands and make eyes for the owl from rubber bands. To do this, we separately place two black elastic bands on the hook in a figure eight three times and pull a blue elastic band through them.
We put an elastic band with eyes on the outer teeth of the lower fork and throw one of the central parts of this elastic band over the fork.
Then we put two elastic bands on the four tines of the forks and throw off the elastic band with the eyes: its central part, and then the outer loops. We continue to throw off the bottom row of elastic bands.
We transfer the loops from the central teeth to the outer ones and throw one blue elastic band over them.
We throw off the lower loops of the elastic bands, and transfer the remaining ones from the lower to the upper fork. We take off the bottom loops.
Tighten the resulting loops and remove from the fork.
The ears that remain can be hidden from the back. We attach a carbine to the owl. Stylish and original keychain made of rubber bands “Owl” on forks
ready. A keychain made from rubber bands on the “Panda” machine is no less beautiful.
Keychain made of rubber bands “Owl”. Photo
| Comments to the news “Keychain made of rubber bands on forks. Owl. Master class with step-by-step photos” is already 0:
Interesting on the web:
E-book “The best handicraft master classes.”
After that, click the “Get book” button.
"Masterclasses" 2011-2017
. All articles on the site are copyrighted, copying is strictly prohibited. In case of partial citation, a direct indexed link to the “Masterclasses” website is required.
Attention! It is forbidden to use expressions in the form of obscene and insulting. HTML tags and URLs are not allowed