Weaving toys on a machine: step-by-step instructions
As a result of experiments and hard work of creative individuals, new weaving patterns for figurines and toys are created every day. Particularly popular are products depicting cartoon characters, animals or vehicles. To learn how to weave them yourself you will need a little:
- Set of rainbow looms.
- Large size machine.
- Hook.
- Beads, clips, ribbons for toy decoration.
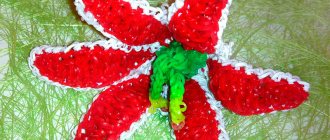
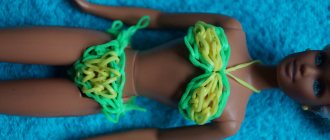
Doll made of rubber bands
Interesting, unusual dolls can be created using Rainbow loom. Such figures will be valuable for children, especially if they make them themselves, and the presented master class will help with this. To create cute dolls using rainbow rubber bands you will need:
- Big machine.
- Rainbow loom of different colors.
- Hook.
Step-by-step production of a doll:
- To create all the details of the doll, a standard scheme is used: we put rubber bands on the posts in pairs, combining them. We wrap one element three times around the last peg, and start weaving from it: remove the lower loops and throw them to where the second turn of this element is located.
- It starts with the doll’s hair: we put on rubber bands, combining the columns of one row in pairs. The length and dimensions of the curl depend on the number of elements used. We weave four such parts according to the pattern described in point 1 (a larger number is possible if desired).
- We create arms with T-shirt sleeves: take two colored Rainbow looms (the color of the clothes) and place them on the first columns. Next, flesh shades are used, which connect the pegs according to the pattern: 2-3, 3-4, and at the end of the product one elastic band must be wound three times in order to secure the work and it does not fall apart after weaving. We weave the details, adhering to the pattern.
- We make the protruding parts of the skirt: take a couple of elastic bands of different colors to create a pattern, a stylish design and place them on the posts in the order 1-2, 2-3; around the 3rd peg we wind one element three times. We weave two parts according to the diagram.
- We begin to assemble the doll. We place silicone rubber bands on the machine, combining the first column of the central right and left rows. Next, we arrange the elements according to the diagram with the photo:
- We remove the prepared curls from the hook and place 2 parts at a time on the first side elements of the machine.
- To make eyes, take elastic bands of the chosen color and make 4 yarn overs around the second columns of the side rows. We put on the Rainbow loom, combining the pegs with the “eyes” and the middle column, after which we remove the yarn overs and move them towards the middle.
- For the neck we place two elastic bands on the pegs of the central row.
- To weave the T-shirt, we use the colors that were used for its sleeves. We connect the lower central peg with the right one, then with the left one and down one step at a time. We shift the hand blanks to the upper side columns of the body.
- To make a skirt we use pairs of elastic bands, taking three steps in each row.
- Making the legs: take two flesh-colored Rainbow Looms and take 3 steps down. To create a boot, we connect the last two pegs with three elements of a different color. We secure the end of the work with an elastic band, which is wrapped in 4 turns around the post. Do the same for the second leg.
- We fasten the extension of the skirt and begin weaving, using the pattern described in point 1, first shifting the loops of the left row, then the right and at the end of the center.
- If desired, the resulting girl can be decorated with accessories.
To learn more about the step-by-step creation of a doll, watch the video tutorial:
Furby toy
Making a fun Furby toy is very simple, and the process will be fun and interesting. For weaving you will need: multi-colored Rainbow loom, a large loom, a hook.
Technique for making the figure:
- For work, two rubber bands are always used, and the machine is adjusted so that the middle row is slightly shifted forward.
- We place the elastic bands, combining the first/middle, middle/left pegs and then down 5 steps in the right and left rows, 6 on average. We connect the lower side pegs with the central one.
- To create volume, we weave 2 simple chains of three paired rubber bands and connect them with the middle columns of the outer rows from the outside.
- For the ears, single rubber bands are used, twisted in half in a figure eight. We put Rainbow loom on 4 central pegs and connect them to the side ones. We weave, transferring the lower loops to the previous elements of the machine. Remove from the product, securing with an elastic loop. We weave two such parts and connect them to the first columns of the side rows.
- To make a foot, we make 4 loops around the hook, transfer them to a folded elastic band, the other end of which we put back on. We repeat the action 3 times, after which all the resulting elements are moved to 1 Rainbow loom. We make two parts and place them on the lower pegs of the side rows.
- By analogy, we make eyes, 4 yarn overs, alternating the colors white/black/white, after which everything is transferred to the purple element. We make two parts and attach them to the main work.
- Nose: we wind two orange elastic bands around the hook, making 4 loops each and remove them onto the purple Rainbow loom. We attach the parts to the three pegs of the side rows.
- We attach the elastic band with a triangle at the bottom of the product. We weave the toy, moving the lower layers to adjacent posts. We remove all the loops - the wonderful Furby is ready.
To see the implementation in detail, watch the video:
Rubber band car for boys
To weave an interesting car figurine from Rainbow loom for a boy, you will need a machine with evenly set rows, silicone rubber bands, and a hook. Step-by-step work:
- We make wheels: we twist the rubber bands in half and place 6 pieces on the side row. We wind 4 turns of the element around the last peg. We remove the lower loops, throwing them onto the previous column. We remove everything with a crochet hook and combine both ends of the chain. We make 3 more parts in the same way.
- We put on the Rainbow loom according to the pattern, according to the photo:
- We connect the lower elements of the machine in pairs with rubber bands of three pieces.
- We attach the wheels to the product.
- We begin to weave from the end of the work, removing the lower loops and throwing them onto the previous pegs.
- We create 2 headlights: we wrap 4 loops of one yellow elastic band around the hook and remove everything with a purple one. We attach it to the base in the front.
- To weave the cabin, we place the elements according to the pattern as for the main part.
- We put on the transverse fasteners in the form of a Rainbow loom and weave it in the same way as the base of the car.
- We make the roof by placing rubber bands, as for weaving the base, but in smaller quantities.
- We weave the roof of the car, removing the lower layers and moving them to the previous pegs. We remove the work from the machine and connect the three parts of the work.
- An unusual car from Rainbow loom is ready to delight its owner.
Watch the video to see how the toy is weaved and assembled:
How to weave a little mermaid
The following master class will help you create a cheerful mermaid with rubber bands:
- Let's prepare the necessary tools and attributes - rubber bands, a machine (the middle posts are pushed forward), a hook.
- We braid the hair using a simple chain pattern: we combine the pegs in pairs, and after the end of the work we transfer the lower loops from each element to the previous ones. Create the required number of curls.
- We start creating the body from the head, placing the elastic bands in a certain order, checking the photo:
- We make a neck by connecting the bottom column of the central row and the next one with 3 elastic bands of the main color.
- We create the basis for the shoulders by connecting the central column with the side and bottom ones.
- To create the torso, we put on elastic bands according to the diagram, according to the photo:
- Let's start weaving the tail: we throw a pair of dark elastic bands on the posts of all rows and finish with light ones until the end of the pegs.
- We prepare 2 blanks for the tail: we wind 4 turns around the hook, thread everything through 2 elastic bands. We carry out manipulations until we get 4 loops.
- For the eyes, alternately twist 2 blue elastic bands around the hook, 4 turns each, and remove them onto the yellow one. We fasten the element to the second columns on the side.
- According to the pattern of how the tail was woven, we make two arms and attach them to the shoulder elements.
- Attach the hair to the upper side pegs.
- We start weaving from the tail, throwing the lower layers of loops onto the posts from which the elastic comes.
- We straighten the products and the delightful mermaid is ready.
Watch the video to understand the technique of making the figure:
Hello Kitty on the machine
Hello Kitty can be woven from rainbow rubber bands and a classic large loom. A detailed master class on creating a figurine will help you do this:
- We prepare the necessary attributes: rubber bands, a machine where all the rows are located evenly, a hook.
- To create a head, you need to put rubber bands on the machine, using 2 pieces each, in the order shown in the photo:
- We add 1 more layer of elements to the side rows to give the toy volume.
- To create ears, we put on elastic bands in a triangle on the right side and on the left. At the top we twist the element with 4 loops, and remove the lower layers, placing them on the pegs where the second end of the Rainbow loom is located.
- To create the body, we connect the columns with rubber bands in the order shown in the photo:
- To make the legs, we put 2 white elastic bands on the side rows, and 4 for the second step; We do the same with the other side. We secure the last columns with an elastic band, twisting it into 4 loops.
- We braid 2 arms with a simple chain, creating a sleeve from 3 elastic bands of a different color. After making them, we place them on the first pegs where we began to weave the body.
- We connect the posts in the center of the work and in the head area with transverse elements to strengthen the product.
- We make the eyes: we twist 2 black elastic bands onto the hook 4 turns each, remove everything onto the white one and fasten it in the head area, combining the second columns of the side rows.
- You need to start weaving from the bottom of the work: lift all the loops located at the top and place them on the post where the second part of the elastic is located. In the process we make decorations and a nose for Kitty.
- We remove the product from the machine, straighten it and the wonderful Hello Kitty is ready.
Watch how to weave Kitty toys in the following video:
Red Bird
In addition to the tools created by Chong Chun Ng - a loom, a hook and a slingshot - craftsmen use non-standard things in weaving. So, you can weave:
- On the machine;
- On hook;
- On a slingshot for weaving;
- On fingers;
- On pencils;
- On table forks;
- On the comb;
Using various tools, you can get very beautiful things. For example, the comb weaving technique allows you to make wide bracelets, or create a fabric for large products like a tablet case.
We invite you to weave a small keychain on a hook in the shape of the main character of the cartoon “Angry Birds”. Not only children will appreciate this souvenir; adults will also like it.
To make a keychain you will need:
- Elastic bands in red, black, white and orange colors;
- Hook.
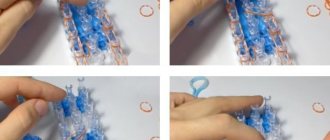
Place a white elastic band twisted in three turns onto the hook. Pull two white elastic bands through the winding. Then repeat the same steps with orange rubber bands. The hook should have two double loops of white and orange.
Pull a double-twisted elastic band through the orange loops. Move one white loop so that it becomes the first one on the hook. Pull two red elastic bands through all the loops. The bird's beak is ready. Add another red pair. Twist the white elastic band four turns onto the hook. In the middle, place a black elastic band, twisted three times. Place the white stitches of the beginning of knitting on the hook and pull a pair of white elastic bands through the outermost (white) loops. Pull two red pairs through the white loops one by one. Insert the hook under the outermost red loops and hang them on the hook. Add two more red rows to the edge. The next two elastic bands need to be pulled through the outer loops and through the loops that form the bird's eye.
Related article: DIY crown for girls made of paper and cardboard with photo
Add a red pair to the outer loops. There are four double red loops left on the hook. Carefully remove them from the instrument and insert it on the other side. Repeat weaving, starting with adding an eye. When there are six red double loops left on the hook, slip them onto a pair of red elastic bands. Pull the remaining loops through each other and tie with a knot. Additionally, stretch a black elastic band over the eyes and a red one under them. This will give the bird density. Hide all the knots. The keychain is ready!
If the photo instructions seemed complicated to you, you can watch a video that clearly shows how to make an angry bird.
Video tutorials for beginners on weaving toys without a machine
Rainbow loom rubber bands are wonderful because you don’t need to have a machine to weave, since you can make an unusual figurine or a chic, stylish decoration using a fork, a hook, or simply. For those who are concerned about the question of how to learn how to weave toys, interesting video lessons and master classes on making unusual figures using Rainbow loom will be useful. A detailed description, step-by-step instructions, and a visual demonstration of the process will help you make an interesting toy even for those who are new to such unusual creativity.
Weaving a little bouncing ball
How to make an easy slingshot toy
Creating a three-dimensional 3D toy on a hook
Find out how this happens in step-by-step master classes.
Found an error in the text? Select it, press Ctrl + Enter and we will fix everything!
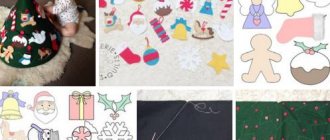
Do you want to make an original craft on a winter theme and don’t know what to come up with? I'm already tired of ordinary appliques and paper crafts, so young needlewomen weave original crafts from Rainbow Loom rubber bands. In this article we have put together a video collection for you on how to weave a Christmas tree from rubber bands.
, make beautiful winter bracelets and creative voluminous crafts.
How to weave a bracelet from rubber bands on a French braid machine
This bracelet is ideal for the winter season and will look stylish on your hand. Blue and blue Rainbow loom elastic bracelets are the best way to add some zest to your image.
3D Christmas tree, part 1, lesson 4
A voluminous Christmas tree is a great idea for a DIY winter craft at school or kindergarten. Surprise your friends and family by weaving a 3D Christmas tree from Rainbow loom rubber bands and presenting it as a gift.
Snowflake, Irises Rainbow Loom
Is it already snowing for the first time? Then hurry up to weave beautiful openwork snowflakes from Rainbow loom elastic bands. You can make not just white or blue snowflakes, but also bright colors. Create a whole collection of different snowflakes and give them to your friends.
Rubber band monkey Lumigurumi Rainbow Lum
Don’t forget about weaving toys from rubber bands; such funny monkeys will not leave either teachers or your parents indifferent.
We hope that our winter selection of videos on how to weave various crafts from rubber bands will be useful to you. Now take to school for craft lessons not only glue and paper, but also Rainbow Loom rubber bands.
The wonderful and magical New Year holiday is getting closer and closer, and there is still so much to do, including decorating your home beautifully. And Rainbow Loom silicone rubber bands are a very good material for making decorations not only for the interior, but also toys for the New Year tree!
In this photo tutorial we suggest making a figurine of a New Year's candy from rubber bands on a slingshot.
. This lollipop will fit perfectly into the New Year and Christmas interior, and will also become a beautiful and original decoration for the Christmas tree.
Knitting a giraffe
For this craft you need to prepare multi-colored Rainbow Loom rubber bands , a special hook and stuffing for soft toys, for example, silicone balls. The work begins with the creation of a magic ring consisting of 6 elements. It is made in the same way as for a bird.
Torso and neck
In the second row, the number of loops is increased to 12, adding one loop to each element. The third row is knitted with additions through one loop, that is, 1 is woven from one, 2 from the second, 1 from the third again, and so on until the end of the row. Rows 4, 5, 6 and 7 are woven in the same way.
To ensure that the color of the giraffe is not monotonous, the rubber bands are alternated in color: 1 row - yellow (you can take red or orange), 2 row - pink, 3 - yellow again, etc. Having reached approximately the middle of the height, 3 rows are woven with rubber bands of a third color . That is, if pink and red were used before, now you can take orange.
How to make a New Year's candy from rubber bands on a slingshot?
The lollipop is woven very easily. The entire manufacturing process is based on the fishtail weaving technique, which every beginner knows.
We start with the correct location of the machine - with the open parts of the posts facing you, so that it is convenient to insert the hook under the elastic bands.
We wrap a red rubber band around the right pin, wrapping it three times. Then we put a couple of white elastic bands on both posts in the usual way.
We lower the triple red one from the right side to the center, and then we throw three red ones on both pins.
The next step is to remove the bottom white elastic bands from the posts, and then put on three white ones in the usual way.
Again, we throw off the previous ones, and then put on three red elastic bands.
Again we drop the bottom ones into the middle from each of the pins and put three more white ones on both pins.
We weave the bottom elastic bands again, sending them to the center. Let's put three red ones on both columns.
And we throw off the lower white ones from both columns. We put on the last white three-piece.
We take off the red ones from both pins, and put one white one on two pins.
We send the lower rubber bands from the slingshot to the white one.
We throw one of the rubber bands onto the adjacent pin.
We throw the bottom one off the post and tighten the loop.
To give the candy the desired shape, insert the hook into the red loop, grab the last loop and pull it out.
Then we insert the hook into the white loop, which is below the red one, and pull the loop out again.
To lengthen the last loop, insert the hook into it and throw a white elastic band over it.
Let's pull out one part, and then put the second one on the hook.
We pull the left side of the elastic through the right and tighten it well. Give the New Year's candy the required shape.
The candy figurine is ready! Happy New Year!
Since the New Year holidays differ from everyone else in their colorfulness and fabulous unsurpassedness, many people try to make every effort to make their home look magical. To achieve this goal, everyone strives to resort to their talents, thanks to which they create unusually beautiful decor not only for the Christmas tree, but for the entire room interior as a whole. The most popular and widely used materials at hand are not only paper, fabric, plastic, wood, cardboard, foil, beads, satin ribbons, beads, spruce branches, cotton wool, nuts, wire, but also, of course, elastic bands for bracelets, of which wonderful decorations are created, through a certain weaving on a special machine, a fork or by hand, not only for someone’s personal image, but also for the elegance of the home. This type of needlework appeared relatively recently, but due to its simplicity and excellent results of the process, it has won the hearts of many people. If you have never done anything like this, then check out our article in which we will provide you with 5 photos of ideas for cool crafts made from rubber bands for the New Year 2022 with your own hands at home. Here you will find a lot of useful and interesting information and master classes, with the help of which you will significantly expand your own knowledge in this area and acquire mastery skills. By the way, don’t forget to include your children in this activity, because it will be very exciting for them.
To make a bracelet on your fingers you will need:
- about 50 pieces of rubber bands of the same color;
- 1 clip for connecting the bracelet;
- actually, fingers)
How to weave a fishtail bracelet on your fingers?
For your first bracelet, take elastic bands of the same color so as not to get confused and understand the technique. In the future, when you understand the concept of weaving, you will be able to confidently create color compositions and unique models of bracelets and other jewelry.
Take three rubber bands. Place the first one on your index and middle fingers in a figure eight pattern, as shown in the photo.
- Put on the next two rubber bands without twisting them.
- Next, we remove the bottom elastic band from both fingers in turn, taking it by the edges.
- Thus, the bottom elastic band should hang on the other two, forming a kind of loop.
The next step is to put on the fourth elastic band (all elastic bands, except the first, are put on without twisting). Each time, take the bottom elastic band by the edges and pull it through your fingers.
- Repeat these steps until you get a bracelet of the required length.
- To finish the bracelet, secure the ends of the outer elastic bands with a clip.
- To do this, hook the clip onto the last rubber band.
- On the other side, hook it onto a full loop (it was the second one when you started weaving), and cut and remove the first one (which was a “figure eight”).
- A bracelet made of rubber bands, woven on the fingers in a fishtail pattern, is ready!
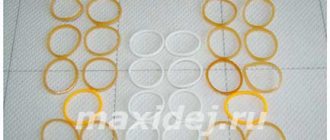
How to weave bracelets from rubber bands on a slingshot
Some Rainbow sets come with a special device for making bracelets - a slingshot. It looks something like this:
You can weave on a slingshot in the same way as weave on your fingers. You will need the same materials: about 25 rubber bands in yellow and 25 in pink (this time try using two contrasting colors to get a nicer bracelet), an S-shaped clip and a slingshot for braiding.
Take a yellow rubber band and put it on the slingshot like a figure eight.
Next, put on the pink rubber band without twisting it. Then the yellow rubber band again.
- Grab the bottom elastic band with your fingers (you can also do this using the hook from the set) and lift it up.
- Do the same on the second side.
- Put on the elastic band in a contrasting color again and repeat the previous steps.
- We continue to weave until we get a bracelet of suitable length.
- Connect the ends of the bracelet using an S-shaped clip, as described in the previous diagram.
How to weave bracelets from rubber bands on a machine?
- Similar bracelets can be woven using a special machine. This machine looks like this:
- The rows of posts are removable and can be repositioned for different weaving techniques.
- To weave a simple bracelet from fishtail elastic bands, you need to do the same steps, but instead of fingers and a slingshot, use the two outer posts from the loom.
This is what it looks like: - And this photo shows ready-made bracelets made of rubber bands, woven according to the above master classes.
Ladder bracelet made of rubber bands
The bracelet according to the Ladder pattern is made on a machine from three different colors of rubber bands. The result is a very original and unusual weaving. Master class with step-by-step photos.
Simple bracelet made of rubber bands
The simplest bracelet made from multi-colored rubber bands can be woven in half a minute! Even the smallest braiders can do this bracelet! Detailed description with photo.
Bracelet made of rubber bands
A very unusual bracelet made of rubber bands, reminiscent of tied shoelaces! This is a great opportunity to show off your skills and stand out from others! Step-by-step master class.
Bracelet as a gift
If you have no experience in weaving elastic bands, then you can use any master class.
Usually, each step is described in detail there, as well as recommendations for obtaining an original item. Since it is customary to give gifts on New Year's holidays, you can make a wonderful bracelet out of them.
To do this you will need:
- pencils;
- hook;
- clasp;
- elastic bands of different colors.
Progress:
- The master class of this DIY craft for the New Year 2022 consists of 2 stages of work. During the first one you need to create a flower. To do this, you need to make 6 petals, which include orange, pink and purple. Weaving should take place according to the “chain” principle. The petals need to be connected to each other, and to do this they should be strung on a red one. The product is secured with a green element.
- The second stage involves making a bracelet. The tourniquet should be created according to the fishtail principle. To do this, put an elastic band twisted in the shape of a figure eight on two pencils. The next two should be put on in the normal position. The first one should be removed and pulled through the subsequent ones. Weaving occurs to the desired length. Then the ends are connected to each other and the clasp is attached. The bracelet and flower must be connected. Having completed the work step by step, you get a wonderful bracelet for a gift.
Master class on making a fishtail bracelet from rubber bands
Red Bird
In addition to the tools created by Chong Chun Ng - a loom, a hook and a slingshot - craftsmen use non-standard things in weaving. So, you can weave:
- On the machine;
- On hook;
- On a slingshot for weaving;
- On fingers;
- On pencils;
- On table forks;
- On the comb;
Using various tools, you can get very beautiful things. For example, the comb weaving technique allows you to make wide bracelets, or create a fabric for large products like a tablet case.
We invite you to weave a small keychain on a hook in the shape of the main character of the cartoon “Angry Birds”. Not only children will appreciate this souvenir; adults will also like it.
To make a keychain you will need:
- Elastic bands in red, black, white and orange colors;
- Hook.
Place a white elastic band twisted in three turns onto the hook. Pull two white elastic bands through the winding. Then repeat the same steps with orange rubber bands. The hook should have two double loops of white and orange.
Pull a double-twisted elastic band through the orange loops. Move one white loop so that it becomes the first one on the hook. Pull two red elastic bands through all the loops. The bird's beak is ready. Add another red pair. Twist the white elastic band four turns onto the hook. In the middle, place a black elastic band, twisted three times. Place the white stitches of the beginning of knitting on the hook and pull a pair of white elastic bands through the outermost (white) loops. Pull two red pairs through the white loops one by one. Insert the hook under the outermost red loops and hang them on the hook. Add two more red rows to the edge. The next two elastic bands need to be pulled through the outer loops and through the loops that form the bird's eye.
Add a red pair to the outer loops. There are four double red loops left on the hook. Carefully remove them from the instrument and insert it on the other side. Repeat weaving, starting with adding an eye. When there are six red double loops left on the hook, slip them onto a pair of red elastic bands. Pull the remaining loops through each other and tie with a knot. Additionally, stretch a black elastic band over the eyes and a red one under them. This will give the bird density. Hide all the knots. The keychain is ready!
If the photo instructions seemed complicated to you, you can watch a video that clearly shows how to make an angry bird.
Snowflake
Snowflake is one of the symbols of the New Year. It is made from various materials, and in each case it turns out original. A snowflake made from rubber bands looks wonderful and quite interesting. The master class for making this craft is perfect for children to make with their own hands.
To do this you will need:
- elastic bands;
- cardboard;
- scissors;
- tapes.
Progress:
- It is better to make the basis for a snowflake from cardboard, but you can use thick paper. It can be of any shape. Then you need to weave a tourniquet from rubber bands with your own hands using the simplest “chain” technique.
- After this, the chain needs to be secured to a cardboard snowflake. You can use thread or glue for this. Beads, beads and sequins are used to decorate the product. A hole should be made for the rope. This craft will look great on the Christmas tree for New Year 2022.
Don’t forget to look at our photo ideas on this topic, and we also have a cool article with many more cool crafts, go see for yourself.
Step-by-step video tutorial on weaving snowflakes
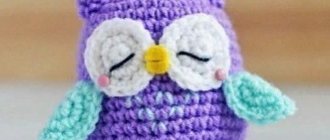
Owl in crochet weaving technique
To weave a three-dimensional figure, such as an owl, you will need to know how to crochet. Otherwise, you will have to study for a long time, watching videos and master classes in Russian, in which weaving lumigurumi from rubber bands is carefully analyzed. For the owl you will need:
- elastic bands of various colors;
- hook, you can even use a crochet hook;
- padding polyester for stuffing.
https://youtube.com/watch?v=WcUYZ3jHj5g
This toy is made very quickly, since it is based on a whole body. It is necessary to prepare all materials in advance so that the weaving process does not take too long. Step-by-step instructions for creating an owl:
- We assemble a ring of 6 rubber bands.
- We double the number of elastic bands by knitting two elastic bands into each loop of the row.
- In this row we add elastic bands according to the ½/1/2 pattern. Here you can change the color.
- We repeat the same steps and get the total number of rubber bands - 24 pieces.
- We also increase the number of elastic bands, adding one every 3 loops.
- We knit the next sixteen rows without adding. Colors can be alternated to make the owl striped. We leave the body blank alone for a while.
- Let's move on to the eyes. We collect six black rubber bands into a ring. In the second row we tie two white loops onto each black one. We do the second eye in the same way.
- For the owl's nose you will need one orange elastic band, which we wrap around the hook three times. We stretch two more elastic bands through the resulting three loops. In the next row, take two more elastic bands and pull them through the loops of the previous row. We finish the beak with one row of two elastic bands.
- Sew the eyes and beak to the body.
- For the wings we weave a standard ring. Next, dilute the weaving with a different color. To do this, we knit two different colored elastic bands into each loop.
- Sew the wings to the body.
- We stuff the body with padding polyester and sew it up with a regular seam, only using elastic bands.
- The easiest way to make owl ears is to stretch three orange elastic bands from the corners of the top of the head, tie them tightly in a knot and cut them. This makes cute ears.
The owl is ready. Try playing with color so that each bird you weave for you and your friends has its own personality.
New Year's garland
If you don’t know how to decorate your home in an original and unusual way on the eve of the upcoming holidays, then make a craft from rubber bands for the New Year 2022 with your own hands in the form of a garland. It will fit perfectly both on the Christmas tree and somewhere on the wall. Better yet, create many similar works and decorate your entire home with them. To help, we invite you to familiarize yourself with the next master class, which contains step-by-step instructions that are easy to understand.
This will require
:
- elastic bands;
- New Year's toys;
- tapes.
Work process:
- The main part of the garland will be a bundle of rubber bands. You can take any weaving, but the “chain” principle is suitable for starting. To create a decoration you need to make a long chain of different colors, you can alternate them.
- After this, you need to tie them with toys, tinsel or handmade products based on the above-mentioned material. Homemade garland is ready! Even just by hanging such a craft around the room for the New Year 2022, you can create a magical atmosphere.
Master class on creating a New Year's garland
Master class lumigurumi toy bunny
A soft and elastic bunny will not only be an excellent gift for a child, but also a good start for learning a new type of needlework.
Getting started is very simple: take a white elastic band and make four turns around the tool. Thread the second elastic band through the one wound around the slingshot (or your other tool), and pull its end onto the hook. Now there are two free loops on the hook, pass any of them through the second. After these steps, the slingshot column should be braided in a circle. To finish weaving, transfer all the loops to the hook, after which you can continue weaving again. Subsequent steps will be described in the video lesson, since the process is long and requires visual understanding.
Video lesson: A beautiful bunny toy made of elastic.
The simplest way to weave a mouse using elastic bands
A similar method may have been encountered by craftswomen who wove these products using thread. The essence remains the same with a small error in the fact that the material is more elastic and is divided into small circles.
The beginning of work on creating a rubber animal will be the ear of the toy. To create it, you just need to wrap the slingshot column four times, and then braid it in the form of a semicircle. Using this method, prepare two ears and set them aside for a while. The body will be a separate part, it is woven in the form of a sock or bag. You can knit it from two halves, as the ear was made before, only there will be a little more additional elastic bands, or you can make a whole bag. In the first case, you will need to fasten the two halves of the body and two ears. For volume, do not forget to stuff the toy with something soft, most often a padding polyester or cotton base is used.
Video lesson: Lumigurumi - bear toy
In the video you can watch in detail a master class on weaving 3D toys. Pamper your child with a toy that you made yourself.
How to knit a horse from Rainbow Loom
For confused children, a craft made from rubber bands can become an excellent and bright keychain, or become a hand-made designer decoration for a pencil case or bag tongue. The lumigurum knitting technique will allow you to make both a flat horse and its alternative three-dimensional model, a 3D toy, from simple material.
When searching for a new master class, you may come across videos where the author speaks an incomprehensible language. If you have already learned the basics and understand the basic principles, then the language will not become a limitation. And for the rest of our readers, we have selected several videos.
Video lesson: Flat horse made from rubber bands
Video lesson: 3D horse lumigurum knitting method
The variety of toys is huge, many of them can be made using machines, slingshots and even on food forks. Most often, crafts are not complicated, but require great attention and patience. In difficult moments, you can use your imagination and create something of your own. Develop yourself, create new products, delight and surprise your friends and loved ones.
Star on the Christmas tree
The instructions will allow you to transform the New Year tree, because with such a craft as a star, it looks much more festive.
To do this you will need:
- elastic bands;
- wire;
- threads
Progress:
- To create a beautiful star for the Christmas tree with your own hands for the New Year 2022, you need to make a wire frame. To do this, you need to bend it and form a star.
- Then you need to weave a long rope of multi-colored elastic bands and secure it to the frame. The result will be a bright homemade star. You will be shown how to make this wonderful craft in the video I posted below.
Master class on making a Christmas star from rubber bands
Volumetric Christmas tree
For a voluminous Christmas tree you will need a lot more rubber bands:
- 230 green;
- 40 brown;
- 12 yellow.
The machine must be installed in such a way that the wide lower part is missing, and the narrow parts are placed along the edges, the middle row is removed, and the holes are placed away from you.
Start weaving with brown elastic bands. Simply throw the next row of brown elastic bands from one pin to another. After this, tie the two rows together. Throw on 4 more circles of brown elastic bands in the usual way and tie them together.
After this, throw one row of green elastic bands in the same way and tie them to the brown ones. Remove the loops from the outer pins onto the next pin of the opposite row.
The star on the Christmas tree is tied on a hook and then tied to the Christmas tree using a green loop. You need to make a knot at the end of the loop.