Weaving clothes from rubber bands is the most common activity for girls. For this, Rainbow Loom elastic bands, popular among young people, are used. The simplicity of weaving, the colorfulness of the material, and the wide availability of the product ensured that weaving clothes for dolls from rubber bands became widely known among teenagers, motivating young designers to create original things and share their achievements with others.
Rainbow Loom elastic band dress
Two Englishwomen, Catherine Burnard and Helen Wright, were very lucky. They became the first wearers of dresses made from Rainbow Loom elastic bands. To create such a masterpiece it took 20,000 Rainbow Loom rubber bands and 48 hours of handmade work. Such painstaking and diligent handwork was worth it! After all, this masterpiece was sold at auction for 300,000 euros.
Architect Margarita Mileva creates unique masterpieces from rubber bands. This dress weighs 10 kg. It’s hard not to call such handmade work a work of art.
Craft options
Professional craftsmen have come up with a large number of ways to make clothes for a doll out of rubber bands. All of them are easy to understand and do not require large time or financial costs. The work process uses a minimum amount of materials that can be easily found in stores in your city. All this allows not only wealthy people to engage in this type of needlework, but also creativity lovers with little financial resources.
Dress for a doll
The basis of any doll's wardrobe is the dress. It makes her more attractive. To work on this garment, you only need a crochet hook and sets of elastic bands in two different colors (green and red). It is important to choose contrasting shades to give the finished dress a more beautiful appearance.
How to make shoes for a Monster High doll
The modern generation of children has their own idols among dolls. In the 80s and 90s, children were fans of Barbie dolls and their various variations, as well as members of her family. Now such heroes are the Monster High dolls. These are popular characters from books and cartoons. Monster High dolls differ from regular Barbies in their unusual appearance. These are multi-colored hair, a disproportionate figure, bright makeup, gothic outfits and paraphernalia. This doll really doesn’t look like a monster, but it looks very bright, original and corresponds to the tastes and preferences of today’s youth.
Doll outfits
To weave from rubber bands, you will need a very small list of tools: the silicone rubber bands themselves, a slingshot for casting on loops, and an ordinary hook for weaving.
All techniques are based on regular crochet weaving methods.
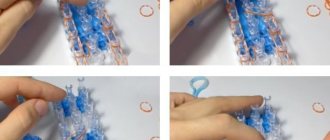
Often creative kits for weaving from rubber bands also come with an additional machine. It is used for more complex work. But there are a lot of simple weaving patterns without a machine, for example, in this video the girl shows a version of a swimsuit woven only on a hook:
A popular hobby is creating a wardrobe for Monster High dolls. The technique for creating a dress with an open back is perfectly demonstrated in the following videos:
Three ways to stretch sandals at home
Please note that all three are only suitable for stretching leather sandals at home. Stretching faux leather sandals requires a different approach
Let's start with the cheapest and simplest. For it, you only need what you already have in the house - warm water and socks:
- Wet your socks and wring them out well. The socks should be wet, but not so wet that they are dripping.
- Wear leather sandals and do something active, like cleaning. You can't sit. Otherwise, within an hour you will develop unpleasant swelling of your feet.
- Walk until your socks are dry or your feet feel freer.
- Take off your shoes and wait for the shoes to dry.
This method of stretching leather sandals at home requires patience and more patience. But it's cheap and simple. If you don’t have the patience and the money for a good stretcher, you can make your life much easier.
Buy Collonil, Salton, Salamander or Tarrago shoe stretching spray or balm at a shoe store. Use as directed, but be sure to wear a pair after applying the stretcher. If you just apply the product to your skin and expect it to stretch on its own, nothing will happen. Put on your shoes and go to the store, for a walk, to the park.
There is another method for stretching leather sandals at home, but it is more suitable for closed-toe shoes. It also helps to break in patent leather sandals and models that are tight in the instep. You will need plastic bags, water and a freezer:
- Fill the bag with water, but do not tie it.
- Place the bag in the shoe so that the water fills the narrow areas that need stretching.
- If there is not enough liquid, add it, and then tie the bag.
- Place the sandals with bags in the freezer and leave for several hours.
- When the water turns into ice, take it out. Let the ice melt a little, after which you can carefully remove the bag from the shoes.
Try on a pair. Still pressing? Try the wet socks option or use a stretching method with a special spray.
How to make original shoes for a doll?
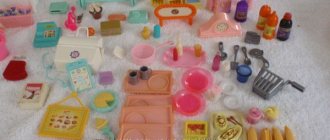
Monster High dolls, like any girls, want to look fashionable and bright not only in their clothes, but also to wear beautiful, interesting high-heeled shoes. There is a huge variety of Monster High dolls out there now, and any parents will find it difficult to purchase additional accessories for the dolls and update their wardrobe. But you can show your imagination and make accessories for the doll with your own hands , thereby diversifying the doll’s wardrobe and saving the parents’ budget. For example, polymer clay makes excellent slippers, stationery, and toiletries for these (and not only these) dolls. Let's look at four simple master classes on making shoes for a Monster High doll. By the way, shoe lasts can also be made from polymer clay.
Preparing to make shoes
By following these instructions, you can easily make shoes for Monster High dolls yourself. Before you start work, you need to prepare all the materials for work and prepare a comfortable workplace. The surface on which work will be carried out must be cleaned of dirt and dust, and all unnecessary objects that may interfere with work must be removed.
Before starting work, you should wash your hands well. You need to prepare napkins or a towel so that your hands always remain clean and dry while working. You should remember safety; when using sharp cutting objects, you need to ask your parents for help, otherwise you can get hurt. When the work area is prepared, you can begin making shoes with your own hands.
Gallery: shoes for the Monster High doll (25 photos)
What do you need for work?
There are many different instructions on the Internet for making your own shoes.
Such instructions may vary in level of complexity, manufacturing technique and materials from which the shoes will be created. Some craftsmen make shoes from silicone with instep supports made from nails and wire (this makes them look like real shoes). Other craftsmen carve shoes from wood. And some can weave them using elastic bands. Modern parents cannot always find the time to create a doll’s wardrobe. And since the main audience of fans are children 8-9 years old, most likely, not every child will be able to carve shoes for Monster High dolls from wood or using a tin can.
Article on the topic: What shoes to wear with coral trousers
“Monster High” dolls Frankie Stein and Draculaura will be happy with shoes that are more simple to make. In order to make such shoes we will need:
- Polymer clay;
- Newsprint, napkins;
- Cardboard.
Gifts, surprises, souvenirs
Crafts for girls can be relevant not only for girls. For example, for his sister’s birthday or for a guest from out of town, a boy can prepare a gift or souvenir with his own hands. It’s good if the donor knows the interests of the recipient well - this will help to choose the topic, form and technique of work.
Having decided on them, it’s easy to find the necessary templates and step-by-step instructions explaining how to make a craft for girls. In any case, the efforts will be appreciated, and the results will be pleasant, whether it be a knitted scarf, a bracelet made of beads and shells, a flower panel or applique, or a homemade doll.
But no matter who the author belongs to, no matter who fills their leisure time with needlework, crafts by girls and for girls are always distinguished by special notes of romanticism and sentimentality, softness and warmth, accuracy and detailed elaboration
Their main feature is attention to detail, their advantage is an aura of tenderness and comfort. Everything that future guardians of the family hearth learn from childhood.
What to remember
When creating any clothes, including clothes for dolls, the first thing you need to do is take measurements from the model and make a pattern. In the case of weaving a dress, you will need the length of the arms and torso (up to the desired length) of the doll. For beginners, it is best to take ready-made patterns and learn to work from them.
The most beautiful versions of dresses are made on the machine. For ease of work, you should remove the central row of columns, since this is where the finished part of the product will go down when weaving. The weaving pattern is as follows: for the first layer, take two elastic bands and throw them on two adjacent posts in a figure eight crosswise, but so that each loop does not intersect each other. This is done around the entire perimeter of the machine.
Then the next row of double elastic bands will come, which will already be thrown in a figure eight onto the intermediate columns. Wherever there are 4 wraps on the posts (two double loops), you need to throw the bottom two inward. At the next level, two elastic bands are put on adjacent columns, but without twisting the figure eight. And again you need to intertwine the rubber bands, where there are 4 of them in columns. And again there is an alternation - the loops are thrown on in a figure of eight.
In this way, you can weave rows ad infinitum, weave in different shades, alternate them until the dress has the desired length. In order for the dress to become narrower towards the top, you should gradually drop the lower rows and gradually move the loops closer to the center.
Do not forget that when stretched on the machine, the product looks much smaller than its actual size. While weaving, it is worth periodically straightening the knitted part and assessing the scale.
wise bird
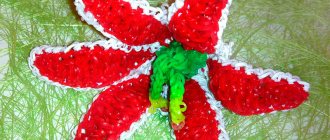
You can also make toys with a slingshot - animals and birds. Let's try to make an owl.
To weave an owl, you need to prepare the following materials and tools:
- slingshot;
- hook;
- colored elastic bands;
- scissors.
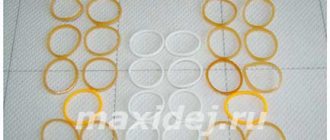
For the body you will need 44 orange rubber bands (primary color), for the abdomen - 8 white rubber bands, for the paws and beak - 4 bright orange or yellow rubber bands and for the eyes - 2 black rubber bands.
The weaving pattern consists of two stages - body and head.
Related article: DIY bows for girls
Weaving the body of an owl:
- Throw an elastic band of the main color in 3 turns over the right horn and put two elastic bands on top of the slingshot;
- Pick up the bottom elastic band in 3 turns and throw it to the middle;
- Transfer the loops from the right horn to the left;
- Wrap the elastic band for the paw 4 turns around the right horn and put 2 elastic bands of the main color on top of the slingshot;
- Pick up the elastic band for the foot and throw it to the center, do the same on the left side and throw on two more elastic bands;
- Place the loops on both sides in the center, place 2 elastic bands on top;
- Repeat step 6 twice;
- Without throwing an elastic band on top, transfer the loops from the left horn to the right;
- Insert the hook into the first elastic band of 3 turns and throw it over the left horn;
- Throw two white elastic bands on top for the abdomen;
- Pick up all the loops from the left horn and throw them to the center;
- Put on 2 white elastic bands and throw the loops of the lower white elastic bands over them;
- Repeat step 12 twice;
- Pick up the white loops from the left horn and transfer them to the right;
- Find the starting loop and repeat step 9;
- Throw on 2 elastic bands of the main color;
- Pick up 3 loops of the initial elastic band from the left horn and throw it to the center;
- Transfer the left loops to the right horn and wind the elastic band for the foot 4 turns;
- Throw two elastic bands of the main color on top and transfer 4 turns of the elastic band from the left horn onto them (it should look like in the photo);
- Throw 2 loops of the main color from the right horn to the center;
- Put on 2 elastic bands of the main color, transfer loops from the right and left horns onto them (repeat 2 times);
- Put 2 elastic bands of the main color on top and alternately throw all the loops on them on the right and left.
We weave an owl's head:
- Put on 2 elastic bands of the main color and transfer the lower loops to the center, and then transfer the loops from the left horn to the right;
Article on the topic: Openwork poncho with knitting needles: diagrams and descriptions for obese women with video
- Wrap the black elastic band around the left horn 4 turns;
- Put 2 elastic bands of the main color on top and transfer all the loops from two horns onto them;
- Repeat the first point;
- Insert the hook into the first loop of the head, pick up 2 yellow elastic bands (for the beak) and pass through the loop, throw the second part of the elastic bands onto the hook;
- Transfer the loops from the hook to the left horn and throw on a pair of elastic bands of the main color;
- Slip the left loops to the center;
- Transfer all the loops from the left horn to the right and repeat steps 5-7, using elastic bands of the main color;
- Wrap a black elastic band around the right horn in 4 turns, put 2 elastic bands of the main color on top;
- Place the loops of the black elastic band and all the loops from the left horn into the center;
- Put on elastic bands of the main color, slip off loops on the right and left;
- Put 1 elastic band on top and throw all the loops from two horns onto it;
- Transfer the left loop to the right horn and tighten;
- To make tassels: insert the hook into the top left loop and pull an elastic band of the main color through it, make a loop (repeat on the right side);
- Trim the elastic bands with scissors to create neat ears.
Other animals using the same principle also work well on a slingshot. Here, for example, is a bunny and a panda: