Crafts made from fluffy wire are gaining more and more popularity. Both adults and children enjoy creating with it. Prussian wire was originally created for cleaning smoking pipes. But it soon became clear that creating little fluffy masterpieces from it was much more interesting. Various colors make it even more attractive. Unlike modeling compounds, wire can be used several times. It comes in different hardness, length, and width of the pile.
We invite you to check out these gorgeous fluffy wire crafts for kids and get inspired to create your own masterpieces. The photos are provided with descriptions of how to make such a craft.
Features of working with fluffy wire
Recommendations when working with fluffy wire:
- before work it is necessary to check the material for integrity;
- during operation, the wire must be bent with smooth movements: chenille is an easily damaged material;
You need to work with chenille or fluffy wire carefully so as not to break it when bending
- Before creating a craft, for safety reasons it is necessary to bend the ends of the wire into loops;
- individual parts can be glued together; regular PVA glue is suitable for this;
- To give the craft the desired shape, it is recommended to use cylindrical objects, such as pencils, during the work process.
Weaving features
Working with wire cannot be called easy, even taking into account the existence of many devices for this type of needlework. To create a simple product, you will need the following tools:
- side cutters;
- thin-nosed pliers and round-nose pliers;
- anvil;
- device for winding springs;
- small hammer;
- Wig Jig (plate with holes and attachments).
All of these items require utmost care and skill to use.
Wire crafts for children are simpler, but the result is less fascinating. Wire can be used to make jewelry and various interior decorations, such as trees. Homemade baskets in which you can put fruits or sweets look original.
Selling most products requires experience and constant honing of skills. There is no point in trying to do something complicated the first time: the result may not please you.
It is recommended to start with light products in order to gain experience and not destroy your motivation.
Wire is very popular among craftswomen because it allows you to create a wide variety of objects with different purposes.
Fluffy wire daisy
To create one chamomile flower you will need:
- chenille wire of 3 colors: white, yellow, green;
- scissors;
- glue.
Crafts from fluffy wire: master class on making chamomile
Making a flower:
- The white wire is bent in a zigzag pattern along its entire length, forming petals. As you work, it is important to ensure that the petals are the same size.
- Close the wire into a circle (there should be a small hole in the middle), twist the ends together, and form a flower.
- Cut 1/3 of the yellow wire, twist one end into a flat spiral, the other should remain straight.
- Wind the straight end of the yellow piece onto the green wire.
- Pull the formed white element through the lower end of the stem to the yellow element.
- Glue the yellow and white elements together in the inner area.
- Form a plant leaf from green wire as follows: twist a piece of working material in a zigzag manner, with the middle loop being larger than the rest, and connect the ends of the wire.
- Glue the leaf to the stem.
Original cup for pens
This model demonstrates an example of the combined use of materials: beads and wire. Step-by-step instructions for creating crafts:
- Prepare an ordinary paper or plastic cup.
- Make a small hole in the bottom into which to thread the tip of the wire.
- Start wrapping the cup around the outer surface with wire.
- After the first three or four turns, they begin to thread the beads onto the wire.
The actions performed - decorating with beads and winding wire on the base - are carried out alternately to the upper edge of the cup.
Soft wire crowns
| Type of decoration | Materials and tools for manufacturing | Mounting accessories |
| Small crown | Several pieces of silver chenille wire, scissors | Elastic bands, barrettes or hair clips |
| Big crown | Soft wire with multi-colored shiny pile, scissors, glue | Not required |
| Crown on the rim | White or silver fluffy wire, scissors, rhinestones or beads | Headband |
Crafts from fluffy wire in the form of crowns are made in several ways.
Method 1. Making a small crown:
- Twist one fluffy wire into a ring, which will be the base.
- From the following 5 equal pieces of wire, the upper part of the crown is formed: each piece of material is bent in half and screwed to the base of the crown (the ends should be a few cm from each other), and loops are formed on the bends.
- For better fixation in the lower part, wrap the rays of the crown several times with chenille wire of the same color.
Method 2. Making a large crown:
- Twist 2 wires together. Form a ring based on the circumference of your head.
- Also connect the next 2 wires of a different color. Bend in a zigzag and attach to the base with glue.
Crafts made from fluffy wire: step-by-step making of a large crown
- Tighten the upper part of the craft with a ring made of the main working material to secure the craft.
Method 3. Making a crown on a bezel:
- Wrap the visible central part of the rim with artistic wire.
- The main and largest figure of the decoration in the form of a star or triangle is created in the center.
- Smaller elements in the form of curls or geometric shapes will be located symmetrically relative to the central figure.
- Decorate the crown elements with beads and rhinestones.
Jewelry for fashionistas
Brass wire is very widely used to create beautiful hairpins, elastic bands, rings, bracelets, earrings, and brooches. Decorative stones, beads, and seed beads are used as auxiliary materials.
To work, you will also need accessories, which can be purchased at a number of specialized stores, and a small set of tools (nippers, pliers).
Instructions on how to make an original brass wire necklace with your own hands:
The first task of the master is to select the necessary weaving pattern. The necklace consists of alternating elements: metal rings and beads of any chosen color. In the middle of such an accessory there is a weaving in the shape of a butterfly (at the request of the master it can be an asterisk, a snowflake or any other shape).
The wire rings are rolled using pliers, which allow you to create very smooth edges and bends.
Connecting small parts together is a rather painstaking task, requiring perseverance and maximum concentration of attention from the needlewoman.
Weaving the central figure is done according to the general pattern, using pushpins and pliers. The final stage of work is to attach the fittings.
Bunny
To make a bunny craft made from fluffy wire you will need:
- chenille wire of the same color - 2 stripes;
- 2 pom-poms to form the nose and tail;
- glue;
- cylindrical pencil;
- plastic eyes.
Making crafts:
- Wrap the first strip of working material around a pencil, forming a spiral.
- Bend the second wire in half. Then bend the edges down so that 2 equal semi-ovals (animal ears) are formed in the upper part.
- Connect the ends of the second workpiece, put an element in the form of a spiral on them (the part should cover the bend point of the second wire). The lower ends of the second element should remain outside.
- Form loops from the protruding ends of the second part. In relation to the first element, bend at an angle of 90°.
- Glue the eyes to the top turn of the spiral of the first part.
- Form a nose from a pompom and glue it in the central area immediately under the eyes.
- At the back, to the lower part of the animal’s body, glue another pompom, forming a tail. The craft is ready!
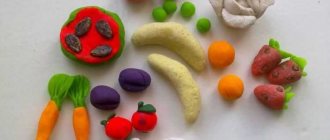
Rabbit with carrot
Here is an example of creating a simple wire figure step by step. For a fluffy rabbit you will need two pieces of gimp, eyes and a nose:
- In the middle of the first segment we form two loops. These will be the ears. Leave two ends free.
- We wrap the second part in a spiral around a pencil or just around a finger. The result is a torso.
- We pass the ends of the ears through the hole of the spiral.
- We bend the end of the spiral into a small loop - a tail.
- We bend the free ends into loops and place them perpendicular to the body.
- The result is a bunny sitting on its paws. All that remains is to glue on the eyes and nose.
- Our bunny is ready.
All he needs is a carrot. We'll do this now.
For the carrots you will need orange and green craft wire. We twist the orange one into a cone shape. We bend the green one several times and insert the tail into the carrot.
Spider
To make a spider from chenille wire, you will need the following materials and tools:
- 2 pcs. fluffy wire of the same color;
- 2 small pom-poms matching the wire;
- glue;
- scissors;
- plastic eyes;
- colored beads (the size of the hole should correspond to the diameter of the wire).
Work process:
- Both pieces of wire are folded together and cut in half.
- The 4 resulting segments are twisted together in the middle. The ends of the wire will be the legs of the spider, they are placed symmetrically.
- String 3-4 beads on each foot. Bend the end and give each paw a semicircle shape.
- Glue the pompoms together, the resulting figure will represent the head and body of the spider.
- Glue the head and torso to the center of the first element. Glue the eyes to the head.
Wrist bracelet
An original decoration for a girl consists of large braided wire - an aluminum or fluffy model. On the outside there is a large decorative metal-cut stone.
Wire weaving is done according to the following scheme:
Three strong metal strings (elastic) are used as the basis. One of them is bent in an arc, the remaining two are twisted into a ring at the ends (the shapes should not be large so as not to interfere with the girl when wearing the product).
The next step is to assemble the bracelet: two short pieces of wire are screwed to the main string with intermediate turns of large wire.
The turns should be frequent enough to create the effect of a relief surface.
The characteristic arrangement of the three components of the bracelet: the middle of the central string remains free, since it is on it that a stone or other decoration is glued.
It is important to first take measurements of the wrist of the future owner of the bracelet in order to model the product according to size.
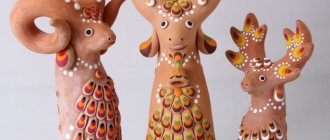
Owl
To make an owl craft from soft wire with pile you will need:
- chenille wire in 3 colors: dark brown, light brown and orange;
- scissors;
- cylindrical pencil;
- glue;
- plastic eyes.
Procedure:
- Prepare 3 equal pieces (about 5 cm long) of light brown wire.
- Wind a 30-centimeter piece of the darkest wire onto a pencil and remove it. Retreat 2 top turns. Between the 2nd and 3rd turns, stretch the spiral a little. Insert pieces of light-colored wire, bend the upper and lower ends inside the spiral.
- From a strip of dark-colored base material, form the ears and wings of a bird according to the following scheme: bend the wire in half, bend the ends down (the shape should resemble the letter M), place the element inside the spiral so that the bird’s ears are in the upper part of the workpiece, free sections at this is passed into the widened gap between the 2nd and 3rd turns of the spiral on the sides, forming wings.
- Use orange wire to form the beak and legs of the bird. Secure the beak under the 2nd turn of the spiral element. Attach the paws to the bottom of the craft.
- Glue the eyes; they should be located on the top 2 turns of the spiral part.
Fluffy sticks
Chenille wire looks like a bottle brush. It is indeed a relative of the kitchen brush and the tool used by chimney sweeps.
It was invented and originally used to clean smoking pipes and mouthpieces. But someone came up with the idea of twisting various funny figures from a pliable material that holds its shape well.
The applied tool became decorative wire for crafts. It was appreciated by children and parents. Now you can quickly build any toy, from idea to implementation in a few steps.
Usually in craft stores you can find wire wrapped in lint, 4-5 mm thick. It is easier to bend and twist, it is not so fragile and does not break easily.
For convenience, it is sold already cut into pieces 20-30 cm long and comes in different colors. Packages are formed from one or a set of several colors, 50-70 or more pieces per pack. On the Internet you can order a large set of up to several hundred fluffy sticks of various colors.
Squirrel made from nuts and wire
Crafts made from fluffy wire can be made using other materials, such as nuts.
So, to make a squirrel you will need:
- hazelnuts;
- dark brown fluffy wire;
- glue;
- scissors;
- dark brown or black felt-tip pen.
Manufacturing procedure:
- Glue the hazelnuts together.
- Bend the chenille wire in half so that a semi-oval is formed at the bend. Bend the ends of the workpiece at a right angle.
- Lubricate the hazelnut blank with glue at the bottom and back, and glue it to the wire element. The semi-oval should be located on top.
- From the second piece of fluffy wire, cut 4 pieces about 2 cm long. Glue the first 2 pieces on each side of the junction of the nuts. Bend the second 2 pieces into a semicircle and glue them to the top nut, forming the animal’s ears.
- Using a felt-tip pen, draw the eyes, mouth and nose of the animal.
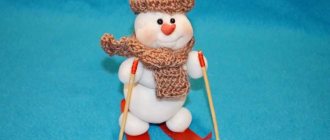
New Year's toy for the tree
Wire crafts for the New Year will perfectly highlight the festive interior of your apartment. The models for the master to choose from can be very diverse:
- Copper star: flat and volumetric model.
- Christmas tree decorations made of twisted wire.
- New Year's candlesticks on the festive table.
To work, you will need to prepare a ready-made scheme for work, a creative approach and a festive mood.
Ladybug
In order to make a ladybug from fluffy wire, you need to prepare:
- chenille wire in black and red colors;
- glue;
- scissors.
Description of work:
- The end of the black chenille wire is twisted into a tight flat spiral (no more than 3 turns) to form the insect's head.
- The remaining piece of working material is visually divided in half. On each of the resulting halves, 2 folds are formed, each of which will be the legs of an insect.
- The unused end of the wire is fixed from the inside.
- A 30 cm long piece of red chenille wire is twisted tightly into a flat spiral. The central part of the resulting circle is raised from the inside.
- Glue the red part to the black piece.
- Cut a small piece of black chenille wire equal to the diameter of the red element. Glue it to the red element on top, dividing the circle into 2 equal parts (insect wings).
- Cut several small pieces of black wire and stick them on the wings of the insect.
Master classes on making crafts
You need to start by choosing a model. Modern needlewomen have access to a huge range of products made from various materials.
Detailed instructions and video tutorials are also a nice bonus for beginners. Original models for work:
- Brooch made of copper wire for a backpack.
- Bracelet on the wrist.
- Cup for pens for schoolchildren.
- New Year's toy for the Christmas tree.
For each model presented, you should prepare a photo, a diagram for work, and the necessary materials. You can also do a few practice sessions on weaving wire jewelry to develop practical skills.
Octopus
In order to make an octopus craft from fluffy wire, you need the following tools and materials:
- fluffy wire of 2 matching colors;
- small foam ball;
- stationery erasers;
- cylindrical pencil;
- scissors;
- glue;
- plastic eyes.
Step-by-step production of crafts:
- Select 8 pieces of chenille wire of each color. The length of all segments must be the same.
- Lay out the pieces of wire in front of you, alternating colors. Secure on top with a rubber band.
- Place a foam ball inside the workpiece, cover it tightly with wire, and tie it at the bottom with an elastic band.
- Twist the pieces of wire in pairs to form octopus tentacles.
- Screw each octopus limb onto a pencil, giving it a spiral shape.
- Finally, glue on the eyes.
General description of the material
This may be news to you, but chenille wire was not produced for creative work at all.
These fluffy, flexible sticks were originally designed to clean mouthpieces. Thanks to the imagination and imagination of craftswomen, this material is widely used for the manufacture of costume jewelry, decorations, decorative elements for the interior, children's crafts, and so on.
Puppet doll
To make an ostrich puppet from fluffy wire, you will need:
- chenille wire;
- pom-poms;
- 2 cylindrical pencils;
- feathers for crafts;
- scissors;
- sewing threads;
- beads;
- plastic eyes;
- glue.
Manufacturing process:
- Wind one piece of fluffy wire onto a pencil and remove the resulting spiral. Apply glue to one end and glue a pompom, which will be the bird's head. Glue the eyes to the top of the pompom.
- Cut half of the second piece of fluffy wire and twist it into a flat spiral. Form a triangle (bird's beak) from the resulting circle and glue it to the pompom. Glue feathers to the back of the head.
- Glue another pompom to the other end of the spiral-twisted wire, which will be the body of the bird.
- Wind 2 identical pieces of chenille wire onto a pencil, remove them, and glue them to the bottom of the second pom-pom (the lower limbs of the bird). String beads onto the lower ends and bend the ends of the wire.
- Twist 2 small pieces of fluffy wire in a circle (bird wings), glue them to the sides of the bird’s body along with the feathers.
- Form a tail from feathers and glue to the back of the body.
- Tie the ends of 2 sewing threads at least 20 cm long to the ends of a pencil. Next, glue the end of one thread to the back of the head, the second to the back of the body. The marionette doll is ready!
Carnival mask decorated with chenille wire
To make a carnival mask decorated with chenille wire, you will need:
- fluffy wire of 2 colors;
- carnival mask made of thick paper;
- glue;
- scissors.
Manufacturing process:
- Between two wires of the same color, place a wire of a different color, make 2 similar blanks and place them opposite each other.
- Stepping back a few cm from the end, form a loop on the left piece, which should be on top of the right piece. Then the bottom of the right bundle of chenille wire is placed over the bottom of the left bundle, then passes under the top of the left bundle of wire.
- It is placed on top of the loop turns, but passes under the top of the right bundle of wire, which was originally under the loop. Carefully tighten the knot. It is recommended to make a knot in the middle of the wire pieces.
- Turn the workpiece towards you so that the free ends of the wire are located on the sides, and the knot is shaped like the number 8. The knot will be located on the bridge of the nose. The free ends are bent into ovals. When making decor from wire for a mask, you need to check the wire blank with the template.
- Twist the ends of the wires of each bundle together. Connect the ends of the wire of the upper and lower bundles.
- Cut 4 small pieces of chenille wire in 2 colors, bend each piece in half. At the central point, twist with the ends of the wires along the edges of the workpiece. Direct the decorative elements upward and bend the ends.
- Apply glue to the inside of the chenille wire piece. Place on top of the carnival mask template.
Execution technique
To make a wire bracelet with your own hands, you must first decide on the weaving technique, because the result will depend on it. After which you need to draw up a step-by-step action plan, select the decor, and then start weaving.
Let's take a closer look at the different methods and features of their implementation.
- Weaving. A braid is made from several pieces of wire, which will eventually need to be flattened to create a more stylish effect, as well as for better fixation.
- To make a braid, you need to take several thick wire elements and thin wire. Depending on your preferences, you can wrap thin wire around thick parts, connecting them together and forming an original pattern.
- Bending and forging are ideal for creating openwork elements. Thick wire is bent to form the desired pattern, then flattened with a hammer, thereby fixing the bends and intersections of the parts.
- Decoration - thanks to this technique, beads, seed beads and other decoration elements can be woven into wire patterns.
- Often, bracelets are made from individual links connected to each other.
To better understand the technology for making wire bracelets, let's look at step-by-step examples using simple options.
Minimalistic bracelet without clasp
To make this product, you need to measure a piece of wire according to the volume of your wrist, as well as pieces to create a decorative element.
The main decor consists of spiral-shaped details at the ends of the bracelet, which are made using bending and forging, and metal beads are attached to the product using braiding technology.
Bracelet with original clasp
To make this product, you will need a piece of thick wire corresponding to the circumference of your wrist, a thinner wire with a reserve, pliers and a hammer.
The surface of the bracelet itself is made using the braiding technique, and both ends are bent into loops that will serve to attach the clasp. The end of a piece of thinner wire must be threaded into one of the resulting loops, after which the piece is twisted into a spiral at one end and into a hook at the other. We fix everything with a hammer. The resulting hook and free loop form a clasp.
New Year's crafts made from chenille wire
New Year themed crafts made from fluffy wire: snowflake, star, Christmas tree.
In order to make a snowflake craft from chenille wire, you must first create a life-size sketch of the future craft. The snowflake craft should consist of 6 identical elements arranged in a circle. In some cases, each element is created separately, then all the parts are attached to a central circle of small diameter.
Another option for creating a snowflake: from 3 pieces of chenille wire of the same length, a circle is formed, where the intersection point of all 3 parts is the central point of the circle; each of the 6 rays of the snowflake is decorated using small pieces of wire; To fix the craft, a common circular piece is glued to the rays of the snowflakes.
To make a star from fluffy wire, you must first make a life-size sketch of the craft. The work begins with creating a ring of fluffy wire, from which the rays of the craft will diverge. Next, the working material is bent according to the contours of the sketch.
At the points of contact with the base ring, the wire of the rays wraps around the wire of the ring. It is recommended to tighten the base ring inside with several diametrical pieces of wire to secure the craft.
To make a Christmas tree from fluffy wire, you will need:
- green chenille wire;
- glue;
- scissors;
- wooden skewer;
- beads of different sizes.
Procedure for creating crafts:
- Cut 3 pieces of fluffy wire, each 10 cm long. Attach 2 small pieces of wire to each end to imitate a coniferous plant. Glue all 3 pieces of wire together to form a snowflake.
- Place the first tier of tree branches on a skewer.
- The next tiers of plant branches are made in a similar way, only the diameter after each level must be reduced.
- Carefully straighten the craft. Attach the largest bead to the top of the tree. Glue the remaining beads to the tree branches.
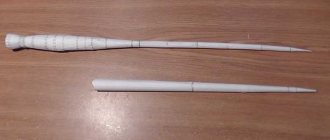
How to bend and join wire
You can make many different objects from wire - from the simplest hook to the most complex designs. Copper, iron, steel, aluminum wire and telephone cable with coatings of different colors are suitable. The wire is stored wound in circles. Tools required: hammer, small vice, file, pliers, wire cutters, pliers, pliers, round nose pliers, plumber's scissors, soldering iron.
The wire is straightened by pulling it between two pieces of wood or by pulling it tightly around a round metal rod (doorknob). It is better to straighten steel wire or thin rod metal on a hard surface with a hammer or mallet. Small parts are bent with pliers or round nose pliers. Large and hard ones are bent in a vice.
Iron and copper thin wire is cut with wire cutters and pliers. Steel - at the site of the cut, it is preheated over a fire. Strip or sheet metal is first marked, and then at the marking points it is lightly scored and chopped with strong blows. Individual pieces of wire and other metal parts are joined by bending or soldering. In the first case, several turns are made, pulling the wire onto the rod. Before soldering, the surface of the parts is thoroughly cleaned with a file or sandpaper to remove dirt and rust. The wire is soldered by putting the two ends together, having first twisted them for strength. Thin wire can be soldered using paste - tinol, which is applied in a thin layer to the soldering site and heated over a fire.
To learn how to make things from wire well and cleanly, you must first make a number of simple parts:
- Spiral spring. A wire 1-1.5 millimeters thick is wound onto a round wooden bolsan of cylindrical or cone shape (Figure 1, a).
- Rings and half rings. The spiral-spring is cut lengthwise (Figure 1, b).
- Flower. Six half rings are soldered to the ring (Figure 1, c).
- Gear. Six half rings are soldered together [Figure 1, d).
- Spiral. Use pliers to grab the end of the wire and twist it in a circle by rotating your hand (Figure 1, e).
- Openwork of three spirals (Figure 1, f).
- Openwork leaf. 4 - 5 rings are made on a cone-shaped blank (wire thickness - 0.5 - 1 millimeter). The resulting rings are given the shape shown in Figure 1g and soldered at the base.
- The trefoil is bent from one wire with pliers (Figure 1, h).
- Wave (Figure 1, i).
Star and ornamental stripe. Mark a pattern on a board of small thickness and drive in nails without heads:
Net:
Flower girl. A bracket with a spiral end is bent from a two-millimeter wire. Separately roll up the ring and fasten it, intercepting the sides. At the top, the spirals are connected by three turns of wire (Figure 4).
Furniture. Made from one and a half to two millimeter wire. Its parts are fastened together with coils. Fine-layer plywood or cardboard can serve as a seat and table top. For fastening, small holes are made in the plywood with an awl (Figure 5).
Puzzle. You should separate its parts so as not to bend the wire anywhere or compress it (Figure 6).
Horse. From two pieces of wire 2.5 - 3 millimeters thick, bend the legs and two lower spirals. From the third piece they make the head, neck and upper spiral. From the fourth - a mane that turns on the back into coils holding pieces of wire together. The mane is soldered in several places (Figure 8).
Heron. It is made from one piece of wire (cross-section - 3 millimeters) with spiral rings for a decorative vase (Figure 9).
I. Lyamin, magazine “Family and School”, 1971
Easter crafts made from chenille wire
The following crafts can be made from fluffy wire for Easter: a basket with a chicken, an Easter egg, an Easter bunny.
All parts of the Easter basket are made separately and then fastened together. First, you need to twist a small piece of yellow chenille wire into a flat spiral (this is how the chicken’s head is formed) and glue the spiral in a vertical position to the pom-pom (chick’s body).
Twist a small piece of yellow wire to form the number 3, bend it in half, and glue it to the pompom (chicken wings). Wrap a small cup tightly horizontally with chenille wire. Twist 3 chenille wires into a bundle, attach the ends of the bundle to the basket. Place Easter eggs and a chicken figure in the basket. The craft is ready.
To make an Easter egg you will need: a plastic dummy egg, chenille wire, scissors and glue. The dummy egg is opened and the lower half is first wrapped with wire. The winding rows should be horizontal and close to each other.
Before work, the plastic mold must be lubricated with glue. When the lower part of the craft is finished, connect the halves of the plastic blank and continue wrapping it with wire. The finished craft can be decorated as you wish.
To make an Easter bunny from fluffy wire and pompoms, you first need to glue 2 pompoms, the third smaller pompom is glued to the bottom pom-pom (animal's tail).
4 semi-ovals are formed from fluffy wire, 2 of which will represent the ears of the animal, and the remaining 2 will be the lower limbs of the rabbit. Glue the blanks to the animal figure. For the mouth, nose and eyes, use small pieces of chenille wire.
Fluffy wire is a material for limitless imagination. Crafts made from such material are not only beautiful and easy to make, but also help develop fine motor skills, which is important for the development of children of any age.
Author: Doroshenko E. N.
Article design: Natalie Podolskaya
Amazing formations
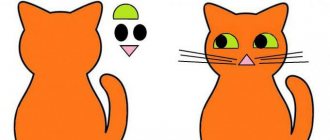
You can also learn to make other crafts from this material in kindergarten. A butterfly, for example. They do it like this. Since the wire is fluffy and a little like an elastic band, we need to take advantage of this property.
A pleasant color of the material is chosen. First, the body of a butterfly is molded from this texture. And only then are wings added to it. Eyes can be made from buttons or beads.
A furry black spider can be made with orange legs. The legs should be positioned symmetrically, 4 pieces on each side, bent, as if the spider had stopped moving for a moment.
A recess must be made between the main body and the head of the spider so that there is a difference: where is the head and where is the belly of the spider.
We recommend reading:
- Crafts from isolon - a manufacturing master class, nuances of working with the material and step-by-step instructions on how to make a craft (85 photos)
- Crafts from saw cuts: stylish and beautiful options for decorating the garden and interior with your own hands (130 photos)
- Crafts from toothpicks - interesting ideas, manufacturing examples and the best crafts for children (120 photos)