I love beer, I love wood, I love being outdoors, so I decided to make myself a souvenir: a good old Viking style 'beer mug'. Completely by hand, just like in the old days.
The goal was to not use a single power tool. It took a lot longer than with the 'proper' tools, but it turned into one of the most fun projects I've ever done.
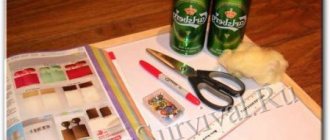
Put away your drawers of classic hand tools because you won't need them this time. All you need is a good ax and a good knife.
Basis for assembling bars
As you noticed, nothing was said above about the length of the pieces of wood from which the mug will be assembled. And all because you define it yourself. On average, the height of the product can be 15 cm, but this figure can be easily modified. We cut all the prepared bars to the same length (having previously estimated how many of them you will need for the selected width of one of them).
The next important step is to chamfer each beam at an angle of 12 degrees (if the width was 2.5). In cross-section, your bars should look like trapezoids - this is exactly what is necessary for them to collectively gather into a single rounded system.
Preparation of wood species, cutting boards into blanks
First, the board needs to be dissolved into slats from which the mug will be assembled. This can be done using a stationary circular saw or a hand saw with a ruler. The thickness of the slats must be at least 1.5 cm. Otherwise, there will be difficulties with fastening the handle.
Any lath is carefully processed using an electronic planer. But here you can completely use ordinary manual ones.
The slats should be very smooth PHOTO: youtube.com
Next, any rail is aligned in width. By the way, when working with machines, do not forget about safety precautions. Violations can lead to serious injuries, sometimes even life-threatening.
The slats need to be aligned not only in thickness, but also in width PHOTO: youtube.com
When long slats are processed, they need to be cut into pieces of suitable length. The result should be wood blocks with dimensions of 15x30x180 mm. The upcoming work will be done with them. In order for them to be tightly connected, you will have to use a milling machine, with the help of which one of the edges of each block will become convex, and the other will become sunken.
The blocks are ready, you can start working with a router PHOTO: youtube.com
Part processing
The setting provided in the program marks the wooden block in yellow. Dimensions for a standard stock were made using a caliper, modeled as a block, and selected from the setup menu. This is necessary to orient the mug diagonally.
The first step removes most of the material from the top edge. The second step is needed to further remove the wood from above in order to prepare for the tool to continue the process. The third step creates a rounded bowl pocket for the stainless steel insert. The finish on this pocket ends up looking like a 3D print.
The fourth step outlines the contours of the bowl in 1mm increments, creating a surface that can be easily sanded. Finally, in the final step, the tool cuts out the last 10mm of thickness and leaves small protrusions to prevent the mug from moving on the final pass.
It is imperative to simulate the trajectory of the tool and monitor the appearance of the red indicator, indicating a breakdown of the machine.
Meet Chuck Dowler
Although Chuck's main passion is turning, he also has a saw in his shop that doubles as a stand for his coffee maker! Chuck enjoys sharpening not only bowls, but also vases, stemmed glasses, Easter eggs and egg holders. He also teaches woodturning to students at the local Woodworking Association in his home workshop.
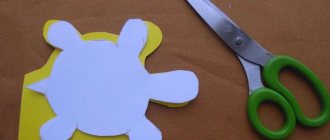
Sketches and patterns for geometric wood carvings
Discussion: 6 comments
- Konstantin:
08/12/2012 at 6:19 pmGood article, inspiring, I’ll definitely make a mug like this, or maybe a set, of course, if I decide to write an article, there will definitely be a link, thank you.
Answer
- Natalia:
09/24/2012 at 10:35 am
The mug looks great, I even wanted to make it myself, but probably it’s only for cool drinks? Or is there a way to connect the parts so that you can pour a hot cup of tea?
Answer
admin:
09/25/2012 at 7:59 am
If the connections are made well, you can pour it hot.
Answer
12/30/2012 at 12:29 pm
And yet this is only suitable for a decorative mug... Apparently, it will be problematic to use it for its intended purpose. Still, synthetic glue... We made a link to your resource: https://tehnologiya-ipk.ucoz.ru/load/drugoe/kruzhka_iz_dereva/545-1-0-4111 Thank you.
Answer
01/26/2014 at 8:32 am
Skewed joints? Glued handle? R'u' serious? Yes, even as a decorative piece, it will fall apart as soon as the wood begins to dry out. And the faster it will fall apart after the first use, when it begins to swell. Impregnation with oil will further contribute to this - PVA is water-based, and oil is hydrophobic. Wooden mugs use raised joints and the handle is attached to a metal rim.
Answer
04/24/2014 at 9:23 pm
With the assumption that there are 12 rivets. The angle on each side of the riveting (bevel) should be 15 degrees. And the riveting thickness of 30 mm is too much, even too much! Difficulty drinking liquids. I have a stave thickness of 8-9 mm and a length of 175 mm, which yields 1 liter. liquids. True, I do not assemble with glue, but adjust each rivet one to the other and tighten the stainless steel. hoops. The hoop has rivets, the rivets are hidden under the handle. A hole is made in the handle and also attached with rivets through the corner. In the morning I insert the bottom and stuff the hoop tightly, attaching the handle. It turns out to be a very strong product. The same goes for tubs and jugs and tubs, and most importantly, no chemicals - a natural product. Thank you anyway, I copied the handle on the mug from you last year (I really liked it) when I took up cooperage)
Answer
Unusual flying cups
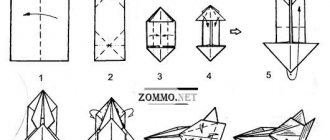
Instead of a flying cup, you can make a flying teapot. This composition will look very original on your kitchen table. When performing such a craft, it is better to choose a teapot of small size and weight so as not to overload the structure. It is better to make a “stream” from a teapot from thin, strong wire (for example, knitting needles) and superplastic.
Hanging flying cups with flowers can become an original decoration! The main thing is to securely fasten them.
A floating cup can be imagined as a mountain waterfall. Moss made from natural sponge or sisal, pebbles and a bear will complete this mountain landscape in miniature)
With the help of LEDs, the bowl can be used as a lamp
Happy creativity and inspiration! Author of the article: Tatyana Babikova
SHARE! "Cross" will not give bad advice!