Washing machines, also known as “washing machines,” are an integral attribute of any comfortable home, because they make life much easier, eliminating the need for heavy hand washing.
Over time, these assistants break down or become outdated, after which the question of their further disposal arises.
Selling scrap metal will bring pennies, but washing machines have a huge potential for turning into other items or tools that are in demand in the household, and all this can be done independently, using a minimal set of tools.
Circular saw from an engine from an automatic washing machine
The author used a 430-watt motor from an automatic washing machine as a power unit. The selected engine produces as much as 15,000 revolutions per minute, at such speeds the saw has monstrous performance, but this is unsafe and unnecessary, so in the future the author plans to reduce the speed by installing a resistor or something similar. The machine is assembled simply and quickly, the author had a table already ready, he used an antique foot-operated sewing machine. So, let's look in more detail at how to assemble such a machine!
Materials and tools used by the author:
List of materials:
— motor from a washing machine; - metal table (from an old sewing machine); — corners, channels, etc. (for making a frame for the engine); - switch and wiring; — a circular saw blade (the author has it attached to a bolt); — drill chuck (installed on the motor shaft); — nuts, bolts; - plywood.
List of tools:
- Bulgarian; - welding machine; - drill; - wrenches, etc.
Manufacturing process of a circular saw:
Step one. Preparing the basis
As a basis, the author used a metal table, which in ancient times was part of a foot-operated sewing machine. You can assemble such a table from scratch using a corner, pipes or something similar. We weld two corners or channels to which we will then screw the engine.
Step three. Final revision
To finish, we will screw protective plywood plates over the engine to prevent chips from falling on it. We cut out the parts from plywood and fasten them with self-tapping screws. That's all, the machine is ready, let's move on to testing! During testing, it turned out that the speed was too high, causing the table to move around the garage. The power of such an engine turned out to be more than enough. In the future, the author plans to modernize the machine - make the speed lower.
In general, the homemade product turned out to be successful and viable. I hope you liked the project and found useful information for yourself. Don't forget to share your homemade products and experiences with us!
Source
Lawnmower
It will come in handy in gardens or summer cottages.
Lawnmower
The manufacturing process is as follows:
- First you need to find the wheels from the cart.
- After this, a metal platform is installed. It is made from a corner of a square profile. A special frame can be made from it, after which the racks should be welded to it.
- For the handle, take a small diameter pipe. The handle is welded to the frame using gas welding.
- Next, a hole is prepared in the platform.
Do you turn off the water tap after washing?Oh yes! No.
- There is a grille in the front part. It is bolted on.
- The engine is attached to the platform so that the shaft fits into the hole. Knives are attached to the end of the shaft by welding.
- To protect the engine from grass, it is covered with a casing. Several small holes should be made in it.
- At the end of the process, the power supply cable is connected.
How to make a circular saw with your own hands from a washing machine engine?
A circular saw is always useful on the farm: at the dacha or in a private house. But not everyone can afford a good expensive tool, and a cheap analogue quickly breaks down. The way out of the situation is to make a circular saw with your own hands. For example, you can make it from an engine from an old automatic washing machine, which is a shame to throw away and takes up space. This homemade tool can handle boards up to 5 centimeters thick. The advantage of this design is its weight, which is about 20 kilograms. The saw turns out to be mobile and you can take it with you in your car.
Brazier
The body of the washing drum, made of durable and high-quality stainless steel, can withstand very high temperatures. Therefore, it can be used as a barbecue.
A few pipes, half an hour of welding and a convenient barbecue grill will appear on your estate. By making the supporting part of the structure collapsible, you can take it with you on country picnics.
Drums from front-loading machines, as well as from top-loading washing machines, are suitable for making barbecues. In this case, you will have to cut off one of the sides of the body with a grinder, and provide it with a stable support from below.
Speed regulation
During the operation of the tool, it becomes necessary to work with materials of different sizes, so you need to be able to adjust the speed up or down. To do this, you can use a dimmer or trigger from a hand-held electrical appliance, because they allow you to regulate the voltage supply and, accordingly, the speed of rotation of the disk. We connect one of the coil terminals to the armature terminal, and connect the second one to power supply from the network. We connect the second armature output through a dimmer in the same way. We check the scheme and launch it.
A more complex way to regulate speed is to use a tachometer. Using it, you can regulate the rotation speed without losing engine power. Attention, you need to connect the tachometer using a microcircuit. It equalizes power when the load on the shaft increases. You can buy the required microcircuit or make it yourself. The TDA 1085 board diagram will help with this. The list of necessary parts is extensive, but with the list at hand, it can be easily assembled in specialized stores.
Wood lathe
Lathe
Step-by-step instruction:
- To firmly fix the engine on the workbench, you will need to make fasteners from special corners. To solve this problem, special holes are drilled.
- To fix the wooden part, you need a flange. It will be fixed to the motor shaft. You will also need special studs, which are made from simple bolts with cut off heads. Several pieces are screwed into the base.
- The motor is fixed to the table with self-tapping screws, the metal part is attached with bolts.
- For a wooden part, the opposite end must be secured with a special device. It is made from a loop screw and several wooden stands that are attached to the corners.
Are you unplugging your washing machine?
Oh yes! No
- The part for mobility is secured to a threaded pin with bolts.
- Now you need to take a power supply (an old computer one will do). It is necessary to control the motor. Switches are installed to regulate the rotation speed.
- To guide the tools correctly, a tool rest is made from a pair of wooden parts and a metal corner. The structure is attached to 1 bolt and thanks to this remains movable.
- The lower part of the tool rest needs to be fixed on the workbench with screws and corners.
- The workpiece is fixed on the machine from several sides. On the right - on a bolt with a handle, on the left - on studs. To fix everything, a hole is drilled.
- To ensure the work is done correctly, you need to use special cutters.
- Finally, sand the workpiece with sandpaper.
Assembly
There is nothing complicated in assembling a circular saw, but there are some nuances. The circular saw motion module includes the following elements:
- motor shaft;
- shaft for disk attachment;
- belt transmitting movement;
- motor and saw pulley.
Important! In a simplified version, assembly can be done without the use of bearings.
The build process includes the following steps:
- a drive belt is put on the smaller pulley: rotation is transmitted to the saw blade from the shaft; to avoid the belt slipping, notches are needed on the pulley; if there are none, we make 3-4 transverse grooves ourselves;
- for better adhesion, bitumen can be applied to the surface;
- the belt can be used not only from a washing machine, but also from any equipment; it must have serrations and be of sufficient strength;
- to prevent the drive loop from slipping off the large pulley, a small protrusion is welded onto its end; you can weld a disk with a larger diameter than the pulley;
- For safety reasons, the disk on the shaft should be secured very well so that it does not come off during operation, which can lead to serious injuries;
- To adjust the belt tension, the hole for fixing the engine must be bored out.
Moving parts
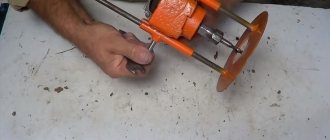
Having finished connecting the engine and making sure that it normally increases and decreases speed, you can proceed directly to the circular device.
Let's figure out which moving units that bear the main load we will need:
- saw shaft;
- SMA motor shaft;
- drive belt;
- two pulleys - from the washing machine and the circular shaft.
The drive must operate in this manner. The engine transmits rotation to a shaft on which a small pulley is pressed. The last one is wearing a belt that sends revolutions to the second pulley. At first glance, everything seems simple, but when the circular is being installed, many difficulties arise that must be resolved.
The small pulley must be sharpened. Three to four transverse grooves are placed on it so that the belt has the opportunity for a good hook.
You don’t have to use the belt from an old washing machine; just take an analogue from another unit. The main thing is that it is durable and has teeth.
A disc of a slightly larger diameter is welded to the edge of the large pulley to create a protrusion that prevents the belt from slipping during operation. It is not necessary to sharpen the serrations on this pulley; the clutch with the belt will be quite sufficient.
The shaft holding the circular saw, fastenings in the form of a washer and a nut must be reliable so that at maximum speed the saw does not become deformed and does not jump off, injuring workers. It is recommended to use the shaft and fasteners from a factory-made circular saw.
The procedure for constructing a circular saw is described for a saw with a three-hundredth blade. Many will say that the SMA engine will not pull such a saw and will stop. But here you should remember a few rules:
- you need to be able to operate a circular saw correctly;
- household saw, designed to work with small volumes of materials;
- the successful operation of such a saw is confirmed by numerous reviews.
Simply put, the saw should not be overloaded, and it is better not to work at idle speed .
Tips for work
It is worth taking into account the following tips from professionals:
- homemade circular saw is intended for household use; it is capable of processing small volumes of lumber with periodic interruptions;
- if the tool is often in demand and the volume of work is large, then it is worth considering the option of purchasing professional equipment;
- there is no need to cut by force if the material does not flow; For a more powerful tool, a more powerful motor is correspondingly needed.
How to make a circular saw from a washing machine engine, see the video below.
Source
How to make a circular from a washing machine motor with your own hands
The electric motor from the SMA should not be lying around idle in the garage. An owner who respects his work will immediately find a use for it. For example, with a small investment you can get an excellent circular saw from a washing machine motor, which can easily cut boards five centimeters thick. Everything you need to make such a machine can be found in your own garage - the necessary tools, components, scrap metal.
Motor selection and connection
It all depends on the power of the unit. Belt-driven motors are best so that the speed is transmitted directly to the saw. If you plan to install a 35 cm disk on a circular machine, then 1 kW of energy will be required to start it. The saw, whose diameter is 17 cm, operates from 500 W. This means that motors from old Sibir or Oka washing machines are quite suitable. All that remains is to adjust the engine speed, because unstable rotation will cause the saw to “tear” the wood.
The tachometer, which controls the control module, is responsible for the number of engine revolutions in the washing machine. But since the module will not connect to the circular circuit, it is recommended to install a voltage regulator.
Juicer
There are two options here:
- Using an old machine with a centrifuge and a washing compartment;
- Remaking a conventional barrel washing machine.
Let’s say right away that the first option is better, since it allows, with minimal modifications, to implement two processes in one device: chopping fruit and squeezing it. To do this, you will need a washing machine in which the activator is located on the bottom, and not on the side wall. Replacing it with three homemade strip steel knives, we get a fruit slicer.
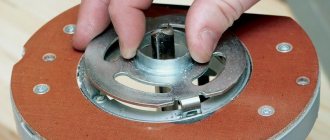
Knife installation diagram: 1. Knife, 2. Shaft; 3. Clamping nut; 4. Washer; 5. Tank bottom; 6. Bearing assembly with oil seal; 7. Activator pulley; 8. Locking screw.
Knife group design
The drain hole of the washing tank must be plugged.
There are few additional treatments for the second unit - the centrifuge. You need to install a stainless steel mesh in it (mesh size 1.5 mm, wire thickness 0.2 mm) so that it covers the side surface of the centrifuge.
After thoroughly rinsing the centrifuge, washing tank, hoses and pump with baking soda, you can make the first load.
The operating principle of this juicer is very simple. The fruits are washed and loaded in small portions (1/2 -1 bucket) into the washing tank (knives must be turned on). After 15-20 minutes of cutting, the engine is turned off and the crushed mass is transferred to a centrifuge (in portions of 3-4 liters). Turn on the centrifuge and squeeze out the juice.
Making a juicer from a barrel washing machine or automatic machine is much more difficult. In a barrel, a homemade centrifuge can become a “stumbling block”. Making it is half the battle; the main thing is to achieve perfectly accurate alignment. Without this, at high speeds it begins to vibrate strongly and it will be impossible to squeeze out the juice.
Here is a drawing of a working sample. The master had to work hard to reduce the runout of the centrifuge (the motor is suspended from the washing machine body on 6 springs). Of these, 3 balance the engine in a horizontal plane, and the other 3 push it upward. The body itself rests on an old car tire, which dampens vibration.
Useful tips
When making a circular machine with your own hands, it is recommended to provide opportunities for its repair and maintenance. Any moving part must have convenient access for lubrication. When starting all installation work, you should prepare detailed drawings and diagrams and perform the appropriate calculations. A homemade circular saw is different in size and can easily fit in a utility room.