4.
5.
6.
7.
8.
9.
10.
11.
12.
13.
14.
15.
16.
17.
18.
19.
20.
21.
22.
23.
24.
25.
26. 27.
28.
29.
30.
31.
32.
33.
34.
35.
36.
37.
38.
39.
40.
41.
42. 43.
sources:
https://panosecontas.blogspot.ru https://www.miniinthebox.com https://fengyixuetang.com
Case from …
Author: KaraMel
source: https://www.fermer1.ru/forum/kak-sshit-chekhol-dlya-noutbuka
To stiffen the walls of the cover, you can lay a plaid between two pieces of fabric, for example from folders. You can also use padding polyester. It is better to sew from durable, dense fabric. Don't forget to make handles for convenience.
But if you plan to carry it in your bag and only use the case to protect it from scratches, then you can come up with something creative and fun.
Master class: how to sew a case for a laptop, netbook
Author: Trisha (Natalia Denisova)
source: https://workshop-trisha.blogspot.ru/2012/01/blog-post_28.html
The long-awaited master class on sewing a case for a laptop, netbook or other device. I’ll tell you another time how to sew a case for a phone or other small device if the size of the hole in the case is smaller than the size of the sleeve platform in your machine.
My eldest son's laptop was lucky with this case. And since the cover is for men, I used discreet materials and did not decorate it in any way.
Professional seamstresses - be lenient, “we all learned little by little, something and somehow”))) I learned the sewing business on my own, an “experienced eye” will certainly notice this. Let's go )
Materials.
We will need: - main fabric - fabric for the lining - fabric for the flap - dublerin (I use medium-density dublerin, you can use other sealing materials, for example, bulk interlining) - two magnetic fasteners (for small devices one is enough)
The photo shows that I chose canvas for the main fabric, striped American cotton for the flap, and regular calico for the lining.
Open it up.
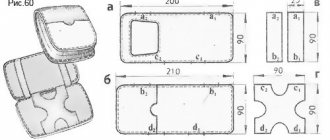
It is very important to correctly calculate the size of the parts, because... We sew a case for a specific device that has width, depth and height. Let's measure these parameters. I have them like this: width 38, depth (i.e. size on the short side) 26, height 3.5 cm. We calculate the size of the pattern.
The main part (parts) is the top and lining.
Width: 38 + 3.5 (height) +1.4 cm. (2 * 0.7 - two seam allowances, I make them 0.7, if you are more accustomed to making a 0.5 allowance, do so) + 2 cm .
for a loose fit. We get 44.9 cm. There are two options for depth. 1. If the piece of fabric allows, you can make one piece, i.e. there will be no seam at the bottom. We count: 52 (26*2) + 3.5 + 1.4 (allowances) + 2 (so that the laptop is 1 cm below the edge or flush, but does not protrude from the case). We get 58.9 cm. 2. If the fabric does not allow you to cut out one solid piece, as in my case, then we calculate the pattern as follows: 26+1.75 (half the height) +1.4 (2 allowances) +1 (so as not to performed). We get 30.15 cm. Everything after the decimal point can (and should) be rounded. We make the lining according to the second option, because... There will be a hole at the bottom for turning it inside out. Valve – 2 parts.
Flap width: 38 + 1 cm + 1.4 (2 allowances) = 40.4 cm. I add 1 cm again so that the flap is slightly wider than the edges of the laptop. Height: Depends on the size of your device and how deep you want the valve to be. My flap is 19 cm. To the desired depth you need to add 1.4 - two seam allowances. After cutting the parts, it is necessary to compact them, i.e. glue with dublerin.
We glue: the upper main fabric, the upper and lower parts of the valve. Sewing.
We pin the main parts (or one part with a fold) with the right sides facing each other, make markings, stitch along three (two) sides and process the edge with a zig-zag.
If there is decor (stripes, applique) on the main part of the cover or on the flap, then it must be sewn on before sewing the parts together. Forming the bottom. We fold the bottom of the cover with a corner so that the seams exactly match, and pin along the seam. It is important to bend the allowances in opposite directions.
Measure 3.5 cm perpendicular to the line (the height of your device), mark it with a marker.
We sew, securing the lines at the ends; to be sure, you can sew twice, we process the edge with a zig-zag, and cut off the corner. We get this corner.
We perform the same operation with the other corner. We turn it inside out and look. Everything is fine.
We repeat the same operations with the lining, with the difference that at the bottom of the lining you need to leave a hole for turning out, at least 15 cm.
Valve. Place the front and inner parts right sides together and stitch along three sides. We process the edge with a zig-zag, cutting off the corners.
We turn the valve right side out, straightening the corners with a stick. We iron the valve well and stitch the edge. We need to insert two buttons into the valve. I will dwell on the buttons in more detail; for those who have not inserted them more than once, the information will be useful (there was such a question in the comments). The magnetic button consists of two parts; each part is accompanied by a metal “pancake” for securing the button on the back of the fabric.
We cut two holes and insert the “legs” of the button into them, put a “pancake” on the back side of the “legs” and bend them in different directions.
This is what you should get.
Further. Place the flap with the outer side to the back of the cover. In this case, the distance from the edge of the valve to the side seam should be the same on both sides.
Pin the flap. I also put a stitch along the edge to make sure that the parts would not move when turning and sewing.
We assemble the lining and the main part together. I don’t do it as is customary, but on the contrary) It’s more convenient for me. We turn the top of the cover inside out and insert the lining into it, right side to front. We look to see if the holes match in size, adjust the size, and pin them together. The side seams of the main part and the lining should match, and the allowances should be bent in opposite directions.
We sew the parts together, process the edge with a zig-zag, trim off the excess (if any).
Through the hole in the lining, turn the cover right side out. Smooth the edge and pin it.
The edge needs to be stitched.
In order to put the second halves of the buttons on the case, you need to mark the place. This should be done not on an empty case, but on a case with a laptop. When I sew covers remotely, I insert a book of suitable thickness. Now you can make the markup.
We installed buttons.
The last operation is to sew up the bottom of the lining. This can be done with a hidden seam or sewn on a typewriter.
Author: Kira Malkovich
Today I want to share with you a very interesting, and, most importantly, useful way of making a laptop bag. In fact, making such a bag is as easy as shelling pears; you just need to put in a minimum of effort and a little imagination.
Of course, there are different bags. Some are fabric, some are leather, some are paper (mostly shopping bags or gift bags), in general, there are a lot of materials used to make bags. I want to share with you how to sew a bag with your own hands, the patterns for which we will make from old, unnecessary jeans.
How to sew a case with your own hands
1.
First, you need to find out what size your future case will be. You can use two halves of felt of different colors. In this example, we used dark green for the back of the case and white for the front.
2.
Both halves are joined manually using thread. A double thread is used (see picture).
3.
The back of the case is longer to allow the case to be closed.
4.
Sew a small strip of felt at the top of the cover, as shown in the image.
5.
To decorate the case, you can prepare several strips of different colors and glue them to the case. If you don't have glue, you can sew them on.
Sewing materials
Have you decided to get something new and unusual? What will set you apart from your friends and make you unique? A homemade laptop case would be a great option. Having decided on the design and color of the future accessory, prepare the following materials:
- fabric of your chosen color;
- fabric for lining (waterproof);
- a set of threads;
- bias binding;
- buttons (for fastening);
- quilted batting.
It is advisable to choose a fabric that is durable and does not stretch, since you will still be wearing an expensive item in it. As for the button, you can use magnetic clasps instead - they will look much better.
How to make a case with your own hands.
You will need:
- a piece of unwanted leather clothing
- scissors
- sewing machine (you can just use a needle and thread)
1.
Prepare a material from which you will later need to cut 3 equal parts - 2 will be used as the front and back of the case, and the third piece for decoration.
2.
Place the phone on the material and mark approximately 2.5cm from the top.
3.
To decorate the cover, you need to cut the third piece of fabric in half.
4.
It's time to cut the fabric into 3 equal parts.
5.
Place the two pieces on top of each other and measure approximately 2.5cm from the top.
6.
Carefully make a fringe from the halves of the third part.
7.
Sew each fringed half to the front and back of the cover as shown in the picture.
8.
Cut one piece to the left and right of each fringe.
9.
Use a sewing machine to connect the halves of the cover.
Useful tips for making laptop bags
- To make sure everything is perfect when you start, always make the first 1-2 stitches by turning the handwheel counterclockwise.
- To check whether the needle enters the fabric smoothly, watch how the machine handles a given fabric thickness.
- Avoid thread snags, plus be precise about the location of the first stitch.
- Never stop the machine with the needle up and out of the fabric.
- To decorate a women's bag, use appliqués, buttons, and embroidery.
- Make sure the handles are sewn securely to the bag. The results of sudden tearing can be extremely expensive!
- Be careful when handling scissors and needles.
Get creative and the results will please you!
Hand washing woolen items
Pattern of a skirt with a yoke
DIY leather case
Option 1
1.
Prepare an A4 sheet of paper and fold it in half.
2.
Mark the outline of your mobile phone on one half of the paper.
3.
You will get a figure like this - you need to cut it out.
4.
Check if you have chosen the correct size.
5.
Now you need to transfer the outline from the sheet to the skin.
You should end up with a segment like this. Fold the ends over and stitch them.
6.
Check the size again.
7.
Using a ruler and awl, start making holes in the piece.
8.
Start sewing. In this case, the color of the thread was chosen in relation to the color of the leather of the case, and the internal seam was used.
9.
If after sewing the cover turns out to be uncomfortable, you can turn it inside out, like this.
Option 2
Repeat steps 1-6 and further according to the instructions below.
1.
Using a plate you can round the bottom of the cover.
2.
Run a ribbon along the top of the cover, which should go on both sides.
3.
Sew the cover around the perimeter with a double outer seam and then you can decorate it however you like, for example, attach a keychain.
Quilting the base
You need to place the main fabric right side down. Then cover it with padding polyester or batting, and cover it with a second piece of fabric, placing it face up. Pin all three layers around the perimeter. Since the filler strip is slightly smaller than the material and backing, staple where they are still connected. Then machine stitch around the perimeter from the side that is most convenient for you to work with.
After this, use chalk or a piece of soap to draw a pattern with which you want to quilt the material. These can be squares, stripes, diamonds, zigzags or wavy lines. Sew along all marked directions. After this, fold the lining and the main fabric around the perimeter so that they are connected to each other. At the same time, tuck the sides inward, since the edges should be neat.
