The final result of embossing.
We prepare the leather for embossing, mark and cut out pockets.
We put our own cliche, if available.
We repeat the embossing of the main part.
Let the skin dry. Tip: You can speed up the drying process with a hairdryer. It is not advisable to do this if you have time. If you still decide to use a hair dryer, try to dry it in such a way that the skin does not heat up too much. High temperatures have a bad effect on natural leather and dry it out.
Coloring the skin
We dye the leather the color you want. Special dyes for genuine leather are used. Apply several coats and let the paint dry before applying the next coat. Drying does not take much time, especially for alcohol-based paints. For application, you can use sponges (suitable for washing dishes), brushes, preferably a squirrel or a pony, but not a goat - the bristles are hard, special wool swabs for applying paint (very convenient, but relatively expensive), cotton mugs for removing makeup, cotton swabs and things like that. Be careful with mugs and chopsticks, they may leave lint. I will paint with an airbrush.
A smooth transition is required. I will use dark brown paint.
Tip: You can achieve a light brown color using an oil-based cream using natural wax. It’s not difficult to make it yourself (I’m planning to make a master class). It’s even easier to get a brown tint by brushing it with vegetable oil and letting it “tan” for a day in the sun. Oil is already dark, but “tanned” is even darker. I used flaxseed oil. Make sure that the paint does not bleed through from the reverse side, otherwise you will have to paint the bakhtarma too, and this is an extra waste of paint and time. Therefore, when painting, do not apply paint generously. It's better to go slow than to get upset about painting through it.
Tip: if you paint small parts or edges with a paint different from the main color, then dip the tip of the brush into the paint (it is advisable to use Squirrel No. 1 or Pony No. 1, ponies are cheaper) or blot the excess paint on a napkin.
Start painting from a wide area to a narrower one, or towards the edge rather than away from it. Otherwise, you can paint something you don’t want to. Let the paint dry well. It doesn't take much time. The manufacturer for alcohol-based paints indicates 6 minutes for drying one layer.
We apply a finishing agent (a finishing agent. It covers the paint so it doesn’t get dirty, closes the pores of the skin, increases wear resistance, gives extra shine, etc.). I will apply it with an airbrush in two layers with intermediate drying of the layer.
The materials for applying finishing are the same as for painting. The only thing is that I do not recommend using cotton swabs and the like made of cotton wool to apply the finish. The lint will remain and is very difficult to remove.
When you apply the finish, make sure there is no excess on the sponge. The finishing agent consists of a mixture of waxes and a diluent. Therefore, the excess (wax mixture) will dry on the skin in stripes. Most likely it won't be possible to fix it. Excess on the sponge, blot on a cloth or napkin.
Remove the tape. Tip: Remove the tape after painting and finishing. This will reduce the likelihood of getting the bakhtarma (wrong side) dirty.
We cut out the part, having first measured it again. The part may “shrink” by 1-2 mm.
Round off the edges. Let's use this tool. It's called a corner trimmer. I round the edges with a 10mm trimmer.
Can be replaced with a coin. Place a coin on the edge (pre-mark an equal distance from the corner in each direction. You can use coins of different denominations. The larger the coin, the larger the corner you can cut). We cut off the excess with a knife. You can not touch the corners at all or cut off a small edge (2 millimeters) with a knife. It doesn't look bad either. In general, whatever you like.
DIY notebook cover: scrapbooking ideas
The technique called scrapbooking is especially popular these days. Products made with its help always look stylish and somehow especially soulful. Using this technique you can also decorate the cover of a finished notebook or even an album, or you can make an entire notebook.
In this case, the sheets of paper will serve as a block for notes. In addition to this, you should purchase beautiful scrap paper, the choice of which is now huge in specialized stores, ready-made elegant cards, or print your favorite images on a color printer. And, of course, office supplies for auxiliary work.
At the first stage of creating the product, we tint the ends of the block, as well as our future cover cut out of paper. It is then attached to the endpaper with double-sided tape. And metal eyelets can be inserted into the blocks, as well as into the cover itself. As a result, we will get small holes through which you can stretch a bright decorative ribbon and tie it beautifully on top. The resulting cover is usually supplemented with an original three-dimensional appliqué, for example, miniature flowers, ready-made or made from any auxiliary materials.
Processing bakhtarma
Of course, you can leave the bakhtarma in its original form if it is roughed (part of the bakhtarma is cut off on special machines) or well sanded, but I prefer to process any bakhtarma.
This is what bakhtarma looks like after removing the tape.
Tip: remove the tape in the direction the pile grows. Then the pile will stick out less. To find out in which direction the pile grows, before gluing the tape, run your hand along the lint in different directions. The side in which the pile is smoothed is the side you need. Apply tape and mark the correct side with an arrow.
I plank (cut) using a plane. It only scrapes along the pile. However, if you start sanding against the pile, you will immediately understand (the pile will rise).
This is what bakhtarma looks like after sanding.
It is not always convenient to sand the edges; fluff remains. I smooth them to the edge and cut them with scissors (sharp, rounded manicure scissors). Please note that the scissors must be very sharp, otherwise you will not cut the pile. The edges of the pockets that will be glued do not need to be processed, as they will subsequently be trimmed.
This is what bakhtarma looks like after processing.
The wrong side turns out smooth, the fibers do not stick out. To do this, I use a product for processing the bakhtarma and the edge of the edge). Diluted 1 to 200 with hot water (not boiling water). It is better to pour a little into the water, and not the other way around. The formation of lumps is inevitable, but after some time they dissolve. The result is a transparent gel.
It is better to prepare the remedy in advance. A very economical product. It takes a quarter of a teaspoon to process the main part and pockets and there is still some left over (although you can’t store it for a long time, a couple of days at most. They write that it’s in the refrigerator. I had it in my workshop. Add a little water, stir it and you can use it). Do not process 5 mm from the edge where the pockets will be sewn. This is necessary so that the parts adhere better when gluing. Apply the gel to the bakhtarma. Can be applied with a brush or sponge. The most convenient way (for me) is with your finger. You control the amount of gel applied. If you apply more (no big deal), you have to remove the excess. After application, polish with a board or any convenient object with a hard, smooth edge. Dry the parts.
We process the edge of the pockets, which will not be attached to the main part. We sand using denim (you can use a sanding board, but it’s inconvenient, the skin is thin, it wrinkles). Lightly moisten the edge with water; just swipe with a wet finger.
We paint using an edge marker. I made the marker myself. A very convenient thing. Paints evenly, evenly, and is economical. Master class on making this marker Homemade marker for coloring the edge of the skin.
Sand again and apply trimming agent. It turns out to be such an edge.
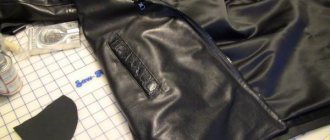
Mark, punch and glue the pockets to the main part
For marking we use such a tool. It's called a parallel marker. One side of the marker is drawn along the edge, the other draws a parallel line on the skin. Comfortable.
If this tool is not available, draw a line using a ruler and an awl.
We punch through with punches. I use these. Step width 4 mm.
First of all, we punch the corners with a punch with 1 tooth.
From it to the sides with a punch with 2 teeth.
Next we punch from edge to corner. The first hole should be 1 mm further from the line to which the pocket will be attached. Don’t punch through right away, figure out that the holes are at an equal distance.
If there are no punches, we buy a fabric marking machine at a fabric store (it’s not expensive). We draw along the pre-drawn line with force using a marker (for even marking, use a metal ruler). We pierce (punch) holes with an awl. The step length of this marker is 2.5 mm. This is too small a distance for a hand stitch. Therefore, we punch an awl through one marking hole. You can grind the teeth down one at a time. It turns out 5 mm between the holes. That's better.
We glue the pockets with special leather glue. I use polyurethane glue (sold in stores for fishermen and hunters - 65 rubles per tube, name "Uranus" 45 mg), you can buy it at shoe repair shops if you ask nicely (250 rubles for half a liter). It sticks tightly, so be careful. If a little time has passed, then you can still tear it off without consequences. If it dries more, it will tear off, leaving part of the bakhtarma, and disfigure the part. Apply glue to the main part and to the pocket, glue it, press firmly.
I use an embossing hammer to press. I roll it over the glued part from above, pressing firmly with my hand. If the glue dries out after application, warm it with a hairdryer before gluing.
Trim off excess pockets. You can cut parts to size right away, but it’s difficult to achieve one hundred percent accuracy. In the future, it will take a long and tedious time to level the edge.
We punch again through the punched holes. You can punch both parts at once; the punch can easily cope with thicker leather, but in my version it turns out smoother and more accurate (my subjective opinion).
Let's get to the cover
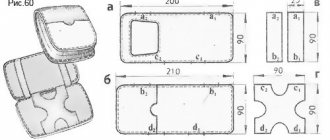
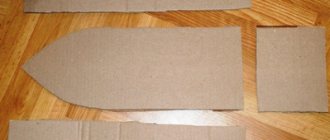
Unless you agree to work with other material, you will need some experience. In addition, ordinary fabric tools are not enough here. Having pieces of leather and suede at your disposal, as well as a pattern of the right size, a couple of sheets of cardboard, glue and the necessary tools, you can get to work. We measure the endpaper of the future notebook and cut the leather according to the resulting size with a mandatory allowance of one and a half centimeters. If you do not plan to transfer (and this is done using a laser printer) the finished drawing to the surface, there is another decor option.
On thick cardboard we draw and carefully cut out figures, stylized, for example, as flowers, hearts or any other three-dimensional shapes. We glue a cardboard flower or something else onto the cover, and on top of it - another leather or suede fragment. We take a dull knife and forcefully press through the outline of our flower, then you can carefully cut the junction of two leather parts (top and bottom) in the form of a fringe. There is no need to use glue.
Processing the edge (edge)
We round the edges of the main part and pockets. To do this, use such a tool (tortsbil).
To process the edge of this leather, I use an engraver with an attachment (sandpaper). The leather is thin, so when processing the edge with a hammer, uneven chamfering is possible. And the engraver produces a neat cut.
Additionally, I sand the edge with fine-grain sandpaper.
This is what happens after sanding.
In the absence of an engraver, everything is done by hand with sandpaper.
Polishing. I use denim and burgundy. I made it myself from beech.
Lightly moisten the edge to make sanding easier. This is what happens after polishing.
After polishing, we paint the edge. I use a marker.
You can use cotton swabs and brushes. We polish again. Apply trimming agent. This is the result.
If the above product is not available, polish with wax. Rub the edge with a piece of wax. Polish with a board or cloth.
Tip: To avoid leaving wax residue when sanding, run a hairdryer over the applied wax. The wax will melt. Can be sanded. You can use a product for treating bakhtorma (applied, sanded). I like it less and hardly use it.
What else do you need?
You will also need a couple of strips of not too thick fabric about 15 centimeters long and about three wide, a 30 mm tube of Moment glue and synthetic threads of beige or black. The tools and materials will be a needle file or file, an awl, a ruler with scissors, a pen, as well as acrylic paints for painting on fabric and a thin brush for working with them. And also instant coffee. With its help, paper can be aged. But if you prefer white sheets, we omit this procedure. For aging, we will make a coffee solution: add five spoons of instant coffee to a liter of water. The more it is, the darker our sheets will turn out. Don't forget that as they dry, they will inevitably lighten a couple of tones.
Flashing
Requires 80 cm of thread on each side. We use a saddle stitch (I won’t show you how to sew, there are a sufficient number of master classes on how to sew with a saddle stitch). You will need two good quality needles with a relatively wide eye for waxed thread 1 mm thick. Tip: grind and round off the tips of the needles on a sharpener. Although the steel is hardened, it is possible to sharpen it. The rounded ends allow the thread not to catch (the thread consists of a twisted set of thin wired threads). Sew along the punched holes.
At the end, to secure the thread, we sew it twice. We cut with scissors, use a lighter to burn the ends and press. Don't leave the ends too long, it won't look neat.
Sew on another pocket.
All is ready!
Decoration options
How to decorate the cover of a notebook with your own hands? This elegant felt case can be equipped with a small pocket and a holder for a pen or pencil. To do this, mark the places where it is attached to the case, cut the felt in this place and thread the holder there. For reliability, it should be sewn with a machine seam.
You can decorate the felt cover by sewing fancy buttons. If you have chosen, for example, rhinestones to decorate your product, then they are attached with glue (you can use the most common “Moment”). The edges of the cover are first secured with safety pins, then they should be trimmed with decorative thick threads selected in a suitable color scheme.
What is the difference between French binding and printing?
Print binding has a limited service life. After several years, the book literally crumbles across the pages, risking turning from an important thing into ordinary garbage.
The fact is that the basis of such binding is gauze impregnated with a certain composition. Over time, it dries out and cannot perform protective functions. As a result, the book falls apart into separate sheets or falls out of the cover completely. In addition, paper clips are often used as fastening, which rust over the years, which has a detrimental effect on both the beauty of the publication and its safety.
Book binding using French technology is qualitatively different from printing. The sheets, or rather notebooks, are sewn together with linen threads onto strong and durable cords made from natural materials. Next, the stitched block is placed in a clamp and the spine is rounded with a hammer and given the shape of a fungus, after which it is glued.
Binding works using French technology allow you to preserve valuable publications and extend the life of your favorite books. Thus, ancient books of the 18th century remained intact and almost undamaged, without losing a single page.
How to decorate it
A do-it-yourself leather notebook cover is decorated by cutting a hole in it and attaching it using small leather tendril strips made of suede, leather, flowers or other decorative elements. The antennae should be carefully inserted into the hole and secured to the wrong side with glue. Having finished decorating the outer part of the cover, we will fold the seam allowances inside, make and attach a lining and, if necessary, make pockets in which business cards can be placed. You can connect the parts of the cover together with leather ring straps.
It often happens that you need a gift, but there is nothing suitable in the stores. Or a person already has everything his soul could desire. He may also have a favorite hobby, and you want to give him something unusual.
You can combine this and make a gift yourself. In this case, I will tell you how to make your own leather-bound notebook for fans of the game "Tanks", however, the design on the cover can be completely different, if you master the technical techniques, there will be no limits to your imagination.
Leather bound books
Leather is one of the main and most commonly used materials for bookbinding. Soft and flexible, with special finishing, leather binding is able to maintain elasticity and not dry out for centuries. Our bookbinding workshop uses leather not only in those tones that were popular in past centuries, but also selects original color solutions at the request of the customer.
As a binding material, leather provides great freedom to work with it: you can cover the entire lids or make a composite binding, covering only the spine and corners; decorate with painting, embossing, relief or marble; combine several types of material on one cover without visible transition boundaries. Leather is strong, durable and gives any publication a noble and respectable look.
Hand binding prolongs the life of books and preserves a piece of the master’s soul invested in the work.
We offer a full range of services for working with books. Restorer-binders will help you preserve the most valuable publications by restoring the original binding or creating a new one at your request. If the binding of the publication has not been deformed, but has only become worn out over time, we will help restore its original appearance: we will restore the lost material, decor, preserve the original cardboard and delicately lift the binding material.
For books that have not stood the test of time and literally crumbled, a complex of restoration work is provided, including stitching the block and restoring the old cover or creating a new one. Our craftsmen work real miracles, turning an old, ugly book into an excellent, unique copy of a family’s cultural heritage.
We offer the following binding options for paperback book owners:
- Paperback preservation and restoration;
- Hardcover production;
- Creating a beautiful and durable book case.
The latter option is perfect for cases where the owner, for various reasons, wants to preserve the original aged cover and prevent further damage.
If the book was fastened with staples (paper clips), which rust over the years and destroy the spines of the sheets, we recommend replacing them with cords.
Prices for binding services
The cost of work is calculated individually depending on the chosen design, materials used, format and circulation of the book, as well as the wishes of the customer. We perform full-leather or composite binding, decorating edges with foil and gold leaf, tinting edges, painting, bindings with figured recesses and inserts, decorating lids with gold, decorative elements or locks, and much more.
The cost of binding work starts from 8,000 rubles. You can find out more about the cost of book binding work
All text is part of the text
We welcome readers of the online magazine “Handmade and Creative”! After the New Year's break, we again continue to delight you with new master classes and ideas. Today I remembered my childhood and how we always made all kinds of crafts before the holidays and then gave them to our family or friends. Today I will show you how I made a beautiful leather binding with my own hands and gave it to my friend, and he loved it!
Required materials and tools:
- sheets of A4 paper or any other paper that you like and is suitable for a notebook;
- a piece of leather or suede (everyone has leftovers or pieces of an old bag at home, if you look carefully, you can find a lot of good material that is just lying around because you don’t know what to do with it);
- sewing threads are dense and strong;
- scissors;
- large needle;
- sewing machine.