A decorative fountain and waterfall for the home is an excellent design solution that performs several functions at once. Firstly, the waterfall humidifies the air, which is important during the heating season when it becomes dry. Secondly, it has a therapeutic effect on the nervous system, promoting relaxation. Thirdly, it makes the atmosphere in the house cozy and unique.
Water is soothing and cool on a hot day.
Types of indoor waterfalls
Waterfalls are distinguished by their shape, how high the water rises and how it flows. The following varieties are distinguished.
- Exotic - it uses artificial stone of various textures and shapes, living plants, shells, jugs, mirrors. As a rule, this type of waterfall always has a fence.
Important! The design of such a waterfall is always large, so this factor is taken into account during installation!
- Classical. This design represents a continuous stream of water flowing over the glass. Another name is “waterfall on glass.” They don’t use any decorations, it’s a simple waterfall look.”
- Combined. The principle of pouring water is similar to the previous type, but the waterfall itself has decor in the form of stones, plants and other elements.
It is important to have a pump and a place to turn it on.
You can do everything else yourself. Also, according to the type of installation, decorative waterfalls are divided into continuous and collapsible, those that move, and those that sing. The type of design depends on the location in which it will be located.
Kinds:
- floor;
- wall;
- desktop;
- columns;
- partitions.
A DIY indoor waterfall is a worthy alternative to expensive factory products.
Detailed description of production
All necessary materials must be prepared in advance. It is better to prepare a beautiful porcelain service. The advantage of this material is its lightness. The cup and saucer must be thoroughly washed and dried well. They must be dry.
Detailed instructions (a DIY floating cup with flowers is easy to do) are presented below.
The wire prepared in advance must be bent with pliers in the shape of the letter “L”. The approximate distance between the saucer and the cup should be about 10 - 15 cm. A zigzag or curl should form at the end. It is necessary to attach the wire to the saucer and cup to ensure that the structure is positioned correctly. If necessary, give the wire the desired angle of inclination. We align the base of the wire so that it fits snugly against the wall of the cup and the bottom of the saucer.
Now we use a glue gun. First you need to glue the wire to the bottom of the saucer and wait until the glue has completely cooled. There is no need to skimp on glue, because the wire should literally sink into it. This way you guarantee the stability and reliability of the future product.
Now you can glue the wire to the cup. Remember that the glue must dry completely, that is, cool.
The remaining part of the wire must be wrapped with masking tape. Now you can glue the flowers, starting from the top.
When the space between the saucer and the cup is covered with flowers, you can lay out the prepared material for decoration on the saucer in any form. These flowers need to be glued well to the surface of the saucer.
The same procedure must be repeated with the cup. Here we carefully place all the flowers, preferably smaller ones, and secure them well.
DIY indoor waterfall
In order to install a home waterfall with your own hands, it is not necessary to resort to the help of professionals. Many people do it on their own, it’s not difficult, the main thing is to follow a certain algorithm of actions and approach it with full responsibility.
It will turn out completely unique and will be relatively cheap.
The very first stage is to determine the type of waterfall, the place where it will be located, and its size. These indicators determine what materials will be needed during the work. Once the scope of work is determined, the appropriate materials and tools are purchased.
Further actions depend on what kind of waterfall will be installed.
Tabletop waterfall
This is the most common type of waterfall that is installed in their homes.
Connect the pump pump to the container. To do this, make a hole.
Connect the water supply hose to the pump.
Important! It should be smaller in diameter than the hose for an airtight and tight connection!
Place the container and pump on the stand. Next, put a hose on the tube from which water will be supplied. The pump is placed in a cardboard box or decorated at the end of the work.
The hose can be passed from the side, pulled into the recess on the edge of the pot, and pulled out through the hole in the center.
Cut off the excess part of the hose and treat the hole with liquid silicone.
Additional Information! At this stage of work, it is important to check the operation of the pump, since it will be more difficult to dismantle the finished waterfall later!
They create a relief at the waterfall using construction foam. Here I do everything to my liking; it is important to consider the size of the slide being built up. Let it dry.
The home waterfall is assembled after the construction foam has completely dried. Glue is applied to the artificial slides and covered with the material to be decorated.
Decorate the fountain with rocks and plants.
When decorating, small indentations are made for water so that it flows beautifully. This is done using a hot gun.
The final stage is to treat the entire surface of the waterfall with a protective layer and check the operation of the pump. Decorate the pallet.
Just remember to change the water from time to time.
You can enjoy an indoor waterfall created by yourself!
Small spilling cup or floating cup with coins “Talisman of Abundance”
Recently I caught myself thinking that I’ve already made a lot of small spilling cups on wire, but I still haven’t completed a master class on them.
A spilling cup or, as it is also called, a floating cup, has become widespread as a handmade gift, combining extraordinary beauty, originality and ease of manufacture. The most common “waterfalls” are made from coins, coffee beans or artificial flowers.
We have already looked at coffee and floral spillers, but what about coins?
For large tea pairs, the master class of pouring cups on a fork is more suitable, since the massive mug is better fixed there. And with a small (coffee) pair it is better to proceed in the following way...
So, let's get started...
In order to make a small spilling mug on a wire, we will need the following materials:
- coffee tea pair,
- strong wire (I have a piece of steel hanger),
- coins of the same denomination, preferably ten-kopeck coins (130-150 coins - depends on the length of the wire),
- adhesive plaster,
- a can of quick-drying enamel - gold,
- hot glue gun,
- pliers, round nose pliers,
- scissors
- scotch,
- food pouch.
I’ll say right away that I’m showing my method of making such spills. I have already made a lot of them, and I have already formed my own style, which, it seems to me, is the most successful: in which the craft turns out very beautiful, neat, without minor flaws - oozing glue, etc.
Someone paints everything with gold, including the tea pair itself, this is the easiest and fastest way. It seems to me that it is more interesting when the cup and saucer remain in their original color. You can paint all the coins at once, and then start gluing them. But when we apply hot glue to a painted coin and glue it to the money waterfall, our fingerprints may remain on the coin when heated, which then doesn’t look very nice!
Of course, it's up to you to decide! It all depends on several factors: how quickly you want to make the craft and what result you want to get.
So, my master class on wire pouring...
Let's color a certain number of coins, and then I'll show you why.
While the coins are drying, let’s prepare a blank, which we will then cover with coins.
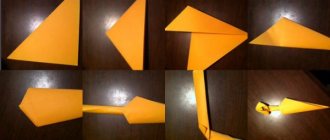
To begin, we bend a piece of wire as follows (we make loops on both sides to secure them later on the bottom of the mug and on the saucer).
It’s not very clear, but when I show it on the mug, everything will fall into place. Glue the wire to the mug and cup using hot glue.
You choose the angle of inclination yourself as you like. Since there are coins in the saucer, the craft will be stable in any case. Just don't take a very long wire for a small cup. It will look awkward.
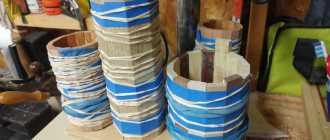
We cover the wire on the cup with unpainted coins, glue them with hot glue, thereby further securing the wire.
We wrap the free piece of wire with adhesive tape. You can make several layers from below.
But we will glue the inside of the mugs with already painted coins... We will also additionally secure the wire on the mug with them.
Inside and a couple of rows protruding from the mug (on the front and back of the mug).
Next, we again glue with ordinary coins on the front and back sides of our craft.
It’s more convenient for me to start from the bottom, it’s easier to control the shape of the “money waterfall”.
Our spill cup is ready for coloring.
Carefully wrap the mug in a regular food bag and tie it.
But we will have to try hard on the saucer, and cover the entire surface that we do not need to paint with small pieces of tape. This is, of course, a labor-intensive task, but the result is worth it.
Like this…
Everyone is ready...
Now we paint everything from a can with quick-drying gold-colored enamel.
Immediately carefully remove the bag from the mug, this is important before the paint begins to dry, otherwise an unsightly mark will remain at the junction
We will remove the tape from the plate when the paint is dry.
No matter how carefully you glue, the glue will still be visible if it is not painted over. For example, I can show the difference, so to speak, “before” and “after”.
Waterfall on glass
This type of waterfall is more difficult to install, but it looks very stylish and original. To create such a design you will need:
- cellular plexiglass;
- hose;
- pump;
- check valve;
- lighting system.
The first step is to make a stand from a material that does not allow water to pass through.
A compressor and a check valve are installed on it, and a power supply system is also placed.
The plexiglass is firmly fixed to the base, and water is poured into a container placed on a pallet. A hose is lowered into the water. In order for air bubbles to flow in the water, you will need an acrylic spray. It is also installed on a pallet.
Dishes for collecting water are mounted behind the podium so that they are not visible.
Note! The water that will be in the waterfall must be distilled!
Plexiglas is degreased before use. The decor of the waterfall is made with stones or other natural materials.
Indoor glass waterfalls can act as a dividing partition.
This is a great design solution! In addition, such a living wall will not get boring even after a long time.
Making a home waterfall with your own hands is not difficult, and the end result is especially pleasant, since you put your own strength into the process!
Guide to making a floating mug with coffee beans
A step-by-step master class will help even beginners in needlework create a wonderful craft from available materials. The first step is to prepare everything you need, namely:
- saucers and cups from the same set or just the same color scheme;
- a fork or a piece of thick copper wire;
- hot melt glue or Secunda glue;
- gypsum or polyurethane foam;
- stationery knife;
- whole natural coffee beans;
- other decorative elements (optional).
When all the components are collected, you can start working. First you need to slightly bend the fork or wire so that one end can be conveniently glued to the center of the saucer, and the other - inside the cup.
Having glued one end of the support, you need to give it time to set (this is 4 hours, no less). Gluing the other end to the cup, it needs to be strengthened on the support until the glue completely hardens, which will also be about 4 hours.
After this, the support can be bent a little more so that the finished composition looks neat. Next, the entire stand needs to be coated with plaster or treated with foam. True, the foam should also be cut off after hardening, and the plaster can be initially formed as intended. In both the first and second options, it will again take time for the structure to dry, at least a couple of hours.
The final stage is the most creative. It's time to decorate. The foam or plaster must be covered with brown paint (you can use gouache or acrylic paints), or you can coat it with a thin layer of PVA glue and sprinkle with cinnamon powder. The smell of such a topiary floating mug will be simply amazing, but not everyone likes this smell, and this nuance must be taken into account if the craft is being prepared for a gift.
Coffee beans must be glued tightly, creating the effect of a waterfall (or “coffeefall”), completely covering the plaster base. On a saucer, some grains can be glued in two tiers, simulating splashes. It is also recommended to decorate such a topiary with a couple of cinnamon sticks, star anise or artificial flowers.
This master class can be taken as a basis for creating your own decor options. The cup is decorated with your own hands with sea pebbles and shells, old keyboard buttons, buttons and beads... and whatever your heart desires.
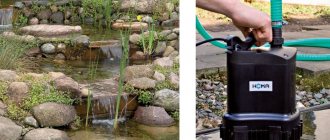
Homemade waterfall for a garden or cottage
Waterfalls in garden plots are a real decoration! Creating an artificial waterfall with your own hands at your dacha is not at all difficult.
You need to know some installation nuances, purchase the appropriate materials and follow consistency in work.
There are several types of decorative waterfall.
- Fixed (stationary) – represents a sculpture. These can be found in parks and squares, but many install them in their garden plots.
- Submersible - they are installed in reservoirs.
Ideas for creating flying cups
A floating cup or flying mug is a modern type of topiary that adds a unique twist to your interior. Creating such an original composition is not at all difficult.
In addition to your hands and the desire to make a decorative craft, you will need a little patience, a mug with a saucer and decorative elements.
To decorate the topiary, take any small objects: coffee beans, pasta, small decorative flowers, small, small toys, flowers made using the kanzashi technique and much more.
When creating a composition, turn your ideas into reality and show your imagination.
Necessary materials
In order to understand what and how much material will be needed, first determine the type of waterfall and its size. But there are three main components, without which not a single waterfall on the site can do.
The design of a site is rarely complete without constructing a reservoir.
- Storage capacity.
- Pump.
- electrical power source. Additional elements are stones for creating a cascade, hoses, sand, crushed stone, waterproofing, concrete mixture.
Additional Information! Construction film is sometimes used as a storage vessel!
Coffee topiary “Flowing mug”
Fans of the strong drink will please themselves or loved ones with a stylish interior detail. To make it you will need materials, as in the previous case. The only exceptions will be a few moments related to the main decorative element - coffee beans. You should choose them not in the market, but in the store. In this case, the special aroma will remain for a long time.
The further procedure is as follows:
- Choose a geometric shape for the composition: ball, heart, etc.
- Find a stick or pencil that will act as a base.
- The craft can be installed in any container the size of which matches the design.
- Mix the fixing solution in a pot and quickly insert the base of the composition into it.
- Make a hole in a pre-selected geometric shape that is used for fastening to the trunk.
- Cover the base with masking tape.
- The first layer of coffee beans is applied with the strip down, and the second - up.
For beginners, it would be useful to know that after each stage of pasting, at least 30 minutes pass before the next one begins. The specified time is enough for the glue to dry. The creative process is completed by fixing a wire that is strong in its structure on the cup and saucer. To do this, you need to bend both ends of the wire by 4-5 cm, moistening them with thermal glue.
Choosing a place for a waterfall
A decorative fountain will last a long time if the following factors are taken into account when choosing a location:
- place it away from direct sunlight, as the water will evaporate or there is a high probability that it will bloom;
- installed away from buildings, as the wind can irrigate the walls with water drops;
- installed in a place empty of trees and shrubs, this harms the trees, and leaves can constantly fall into the waterfall container.
The entire procedure for constructing the bowl, all the technological and nuances completely coincide with the construction of the pond.
Communications
Necessary communications to create a waterfall:
- pipes that will be in the water treatment system;
- a device that collects the top layer of water and supplies it to the filter;
- wires for lighting.
The entire filtration system is installed at the bottom of the container.
In the future, they can be hidden by decorating with stones. All these communications are positioned in such a way that the shield is close to the waterfall itself.
Important! At this stage of work, be sure to check the operation of the pump!
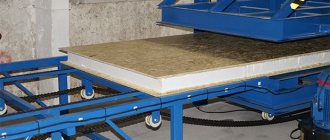
Basis for the cascade
The base must meet several requirements:
- be moisture resistant;
- wear-resistant;
- be resistant to temperature changes.
Typically, concrete blocks are chosen as the base, which are then decorated.
These blocks are used to form a cascade of the required height; they can be left unattached to each other.
The first stage is positioned in such a way that it partially covers the place where the communications are located.
Subsequent steps are always smaller than the previous ones.
The lowest step is decorated with a border, which is subsequently decorated.
Where water outflow is planned, the walls are made smaller in height.
Making a water spout
Ready-made designs are sometimes purchased as a vessel for pouring water, but a bowl can easily be made on your own using improvised means. A plastic container in which a longitudinal hole is made is suitable for this. They bend it outward, and the water will flow down it.
In order for water to flow there, a small hole is made at the bottom and a hose is inserted.
Additional Information! The hole should be made slightly smaller than the diameter of the hose itself!
Process of creation
For greater stability, it is important to follow the following rules.
It is advisable to choose a lightweight cup so that your creation does not fall apart under the weight. Also, the pair should match in size and color. The distance between them should be no more than two mug lengths. The top should be positioned at an angle of no more than 45 degrees and should not be pushed beyond the center.
The ends of the plug or wire, the bottom and the part from which water will “drain” must be degreased so that they adhere well. They are glued one at a time and left for a day to harden. If you need a wider decoration surface, wrap it with fabric, felt or special plastic - polymorphus.
When you have strengthened the frame, make sure it is secure. And, if it is stable, does not fall and does not come off, then you can move on to the next step - design. How to do this - see the step-by-step photos in the master class.
We install waterproofing of thresholds
Thresholds require high-quality waterproofing. The film used after the construction of the pool is used as film. Any waterproofing fabric and agrofibre are also suitable.
Waterproofing is done on both sides, leaving a slight overlap on the curbs.
After the waterproofing work is completed, the installation of decorative stones begins. They are attached to the waterproofing; a moisture-resistant sealant is chosen as the glue.
What you will need for work:
- glue gun;
- craft gift bag;
- paper in silence;
- pencil;
- stationery knife;
- small dragon figurine;
- small figurine of a deer;
- multi-colored mother-of-pearl stones;
- thick cardboard, also called “beer cardboard”;
- padding polyester;
- lawn.
Installing equipment
This is the final stage in the construction of an artificial waterfall. The compressor is attached to the bottom of the tank, a device is installed on the surface to collect the top water and filter it, all other equipment is placed in a shelter built nearby.
Decorate the waterfall to your taste, you can plant plants that love moisture nearby, and lay out the bottom with beautiful gravel.
This design will perfectly humidify the air in the summer!
How to make a fountain in the courtyard of a house
The decorative fountain is also popular in landscape design. It also solves the problem of air humidification on summer days and serves as a worthy decoration for the site!
Fountain device
Fountains can be stationary or submersible.
Regardless of what type of fountain is installed, the device is almost always the same. This is a pump (underwater or above-water), a pool, a pipeline, various nozzles that spray water.
If it is a stationary fountain, then choose a sculpture.
Determine the type, size and shape
If the type of fountain is clear, then the size depends on the place in which it will be located and on personal preferences. The shape is chosen in accordance with the general style of the landscape; it can be rectangular, square, or round.
The simplest type of design is a jet home fountain. When the jet flows upward, more than a few jets break up.
Choosing a place
A decorative fountain is installed in places where it is clearly visible, but away from direct sunlight. An excellent solution is to install it in a recreation area.
During installation, the movement of groundwater is also taken into account.
If the structure is planned to be large, then nearby buildings and vegetation are taken into account. It is not recommended to place decorative fountains and waterfalls for the garden near trees, since the waterproofing layer can be damaged by tree roots. When choosing a location for a fountain, take into account that the pump will be powered.
Selecting pumping equipment
The pump is the heart of a decorative fountain and waterfall, so its selection is approached with special care. The design of the pump consists of continuous circulation of water through the generated pressure. It consists of the compressor itself, pipeline, hoses, and filter.
Sometimes, for a home fountain made by hand, the famous principle of communicating vessels, discovered by Heron, is used.
Depending on the height and size of the fountain, a pump of appropriate power is selected.
Making a fountain
To make the most basic waterfall fountain from stones you need:
- hammer;
- scissors;
- waterproofing gel;
- pipes;
- bowl;
- pump;
- stones;
- slats;
- water pump;
- mounting grid.
First, a pit is dug for a container in which water will be collected. Then the bottom is covered with a drainage pad, a hole is made in the bowl through which the pipe and hose are brought out. Covered with earth. Further actions proceed according to the following algorithm:
- The pump is installed inside the bowl.
- A hole is made on the mounting grid through which the pump will pass and placed at the top of the container.
- A hose and tap are attached to the pump pressure valve and covered with a drainage pad. The pressure pipe must be positioned straight up!
- Wooden slats are laid on the mounting grid. Holes are drilled on flat stones of such a size that a pressure tube can pass through.
- Place the stones on the pressure tube, adjusting the shape and size.
- Then turn on the pump and see where it is necessary to fill the space with small stones.
The stones are glued using glue with a silicone base. They also decorate all communications.
To decorate a home waterfall fountain, use natural stone, gravel, shells, jugs, or moisture-loving plants.
When installing decorative waterfalls and fountains for the garden with your own hands, you need to study the construction technology. Following clear instructions, the work will not be difficult. Knowing all the nuances, you can easily build such a structure on a personal plot, as well as install a waterfall in a residential area.
Do-it-yourself indoor waterfall fountains built according to all the principles will last a long time, in addition, the mobility of all structures will allow you to slightly modify the structure at any time and give it an updated look!