2021
| no comments
Metal profile for making a transforming bench
This bench for a country house is a fairly simple design that can easily be transformed into a table with two comfortable benches. And when folded, it is an ordinary bench with a back and handrails. It will not take up much space on the territory of the personal plot and at the same time will be able to perform all its functions in full. Bench - assembled transformer for a country house
Functions and convenience of the bench
This is a compact and practical bench that easily turns into a fairly spacious table and two comfortable benches. Thanks to its high degree of mobility, it can be installed anywhere in the garden. The only drawback of such a bench is its considerable weight, since it will take a lot of wooden boards to make such a complex structure, but it will be quite stable, reliable and durable if everything is done correctly and exactly according to the developed instructions in compliance with all technological processes.
Bench - disassembled transformer for a picnic
Make levers from two blanks measuring 880x60 mm. They are attached to both sides of bench No. 1 and connect it to the back. The length of the lever, unlike the width, does not change for the specified dimensions of the bench.
Advantages of choosing a transformer model
Such a bench becomes a necessary attribute for several reasons. When folded, it is a comfortable bench with a back, and when folded out, the back turns into a table, and the seating area into 2 small benches. It takes up a small amount of space. Compactness is its main trump card. The light weight of the bench makes it possible to easily move it from one place to another. For outdoor dining, this version of country furniture will have a number of advantages over other models. Making such a beautiful thing yourself is not at all difficult. You don't need any special skills to do this.
The photo clearly shows the principle of operation of the bench
Video: what this bench-table looks like and how it works
- Square metal pipe with a cross-section of 25x25x1.5 mm (4 pieces of two meters and 2 pieces of 1.5 meters). This way we can save money and have minimal waste.
- Wooden boards - about 8 pieces.
- In addition to the basic tools, we will need a welding machine and a set of electrodes.
- Bolts, nuts, washers.
- Metal paint or water-repellent varnish.
- Antiseptic impregnations for wood.
- Grinding machine. Metal profile for making a transformable bench
Drawings, dimensions with descriptions and assembly diagrams of the transforming bench
At first glance, the structure of the bench seems so complicated that to assemble the furniture you must use drawings and a detailing diagram. Formally, this is true. If you make a transformable iron bench with your own hands in a private house, then the drawings can be successfully replaced with several sketches. It’s another matter if the parts for making the bench have to be ordered from a locksmith workshop. In this case, it will not be easy to assemble a transformer bench without details, drawings and dimensions.
Drawings of the most successful model of a transformable metal bench for a summer residence
According to the scheme, this design is no different from the rectangular options, but there are practically no welded joints, which means that most of the parts can be made using a homemade method.
You can make drawings of a transformable bench from a rounded profile pipe yourself or use the bench dimensions given below. Despite its decent dimensions, this transformer design is rightly considered one of the most reliable and safe in operation. The only exceptions are the arches of the right bench and the base of the backrest. Additional bushings will need to be welded to the arcs to install the bolted connection. Few people pay attention in the drawings of a transformer - a bench made of a square pipe - to the presence of additional welded elements - bushings. Most people make the grave mistake of trying to drill holes directly into a square pipe. Due to the small cross-sectional size of the material, this is strictly forbidden, otherwise the profile may burst under load. If it is impossible to weld the bushings, for example, there is no welding, then it is better to find drawings of a transformer on a round pipe. The table, also known as the back of the transformer, is assembled in a frame made of a metal profile, therefore, despite its small size, the strength of the tabletop is quite large. Important! Unlike other models of benches, the size of which rarely exceeds 150 cm in length, in this scheme it is 180 cm, so vertical supports made of a round pipe are used. This means that the transformer can withstand a significantly greater load than models with rectangular supports.
Drawings of a transformable garden bench made of wood
Building a bench out of wood may seem more complicated, but this is not entirely true.
If you take a closer look at the drawing and details given below, it turns out that the structure is simply planned from a larger number of elements. This is what the drawing of a classic transformer looks like - a bench made of wooden slats. Diagram of a transformer with an attached bench. The dimensions of the structure can be changed, since the seat width of 183 mm is not enough for an adult
In fact, the most difficult stage is assembling the frame of the benches; it has to be done according to the details given below.
It is best to press steel bushings at the hinge points, and a bolt with a nut will be used as a rotary axis.
In a country house or dacha, every person wants to have only high-quality and multifunctional garden furniture that will not take up much space, and at the same time will perform maximum functions in their garden plot. Therefore, a transforming bench will be an excellent solution for sharing tea with your family. Here you have both a bench and a table at the same time, and the main thing is that you can make such a structure with your own hands.
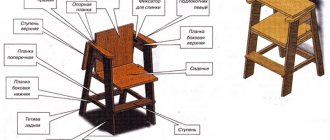
How to make a transforming chair-bench for a gardener with your own hands
The simplest transformer, designed for one person, can be made from a profile pipe and a wooden slat. One of the options for such chairs is presented below.
The dimensions of the pipe are 25x25 mm; when unfolded, the circuit may be unstable
The design is based on a metal frame made of a 25x25 mm profile pipe. You can make it yourself or order it from welders according to the drawing.
The trick to this scheme is the use of folding metal frames, for which corresponding grooves are provided in the vertical posts of the chair.
The tabletop and seat can be made from slats and plywood.
Important! The only inconvenience is the incorrect location of the center of gravity of the structure.
A child can sit on such a bench without risk, but for adults it will be necessary to assemble a structure from two transformers.
Working with a drawing
To choose a suitable drawing, you need to accurately determine the design of the product. You should also take into account the maximum load on the transforming bench (depending on who will use it - children and adults, or just kids). It is not difficult to read the diagram; in most cases, the drawings are of the same type and represent a garden bench in two projections: side and front views. Dimensions are plotted in centimeters on lines delimited by arrows. The vertical line indicates the height, the horizontal line indicates the length. To make a transforming bench with your own hands with details according to a diagram or drawing, you need to clearly imagine what the finished product will look like. All components of the product and dimensions are applied to the drawing (not only the main ones, as in the standard diagram). The locations of additional decorative elements (if any) are also indicated.
To create a drawing of a transforming bench, you can use special computer programs. If you need a product of non-standard shape or dimensions, it is better to draw up a diagram manually, taking into account all the necessary nuances.
Connect the legs using self-tapping screws and metal corners
Varieties and interesting design options
To choose a suitable transforming bench, you need to take into account the number of people who will sit on it. The number of seats depends on the type of structure:
- Bench-table with benches. This variety is the most common. With the help of simple manipulations, the model turns from one bench into two with a table. Advantages: accommodates up to 6 people, does not clutter up the space. The disadvantage of the bench is that it does not look very attractive when folded.
- Designer bench. When disassembled, it provides seating for up to 6 people, when assembled – for two; complemented by a tabletop. Advantages: ease of use, functionality. The disadvantage of the bench is that it has more modest capabilities compared to the previous option.
- Bench-flower. It is similar to a construction set, but there are differences - when assembled, it has the shape of a bud. Advantages: adjustable backrest elements, accommodates up to 5 people. The disadvantage is the recesses and cells on the seats.
There are other transformer options. The model with two benches is characterized by simplicity of design and manufacture. A corner product can include a different number of turns and provides a large number of seats. The option in the form of a coffee table has an original design, suitable for relaxing, reading, or working on a laptop. The hexagonal bench table is an eye-catcher and seats up to 8 people.
Connoisseurs of non-standard solutions will like the model of two chairs, which transforms into an ordinary bench, a bench for placing a couple opposite each other, as well as a product with a side table.
Bench-table with benches
Constructor
Hexagonal bench
Decorating Tips
The transformable bench can be covered with stain and then with water-repellent varnish, which is used to paint yacht decks. The varnish dries in about 36 hours. But still, it is not recommended to keep a bench coated with varnish outside in the rain and snow. If you still plan to install it in a permanent place on your garden plot, you can paint the structure with waterproof paint, which will dry for about a day. Once every few years, the paint must be renewed so that the wooden elements do not begin to rot, become moldy, and various parasites do not grow in them. If the structure is done correctly and you take care of it, it will serve you for at least 20–25 years. Very often craftsmen replace wood with metal, which does not look as beautiful and aesthetically pleasing, but the service life increases significantly.
We paint all the elements of the bench with stain
When creating high-quality transforming benches with your own hands, drawings are of great importance. There are many ready-made schemes on the Internet, but if necessary, you can create an individual plan. To do this, you need to keep the following information in mind:
Making a transformer tabletop
According to the drawings, the wooden tabletop will have dimensions of 126 by 57 cm. To assemble it, you will need 5 boards of suitable sizes, as well as 2 planks 57 cm long and any width (we take 4 cm wide planks as an example). The planks must be placed vertically, the boards must be attached to them with self-tapping screws so that there is a distance of 4 cm on each edge.
The tabletop is then attached to the base. To do this, you will need to cut 2 support boards for the tabletop, each measuring 40 by 10 cm. On one edge of each support you need to make a cut at an angle of 115 degrees, this is the angle at which the back of the chair will be located. It is necessary to retreat 14 cm from the edge of the tabletop, secure the stops on the inside of the plank using self-tapping screws. At the next stage, the master needs to place the back of the bench on the leg supports, drill holes with a diameter of 7 mm in the support and vertical board. Then the elements are connected using a furniture bolt 8 mm long and 6 mm in diameter, as well as a self-locking nut. Metal washers must be placed between the stops. When the structure is assembled, the master must himself check the correct installation of the tabletop-backrest. If the device opens and closes freely, then you can connect two benches together. For this purpose, armrests are installed on the protruding boards of the legs. To make them, you need to cut 2 boards measuring 8x22 cm and another 4 - 6x27. To figure out how to make a transforming bench yourself, you need to use master classes. The detailed description includes drawings with dimensions and photographs of each stage. The easiest way is to make your own models of benches from wood and metal. For work you will need the following materials and tools:
- boards and beams;
- building level, tape measure;
- screws;
- self-tapping screws;
- marker or pencil;
- sandpaper;
- metal fasteners;
- Bulgarian;
- screwdriver;
- drill.
To make a high-quality bench-table, you must carry out all the steps according to the instructions:
- Two boards 120 x 12 cm for the seat are carefully sanded. Two more - 37 x 10 cm (for the legs) are connected to metal fasteners so that they take on a triangular shape.
- A pair of prepared boards are screwed to the legs with self-tapping screws. The holes are drilled in advance.
- The lower part of the seats is strengthened with spacers, which are fixed with corners and screws.
- For the second bench, boards with dimensions of 110 x 22 cm are required. The legs are made of timber and attached with self-tapping screws.
- The boards are screwed to the base, the seat is secured, then the spacers are secured. The correct assembly of the structure is checked.
- For the tabletop, take 5 boards and 2 planks. All elements are connected to each other. The tabletop is fixed to the base.
- A lever responsible for transforming the model is installed. To do this, you will need two boards of any width, 88 cm long. Their ends are rounded.
- Holes with a diameter of 7 mm are drilled in the lever, leg and bar. All elements of the transforming bench are connected using furniture screws and nuts.
The accuracy of the construction of the table with benches is determined by checking compliance with the drawing. The internal width of the structure should be 115 cm, external - 120 cm. If these parameters are violated, the product will not fold. Creating a transformable table-bench with your own hands is an exciting activity. For work you will need the following tools and materials:
- square pipes 25 x 25 x 1.5 mm, six pieces in total;
- boards - 8 pieces;
- drill;
- Bulgarian;
- screwdriver;
- Sander;
- welding machine with a set of electrodes;
- washers, nuts, bolts;
- metal paint.
Step-by-step instructions will help you complete each stage of the work correctly:
- Metal profiles are cleaned and rust is removed. The blanks are cut according to plan.
- To create the frame of the bench, the tubes are welded. Holes for furniture bolts are drilled. Washers are used for easier unfolding.
- For the legs, elements 50 x 50 mm are cut out of a metal sheet. All frame parts are treated with a special compound.
- The boards are cut according to the parameters of the bench, sanded, impregnated with antiseptics and fixed to the body.
The metal structure can be made by experienced craftsmen and beginners who are encountering the manufacture of garden furniture for the first time. It is advisable to have experience with welding. Otherwise, the product may not be strong enough.
Additional materials for the bench
If we talk about the full production of a bench, then you won’t be limited to just metal and wood. There is also a small list of materials and consumables that will be needed. They are listed in the following table.
| Materials, photos: | Description: |
Primer paint for metal | The final coating of the metal may vary. Primer enamels are often used, which do not require surface preparation, apart from cleaning it. This paint is applied in several layers. You can even cover rusty areas with it, but we do not recommend doing this, since the service life of the protective layer will be reduced. |
Grinder circle for cutting metal | For frame structures, the metal always has to be cut to the design dimensions. For cutting, abrasive wheels are used, mounted on a grinder or similar tools. Wheels made of the same material are used for grinding metal and processing welds. |
Wire brush | Before painting, the metal must be cleaned. The task is to remove all the rust and expose its shiny surface. On this basis, even primer paint will adhere much better. |
Degreaser | Before painting, the metal is degreased. This will seriously increase the adhesion of the material and promote even application of paint layers. As a degreaser, you can use universal compounds, which are ordinary kerosene, or its light varieties, for example, white spirit. |
Electrodes for welding | Electrodes are also consumables. Without them, the benches definitely cannot be assembled. |
Set of metal drills | You will need to drill a little, but you should always have several drills of the required diameter in stock. Holes are made for bolted and screw connections. The wooden part of the bench is fastened in this manner. |
Bolts and screws | Again, necessary to secure the wooden parts of the frame. Sometimes they are used to connect metal parts, although welding is the preferred method. |
Wood processing materials | We have combined them into one line because different options may apply. Let us note antiseptic impregnations, which significantly increase the service life of wood in the open air, impregnations for changing the color of boards (this includes oils, stains, glazes, waxes, etc.), protective compounds and paintwork materials that create a waterproof film on the surface. These properties may be combined in some materials. For example, oil from water qualitatively protects and transforms the color of wood, making it more saturated. |
Sandpaper for random orbital sander | The surface of the wood must be carefully treated to make it smooth, safe and pleasant to the touch. To do this, it is polished with abrasives of different fractions. |
This variety is accompanied by the following set of tools:
- Bulgarian.
- Carpenter's square.
- Electric drill.
- Sander.
- A hammer for knocking down scale after welding, and indeed this tool is always required.
- Clamps for preliminary fixation of parts.
- Brushes or a small roller for a more even application of paint.
- Welding machine.
- Tape measure, pencil, marker.
- To create curved parts, a pipe bending machine is required
Pipe bending machine Other
small things can also come in handy, which you will find out for yourself when you start assembling your bench.