Plastic and glass surround us everywhere and very often bottles made from these materials accumulate in large quantities and litter balconies, garages, sheds and verandas. You can just throw everything into a landfill, but it’s better to try to use them as material for creative ideas.
Even inexperienced craftsmen can create an original lamp with their own hands from plastic or glass bottles. It is enough to be inspired by the ideas presented and arm yourself with our tips and recommendations.
Advantages and features of application
There are always many positive things about creating home decor items with your own hands. First of all, you can immortalize your favorite things, for example, by giving life to something that reminds you of a special event.
Another positive aspect is that by reusing old things, people help save nature from pollution from household waste.
Thanks to the variety of colors, the light from bottle lamps is very warm and creates a feeling of comfort in any space.
When creating lamps from glass bottles, you can implement different ideas and stylistic solutions. This could be a stylish bar accessory, a cozy table lamp, a vintage loft-style lamp, a romantic sconce, or a multi-colored gazebo lantern.
According to the method of power supply, the light bulbs can be battery-powered, run from a regular electrical network, batteries or solar panels.
To create a romantic mood, you need to take an empty container and place LED garlands inside it.
Peculiarities
Homemade lamps have many advantages over purchased ones.
- Firstly , by creating a decorative lamp, you harm nature less by reusing items that could be thrown away.
- Secondly , making a lamp from plastic or glass bottles is much easier than it seems.
Even if you have never done needlework, you can make an interesting and unusual lampshade by following simple instructions.
- Another advantage of such lamps is that you can make them the way you want to see them. Use your imagination and the advice of designers, and you can get a truly unusual decorative element for any of your rooms.
- Lamps made of glass or plastic will become a real decoration of any room.
How to make a lamp from a bottle
Any glass or plastic containers are suitable for production. Bottles of champagne, wine, sparkling water and beer - there is an idea for every occasion.
Tools and materials
To create a lamp, there are several ways: put a battery-powered LED garland inside, or you can make a full-fledged lighting device powered by an electrical network. Based on this, the process will require a different set of tools and materials.
Basic set of materials and accessories:
- glass or plastic bottles;
- glass drill;
- electrical kit or garland;
- sandpaper (sanding paper);
- scissors;
- wire cutters
For decoration you may need:
- old base from a floor lamp;
- wooden base;
- metal structure for the lamp;
- glass matting paste or paint;
- decorative rhinestones, sparkles.
- accessories for decoupage (glue, plastic mass, jute cord, paints);
- decorative glass stickers.
If the glass specimen is valuable, you should handle it very carefully when working so as not to damage it. To do this, the surface is wrapped in paper and secured with tape. Simple bottles made of beautiful glass are usually washed and the paper stickers are removed from them. The same goes for plastic.
Particular attention should be paid to safety rules when working with glass and electricity. If you are not sure of safety, do not take risks.
When working with glass, you must protect your hands from cuts and your face from injury from splinters.
To work with glass you need to have:
- protective glasses;
- thick rubberized gloves.
Electrical installation work requires special tools and dielectric gloves.
Important! If you have no experience working with electricity, carry out actions strictly under the guidance of a knowledgeable specialist.
DIY table lamp made from glass bottles
The lamp, which can be made in 10 minutes, consists of a glass bottle and an LED garland, with batteries hidden in the cork.
A banal glass container can be turned into a stylish design object
For production you will need:
- Prepare the source material, clean the label from the surface or leave it unchanged.
- Insert an LED filament with bulbs through the neck and close the bottle with a cork.
Another option for a beautiful night light is a floor lamp. A stylish bottle of expensive alcohol is very suitable for this occasion. At the same time, you can take any container made of beautiful glass or unusual shape. Even a lamp made from a beer bottle will look very original.
Lovers of designer items will never throw an empty glass bottle into the trash, but in a few hours will turn it into a fashionable lamp
Before production you need to buy:
- lampshade for a floor lamp (you can make it yourself);
- a set of electrical elements for fastening in the neck; before purchasing an adapter, you should measure the internal diameter and purchase an element of the required size;
- garland (optional).
In this manufacturing method there is no need to drill the glass, since the wire runs from the outside, from the light bulb socket.
Procedure:
- Wash and dry the bottle base.
- Insert the electrical adapter into the neck and secure it. If its size is smaller, you need to supplement the missing volume by wrapping it with electrical tape.
- Screw the light bulb socket to the adapter.
- Connect the electrical cord and plug. In this case, it is necessary to strictly follow the instructions for assembling the electrical element.
- Install the lampshade and screw in the light bulb.
Blanks for crafts
If you decide to make chandeliers from plastic bottles, first you need to purchase blanks, as well as buy those elements with which you plan to decorate it. Parts that may be useful when creating a chandelier from plastic bottles are wire, satin, plastic, toys, artificial butterflies, etc. You will also need wooden slats and wire as fastening: this frame will hold the entire chandelier.
Important! Think through every little detail. You can even draw a sketch and several chandelier design options in order to choose the best one. This will save you time and effort, besides, it will be possible to better understand what exactly you want to see in your room and what will look better in the overall interior.
Chandelier in the form of petals
Materials needed to create a chandelier from plastic bottles In order to create a chandelier from plastic bottles with your own hands, you will need to prepare:
- clean plastic bottles (cleaned of stickers);
- nail scissors;
- a new light bulb and possibly a socket;
- blowtorch;
- wire (you need thin and thick);
- soldering iron;
- regular scissors;
- knife;
- gloves to protect hands;
- chandelier frame.
First, you will need to trim the top of the bottles, and then cut the resulting ring. This will make it easier to cut out leaves from them. To make the edges more beautiful and neat, use not ordinary scissors, but manicure scissors: the work will be quite painstaking. After this, you need to treat the ends of the resulting leaves with a blowtorch.
Remember! It is very important to use protective gloves to avoid getting burned or injured when preparing sheets for the plastic bottle chandelier.
To create a visual effect of naturalness, it is worth heating the front side with a blowtorch, and at the moment when the leaf is well heated, you can make veins on it using a knife.
You can choose the shape of the sheets yourself. The leaves that look the most beautiful are those that are similar in shape to maple.
After all the leaves have been prepared, you can proceed to the stage of attaching them to the frame. Thin wire needs to be cut into small pieces. After this, take a leaf and melt its back side. While it's warm, glue the wire to it. After such work done, you should have full-fledged leaves with sticks.
At the next stage, you will need a large and long wire so that the leaves can be collected into one branch. All branches can be carefully screwed to a long wire. The resulting chandelier can now be mounted on the ceiling.
Insert the socket and screw in the light bulb. Your chandelier is ready!
Rate the photo of the layout of a studio apartment of 30 square meters. m: even in such a small area it is possible to create full-fledged comfortable housing with maximum functionality.
And in this article we suggest looking at photos of Ikea kitchen design in the Scandinavian style and evaluating the ergonomics, functionality, and laconicism of the facades.
Glowing ball
Another original option that you can quickly and easily make yourself is a chandelier in the shape of a ball made from plastic bottles. This idea is especially useful if the chandelier shade was broken. If there are several of them, you can remove the others and make as many shades for the chandelier as needed.
Making a lampshade is very simple. You will need glue, plastic bottles and a simple tool, you will also need scissors.
Advice! You should choose thermal glue, it will stick better, and the lampshades will last you a long time. It is advisable to choose plastic bottles that are the same - both in color and size.
Creating a plastic chandelier begins with carefully cutting off the bottoms of the bottles. This needs to be done as smoothly as possible. If something doesn’t work out, you can trim the cut using nail scissors. However, the sections of the shade will be on the inside, so if you are not worried about how your chandelier shades will look from the inside, you can proceed to the next step and start gluing the bottoms of the bottles together.
To make the cut look beautiful, the edge/cut can be immersed in hot sand in a frying pan for a few seconds, or you can use a blowtorch.
The lampshade for the lamp is very simple to make, but it requires diligence and attention. It is worth noting that instead of glue, you can use any other fastener. For example, you can simply tie the bottoms together using an awl and wire. It is best to take a thin wire - this way it will be practically invisible.
Got a ball from the bottoms of plastic bottles? Great, the lampshade is ready. Now you need to make as many lampshades as you have on the old chandelier, and then hang them.
Important! Since plastic cannot withstand high temperatures, you should choose bulbs with cold light. This will provide you with such a beautiful interior detail as a chandelier made from plastic bottles with daylight, which will keep this decor item in good condition for a long time.
Chandelier with flowers
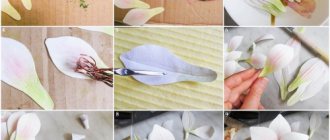
For such a chandelier, you will need bottles from which you can cut flower blanks using nail scissors. Therefore, it is important to cut the plastic bottle into two parts. Cut the top into petals. After this, twist the resulting petals inward and come up with a beautiful center for the flowers.
Buttons are suitable for the core of the flowers. They can be matched to the color of the bottles, plain or, conversely, multi-colored. Instead of buttons, you can use corks, caps and the like.
After this, the flowers need to be strung on a wire, after which you can collect everything into one ball. It is best to match the twigs to the color of the bottles and carefully tie the flowers crosswise.
Such a chandelier can be attached to an old frame. This can be done using available materials - such as paper clips, wire and buttons. After this, the lampshade can be attached to the ceiling. The easiest way to attach it is with double-sided tape. You can also use screws for decoration.
Are you planning to buy a floor lamp with a table? Learn about the varieties, evaluate the advantages and disadvantages of such items, look at a selection of photos of various models.
Find out more about Scandinavian kitchens with photos here: any housewife will appreciate the convenience, functionality, practicality, minimalist design in clean and light colors.
Beautiful lamp made from wine bottles
A lamp made from wine or champagne bottles can be made in the form of original candlesticks.
Having learned a simple way to cut bottle glass, you can make many useful things - candlesticks, glasses, vases
For work, you can use glass of any color, select identical bottles of the same volume, or find containers of different shapes and colors. The play of light and the tone of the interior lighting will depend on this.
For production you will need:
- bottles;
- cotton (natural) thread.
- alcohol or acetone;
- lighter;
- sandpaper;
- container (bucket) with cold water.
Progress:
- In the place of the intended cut, wind a thick natural thread well moistened in acetone or alcohol liquid. Do not use synthetics as they will melt.
- Light the thread and begin to rotate so that the flame evenly heats the entire circumference.
- Place the container in ice water. The crack should run exactly along the circle where the thread is stretched.
- Sand the cut with sandpaper. To do this, place a sheet of sanding material on a flat surface and make circular movements with the cut.
- Place candles of suitable diameter on wooden or ceramic stands. Place ready-made candlesticks on top.
Step-by-step instruction
Step 1
It is necessary to soak the bottle in water for some time. This will make it possible to easily remove labels from it and wash off various contaminants. After thorough cleaning and rinsing, the workpiece should be allowed to dry thoroughly.
Step 2
After the bottle has dried, a cut is made at the desired level using a glass cutter. To obtain a perfectly straight cut line as a result, it is recommended to carry out this procedure slowly and systematically.
Important! All work with glass must be carried out wearing protective equipment.
If you don’t have a glass cutter at home, the cut can be made using ordinary thread. There are many demonstration videos on the Internet on how to do this correctly.
Step 3
After making the cut, the workpiece must be placed under the tap, first with hot water, then with cold water. Thanks to sharp heating and then sudden cooling, the unnecessary part of the glass will fall off exactly along the cut made.
Step 4
The cut line is processed using sandpaper. As a result, it should turn out quite smooth and even.
Step 5
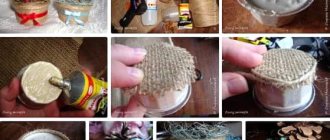
Taking the screwdriver in your hands, you need to disassemble the lamp and carefully pull out the electrical wire. Then it must be carefully passed through the neck of the bottle. The lamp is put back together and its functionality is checked.
Step 6
The final stage is decorating the exclusive lighting fixture. Ordinary wire of any color is wound around the product, starting from the neck, depending on the owner’s preference or matching the color scheme of other elements of the interior of the room.
The illuminator is ready, all that remains is to mount it in place. If desired, it can be given any design look, for example, painted. The main task is for the homemade lighting device to fit organically into the surrounding environment.
Recommendations! Glass stone is ideal for decorating a chandelier, but it is worth considering that light transmission will be somewhat reduced. It is better to take stones of different shades to reproduce the effect of a play of colors. The main thing is that the product looks organic. To attach glass pebbles, a special glue is used that can withstand temperature changes.
A homemade illuminator will be completely ready for use only after the adhesive composition has dried, this will ensure maximum reliability of the connection of glass parts. This will take approximately a day. As you can see, making a lamp from a bottle is not difficult.
Loft lamp made from bottles
In modern apartment design, the loft style has become very popular. The bottle lamp is ideal for such an interior.
Sometimes accessories for creating an unusual sconce can be found in the most unpredictable places, for example in a plumbing store
To make it you will need a beer bottle, several brass parts for plumbing and adapters for attaching wiring and light bulbs.
This model uses a narrow LED lamp, so there is no need to drill or cut glass. The function of the switch is performed by the water valve. To simplify the design, it can be placed on a wire.
DIY New Year's lamp from a bottle
Colored lights sparkling in the glass create a fabulous New Year's atmosphere. Lamps filled with colored garlands are very easy to make. To do this, it is enough to have some electrical installation skills to partially disassemble the garland and thread the wire into the hole drilled in the bottle.
New Year's design can be created by decorating glass containers with symbols of winter
The lamps can be decorated with sparkles, snowflakes can be glued on, covered with matte paint, and other New Year’s accessories can be placed inside in addition to the garland.
Without extra costs, you can make New Year's decorations for your home by taking a wine bottle and holiday decorations
White cloud of flowers
A lampshade made of embossed bottoms, painted white, will refresh and brighten the room.
It is necessary to prepare relief bottoms of different sizes in the amount of 140-180 pieces. You also need a utility knife, a heat gun and paint (acrylic or in a spray can).
Cut off the bottom, grabbing the sides by about three centimeters. Paint the bottoms white. Some don’t need to be painted, it will look more interesting. Fasten the resulting “flowers” together with hot glue, forming a dome. Leave a hole in the middle to thread the light bulb socket through.
Pendant lights made from wine bottles
You can make a pendant lamp from a bottle, decorated with wire, using a minimal set of materials.
Pendant lamps can be mounted on a common wooden base - such a chandelier can be hung above the bar counter
To work you need to prepare:
- 3 bottles;
- glass cutting machine;
- sanding paper;
- light bulbs with wires;
- glasses and gloves for protection;
- wire black or other dark color.
- screwdriver.
Progress:
- Prepare the material.
- Cut the containers along the marked lines. The size of the lamp depends on individual preferences. Don't forget to protect your hands and face with protective equipment.
- Sand the cut with sandpaper.
- Using a screwdriver, disconnect the wire from the socket and thread it into the neck. Reassemble the structure, attaching it to the base.
- Decorate the lamp by winding the wire around the circumference in any order.
Glass overexposure: interesting ideas for pendant lamps for apartments and cottages
To make a lamp, you can use not only wine bottles, but also shaped bottles for cognac and liqueur or miniature beer bottles.
A composition of lampshades of different sizes and shapes will certainly impress your guests. You can use the frame from an old chandelier, or you can fix them as separate lampshades.
Glass goes perfectly with a metal or wooden frame.
To carefully and safely remove the bottom of a bottle, you need to wrap the bottle along the “cut” line with woolen thread in several layers, then, after tying the ends, remove the wrapping to wet it in acetone or vinegar and put it back on the bottle. After this, the thread should be set on fire and, turning the bottle, wait until it burns out and then immediately lower the bottle into a pre-prepared basin or sink with cold water. The bottom will easily fall off, leaving a clean, smooth edge.
Another method requires rigid fixation and a glass cutter. First, use a glass cutter to make a closed cut line. In this case, the glass cutter is pressed tightly against the glass, and the bottle, sandwiched between the bars, is slowly rotated. When the line is ready, the container is immersed in cold water slightly above this line, and boiling water is poured inside through a funnel. As a result of such actions, the glass at the notch will burst and the bottom will fall off. All that remains is to sand the edges with sandpaper or a block. You may not get the desired result right away, so first you can practice on not the most beautiful bottles.
To implement the idea presented in the next photo, you will need three identical containers made of light brown glass. When the bottom is separated by the methods described above, you can begin assembly and decoration, which consists of randomly wrapping copper wire.
The next version of the pendant lamp is suitable for the kitchen and living room.
A convenient and practical lamp for illuminating a country porch or a gazebo for tea drinking can be made quite simply and quickly from beautiful bottles of noble alcohol lying around. To be more economical, it is better to use energy-saving lamps.
A street lamp from bottles can be made using solar-powered LED lamps or using wax candles. Such designs are indispensable in places where it is difficult to install an electrical wire. Glass perfectly withstands contact with open fire, so using candles is completely safe.
Floor lamps made from plastic bottles
You can make an original floor lamp with your own hands from ordinary plastic bottles and disposable spoons.
A cheerful floor lamp in the shape of a pineapple will decorate a child's room - to create it you will need a plastic bottle and disposable spoons
To make a bright floor lamp you will need the following materials:
- five-liter plastic bottle;
- knife;
- gun with silicone glue;
- disposable large spoons (for the “Pineapple” model, use yellow material);
- base for a floor lamp.
Sequence of work:
- Cut off the bottom of a large container.
- Cut off the handles from plastic spoons. The parts can be painted or you can immediately purchase colored cutlery.
- Start gluing from the bottom edge. Attach each next row, slightly extending onto the previous one.
- Make pineapple sepals and leaves from thin green plastic.
- Attach the lampshade to the base of the floor lamp.
Lampshade made of plastic
Some will say that such a lamp made from plastic bottles is unsafe and has an unaesthetic appearance. In urban environments this is true. But it is ideal for a gazebo in the country.
Master class: how to make a lamp from a plastic bottle with your own hands:
- Prepare a socket with an electrical cord and a switch, a light bulb (you need an LED, an economy one or a regular one, but of low power), a five-liter water bottle, a glue gun, pliers, plastic spoons, a screwdriver, and a construction knife.
- Use pliers to completely bite off the handle of the spoon so that only one oval part remains.
- Cut off the bottom of the eggplant using a construction knife.
- Connect to the network.
- Once it's ready, start gluing on the spoons. The first row goes from the bottom, and all subsequent rows slightly overlap the previous ones.
- Cover the entire container in this way.
- Glue the spoons together, stacking them one on top to form a ring.
- Attach the cartridge and cord to the neck of the bottle.
- Glue a ring of spoons onto the neck.
- Screw in the light bulb.
The lamp shade is ready! If desired, it can be painted. To ensure that the paint applies evenly, it is better to paint each spoon separately, and then paste them over the eggplant. It is most convenient to use spray paint. This way you will get less dirty and the layer will lie evenly on the surface of the spoons. Plus, it dries faster.
How to make a ceiling light from plastic bottles
Scrap material, such as plastic bottles, can take its rightful place in the house or country house in the form of original lamps.
Lampshades made from transparent plastic bottles will add an unusual style to the interior of a country house or gazebo.
Plastic is a very malleable material. It can be cut, heated, bent, melted - this is how various decorative parts can be made.
This master class describes the process of assembling a lamp from transparent plastic bottles with a volume of 0.5 liters.
For work you will need to prepare materials and tools:
- bottles 50-60 pcs.;
- stationery erasers;
- sharp knife;
- set for a light bulb with socket and wire and switch;
Lamp assembly:
- Clean and dry the collected material well.
- Cut off the plastic rings.
- Tighten the bottles together with rubber bands, securing each row sequentially.
- When a sphere is formed, insert a cable with a light bulb into it.
Advice! Tighten the structure with rubber bands as tightly as possible so that the lampshade does not sag or become deformed during use.
Master class No. 2. Chandelier made of bottles
If you've ever been on the phone without noticing something you've painted or cut into pieces, check out how it can be used to create extremely original pieces, like this bottle chandelier.
Materials and tools:
- 10 small plastic bottles (transparent, same or different colors);
- plastic frame for a light bulb (can be found at a hardware store that sells electrical goods);
- screws (they may be included with the frame);
- 10 zip ties;
- crosshead screwdriver;
- big scissors.
Technological process
Step 1.
- We take the bottles, remove the caps (we won’t need them) and cut off the bottom of them, about a third of the height of the bottle. We begin to cut them lengthwise, as shown in the photo, 1-2 cm wide.
- Don't try to make even stripes , this is of no use here. But you should cut it all the way to the neck - this is necessary for later securing them to the frame and to each other.
The strips on the bottles can be bent in different directions - the more magnificent the lamp looks, the better.
Step 2.
- When all the bottles are cut, take the chandelier frame (frame for the lamp) and attach it as in the photo. We insert the neck between the axles and clamp tightly with two ties.
- We do the same with the other bottle - we insert it with its neck into the opening between the other two axes and secure it. And so on until all the bottles are attached to the frame.
Step 3.
Now you need to make sure that all the axes of the frame are covered with bottles and when the lamp is ready, there will be no gaps left. After this, you can trim the tendrils of the ties.
Step 4.
Soon the lamp will shine in all its beauty - insert the light bulb into the frame and hang it from the ceiling. Like a furry colorful hedgehog or a blooming flower, she gives joy and a smile to everyone who pays attention to her.
DIY sconce lamp made from a plastic bottle
Sometimes at home you can find a base from an old wall sconce that you would hate to throw away. To prevent it from going to waste, you can make a new lampshade from plastic bottles.
For an air lampshade you will need about 10 plastic containers and a gun with silicone glue
Completing of the work:
- Cut off the bottom. Cut the plastic lengthwise into strips. To determine the length of the petals, you need to bend the strip in half and attach it to the base. Cut the remaining bottles in the same way as the first, observing the dimensions.
- On all blanks, bend the strips outward and secure them to the neck using glue or rubber bands.
- Glue the resulting decorative elements onto the base of the lamp. Only an LED lamp can be used in sconces.
Is it worth making a chandelier yourself?
In order to properly decorate your home, you should pay attention to lighting. It is very important to choose the right light source and its location, since even a simple lamp or chandelier can ruin the entire interior.
Many people wonder whether it’s worth taking on such a task, or maybe it’s easier to go to the store and buy a chandelier? This decorative element is a common product, and in stores that specialize in selling such things, you can choose a chandelier to suit your taste, as well as for any interior style.
Those who like to stand out even in small things should ask how to make a chandelier from plastic bottles. In addition, this is a cheap and exclusive way to decorate any room in the apartment.
.
Street lamps from a bottle
You can make a cute, weather-resistant lamp from a plastic bottle.
An original and affordable lampshade, made from one plastic bottle
For the lampshade you need to take 3 plastic containers - 1 for the base and 2 colored ones for decoration. Sharp scissors, a utility knife and tape will come in handy.
Sequence of manufacturing the lampshade:
- Cut off the bottom and threaded neck from the main bottle.
- Cut the colored containers in a spiral into strips 0.5 cm wide and paste them over the base for the lampshade in any order and secure with tape.
- Place the lampshade on the lamp.
Important! Only LED lamps can be used in a plastic lamp.
Features and nuances of making a chandelier with your own hands
Before you begin the exciting process of making real designer chandeliers with your own hands, I would like to pay attention to some points:
- materials for the chandelier should be non-toxic and painted with environmentally friendly paints. These are important requirements for placing lamps in living rooms;
- for fire safety purposes, only LED lamps with a low heating temperature can be used for chandeliers;
- It is important to think about the lighting intensity in advance. According to standards, 20 W are required per 1 m² of area. By simple arithmetic calculations you can correctly determine the number of light bulbs;
- the decor of the chandelier should suit the design of the room, complement it, creating a special atmosphere of comfort;
- When making a lamp, it is important to take into account the height of the ceiling. For low rooms, a ceiling mount on a strip is suitable. If the height is about 3 m, give preference to suspended structures.
Decorating ideas
The glass bottles in the form of lamps themselves look original. Especially collectible or expensive items. Excessive decor will only spoil the effect of the expensive design of bottles of elite alcohol.
To decorate lamps you can use various techniques and materials:
- Paint with stained glass paints or simply paint the inside of transparent glass.
- Decorate with decoupage elements.
- Cover the surface with rhinestones, marbles, decorative ribbons and figures, stickers, twine.
- Decorate with macrame elements.
- Place sea pebbles, colored sand, glass balls, decorative soil, and dried flowers inside the bottle.
- Make the surface of the glass matte using paint or a special paste.
- Create lamps and candlesticks of different shapes by cutting bottles.
Decorative elements need to be selected so that they harmoniously combine with the interior and the lamp itself.
Chinese lantern
An option in the form of a Chinese lantern is suitable as a wall lamp.
You need to take a 2-3 liter container with smooth walls, 20 cm long wire and a stationery knife.
Cut the walls from the throat to the bottom into even strips. Bend the ends of the wire with a hook and secure it to the bottom and throat. Pass the wire through the neck and secure the socket with the light bulb on it.
Original ideas for lamps made from bottles with photos
Bottles from famous brands can become a design detail in an ordinary tabletop floor lamp The combination of a glass bottle and wood looks presentable and can become an original gift Volumetric decoupage allows you to create sculptural masterpieces even on the surface of a glass container, turning the lamp into a work of art Original candlesticks can be made from ordinary wine bottles by cutting cut them in half and decorate them with decor from wire and letters. To make bottle lamps, you don’t need to know how to handle electricity; just insert a special luminous cap into the neck of the bottle. Urban style and loft carry the idea of using old things in an unexpected embodiment. If you have a glass collection in your closet, you can make it from her enviable lamp or even a chandelier
Possible luminaire design
It is not necessary to make a lamp from an ordinary bottle. It can be used as a basis for implementing interesting ideas and ideas.
Design options:
- Paint the bottle with acrylic paint. You can draw a picture or make a stained glass window. A lot of lamps made from bottles, identical in shape, but painted in different colors, look very beautiful.
- You can wrap the bottle tightly with thread or yarn.
- Cover the bottle and make an engraving.
- If you are making a table lamp, then inside the bottle you can pour coffee beans, multi-colored salt, seasonings, cereals, pasta, and so on. Such a lamp will not only serve its intended purpose, but will also serve as an excellent decor for the kitchen.
- There is much more you can do.
- If you have large perfume jars, they will also serve as an excellent material for creating lamps.
- To make a pendant lamp, it is not necessary to fix the cartridge or stopper in the neck of the bottle. You can insert the cord completely into the container, and place all the other parts under the narrow top. This bottle will look more like a lampshade. Only then do you need to think carefully about fixing the electrical cord.