Carpets have been created by hand for many centuries. To create an exclusive accessory for decorating your own home, you can use a variety of materials in the form of threads and yarn, ropes and plastic bags, lids, terry towels, pebbles from the sea, corks, etc.
The first thing you can say when starting a master class on how to make a rug with your own hands is the manifestation of imagination, the application of perseverance and patience, and then you can create a unique product without difficulty.
And if you fill the mat with a removable pad in the form of an abrasive filler, then it will turn from decorative into massage.
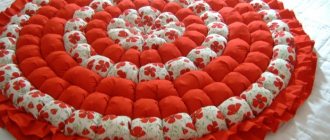
The photo of the rugs shows that the floor covering can be made with your own hands from pre-prepared pompoms or pile threads, by knitting, weaving or weaving.
Knitted floor products
To make a knitted product, you need to prepare the following materials
- cardboard sheets,
- marker pen,
- threads of various thicknesses,
- scissors,
- hook number 7 or higher (can be replaced with knitting needles).
First of all, air loops are collected in the quantity that corresponds to the rectangular size of the future carpet. To make a round product, it is enough to cast on five air loops, connect them with a ring, and then, adding them in a circle, tie the workpiece.
For convenience, they came up with the “patchwork” technique, when several parts of the canvas are prepared, and then they are all sewn into a single product.
Old things
Anyone who has accumulated unnecessary T-shirts, T-shirts and other knitwear items can make rugs from old things.
To work you will need:
- construction mesh, divided into large cells,
- thick crochet hook,
- strips cut from old things.
A strip of fabric is placed under the prepared mesh in the center, and the ends are pulled out using a hook and tied tightly. The next strip is threaded side by side in the same way and also tied with a knot.
Knitting is carried out in a spiral until the entire mesh is filled. You can make braids from such strips in advance and lay out a carpet from them.
Note!
Photos of do-it-yourself rugs
This time we will talk about weaving rugs on a frame. These are...
These rugs are good as door mats, on benches and chairs. The checkered rug “lives” in the back seat of my burgundy car and protects it from getting dirty by the kids.
I must say that this is no less exciting activity than crocheting. It is complicated only by the fact that you need to make a special frame. But there are more than enough raw materials for weaving such carpets! After all, any unnecessary rag is suitable for him.
Schematically the frame looks like this. Its dimensions depend on the desired size of the rug.
This is an improved frame.
It can be used to weave 7-10 sizes of rugs from small lunch mats to frame sizes. There are several pin positions and the ability to move the middle bar.
And this is the frame assembly close up
. While wooden fingers can be replaced with nails, a metal rod is difficult to replace. The material must be smooth, steel and not bend.
This is perhaps the most difficult thing. But if you manage to overcome these obstacles, then you can easily and happily recycle all the junk in the house into rugs.
To be fair, this is not the first article on frame mats and not the first video.
The previous Rug from shreds and Rug from shreds on a frame are made with a different, more complex weave, rope.
New rug
We use plain weave, which even children can handle. These are the warp threads of that same checkered rug.
You can start with smaller things - hot coasters, lunch mats. True, the photo shows a weaving rope, a link to which is in this article.
So this winter you will definitely have something to do! And we, as always, welcome your comments!
Spring is the time for general cleaning. Therefore, we should look into our closets and go through everything to get rid of the old things stored there. But don’t rush to get rid of it for good, because everything has the right to a second life. For example, you can create rugs from old things with your own hands and give yourself new emotions and memories.
Weaving on frame. Imitation of bran weaving.
A long time ago... but not very... about 10 years ago they taught me how to weave on a frame. The result was an imitation of sack weaving. Being an “information hamster”, I tried for a long time to find on the Internet MK for this type of weaving (originally Russian!) But, alas, I couldn’t find it. I had to do it (so as not to forget how to do it:)..). We need a wooden frame with nails and woolen threads in two colors: main and finishing. There may be several finishing colors, depending on the pattern. The thickness of the threads should be the same (to avoid problems). The frame for this weaving can be either square or rectangular. It is best to make the distance between the nails 7mm. Then you can weave from thin yarn. This mk uses a frame with a pitch of 10mm (1cm) nails m/d
Needle with a wide eye, scissors, fork So, let's get started: We tie the warp thread to the outermost nail and begin to warp the warp, done loosely, with slack
If you press on the threads, they should bend down by 3-4 cm. We tie the tip of the thread on the outermost nail. We cut the threads of the main tone: 2x (side length + 20 cm (fringe))
I like to work with a needle for sewing up bags. The flattened, curved tip is very convenient
We insert the thread folded in half into the needle and begin to make a plain weave.
..to the top
Cut the loop on the eye of the needle...
and point the threads in opposite directions
thread a new thread into the needle and lay the next row of plain weave
and we repeat: cut the loop,
separate the threads
We tie the ends on one side with a knot and put a loop on the outer stud
and begin to lightly nail the threads (the fork does the preliminary work :) )
after preliminary tamping, we tighten the free ends on the other side
we tie them in pairs with knots and put them on nails: one pair of threads - one nail
repeat the tamping
and so on until the beginning of the drawing
Drawing upon request. It can be paired, maybe in the center. It is advisable that the broaches be no more than 5 threads
Now we lay the threads according to the pattern of the drawing. But also: double thread - cut the loop - separate
In the process, I realized that the decorative thread is thinner than the main thread. I had to double the threads of the pattern
Don't forget to tap the threads every 3-4 pairs. It is advisable to control parallelism with a ruler
We are nearing completion
We laid the last pair. You can leave it like a designer garment :)
But I decided to finish it right :) Cut one length with some extra for fringe
and stretch the last thread of linen
Ready!
Trim the fringe. (I was in a hurry. It’s better to cut it after removing it from the frame)
Filming
Here is the finished napkin!
Face
Wrong side
Creative success!
Rugs made from old things, what techniques can be used
Old things are an excellent material for creativity, which a thrifty housewife can always find. T-shirts, unusable towels, and any wardrobe items can always get a second life. But it is still very important to understand that in order to create new things from old ones, it is necessary to pay attention not only to the material for creativity, but also to the technique that we choose for this.
After all, rugs from old things can be:
- weave,
- to tie,
- sew.
And we will try to create a rug from old things with our own hands step by step, using detailed master classes and getting an excellent result.
Weaving
One of the oldest and most proven techniques for creating carpets is weaving. After all, this does not require a lot of knowledge or skills. And sometimes the simplest tools are required, easily replaced with something that is always at hand. And therefore, it’s worth starting to create your first rug with weaving or weaving.
Weaving according to the principle of macrame
If you think that macrame is only suitable for creating small elements, then now we will dispel this belief. After all, if instead of a thin lace you take something more voluminous and dense, then the result will be completely different.
There are no difficulties or tricks in weaving rugs from old things that are inaccessible to novice craftswomen. As in any technique, the main role here is played by the sense of taste and the desire to create. Therefore, any set of old clothes can easily be turned into a charming bedside rug with a little effort.
Basic knots and pattern combinations are great for weaving. But it is worth considering several factors:
- The rug is used actively and therefore needs to be washed from time to time,
- they will not only trample on it, but can sit, lie or use it as a bedding on a chair,
- it must fit into the overall interior.
That is why when choosing knots, do not forget that the rug should:
- look like a new, not well-worn rug,
- have a dense structure so as not to crumble in your hands and not turn into a string bag,
- not be easily soiled or bulky, for ease of cleaning.
And therefore, the most common way of weaving at present is to use the principle of French bracelet knitting.
Such a charming rug will definitely not go unnoticed in the house and will highlight the interior and taste of the owner. And to create it you won’t need much:
- wide strips of old things,
- adhesive tape,
- scissors,
- thread and needle.
To begin, arrange the 5 strips in the order you like best. Next, fold 5 more strips, but in a mirror image.
It is most convenient to fasten all the ends from the beginning side with adhesive tape. This will allow you not to be distracted during the weaving process, and also clearly define the sequence.
So, when all the ribbons are laid out, we take the leftmost one, take it to the side and fold it so that it lies on top of all the others, creating the number “4”. We place the working tape behind the adjacent one and tie the first knot.
We continue to tie the same knots on the next 3 ribbons, and then move to the opposite side, starting to weave towards the first series of knots.
When both working strips meet in the middle, tie them and continue weaving from the edge. Once you've reached your desired length, simply tie the last knots with a strong thread and trim off the rest to create a cute fringe.
Don't forget that you don't have to twist the braid, you can fold it like a snake or lay it parallel to one another to get a charming rectangular rug with fringe.
Knitting rugs from old things
It is not necessary to weave rugs from old things; knitting is considered a more common solution for creating them.
Even if this is your first time picking up a hook, you will be able to create a charming and practical decorative element. After all, it is the large knitting that will help you quickly understand the intricacies of crocheting. And a pattern made from the simplest single crochets can look very bright and original if you choose the right yarn.
Moreover, yarn is also made from old things. This is how things can go:
- old T-shirts,
- jeans belts,
- just thin strips of fabric left over after sewing outfits.
It is enough to know and be able to knit increases, and then it’s a matter of technique.
If the yarn taken for the rug seems loose or thin to you, you can use an excellent trick - at the beginning of knitting, insert a strong cord into the stitches and continue tying it. This way your spiral will keep its shape perfectly.
To get a more openwork rug, knit with double crochets, increasing their number in each row. But keep in mind that although such knitting will be beautiful, it will be less dense.
Openwork rug
It is worth noting that you can knit a rug from old things without a hook - an interesting technique of knitting from rings on your fingers will help you cope with the disposal of small pieces without spending extra effort and without forcing you to buy any special tools.
You can learn how to knit from rings from Olga Popsueva. In her video master class, she explains in detail how to weave a braid and then form it into a rug.
Patchwork
When talking about using old things to create rugs, it is difficult to ignore sewing. After all, they started a long time ago and independently of each other in different countries.
As now, women did not throw away old things, children's dresses or their husband's worn-out shirts, preferring to collect them so that they could then sew bedspreads, curtains and, of course, rugs. It’s no longer a shame to trample such rags, cut them and assemble them into various intricate patterns.
Fluffy rugs on mesh
In the last few years, fluffy rugs have become very popular, making it so much fun for children to play and crawl in them. And it’s just nice to immerse your feet.
The high pile and soft texture have won the hearts of craftswomen and housewives, and the bright colors attract the attention of household members. But what’s most pleasing is the fact that you can make such a rug without using any special tools.
A fluffy rug can be created in different ways:
- tying the cuts in knots,
- using a carpet hook,
- using the simplest crochet hook.
Our basis will be a mesh from a hardware store with a large mesh or a bath mat with holes.
In addition to the basics, we also need:
- fabric ribbons,
- scissors,
- hook (optional).
To begin with, cut short ribbons, but do not skimp on their length, because you need to take into account that they will be folded in half, and even tied or otherwise fixed to the mesh. Therefore, it is better to make them longer, and then cut them as you want.
When everything is ready, you will be left with the most important task - thread the strip of fabric into the cell so that both ends remain on the front side, and then you can tie them together with a simple knot, or pass them through a loop using a hook.
When the flaps completely cover the mesh, all you have to do is cut them to the desired length and the rug made from old things is ready to delight you and your feet.
Fluffy rugs using a sewing machine
If you don’t want to waste your time tying each individual ribbon, or you haven’t found a suitable mesh, then you can go in a simpler way, for which we will need:
- an old pillowcase or piece of fabric that will become the base,
- all the same ribbons from old things,
- scissors,
- sewing machine.
Knitted fabric is best suited for such rugs, as it is more elastic and soft. In addition, it is easy to sew on without fear of breaking the needle.
Bright carpet made from old knitwear
Heart shaped rug
After you cut the required number of ribbons, pull them lengthwise so that they curl a little, and then simply apply them to our base and sew them in the middle, row by row.
Don’t worry if the strip doesn’t lie flat, you can always trim the entire pile, leveling it to the desired length.
Instructions for weaving a rug on a frame with nails
For me, it’s easier to knit a rug on a frame with nails than to describe this process on paper, but since I decided to tell you how and where I use unnecessary things, here are instructions with photos for you on knitting rugs from rags.
My granddaughter Julia helped me take photos to show the process. So, the frame with nails is ready, the rags are cut into a long thread, wound into balls. Weaving on a frame with nails begins by stretching cut yarn from rags onto nails.
How to make a rug from old things on a frame with carnations
Beginning the process of weaving a rug
I will try to show step by step the weaving pattern on a frame with nails. For the 1st layer, choose yarn of the color you have in mind. In my example, the color is pink. We put a loop at the end of the thread on the 2nd nail on the left side (we skip the 1st for the convenience of further weaving) and lead the thread to the right side.
There we bend the thread around the stud of the same name, and lead it again to the left, then again to the right and back, alternating studs one at a time. It looked like zigzags made of thread. We do this all the way to the bottom, but do not forget that we do not hook each nail, but every other one.
At the end, we make a loop at the end of the thread, and with this loop we hook the thread to the last nail at the bottom right. 1st layer is ready. Let me remind you that there will be 4 layers in total. If you are learning to weave for the first time, it is better to take balls of different colors of fabric to make it easier to navigate when working.
Next, turn the frame onto the other side by 90 degrees. We will pull the yarn in the same way, in a zigzag, through 1 nail. The dark gray threads lie perpendicular to the pink ones.
I note that the tension of the threads should be average so that they do not fall off the nails, and so that as a result the knitted product does not decrease too much in size. The thread on the last row at the bottom is again secured with a tied loop on a nail.
Next, we turn it 90 degrees again, take yarn of a different color (I got it raspberry-pink, since the children’s T-shirt was like that) and stretch it over the nails that we skipped in the previous layer. In the photo below you can see that all the studs on this third layer are occupied.
The last, 4th time we turn the frame and stretch the last layer, it will be dark gray. Thus, we “occupied” all the free nails, hooking the cut threads into them in the form of zigzags.
Weaving rugs on a frame - technology
Now you need to understand that the rug will have neither a front nor a back side - they will be the same, in the form of a checkerboard pattern. This will happen because it was not in vain that we pulled the threads through one nail. This alternation will create the weave, and this can be understood from the attached photos.
First, we secure all the rows on the left so that they do not fall off the nails. To do this, remove the left edge of the lowest dark gray thread from the nail and drag it under the pink thread, which we will pick up with our finger from the depths, from the 1st layer.
Having pulled the thread through, we again put this fixed left edge on the same nail. We do this through the row (1st, 3rd, 5th, etc.). The pink thread secured the entire left edge of the future product.
Now we remove the bottom thread from the right side {1} and begin to “dive” with this thread under the pink thread, which we take out from below, from the 1st layer {2}. We dived in, pulled the top thread under the pink {3} and saw the resulting weave {4}.
Then we “compact” the resulting row with our fingers. To create an interlacing of threads, that is, a checkerboard pattern, you need to move the next row, which is visible inside, by hand towards the just “compacted” row.
Then we continue like this: we stretch one row under the pink thread, and simply move the other down to the formed row. On a small frame this happens very quickly, but on a large frame it happens more slowly, since the rows are longer there. We do this until the end.
The final stage of weaving with carnations
When all the threads are hooked onto the nails, they need to be closed with a hook to create an edge. To do this, we insert the hook into the 1st loop, then pull the 2nd through it, removing it from the nail, then pull the 3rd through the 2nd, and so on.
It is important that there is always 1 loop left on the hook. When we close all the loops, there will only be one left. It needs to be sewn to the edge of the rug so that it does not unravel. Our rug is ready!
All that remains is to use a hook to hide various “tails” and knots inside. You can decorate such products with fringes made of threads or beautiful shreds - whatever your imagination requires. If you use rugs as rugs, then it will do without fringe.
My very first one was not made from knitted rags, but from old yarn. His granddaughters immediately took him to their house to play. Of course, the yarn makes the weave even, and the rug looks beautiful and neat. But the threads do not stretch, and weaving becomes difficult.
Rugs on frames with nails are used everywhere: I give them to friends for a bath, for a dog bed, for a stand for pots. Our family lives in a private house, so I have such products everywhere on the floor, and in the bathhouse too. In the summer we sit in the yard on a bench covered with rag rugs.
Rugs made from old things, what will be used?
We learned about techniques for creating a rug from old things, now it’s worth talking about what can serve as material for them and how best to bring your idea to life.
Taking into account the density, quality and size of the old item, you can choose the method of its transformation. That is why we would like to tell you a little about how and what rugs are made from by modern needlewomen.
Rugs made from old jeans
The first thing that comes to mind that requires regular disposal is jeans. Denim has long conquered our hearts and there is not a single fashionista or fashionista who does not have jeans in her wardrobe. Moreover, despite their strength and versatility, they still wear out, stretch, or otherwise become unusable.
Of course, it’s a shame to throw them away, so we collect them on a separate shelf so that we can sew something later.
But sewing requires patterns, a sewing machine, and sometimes also space. While making a rug from old jeans with your own hands will not be difficult at all - everything from the canvas to the pockets and belt will be used.
Just choose a technique and select flaps for it:
- cut them into long strips and weave a rug on a loom,
- weave long braids and gather them into a round rug,
- arm yourself with a large hook and knit any shape using cut strips instead of yarn,
- weave the strips together using the braiding principle and sew on a machine or by hand.
And the cat liked it)
Considering the strength of the material, such a rug will serve you for more than one season.
Rugs made from old T-shirts
But we wear out T-shirts more often than jeans. After all, we use them every day, grow out of them, stretch them, get dirty with paint and simply get tired of them over time.
You may not be able to wear them anymore, but the knitwear used to make T-shirts can be an excellent material for creativity. They make great potholders, coasters, bags and, of course, rugs.
How to make knitting yarn with your own hands
When we look at these DIY rugs made from old T-shirts, at first we can't believe what they're made of! After all, craftswomen knit with crochet from something very similar to yarn, and not like an old T-shirt.
However, do not be surprised by this and do not think that there is some kind of trick here. Anyone can turn old T-shirts into knitting yarn.
To do this, just follow the detailed video master class on the Utilitarian Crafts channel, in which they will teach us how to make as much yarn as possible from an old T-shirt for new rugs.
Features of creating paintings
First you need to decide what kind of pattern you want to create, think about the dimensions, number of colors, and other parameters. Often ready-made diagrams from magazines are used - these are inscriptions, silhouettes, plot drawings. Pictures with “tips” will be useful for beginners. The most important point in creating a thread pattern is tensioning the threads. It is advisable to do this not too tightly so that the nails do not bend, but not too weakly either. Only strong threads are used - if the material breaks, it is tied, and the resulting knots spoil the appearance of the product.
If you need to get a rich color, a larger number of threads are wound in a certain area. When using several shades of the same color, the threads intersect each other, forming soft gradient transitions.
How deep should you drive the nails?
All nails are driven in to the same depth, at an equal distance from each other. The height of the part protruding above the surface is five to nine mm. When driving in nails, use small forceps or pliers - this way there is less chance of damaging your fingers. After the painting is completed, it is permissible to drive the nails deeper, although this is not at all necessary.
How to change thread color
When winding the thread, its beginning is secured to the first nail with a knot. When it runs out or you need to change the color, a neat knot is also made. The new thread starts again from the knot. After finishing the work, all the “tails” are cut off and glued inside out to make them unnoticeable.
Using the same pattern, using different colors and thread placement options, it’s easy to create completely different paintings.
Options for filling the picture
When the nails are already filled along a certain contour and perimeter of the board, there are two filling options. In the first, the interior is filled, in the second, the background. There is a third option, when the middle is decorated with threads of one color, the edges - with others. The threads do not necessarily intersect in many places. For example, if the outline is square (round) and the middle is in the shape of a heart (circle), the lines run in different directions side by side, like rays from the sun. The use of several overlapping thread colors allows you to create beautiful shades. To create a light, openwork pattern, thin sewing threads are used, wool yarn is used for more voluminous work.
Edging the picture
The edging is a dense, usually contrasting outline of the design. It is performed by entwining carnations with a “snake”. The outlines are often made with a thicker, denser thread, while the filling is made with thinner threads. Sometimes the edging is made just two or three tones darker (lighter) than the figure itself, which looks especially beautiful when creating realistic paintings.
How to create multi-layer compositions
Complex, two-three-color, multi-color compositions can also be created using this technique. If we take an image of an animal or a bird as an example, then first the main color of the creature’s body is woven into the picture, then the contours, paws, spots on the “fur” are made, and lastly the eyes and noses are made. To give the color an interesting shade, threads of similar tones of the same color are used.