But it is not always possible to buy an interesting figurine or souvenir. Clay cats are something that might interest you. Try making your own cat figurines. We will make figurines from polymer clay. What is this interesting material? Clay is a solid mass, very similar to plasticine. Most often, various costume jewelry (bracelets, pendants, brooches), dolls, figurines, crafts, and so on are made from it. Clay comes in different properties and manufacturers.
When purchasing plastic, pay attention to the expiration date. If you buy old plastic, it will crumble after baking.
Clay is sold online and in artist stores. As for firing polymer clay, it must be baked at the temperature indicated on the package you purchased. Bake in the oven for 10 to 30 minutes.
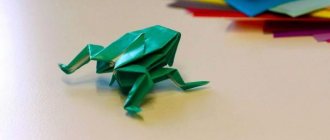
The Maneki-neko cat is a sculpture from Japan made of ceramic, glass or porcelain. In the East they believe that it brings wealth and good luck to its owner. It is customary to place such an original figurine, with its paw raised up, in shops, bars, and restaurants to attract buyers and to attract wealth. Many Japanese people have this figurine in their homes, on a red stand. As you noticed, the cat holds a gold coin in its paws to lure gold and wealth.
Maneki-neko are made in different colors; the most numerous and famous are white cats, with yellow and black spots on the body.
To work you will need:
- Baked clay CERNIT is white (you can use any other clay).
- Stack for modeling.
- Food foil.
- Adhesive Moment transparent.
- Toothpick, cotton swabs.
- Acetone.
- Paints for glass and ceramics (black, yellow, red).
- Brush.
- Any clear plastic varnish.
- Red ribbon and bell.
For modeling, we take white clay, let it remind us of porcelain. While sculpting, wash your hands often; the white color of the clay always gets very dirty while working.
The clay must first be divided into parts: 4 largest (torso, head, hind legs), 3 smaller parts (tail, front legs), 3 smallest (ears, coin).
Try to give all parts the initial shape and make a test connection.
We sculpt the elements of the figure until we connect them. All small details can be sculpted or drawn (claws, nose).
Use a toothpick to make a hole to connect the head - body - tail.
Next, we get ready for baking. Fold the foil sheet several times. CERNIT clay is baked at 100 degrees for 30 minutes. Don't forget to preheat the oven for 15-20 minutes. After baking, leave parts of the figurine in the oven until completely cool.
We connect all the parts using toothpicks and Moment glue. We make one paw raised. Wait 10 minutes until the glue dries completely. If there are stains or paint left on the figurine, it can be cleaned with acetone.
All that remains is to paint the figurine. We do this with ceramic paints or just acrylic paints. We draw ears, claws, nose, mouth, bib, yellow-black spots on the tip of the tail and the bends of the paws. We paint the coin with gold and apply hieroglyphs.
After the paints have dried, you need to cover the entire figure with varnish. Below is the same figurine in a different color:
Small colorful cats can be made from light self-hardening polymer clay. These are small figurines the size of a matchbox.
To work you will need:
- Self-hardening polymer clay (velvet plastic), 20 grams.
- Copper wire.
- Food foil.
- Acrylic paints.
- Beads for eyes.
- The brush is thin.
- The knitting needle is thin for working with structure.
Self-hardening clay is stored in a hermetically sealed bag or in several layers of plastic film. Keep excess clay in a container while you work, otherwise the plastic will dry out. We will make a frame for one cat from wire and foil. Since the craft is small, the frame is quite simple, it consists of a head, body and tail. Take two identical pieces of foil. The cat's head will be in the shape of a ball, and the body will be in the shape of a cone.
We cover a piece of wire with foil, try to do it as tightly as possible. There are 2 options, choose any:
Next, we cover the frame with another layer of foil. Press down the foil to prevent the neck from being too thin. It is necessary to ensure that the figure is stable and does not fall to one side. Leave the wire for the tail long. We press down with beads and mark the places for the eyes. The distance between the eyes is small.
To make a tabby cat, we get a gray-brown fur color. Add a little brown and black paint to the plastic and knead.
Knead the clay with your fingers to a thickness of 2-3 mm. We will stick to the frame in two stages.
Cover the foil with the resulting plastic. Leave the tail open. Before the plastic dries, press the beads into the head. The eyes should not protrude too much. Any glue will help, just drop it on the ends of the beads.
Paint the eyes with acrylic paint. You can use yellow and green paints. We are waiting for this layer of clay to dry. We make other colors of cat fur and texture it. To do this, slightly moisten a piece of plastic and scratch out the grooves with a knitting needle.
We sculpt the forehead with a “swallow” shape and stripes on the cheekbones. While we are not puzzled by the required volume, the main thing is to position the eyelids. We use a knitting needle to remove excess plastic from the muzzle and make a typical cat slanted eye shape.
We make a small triangle nose, pads for the mustache and cheekbones. Depending on the breed, the nose may be voluminous or, conversely, flatter. We don’t touch the bridge of the nose yet, the main thing is to position the nose. Then we shade the cheekbones, at the same time giving them the texture of wool with a knitting needle. Adding a chin. We make the shape of the nostrils, pressing the nostrils with a knitting needle, we get something like a heart.
We sculpt stripes of dark and light tones and place them on the forehead. We take only large areas; if necessary, we will complete small ones after sculpting. Lightly moisten the surface and knit the wool texture, simultaneously smoothing the seams between strips of different colors.
Let it dry.
We sculpt the neck and chest of the cat. To ensure that the new layer adheres well, you can moisten the old one a little with water.
Then we sculpt the paws using the main tone. If the paws are striped, then it is better to stick stripes on top.
Press the slits between the fingers.
We sculpt small mug-pillows onto the paws.
We attach the paws to the body. We sculpt the lower ones in a semicircle.
We sculpt the tail at the very end, giving it the desired shape. We sculpt the ears by connecting triangles of pink and primary colors and squeezing them with our fingers. Slightly round, moisten the bottom and press the ears to the head.
We are waiting for the product to dry. Let's start painting. Using a thin brush, draw the pupil. We draw the eyes, nose, contour of the bridge of the nose. As a rule, you also need to tint your eyebrows, cheekbones, and mustache pads.
Add spots and stripes where necessary.
Cats are favorite pets for many of us. Fluffy, wayward animals easily conquer the hearts of their owners. Children are especially partial to these pets. Every child would like to make a cat out of plasticine. This wonderful wish can be easily realized thanks to a simple master class. You can also make a beautiful pet figurine from other materials. For example, from clay or mastic. Let's look at all the options on how you can make a wide variety of kittens.
Cats made of polymer clay. We sculpt cats from polymer clay. Modeling, Cat made of plasticine
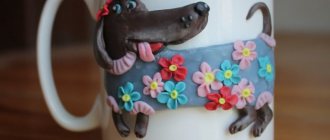
Many needlewomen love cats and often embody their image in various projects.
Why not use the cat theme in decorations too? The result will be both attractive and pleasing to the eye. Today we propose to make your own jewelry from polymer clay in the form of cats. All the necessary instructions are waiting for you under the cut.
Everyone loves unusual and original jewelry! If you add a touch of fun to these qualities, you might end up with something masterpiece. After all, you really want every item in your wardrobe or collection of accessories to please the eye and inspire.
For example, brooches and pendants do not necessarily have to be examples of jewelry art. Individuality is what every woman is looking for, driven by the desire to highlight her personal style. Therefore, an animalistic theme may well help in this difficult matter.
Fauna, like flora, inspires us in many ways. Today we will add a few more master classes to your collection of animalistic polymer clay projects.
These tutorials focus on the cat theme in jewelry. Brooches and pendants in the shape of cats look funny and are easy to make.
You will find all the necessary instructions and explanations on how to make a cat from polymer clay in our selection of lessons today.
What elements are used to create paper crafts?
When studying these techniques, you must first understand what parts the paper quilling creations will consist of. Almost all work involves the use of a tight spiral, which is then carefully unraveled, giving it the desired shape.
To do this, use a special rod or wooden toothpick. A strip of paper is carefully rolled onto it. To prevent the inside of the product from unraveling as it forms, you must carefully lubricate the end with glue.
The work also uses a “free spiral”. It is made in the same way as a tight one. To give it a streamlined shape, one end is carefully untwisted to the desired size.
Using the same technique, a “curl” figure is made. The inner part is tightly screwed onto the rod, and the end is not fixed with glue. This creates a loop.
Materials for sculpting a cat from plasticine
Before you sculpt a cat from clay, you can make it from plasticine - practice. To do this you will need:
- plasticine in black, white, green and orange colors;
- match or toothpick;
- stationery knife;
- needle;
- stack - a special stick for working with clay.
Stages of making a plasticine cat
Before you start sculpting, knead the plasticine to make it easier to work with. Roll an elongated oval from an orange piece of plasticine and make a cut on each side of the workpiece.
Bend a piece of plasticine in an arc so that you get the shape of a cat standing on four legs. Give the paws a more cylindrical shape. From the bottom, bend all the legs in one direction.
From a piece of orange plasticine we roll a ball that will become the head of your cat. Also, make two small ears in the form of triangles from orange plasticine and attach them to the head. Using a stack, we smooth out the joints.
Make a small flat oval from a piece of white plasticine and attach it to the cat's face. Small pieces of black plasticine need to be rolled into six thin strips and two small balls. We place the stripes on a white oval, three on each side, to form a mustache, and attach the balls in place of the eyes. We make another ball for the nose from pink plasticine and stick it to the cat’s face.
Insert a match into one of the edges of the cat’s body, and then attach the head to it. Using a needle, press the cat's mouth. Now all that remains is to mold the tail in the form of a large drop and attach it to the body.
Making a cat from polymer clay
Thin and long cone-shaped parts are sculpted separately. These are the front paws, tail and torso of the cat. Carefully smooth all parts so that the surface of the element is smooth.
Insert a toothpick into the body as a rod and immediately attach the hind legs to the sides for stability. They are made in the shape of a dumbbell and bent along the lower part of the body at an angle.
Using a sharp edge, attach the tail from behind and wrap it in a smooth curve around the body. The front paws are thickened at the bottom, so they are smoothed at the top with the fingers towards the body.
The head is the largest detail of a polymer clay cat figurine. First, roll into a ball and then flatten it in your palms. Use a metal dot to make holes for the eyes. There are still small details to work on. You will have to try hard here, as this is the most difficult part of the work. The eyes need to be seated in the recesses and pressed down lightly. Try to apply the same amount of effort on both eyes. Attach black balls to the sides of the mouth and make a small red nose.
Step-by-step instruction
For the first time, you can make a cat from polymer clay according to the model in the article. Since the cat's head is large, they use an internal rod, for example, a toothpick or a piece of wire. You will also need a stationery knife for separating pieces of the desired size from a large breast, a rolling pin, preferably metal, and a dot for making holes (this is a stick with a ball at the end).
While working, experts advise using a silicone mat, rolling up your sleeves so as not to accidentally touch the clay (threads from clothes or hairs may stick to it) and having wet wipes nearby. They wipe their hands after changing colors and wipe the surface of the part so that it is smooth.
Cat head
Ideas for cats made of clay can be different. It’s interesting to make a cat sitting on its hind legs or curled up, a couple of Siamese cats hugging, or a kitten sneaking up on its prey. The movements the sculptor conveys are different each time, but the head is often depicted according to a template. We will consider it further in the article.
The main part is a ball that is slightly flattened on both sides. The ears are triangular, with a rounded notch in the middle.
Using a metal rod, push the strip down the center of the front of the head. Use dots to make two indentations for the eyes.
Dry your hands with a damp cloth and attach two white balls. The pupils themselves can be made by pressing the beads. The volumetric part of the cat's face is also made from white balls - first the central element is attached, and then the side ones, a little larger in size.
All that remains is to make the nose, and the polymer clay cat's head is ready.
Drying products
To preserve the crafts for a long time, the sculptures must be dried in the oven at the temperature indicated on the package. It will be different for each type of clay, so it is impossible to give advice to all readers at once. Place the parchment on a baking sheet, and after drying, be sure to ventilate the kitchen area and wash the baking sheet thoroughly. Then the product can be coated with acrylic varnish to give a glossy surface.
Try using polymer clay in crafts and bring your ideas to life! Good luck!
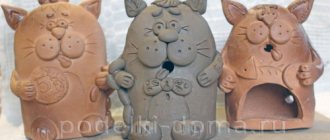
Modeling a cat family from clay
If you want to make a real figurine, then instead of plasticine, take another material. For example, clay. This is a popular mass for sculpting souvenirs; it is very easy to work with. Polymer clay (plastic) for crafts is sold in handicraft, art and online stores.
This material has its own characteristics:
- Self-hardening clay hardens in air. This may take 2 days.
- Baking clay hardens when heated. It is kept in the oven for 10-30 minutes.
- Clay can be tinted, that is, mixed with paint to obtain all kinds of colors.
- To reliably fasten clay fragments, you need to moisten them with water.
Clay cat
First, make the simplest figurine . For the master class you will need:
- clay;
- modeling board;
- toothpick;
- water in a bowl;
- brush and paints (acrylic or watercolor).
Take the amount of clay with the expectation that you will get a craft of the required size. Let's get started with some fun sculpting:
- Divide a piece of clay in two. One segment will make a body. From the second part, sculpt the paws, tail, ears and cheeks.
- The body should be shaped like a rounded cone. Press the bottom of the shape onto a flat surface to make it stable.
- Break off fragments from a smaller piece of clay to form ears. These will be two pointed triangles. Moisten these parts with water and connect them to the body.
- In a similar way, mold the remaining elements for the muzzle: voluminous cheeks, eyes, nose. Don't forget also about the last important detail - the tail. Moisten all this in water and secure it to the body.
- Add details to the finished figurine using a sharp toothpick. You can make pupils, a charming smile and dots on the cheeks. The mustache will be made from wire or fishing line.
- Wait for the craft to dry for a couple of days and paint the cat to your taste.
Cat Maneki-neko
Animal figurines often serve as a talisman in the home.
The Maneki-neko cat figurine is common in Japan. It is believed that it gives wealth and great luck to its owners. This figure looks like this: the cat is waving friendly with one paw, and in the other she is holding a shiny gold coin. The figurine is made of porcelain, ceramics or glass. Its colors come in a variety of colors. But the most admired cat was a white cat with bright yellow and black spots on its fur. We will work with clay, which will perfectly replace porcelain. Gather all important materials and tools:
- baked white clay;
- stack;
- food foil;
- toothpicks or matches;
- glue "Moment";
- brush and paints for ceramics;
- golden acrylic paint;
- colorless varnish for plastic.
During the process of sculpting with white clay, you need to wash your hands periodically. This material can get very dirty during operation.
How to make a cat from clay:
- Divide the clay into parts: 4 large fragments (body, head, hind legs), 3 smaller segments (forelimbs and tail), 3 tiny parts (ears, coin).
- Try to give all the elements of the figure an initial shape, and then try to connect them. If the body parts look proportional, start working on them in detail.
- Stick your ears to your head. It is necessary to create a convex nose on the face. Make folds on the paws. Make a flat coin. Connect the hind legs to the body, but do not fasten the remaining parts yet.
- Use a toothpick to make holes to connect the head, body and tail.
- Prepare everything for baking. Fold the foil in several layers. Place our clay parts on it. Preheat the oven for up to 20 minutes, and then place the pieces with foil on a mesh baking sheet. Bake for about half an hour at 100 degrees. After this, turn off the oven and, without removing the figures, wait until the oven has cooled completely.
- Connect all the parts with toothpicks and glue.
- Paint the craft: draw ears, mouth, nose and claws. Make yellow and black spots on the legs and tail. Paint the coin with gold acrylic and draw hieroglyphs on it. After the paints have dried, coat the figure with varnish.
Kittens
Let's make figurines of small colorful animals. The cats will be successfully made from self-hardening polymer clay. In addition to this mandatory component, you need:
- foil;
- copper wire;
- spoke;
- a set of acrylic paints and a thin brush;
- beads.
Self-hardening clay is recommended to be stored in airtight containers. Do not leave it in the open air for a long time so that the plastic does not dry out.
Detailed instructions:
- At the first stage, prepare a frame for the kitten. Roll the foil into a circle (head) and a cone (torso).
- Wrap a piece of wire with foil so that a long tail remains.
- Place a second layer of foil on the workpiece. Make a beautiful transition from head to body. The neck should stand out, but not be too thin. Achieve stability in your figure. Use beads to make indentations in the places for the eyes.
- To obtain brownish-gray wool, mix plastic with brown and black dyes.
- Mash the clay into a layer of 2-3 mm. They need to tightly adhere to the foil figure. Don't touch the tail yet. Glue beads into the dimples for the eyes and draw pupils.
- Wait for the previous layer to dry. Blend different colors of wool and apply texture to it. To do this, scratch stripes on a piece of clay moistened with water using a knitting needle.
- Make the kitten's face: forehead and cheekbones. Create the famous cat eye shape. Make a triangular nose and white “pads” for the mustache. Then smooth out the contours of your cheekbones and also add texture to them. You need to pierce your nostrils with the same tool.
- Now start sculpting the top layer. Attach alternate strips of different shades to the entire body. At the same time, use a sharp knitting needle to create a wool texture on them.
- Make the front legs with pads. Form the hind limbs in a semicircle. Attach them to the body, and also cover the tail with plastic. Make ears by connecting wool-colored triangles with pink ones.
- After the product has dried, decorate the kitten's face. Draw the nose, eyes and cheeks.
Cheshire Cat: stages of work
Take a piece of white clay, add a small piece of black and mix thoroughly to get a gray color for the base of the cat. Roll out the gray clay into a layer 2 mm thick.
Place the paper face of the Cheshire Cat on the layer and carefully trace it along the contour with a stationery knife to cut out the desired shape from clay. Using a needle, pierce the place on the template where you will need to place the eyes and mouth of your clay cat being created.
Remove the template from the clay layer, place the eyes on the workpiece and press them in a little. After this, you need to add volume to the cat’s face. To do this, first roll pieces of polymer clay into a “sausage” and attach them around the eyes. Then the clay needs to be smoothed using a modeling tool.
We take another strip of clay and apply it to the lower jaw of the craft and smooth it too. Between the eye and the lower jaw of the Cheshire Cat, made from clay, there should be a depression.
You also need to put polymer clay above the eyes to make the bridge of the nose and add volume to the eyes. Then we again roll out the pieces of clay into “sausages”, flatten them and, using such elements, make a cut for the eyes.
Place a little more polymer clay in the center of the muzzle and form the bridge of the nose and forehead. We smooth the clay onto the workpiece with modeling tools to give the craft its final look.
Roll out a black piece of clay and use a template to cut out the cat’s smile. We place it in the recess between the lower jaw and the eyes.
We make teeth from white polymer clay. To do this, roll it up so as to get a sharp tip and cut it off. We repeat this action until we have made a sufficient number of teeth. We attach the teeth to the craft and form the cat’s lips from gray clay. The upper lip should consist of two parts, and the lower lip should consist of one.
We cut the turquoise clay into several small pieces and roll them into small droplets, which we then place all over the cat’s face.
Mix red and white clay to get a pink color. We make small droplets from the resulting pink clay and place them on the cat’s ears. After this, we draw the “fur” with a needle.
Make a triangular nose from a piece of pink clay and place it on the cat's face.
Crumble some black pastel onto a piece of paper and use a thin brush to apply the resulting dust to the area under your nose and in the corners of your eyes. We also add some shadows with dry pastel.
Now we send the craft to bake for 30 minutes. After baking, coat it with varnish.
Materials for creating the Cheshire Cat
Making the famous character from “Alice in Wonderland” - the Cheshire Cat - is much more difficult than previous crafts, so you should first practice sculpting in simpler master classes. And for work you will need the following tools and materials:
- white, black, red and turquoise polymer clay;
- stationery knife;
- metal knitting needle and needle;
- modeling tools;
- thin brush;
- glossy varnish;
- doll eyes;
- Cheshire Cat face template;
- black dry pastel;
- rolling pin
Flower arrangement using quilling technique
In the vastness of the virtual space, there are many ideas for quilling crafts that combine simple and complex shapes. To create a flower you need to make 6 “drops” in a “free spiral” type. The core of the flower is made from a round base.
The leaves of the plant are made into a “heart” or “eye”. To make the finished composition light and weightless, each element is placed next to each other. During the process, you must work carefully with the glue. To do this, use a thin brush.
Experienced experts recommend making crafts on thick cardboard. It will protect products from mechanical impact. Paper blanks are firmly fixed onto thick paper.
Miniature cats
Small colorful cats can be made from light self-hardening polymer clay. These are small figurines the size of a matchbox.
To work you will need:
- Self-hardening polymer clay (velvet plastic), 20 grams.
- Copper wire.
- Food foil.
- Acrylic paints.
- Beads for eyes.
- The brush is thin.
- The knitting needle is thin for working with structure.
Self-hardening clay is stored in a hermetically sealed bag or in several layers of plastic film. Keep excess clay in a container while you work, otherwise the plastic will dry out. We will make a frame for one cat from wire and foil. Since the craft is small, the frame is quite simple, it consists of a head, body and tail. Take two identical pieces of foil. The cat's head will be in the shape of a ball, and the body will be in the shape of a cone.
We cover a piece of wire with foil, try to do it as tightly as possible. There are 2 options, choose any:
Next, we cover the frame with another layer of foil. Press down the foil to prevent the neck from being too thin. It is necessary to ensure that the figure is stable and does not fall to one side. Leave the wire for the tail long. We press down with beads and mark the places for the eyes. The distance between the eyes is small.
To make a tabby cat, we get a gray-brown fur color. Add a little brown and black paint to the plastic and knead.
Knead the clay with your fingers to a thickness of 2-3 mm. We will stick to the frame in two stages.
Cover the foil with the resulting plastic. Leave the tail open. Before the plastic dries, press the beads into the head. The eyes should not protrude too much. Any glue will help, just drop it on the ends of the beads.
Paint the eyes with acrylic paint. You can use yellow and green paints. We are waiting for this layer of clay to dry. We make other colors of cat fur and texture it. To do this, slightly moisten a piece of plastic and scratch out the grooves with a knitting needle.
We sculpt the forehead with a “swallow” shape and stripes on the cheekbones. While we are not puzzled by the required volume, the main thing is to position the eyelids. We use a knitting needle to remove excess plastic from the muzzle and make a typical cat slanted eye shape.
We make a small triangle nose, pads for the mustache and cheekbones. Depending on the breed, the nose may be voluminous or, conversely, flatter. We don’t touch the bridge of the nose yet, the main thing is to position the nose. Then we shade the cheekbones, at the same time giving them the texture of wool with a knitting needle. Adding a chin. We make the shape of the nostrils, pressing the nostrils with a knitting needle, we get something like a heart.
We sculpt stripes of dark and light tones and place them on the forehead. We take only large areas; if necessary, we will complete small ones after sculpting. Lightly moisten the surface and knit the wool texture, simultaneously smoothing the seams between strips of different colors.
Next, we sculpt the back of the head and back. Apply the stripes on top of the main figure.
Let it dry.
We sculpt the neck and chest of the cat. To ensure that the new layer adheres well, you can moisten the old one a little with water.
Then we sculpt the paws using the main tone. If the paws are striped, then it is better to stick stripes on top.
Press the slits between the fingers.
We sculpt small mug-pillows onto the paws.
We attach the paws to the body. We sculpt the lower ones in a semicircle.
We sculpt the tail at the very end, giving it the desired shape. We sculpt the ears by connecting triangles of pink and primary colors and squeezing them with our fingers. Slightly round, moisten the bottom and press the ears to the head.
We are waiting for the product to dry. Let's start painting. Using a thin brush, draw the pupil. We draw the eyes, nose, contour of the bridge of the nose. As a rule, you also need to tint your eyebrows, cheekbones, and mustache pads.
Add spots and stripes where necessary.
Paper
For this type of creativity you need paper with a density of 120-140 mg/sq. m, or rather, paper strips. Their width can vary from 3 to 15 mm.
We recommend reading:
DIY polymer clay jewelry: review of the best master class with step-by-step instructions for beginners (150 photos of original ideas)DIY polymer clay flowers (120 photos of the best ideas) - simple instructions with full description + master class and video tutorials
DIY paper orchid - a review of the best ideas and tips from craftswomen. Step-by-step instructions + master class (photo + video lessons)
In stores there are ready-made sets of multi-colored or single-color strips, 30-60 cm long. Beginners can use office paper by cutting it as needed with a stationery knife.
Some ideas for quilling crafts involve the use of:
- cardboard;
- papers for creativity;
- foil;
- films.
Sphinx made of plasticine
You can sculpt cats of various colors and breeds: Siamese, Persian, tabby, long-haired and even hairless. Let's try to make the most unusual animal - a sphinx from plasticine. These cats come in solid colors, spotted or striped, with white, gray and black colors. Therefore, we will need the corresponding colors of plasticine. But you can safely choose another original color, giving free rein to your imagination.
The pattern for sculpting a sphinx is no different from making an ordinary cat. You need to fasten together the body, head, paws, tail, ears and all the elements of the face. The difference is to make the figure thin and the ears large. Using a stack you need to draw many characteristic folds of skin throughout the body and on the face.
Advice from professionals
We bring to your attention recommendations from experienced specialists who significantly save time and allow you to quickly master the technique of paper rolling. They include:
- If novice needleworkers are right-handed, then the strip must be held with the left hand, and the tension of the rod must be controlled with the right;
- A double-sided strip implies the correct location of its central part. In simple terms, its back side should be directed towards the rod;
- The guide pin must be rotated clockwise;
- The quilling technique is intended for diligent and hardworking people. The strips should be wound evenly. It is not recommended to rush in the process of creating paper parts.
It is best for beginning craftsmen to purchase paper strips in the form of sets. They feature several shades and elements of varying thicknesses and lengths.
Ginger cat
Try to create a charming domestic cat with a fiery coat color.
What to take:
- plasticine (orange, white, green and pink);
- match;
- stack - a special spatula for working with plastic material.
How to make a cat step by step:
- You will need a whole brick of orange plasticine. This will be the main color for the body. Take about three times less white material. Only details will be sculpted from it.
- Roll the orange mixture into an oval. Then extend the shape from one side. This will create a long neck for the cat. Now insert a match here to secure the muzzle on it in the future. It is better to slightly bend the shape, then you will get a figurine of an animal sitting on its paws. Stick a characteristic cat “tie” on the front of the chest - an oval white spot. Use a stack to make many longitudinal grooves in the wool.
- Shape two orange tablets to create bent hind legs. Attach them to the sides of the body. At the bottom, stick tiny feet from white plasticine.
- Make the forelimbs. Twist two identical orange tubes. Extend them at the ends to give the shape of a cat's front paws.
- Make the head in the shape of a flattened diamond. Prepare two miniature orange ear tablets.
- Stick the front legs to the body so that from below they are at the level of the hind legs. You will get a stable figure of a sitting pet. Stick the long tail in place. Attach a white plasticine mustache, round cheeks and a pink nose to the head.
- Keep adding details . The ears will be in the form of triangles . Carefully attach them to your head. Draw stripes on the mustache in a stack. Don't forget about the slanted eyes. To do this, attach green pupils to oval molds made of white plasticine.
- Connect the head to the body with a match. Now the purring pet is completely ready.
Exposed parts
In such elements the end of the strip is not secured. The most striking examples could be:
- curl;
- S-element;
- C-element;
- V-element;
- heart;
- twig.
Similar details are used to decorate crafts made using paper rolling technology.
Black cat
There are many ways to sculpt, let's look at another easy example. To do this, prepare black plasticine and a stack. It is most convenient to work on a modeling board.
- Roll out an oval from black plasticine. Scrunch it slightly to create an oblong shape.
- On both sides of the oval, cut small pieces of the same size in a stack. A large fragment of plasticine will be the body. Two small pieces will be needed for the head and tail.
- Make cuts on both sides of the body to create long legs.
- Shape the head into a round shape and draw out the ears. Make a long ponytail and fasten all the parts to the body.
- To give the muzzle expressiveness, stick eyes, nose, mouth and mustache on it.