Types of puppet theaters and materials
Any parent can create their own home theater. You can also involve a child in this matter. Surely in this case the process will be more fun, and the baby will be busy.
For work, something that many people will definitely have at home is suitable. Even some waste materials will come in handy, so don’t rush to scrap them.
It could be:
- Disposable plastic tableware,
- Felt,
- Boxes of different shapes and sizes,
- Colored paper/cardboard,
- Rolls of paper towels, foil or toilet paper
What types of dolls are there?
- Stationary
- On hand
- Finger
Gypsum is an excellent base material.
Small items can be mounted on plaster stands. They are quite heavy and do not tip over. To perform this work you will need the following raw materials:
- gypsum powder;
- thick copper wire;
- metal tube of the required diameter.
First, a stand is made from wire. The length of the wire should be three times the height of the stand. The dart is bent in half and a ring is formed for the stand. The ends of the wire are passed through a metal tube.
Next we begin making the base. To cast the gypsum support, formwork (a special mold) is prepared. Liquid plaster is poured into the mold and the lower part of the wire stand is immersed in it.
After the workpiece has hardened, the formwork is removed and possible irregularities are rubbed with plaster. Such a product can be covered with any dense fabric, for example, a piece of velvet.
Paper
Paper is one of the simplest and most accessible materials for creating crafts on the theme of puppet theater.
For what purposes can the layout be used?
A DIY stage mockup out of the box can be used in many different ways. Most often, this product is used at home for a puppet theater. It is very interesting for children to watch their favorite characters on a real theatrical stage.
A DIY theater stage model out of a box is a wonderful craft for a kindergarten or school. If everything is done beautifully and correctly, the product can also be useful for the educational process.
This type of craft is also suitable for independent play. Girls will especially enjoy the stage, as here you can perform entire performances by playing with dolls. It will also be very interesting for little ones to change the scenery of the theater stage.
A stage can be an interesting design element for a children's room. You can add functionality to the stage if you place figurines or figures in it, like on a shelf.
Source
First way
You will need:
- Paper or cardboard,
- Cereal box/desired size,
- Plastic straws,
- Wooden sticks,
- Glue,
- Scissors,
- Paints,
- Pencils.
Progress:
- On thick paper, depict the characters of the chosen fairy tale or story.
- After they are cut out, glue tubes or sticks on the inside.
- The box will act as a stage, so you will need to cut out the "screen" or one of the larger sides.
- A slot is also made in the lower part. Prepared figures of heroes on sticks should be inserted there.
Such a theater is either installed on a stand or hung around the neck thanks to a ribbon attached to the box.
The principle of making a stage out of a box
The work can be done together with the child, since a product of this format does not require any special skills. To make a scene layout with your own hands from a box step by step, you need to perform the following steps:
- First you need to prepare a sketch. Make a rough sketch of what the model should look like.
- Place the box so that it is fixed on a narrow edge. The part where the lid unfolds should be in front of your eyes.
- Using tape, fix all bends and particularly weak points that could cause the structure to break or collapse.
- Each fold can be strengthened with wooden skewers. You need to put the elements in the fold and seal them with tape.
- Using scissors, cut off parts of the lid, forming the scene itself. You can give the scene another shape. You can cut off the top of the cardboard box. Make a frame that fits on another box.
- Cover the inside of the box with colored paper, except for the wall that will be visible: it needs to be covered with white paper so that you can change the decorations later.
- The outer part should be covered with corrugated paper.
- You need to cover the bottom of the stage with foil or simply lay down reflective material. This will create the effect of additional light.
To understand how to make a theater stage out of a box, you need to look at an example of the design of a real stage.
Second way
As a base for the characters' bodies, either homemade paper tubes or ready-made paper towels or toilet paper are used.
Depending on whether the doll will fit on your hand or on your finger, the size itself is selected. The scene is also made out of the box, as in the previous version.
This craft can be made for kindergarten or for some event.
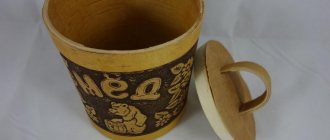
Cardboard theater
An ordinary cardboard shoe box will become magical if you decorate it with fabric, secure it in the form of a curtain, and place a picture based on the plot of a fairy tale on the backdrop. You can make the decorations yourself: print or draw a chair, a chair, a table, a magic castle or a hut.
Cut a hole in the bottom of the box and attach ribbon to the side walls. Such a theater can be hung on your neck, then it will be very convenient to show scenes from figures attached to wooden skewers.
The characters are simply cut out of paper, and the manufacturing process itself is an act of improvised theater. The child can try himself as a costume designer and artist, choosing characters and scenery or a director, changing the plot at will.
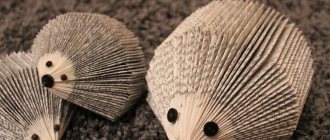
Make little characters to put on your fingers. This is a very fun activity for a child.
Felt finger puppets
Here we will talk about felt crafts for elementary school on the theme of theater. This dense material will allow you to create many detailed and at the same time simple dolls. They are usually the right size for a finger theater.
To make them you will need:
- Felt in several colors
- Threads, needle,
- Scissors,
- Glue,
- Paper and cardboard.
Beautiful design
When decorating the stand, you should take into account that it should optimally fit the image of the doll, being its organic continuation.
You should adhere to a simple rule: the stronger the visual load on the doll’s outfit, the simpler the stand under it should have. Options for this design include pasting with felt in a harmonizing color and tying with contrasting ribbons.
Real collectors often have the need to make a stand for a doll with their own hands.
To decorate wooden coasters, you can use the aging effect. You can do this in several ways:
- Cover the workpiece with stain or dark acrylic paint, then apply Vaseline to the areas for aging, and on top - a second paint of a contrasting color. Once completely dry, the paint must be wiped off and the stand coated with a medium or aging wax. When all layers are dry, the base should be coated with acrylic varnish.
- Sand and treat the workpiece with an acrylic primer, then cover it with two layers of dark paint. Sand with wrapping paper and treat the stand with a candle in those places where a worn effect is needed. Next, cover the wood with light paint in one layer and leave to dry, then melt the wax using a hairdryer. Remove excess wax with a rag.
It is important that not only the collection surprises with its originality, but also that the holder suits the favorite one hundred percent.
Before you make a stand for a doll, you need to decide on the mounting method and design style. The resulting product will become a functional addition to the collection, ensuring its convenient placement.
The stands can be decorated at your own discretion. You can paint it with paints, cover it with fabric or corrugated paper.
Option with puppets
- To do this, you need to prepare a sketch in advance. There should be several elements: a large main part, hair, clothes, handles, and for animals - a muzzle.
- The next stage is transferring the pattern onto felt. Colors can be chosen to suit your taste or the child's wishes. So in photos of various theater-themed crafts you can often see pink bunnies or multi-colored cats.
- Next, once all the parts are cut out, it is better to carry out a test assembly. Thanks to this, it will be possible to correct possible errors or remove inaccuracies in a timely manner.
- The final assembly of the character should begin with the main part, adding other elements to it. You can fasten them either by sewing or using a glue gun.
Hand puppets for home theater
Felt doll
Will need
- Sketch of a puppet toy.
- Two sheets of felt, A4 size.
- Small pieces of colored felt.
- Thread and needle.
- Glue gun.
- A sheet of thin cardboard.
We start work by creating a pattern. To do this, draw the sketch onto a sheet of cardboard and cut it out. You will get the main pattern of the figure and individual small details: eyes, muzzle, palms, tummy, ears. The number of details depends on the choice of sketch of the puppet hero.
Then we transfer all the details onto felt. We select the color scheme according to our taste or the content of the fairy tale. The hare can be white, gray or pink, and the fox yellow or orange. If you are doing a craft with your child, let him choose what color the characters in your play will be.
We cut out the parts and pre-assemble the toy, placing all the parts in the places where they should be. If the result is satisfactory, we begin the final assembly. First, we make one main piece out of felt. We sew on all the parts that can be sewn. We sew with a buttonhole stitch. We glue small parts with a glue gun. We put all the parts together in accordance with the sketch.
If the toy has ears, we attach them last. To do this, we fold the two main parts with the right sides facing inward. We apply the ears in such a way that the edges of the part coincide with the edges of other parts, and the tips of the ears look inward. We sew all the details along the edge with a buttonhole stitch and turn the toy inside out. The glove puppet is ready, and the ears will stick out funny on the top of the head.
Sock puppet
Original dolls are made from ordinary children's socks.
To make it you will need a sock, cardboard, a small skein of thick thread or yarn, pieces of fabric for the mouth, sewing thread and buttons, and a glue gun. You can take a sock in a plain color or with a pattern, polka dots or stripes - all this will create the image of a future toy.
We make a blank for the mouth from cardboard. To do this, fold a cardboard rectangle 7 cm wide and 20 cm long in half. We round the corners along the width. From the fabric for the inside of the mouth we cut out a blank according to this template.
Trim the toe of the sock. We cut off the edges along the edge of the workpiece. Glue the cardboard blank inside the sock using a glue gun. At the same time, we fold the edges of the fabric onto the cardboard. Glue the fabric interior on top.
Making a hairstyle for the puppet. Take thread or yarn and wrap it around your hand several times. Tie in the middle and cut the ends. If you spread your fingers wide, you will get a long hairstyle. Sew the hairstyle to the sock.
Let's make eyes. We take two buttons and sew them to the sock, overlapping one on top of the other. You can use ready-made eyes or ones drawn and cut out of cardboard. You can complement the image with any details, make eyes from balls of cotton wool or add decorative elements.
Decoration and background
- Prepare in advance a diagram according to which the scene will be created in the future.
- The cut out elements are sewn onto the front side of a thick sheet of A4 felt.
- The next step is to sew together 2 sheets: a blank with decor and a felt backdrop.
- Cardboard is inserted between two fabric sheets for compaction. It should protrude a few centimeters. This strip is folded to form a stand.
Tripods with corsets
Doll beauties with labile, soft bodies can be placed on a stand by placing them in rubber band corsets. It is better to make these rubber belts narrower than the waist. First, a base and a stand are made from scrap materials. It can be a wooden base and a metal tube. The loop for the stand is made of wire. Some people manage to saw off the top of the paper towel holder.
How is the doll secured? First, a rubber corset is put on her, and then she is placed on a metal loop. This corset stand is very convenient.
Shadow play
One of the famous and interesting types of puppet theater. The main focus is on the silhouettes of the dolls, so the main challenge is to make the characters recognizable through their outlines.
A short master class on creating crafts related to shadow theater will help you organize an exciting performance at home.
Screen
For more serious presentations, you can buy a ready-made screen or make it yourself.
Video for dads who can make their own from wood, plywood or laminate:
The simplest screen for a puppet theater can be made from a large cardboard box from household appliances:
Video:
But Parsley is both a toy and a screen - “2-in-1”. The doll is hidden in a conical base made of a plastic cup using a stick on which it is placed. And it also pops out, which kids really like.
Homemade Parsley, a fair one, who can wave his fists and hide in his glass. Since it was sewn a relatively long time ago, there are no photographs of the production process. But there are no big difficulties either; it can be explained in words.
Two sticks are taken as the basis, the long one is the axis, and the short one is the shoulders. They are tied with a cross, it is advisable to file them slightly at the joint so that they hold tighter. Then a piece of cotton wool or rags is wrapped in a square of white cloth, put on a stick, and tied to create a head. Two opposite ends go to the arms, two are tied under the shoulders. A shirt is cut out of colored fabric, sewn together, and put on the doll. You need to put something in your fists for weight (small pebbles or nuts). Sew hair onto the head and paint the face.
For a barrel, you can take a plastic glass, make a hole in the bottom into which to insert a stick with Parsley. Cover the glass with fabric, tie it at the bottom, and sew a shirt on top. Decorate with braid. Now Parsley can turn around, waving his arms, hide and jump out for the amusement of the children.
But according to the Waldorf method, fairy tales are told without any screens, using ordinary toys and dolls on a toy stage:
Well, the simplest puppet theater is a shadow theater. Surely many people have been able to show a dog or an ostrich since childhood, but here are other options:
As they say, it couldn’t be more convenient
And if you try a little and make figures out of paper and a screen out of a box, you will get the same wonderful shadow theater:
Another video - paper puppet theater:
As we have new master classes on this topic, we will add their announcements here.
Send your photos if you also have your own puppet theater at home!
In order not to forget the page address and share with friends, add to your social networks:
Stage 1. Scene
Materials:
- Medium size box
- Ruler,
- Scissors,
- Pencil,
- Paper,
- Glue or stapler
- You need to get a large rectangle from the box. One of the main sides should be without folds. The outline of the screen is drawn on it, with an indentation of five centimeters from the edges. The resulting rectangle is cut out.
- The size of the paper sheet should be larger than the resulting hole. The screen is glued on the back side. Additionally, it is secured with a stapler for strength.
What tools and materials are needed to make a cardboard scene model?
To make a scene layout with your own hands from a box, you need to prepare the following tools and materials:
- A cardboard box of the required size.
- Scissors, stationery knife.
- Corrugated, white and colored paper.
- PVA glue.
- Glue gun.
- Scotch. You can take decorative adhesive tape.
- Wooden skewers.
- Textile. You can choose any colors and texture.
- Needle and thread.
- Foil.
Additionally, you may need other elements for decoration: beads, sparkles, stones, knitting threads, ribbons and buttons. You can take any elements for decoration and decoration, including toys.
Stage 2. Heroes
Necessary:
- Pencil,
- Cardboard,
- Scissors,
- Glue or stapler,
- Straws,
- Tubes or wooden sticks
1. The silhouettes of the characters are transferred to cardboard and then cut out along the contour. They must be recognizable, with characteristic features or shapes. The scenery is created in the same way.
2. The cut out elements are attached to sticks with glue or a stapler.
Crafts from boxes: DIY puppet theater
Read our article on how to make a small but cute puppet theater out of a cardboard box with your own hands to perform home performances with your children.
Got a box of shoes lying around? Don’t rush to throw it away, because this is a wonderful material for making interesting cardboard toys for a child. We have previously written about how to turn an ordinary box into a floral stained glass window. Today we will share with you an idea on how to turn an ordinary box into a puppet theater with lights. The manufacturing process itself will bring great pleasure to everyone, and the impromptu performance will be wonderful even when the lights go out.
Toys made from cardboard boxes do not require huge expenses, the main thing here is imagination and imagination. Involve kids already at the stage of creating the theater: older children can prepare the box with you, and younger ones can draw, decorate and play. Well, you can’t do without the heroes of the plays in your home puppet theater made of cardboard either: penguins, dinosaurs, even paper figurines of Star Wars characters - everyone can take part in the performance.
To make a puppet theater out of cardboard with your own hands, you will need:
- shoe box with lid;
- 1 piece of cardboard (from another box) size A3;
- 1 sheet of white copy paper;
- 2 sheets of dark and dark blue A4 size paper;
- 5 or 6 wooden sticks;
- 1 small LED garland (up to 10 lights);
- small wooden beads;
- ruler;
- stationery knife;
- craft tray;
- scissors (children);
- felt-tip pens (black and colored);
- pencil;
- scotch;
- PVA glue;
- hot glue gun.
Non-standard theater
In addition to standard and popular children's crafts, you can arrange your own performance using non-standard materials.
An original solution would be disposable utensils made of plastic or wood, in particular spoons. Selected characters are pasted or drawn on them, and decorated as desired. By the way, it is better to use acrylic paints for painting.
Yogurt jars, as well as plastic bottles of interesting and unusual shapes. They, like dishes, can be painted or covered with colored paper. In addition, you can make mini-scenes with decorations from bottles and arrange small stories there.
DIY puppet theater from colored paper and a large cardboard box
Master class for teachers on origami technique, presentation on the topic
Take a box from under large household appliances. It will be more convenient to stage performances on a large stage.
You will need:
- Box.
- Colored paper.
- Scissors.
- Scotch.
- Glue.
Secure the box tightly with tape so that it becomes rigid. It is best for the box to be rectangular. This will provide the opportunity for more characters and scenery to appear on stage. On the front side, which will be turned towards the audience, using a simple pencil, draw a window in which you will show performances. Make a cone towards the top so that the opening looks a little like a curtain. Using a craft knife, carefully cut out the puppet theater scenes.
Using colored paper and glue, cover the entire perimeter of the puppet theater. Signs can be attached to the sides or front with the words:
- Premiere!
- Performance!
- Puppet Theatre!
On the sides, where the cone begins to form towards the top, glue the rhinestones over the stage line. You can attach very beautiful bows to the pointed tips. And glue beautiful decorative pompoms to the bottom of the stage. Thus, our improvised children's puppet theater stage is ready. The front side is decorated, and the cutout of the stage has the appearance of a house. Now we need to make a curtain for our stage.
Materials for the curtain and algorithm for its manufacture
- Take a stick with a length equal to the length of the puppet theater. It is best if it is smooth and straight so that the curtain material does not touch anything when closing and opening.
- Take the material for the curtain and lay out the patterns prepared from paper. Cut out the curtains and use a sewing machine to make a hole at the top to insert a stick on which it will hang. Attach the stick to the puppet theater from the inside with the curtains. When the performance starts, you will move them in different directions and a stage will appear.
So our little theater house is ready for playing puppet shows. All that remains is to make the scenery for the performances. And of course, create characters from Russian folk tales. Next we will tell you how to make theatrical puppets for a performance.
DIY scene
To fully understand how to make a full-fledged theater-themed craft, all that remains is to create a stage. It is an important part of the production because it is where the action takes place.
- The simplest and fastest option is a plain fabric used to cover the doorway. A horizontal cut is made in the center for the dolls.
- The next simple way to build a home stage is to place two chairs with their backs facing each other and cover them with fabric.
Previously, the option of using cardboard boxes was considered. It is time consuming and requires more effort, but the results are definitely worth it.
- A frame is formed from several boxes by laying them out like bricks.
- There should be a window in the center, which will be curtained with fabric.
- For the background, all the folding parts and 2 walls of one of the boxes are cut off. A rectangle is cut out at its bottom.
- The walls are fixed in a certain way, in an angular position. This is done specifically for stability.
- Small cylinders are fixed at the folds. They will not allow the structure to develop during the presentation process.
- When the base is ready, it's time to add decorations.
How to make a puppet theater from a cardboard box with your own hands
Make a mark on the bottom of the box and cut it out as in the picture. Draw 3-4 lines along the long side of the box and cut out holes using a utility knife. The holes should be wider than the wooden sticks for the theater characters.
To make a platform stage out of cardboard, mark and cut the same lines on a slightly smaller piece of cardboard that will fit inside. Cut two pieces to fit between the stage and the bottom of the cardboard theater so that the platform is level with the bottom of the box.
Be sure to test the sticks at this stage; they should move easily in the slots. If this fails, widen the incisions slightly. Afterwards, glue the two separating parts and the platform, and also drip glue onto the beads and glue them onto the sticks.
Now move on to decorating the cardboard theater house. Use a shoebox lid as a backdrop for your future puppet theater. For an arctic theme, use blue and white paper. For snow, cut (tear) the paper into pieces. Kids will especially like this activity.
Cut out three small pieces of cardboard, decorate them with blue and white paper in an arctic style, and glue them to the “stage” for an ice block effect.
It's time to create snow actors! Draw a few penguins and a whale yourself or give the children a task (puppet characters come out well from children's drawings). Color them with your children and cut them out.
Using tape, attach the finished figurines of the characters of the future play to wooden sticks.
Punch a few holes in the backdrop of the boxed playhouse using one of the sticks and tuck the garland in there.
Lead the garland wire back behind the cover. Now it's time to turn off the lights, turn on the fairy lights and start playing!
Look who is making his way to us through the snow and blizzard. All the other characters were scared of the dinosaur, so it's time to make a second box.
Making a do-it-yourself puppet theater with your children from a cardboard box will be remembered for all the fun and good time spent with your family. Create new characters in home plays, use a cardboard theater as part of a dollhouse, or create several scenes for different plays - use your imagination and have fun with your children.
Read also: Fire-breathing dragon: paper craft for children
Read also: Crafts from cardboard tubes: 12 original ideas for children
Read also: DIY. Making a large cardboard castle (PHOTO)
Photos of crafts on the theme of theater
Possible materials
A stand for dolls must meet the following requirements, regardless of the materials used for its manufacture:
- stability so that it does not fall on its side from the weight of the doll;
- simplicity so as not to distract attention from the doll itself;
- accuracy;
- ease of use.
Possible materials for making stands:
- tree;
- wire;
- cardboard;
- newspaper tubes;
- gypsum;
- computer disk;
- seaming cap, etc.
Let's look at different ways to create stands using different materials as examples.