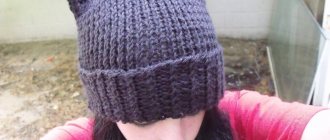
Stylish fur hat in the shape of a papakha or a pill with your own hands
To sew a hat in the form of a papakha you will need:
- Fur;
- Fabric for lining;
- Pattern paper or tracing paper;
- Tape measure;
- Needles, scissors, knife, marker and sewing machine.
Instructions:
- Measure the circumference of your head. The height of the pattern will be the height of the hat itself. For a circle pattern, you can also use the length of a rectangular piece;
- Create a pattern. Transfer the obtained parameters onto tracing paper or paper. Cut out the sample along the lines. The result should be a circle and a rectangle;
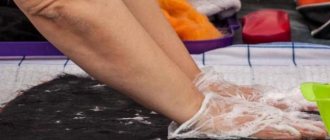
- Place a rectangular shape and a circle on the back of a piece of fur and trace it with a marker. Using a knife or scalpel, cut out these parts.
Important ! In order not to damage the fur, you need to cut not the pile, but the fur fabric itself. Be careful.
- Cut out the same details from fabric as from fur;
- Turn the fabric and fur inside out. Connect the sides of both pieces and secure them with pins. Then use a sewing machine to make stitches – a centimeter from the edge;
- Carefully examine the fur and the direction of the pile. This is necessary to determine the place where the connection to the circle will occur;
Note : the fibers on such hats are usually directed towards the face.
- Turn both pieces over again - the circle and the rectangle to the wrong side and pin them together;
- Sew 1 cm from the edge of the circle, so that both parts are fastened together;
- Turn the hat right side out and release any lint caught in the stitched line;
- In the same way, sew the blanks from the lining fabric, but leave a small hole on it;
- Place the fabric in the fur blank so that the edges meet. Secure everything with pins and make stitches on the machine again;
- Turn out the resulting cap using the gap that was left in step 10.;
- Use hand stitches to close the hole;
- Align and straighten everything, then comb and shake the fur.
An unusual and very stylish headdress is ready. This style will look great together with a warm coat made of drape, wool, etc. As you can see, sewing a fur hat with your own hands is not so difficult. The main thing is the tool.
Two-tone fur hat
To make it, prepare the following materials and tools:
- Natural fur of two contrasting colors and not very thick;
- An old knitted hat or sweater (if you don’t find it at home, you can buy it or knit it yourself);
- A sharp blade, scalpel or stationery knife;
- Threads, needle;
- A small piece of leather;
- Sintepon and fleece (felt)
The operating principle is as follows:
- On the fur, make markings for 7 mm stripes;
- Using a utility knife, blade, or scalpel, cut the marked strips. Be careful;
- Take a hat or sweater as a base. If the latter, then take the bottom of the sweater and apply the resulting strip to your forehead. The crown of the head should not be connected together;
- On the sweater strip, gather the stitches into a knitting needle and cast off. If you don’t know how to knit, then assemble them with an elastic band or thread;
- Start sewing fur strips to the convex part of the workpiece, alternating light and dark colors;
- It is advisable to make stripes of dark fur shorter than light ones, but here everything comes from your imagination and the available material;
- Connect the dovyaz with fur into a ring. Use a hook or thread with a needle;
- Seal the top hole with leather approximately 12 cm in diameter (you don’t need to sew it directly on top, but by pressing it down a little). Place some synthetic padding in the middle, and cover the hole with fleece or felt on top;
- Turn the hat inside out. To straighten the fur, comb it well, straighten it and shake it a little. All is ready!
A little effort and you will get an interesting and fluffy two-color hat.
This is interesting: Pattern Women's T-shirt SML-XL
Video: Master class: How to sew a hat from an old fox collar
Fur hat with earflaps
For this hat you need the following tools and materials:
- Pieces of fur;
- Braid;
- Paper or tracing paper for a pattern;
- Measuring tape, scissors, tailor's chalk;
- Fabric for lining;
- Wooden hammer and small nails;
- Plywood board.
Sewing instructions:
- Create a pattern: a cap of 2 parts, ears and a visor. To do this, mark a horizontal line 30.5 cm long on paper or tracing paper, in the middle of it make a line 14 cm high, which should be perpendicular. From the intersection point, step back 2 cm vertically. Next, make another horizontal line 28.5 cm. It should intersect the vertical strip in the middle of the length;
- Make four more horizontal stripes - 27 cm, 25.8 cm, 22.5 cm and 17 cm and indent twice by 3 and 1.5 cm. From the final drawn point, make 3 cm upward and mark this place. Connect all left and right points to the top;
- Mark the dart. To do this: move up 4.5 cm along the central vertical and to the right, to the left along the lower horizontal from the center point - 3 cm;
- Make a pattern for the ear of the hat. Make a horizontal line 13.5 cm long. Divide it into 2 parts, from the center create a perpendicular vertical line of 12 cm. Mark on it from bottom to top points at 3, 3 and again 3 cm, then at 1.5 and 1, 5 cm. From these points, draw horizontal stripes 12.6; 11, 9, 7 cm. The middle of each strip should fall on the marked points. All points are connected to each other;
- To form half of the visor pattern, you need to build a drawing. Make a rectangular figure on paper with dimensions of 11.5 and 13.5 cm. On the 11.5 cm side, set aside 3, 2 and 5 cm. On the opposite side of these points you need to make perpendicular lines. Mark points along them 0.5; 2, 3, 5, 11 cm. Connect them. The resulting line will indicate the front stripe of the visor;
- On the other smaller side of the rectangle, lay a segment 9.1 cm long, then 3 times 0.8 cm. From these points, draw perpendicular lines to the opposite side. On the 2nd perpendicular mark 7, on the 3rd – 10 cm. Combine the 9.1 cm point with the point on the opposite angle, with the points – 0.8/7 cm, as well as 0.8/10 cm. This line will become rear visor stripe;
- Place all samples on the board and outline with chalk. Attach fur;
- Sew together pieces of fur using stitches. The pile should not get on the wrong side. Lay out the made part, break the seam with a wooden hammer. Moisten the fur and straighten the pieces. Secure them with small nails to the plywood. The pile should be out. Let the fur dry;
- Remove the fur from the board, lay out the pattern pieces, and outline them with tailor's chalk. Make patterns for 2 parts of the cap, 4 parts for the ears of the hat and the visor. Stitch the darts of the cap, then sew it. Afterwards, sew on the ears and visor. Turn the fur inside out and sew in the braid for the ties;
- Lay out the fabric for the lining on the bias, transfer the details of all the patterns on it, cut along the contour, sew together, smooth and sew into the resulting fur hat.
Fur hat with earflaps patterns
Despite the fact that sewing such a hat is not so easy, the result is a chic and fashionable headdress that will definitely keep you warm even in the harsh winter.
Don't be afraid to sew, because it makes you and your wardrobe unique and unique.
Winter hat with wide fur trim: choice of material
We sewed caps from soft corduroy with a pattern. To make the hat warm, we additionally laid a layer of synthetic padding in each wedge of the crown.
You will need a piece 20 cm long with a fabric width of 150 cm. For insulation we used synthetic padding, and the inside of the crown is made of silky viscose lining. You will need pieces of these materials approximately 10 cm long; you can calculate the exact quantity after printing the pattern. For the trim in our model, faux fur with a fairly long pile is used. You can also sew a hat from natural fur, but first make sure that your machine can handle this task or sew by hand.
Both natural and faux fur require special cutting, and we will show you how to do it correctly. Before purchasing fur, decide on the width of the trim. In our photos, the width of the trim on the hat is 8 cm when finished, plus 2 cm for seam allowances. Sometimes the trim is double sewn and folded in half, but in our case, the inside of the hat is made entirely of fabric.
If you buy real fur, draw in advance a rectangle pattern with a width equal to the desired trim width plus allowances and a length equal to the head circumference plus 5 cm. For faux fur with a width of about 140 cm, you only need to know the width of the trim.
So, let's sew a winter hat with fur trim!
Uncover
Print the pattern, making sure your printer is set to “actual size”, “100%”, and not “scale to fit”. In the Russian-language program, the option “real size” is possible. Cut out the pattern.
Also measure the length of the bottom edge of the resulting model and cut out the fur trim, focusing on this size and adding a spare 2 centimeters.
Cut out:
- 6 wedges from the main fabric and 6 wedges from the lining fabric with 1 cm allowances on all sides.
- 6 synthetic synthetic wedges without allowances
- A strip of fur trim with a length equal to the circumference of the head plus 5 cm and the desired width plus 2 cm for allowances.
- The same strip of lining under the trim from the main or lining fabric
To cut natural or faux fur, use a knife or razor. Using a sharp blade, carefully cut along the intended contour from the wrong side of the material. Cut the base material of the fur, but do not touch the pile.
Slowly move the edges of the cut out part, straightening the fur pile.
Progress
- Wedges made of main and lining fabrics, insulation
- Strip of fur and main fabric
- Threads and scissors
Sew three wedges at a time from the main fabric, folding them right sides together. Press the allowances to the sides, cutting them diagonally at the top.
Place insulation inside the wedge, cover with seam allowances and pin. Stitch along the front side, grabbing the insulation, retreating 3-4 mm from the seam.
Fold the two halves of the crown (each of 3 wedges) with the right sides inward and stitch, aligning in the center. Topstitch the seam allowances, straightening them onto the insulation.
Sew the details of the crown lining. Iron the allowances together, straightening them at the top.
Place the lining in the crown with the wrong side inward and pin, starting from the middle. Baste along the edge. Check the length of the bottom edge and compare it with the length of the trim and its lining, if necessary, trim the trim parts.
Sew the hem and hem lining along the long edge, with right sides facing in. Tuck the fur pile inside the seam.
Sew the hem and lining into a ring along the side edges, folding it in half with right sides facing inward.
Pin together the crown and trim, placing them right sides together. Tuck the fur pile inside the seam. Stitch.
Turn the seam allowance to the hem side. Turn 1cm of the lining edge over to the wrong side and baste or iron.
Hand stitch the folded edge to the topstitch seam allowance using a blind stitch. Pull out the basting.
The winter hat with fur trim is ready!
LiveInternetLiveInternet
—Quote book
Recipe for Turkish flatbread "Gözleme" with potato filling and double filling.
☑ The most airy, sophisticated, but not complicated cake from Ekaterina-verdadedesabor (v.
Summer top with one-piece sleeves. The model is knitted in one piece, starting from the bottom edge of the front. Sp.
Delicate cream reminiscent of a sundae