Beautiful and original decor for crafts
Skeletonized leaves amaze the imagination with their openwork and graceful shapes and are used for stylish decoration of finished products.
Using such a natural material, which can be easily made at home, you can decorate glasses and candlesticks, full-fledged installations and postcards, and make paintings.
Unique decor will look great in the interior as part of decorative accessories and helps highlight the design concept.
Often, such materials are used to decorate paintings or themed cards, greeting cards and bouquets of fresh or dried flowers, for which they can be painted.
Post-processing
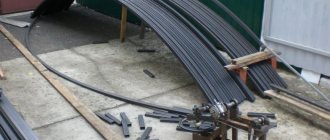
What to do with them next? First, dry completely flat. Secondly, iron it. Tender leaves are cooked for less time and straightened out while still in the saucepan, with great precautions. Therefore, see for yourself which material can be ironed immediately without waiting for it to dry, and which - after drying. Know that the following species: sycamore, maple, birch, poplar, aspen, oak, linden, walnut, ficus, blueberry, rowan, alder are the best and highest quality to “skeletonize.” They make more beautiful specimens than others.
In principle, you can use ready-made material this way. But it would be nicer to paint it. In this case, cans of paint are useful, which is sprayed on the fly, protecting your hands with gloves.
Paint it any color you want, but be sure to try gold and/or silver! It turns out great.
A detailed master class in the following video, which will teach you with step-by-step instructions:
Photos of various works clearly show the variety of uses of skeletonized leaves in creativity. See how they can be designed and what extensive areas of needlework are covered:
The most common option is application:
Crafts made from skeletonized leaves in combination with other materials can be very original:
If you take ordinary plastic or polymer clay, cut it in the shape of a skeletonized leaf and put it on top, then cover it with varnish, then the beautiful decoration will be the most exclusive in your collection:
Using the decoupage technique, skeletonized natural material will look great and will give a special magical look to any product:
By placing your work under glass, you will get an unforgettable picture - a decoration for any room:
Oddly enough, you can also bend and shape skeletonized leaves! Nothing will happen to them:
They also use ready-made leaves to draw, embroider, make night lights and garlands, even entire vases! Volumetric compositions are also very popular.
Choose any method or come up with your own!
What is skeletonization technology?
Looking at the photos of leaf skeletonization, you can see how fragile and elegant the finished products look, already prepared for decoration.
By coating them with varnish or paint, such openwork products receive additional strengthening, and the technology for their creation itself is not particularly complicated.
It is important to understand that the leaf of any plant consists of soft tissues and a sinewy skeleton, which creates the shape of the leaf itself.
Having removed the fleshy part of the leaf plate using a pre-selected method, the master receives a ready-made skeleton with thin veins, which can be used for decorating and decorating crafts.
Advice from professionals
The success of separating the pulp from the skeleton depends mainly on the stiffness and thickness of the leaf. The leaves of the following plants skeletonize more easily than others: poplar, plane tree, linden, oak, blueberry, birch, aspen, ficus. Experiment with cherry and currant leaves.
Also think about decorating the skeletons: painting them, laminating them, additional coating.
Painting skeletonized leaves can be done at several stages:
- in the process of separating the pulp from the veins, whiteness and potassium permanganate will help you;
- after the final drying of the product, use watercolors or gouache, spray paint cans.
Coat the finished product with varnish or a fixative to make it more durable. Use sparkles, rhinestones and beads for decoration.
Which leaves are best to use for skeletonization?
It’s good when the craftsman already has leaves of different shapes and configurations at his disposal, which will greatly facilitate the process of decorating crafts.
If such material is not available, you can make it yourself by choosing the best and most convenient technology for implementation and choosing the right consumables:
- leaves with well-developed veins that stand out on the leaf blade;
- fresh and undamaged leaves that can retain their shape after processing;
- leaves having different shapes or configurations, suitable for decoration.
Depending on the size and density of the leaves, the technology for processing them is selected; in the process of its implementation, the structure of the leaf must not be damaged.
The leaves that are best suited for processing are fairly fleshy leaves, in which the skeleton of the veins is clearly visible; such decor, after processing and dyeing, will look great on any product.
Paper crafts on the theme “Autumn” for kindergarten
Autumn leaves
Autumn leaves made from paper are a simple idea for a children's craft for a preschooler. Leaves can be cut out of colored paper using stencils, or folded according to a pattern. Simple applications and garlands are made from autumn paper leaves. In kindergartens, autumn leaves are used to decorate group windows.
To make a beautiful, bright applique, you need to add foliage from different trees: birch, maple, oak, etc. Foliage is very easy to make using stencils of the right sizes.
Leaf Patterns:
Tree
Making a tree from colored paper and cardboard will appeal not only to children, but also to adults. One of the simplest options is a tree in the shape of a palm. This application can be done together with children of kindergarten age. Here you can show your imagination and choose the color scheme that the baby considers most pleasant for himself.
What materials will be required for manufacturing:
- corrugated paper;
- cardboard;
- regular colored sheets;
- scissors;
- glue.
Manufacturing instructions
- Prepare the base of the craft - the trunk. To do this, the child will need to trace his hand on a piece of brown construction paper.
- Prepare the foliage. For a more interesting and vibrant result, cut paper of two colors into small pieces and crumple it into an accordion.
- Glue the tree trunk onto a blank sheet of paper.
- Then we glue two-color foliage in a chaotic manner to form a crown.
- Then we glue the sheet along with the tree onto a larger cardboard. A handmade tree can be placed in a frame and decorate the interior of a nursery or any other room.
Corrugated paper tree applique
Pumpkin
Pumpkin is the most popular choice when Halloween competitions are coming up.
To make it, you need to take colored sheets of yellow or bright orange. Draw stripes on them every 1.5-2 centimeters. The length of these strips should be different. Their length is shortened by half a centimeter every two strips.
Each two strips are fastened to each other with glue or a stapler and fixed to the middle. When all the stripes are connected into a pumpkin, you need to fix a green leaf on top. It can be cut out using a stencil.
Craft paper pumpkin
fly agaric
Fly agaric is another bright and interesting craft for kindergarten.
There is nothing complicated about making them. After the example, the child can easily make a whole mushroom meadow. It is recommended to use toilet paper rolls as a base, as such mushrooms will be stable. If you don’t have any bushings in stock, you can simply make tubes out of cardboard, thoroughly coating it with glue.
Paper crafts in the form of fly agaric mushrooms turn out to be very elegant and interesting. After preparing the bushings, you need to cover the mushroom stems with plain white paper. Cut a strip approximately 3-5 centimeters wide from a blank sheet of paper. You need to make cuts on it, imitating fringe. Then fix the fringe on the mushroom stem with glue.
After this you need to make a cone or hat from red paper. There is no need to glue the cone, as it should stick well. The white circles on the hat are made of cotton wool. Small circles are rolled out of it, rolled into glue and fixed on the cap. If you don’t have cotton wool on hand, use white paper mugs.
Several of these mushrooms can be placed on a sheet of cardboard or the inside of a box lid, and the bottom can be lined with dried leaves. This autumn paper craft will take pride of place at a craft exhibition in kindergarten.
Hedgehog
A children's craft in the shape of a hedgehog can be made in a variety of variations. You can make a hanging animal with your child and hang it in the children's room.
Manufacturing technology:
- Cut out the silhouette of a hedgehog using a stencil, or use any other template.
- It is better to use cardboard for the silhouette of the animal.
- In the middle of the silhouette we glue several colored dried autumn leaves. To make them as bright as possible, you can pre-paint them with oil paints.
- The paws are made from beads and pieces of cardboard. They are attached to the body with ropes.
Paper hedgehog
Existing methods for skeletonizing leaves
The proposed master class on skeletonizing leaves will help you independently evaluate the ease of performing a simple and simple procedure.
To independently process the collected material, you can use different methods, which depend on the level of skill and desire of the master himself, and allow you to obtain different results.
What parts does the sheet consist of?
You all know what a leaf looks like, but what does it consist of? If you examine it under a microscope, you can distinguish...
- The epidermis
is a layer of cells that protect against the harmful effects of the environment and excessive evaporation of water. Often, on top of the epidermis, the leaf is covered with a protective layer of waxy origin (cuticle). - Mesophyll, or parenchyma
, is an internal chlorophyll-bearing tissue that performs the main function of photosynthesis. - A network of veins
formed by conducting bundles consisting of vessels and sieve tubes for the movement of water, dissolved salts and sugars.
On the lower part of the leaf there are also stomata - special complexes of cells located mainly on the lower surface of the leaves; Through them, water evaporation and gas exchange occur.
The network of veins in this complex is the strongest and most resistant. It needs to be carefully separated from the sheet, and everything else needs to be gotten rid of.
Boiling with soda
The boiling procedure allows you to significantly soften the leaf plate, and the alkaline environment created by soda accelerates this process.
In hot boiling water, the leaves must be simmered over low heat until the green mass is completely dissolved; for different leaves this period can last from 20 to 40 minutes.
Natural or natural way
Do you know how to collect leaves? How about for a herbarium? Then you will find those skeletonized by nature! Most often they are under the snow - during the winter they get wet and such skeletons remain. True, they are not so beautiful. But, again, it depends on what craft! Here's what they look like after they're cleaned:
To make the leaves look more decent, arrange this process at home. Place all the leaves you need in a jar of water and leave there. Check after a couple of weeks - if the skin does not come off when rubbed, then leave it for some more time, no more than a month. When you feel that it has become soft and the skin is peeling off well, rub lightly with a toothbrush under running water until the entire top layer comes off. However, it is quite a long wait. Therefore, there are other methods.
Boiling with chemistry
The skeletonization procedure can be speeded up as much as possible by using aggressive chemicals and preparations during the boiling process.
Liquid for washing windows or breaking through blockages is excellent for these purposes, but it is important to remember that during the boiling process it is necessary to organize high-quality ventilation of the room.
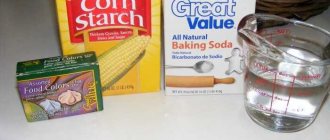
Preparation of the composition
In a bowl or basin, mix 1 part glycerin and 2 parts water. The volume of liquid depends on the number of leaves collected. The mixture of water and glycerin should completely cover the plants. To stabilize 15 leaves I needed 2 cups of glycerin and 4 cups of water.
Natural anomalies - brown snow fell in one of the US states
“Let the children grow up first!”: why people put off apartment renovations
Back to Russia: Serebryakov, who returned from Canada, was inundated with new roles
Soaking in water
The harmful effects on the body can be minimized by using the technology of soaking the leaves in ordinary water for 5-7 days.
This procedure differs in duration, but allows you to obtain the most intact and beautiful leaves, used in the design of beautiful and stylish, original crafts or decor.
The wet method is more complex
You'll have to try hard here. First, stock up on powdered cleaning agent - any chemical, but harsher, such as powder for cleaning sewer pipes. Secondly, the leaves must be boiled in this version. And this takes a long time - cook hard leaves for about 3 hours, soft leaves for an hour. Pour the powder into the pan - about 2-3 tablespoons.
The cooked leaves should become soft. The pulp should come off if you rub the leaf with force. This should be done in a bowl of warm water. To prevent your hands from getting tired from staying in water for a long time and for an additional cleaning effect, wear rubber gloves with pimples. If the sheet was hard before cooking, then place it on a wooden board and use a small brush with soft bristles (a toothbrush will do), moistening it with water.
Knocking out leaves
Another simple way to do skeletonization at home is to knock out pre-collected and carefully dried leaves.
Carefully dried natural materials are placed between sheets of paper or fabric and knocked out with a regular brush with soft and flexible bristles, which will help turn them into real jewelry.
Craft Volume Umbrella
You will need three A4 sheets of any color, a disk, scissors, glue, a piece of wire.
1. Place the disk on the sheet and trace it. One sheet will make three circles. And the umbrella will take 9 circles. Cut it out.
2. Bend the circle in half and in half again. It turns out to be a quarter circle. Apply glue from the center of the circle to the outer edge and glue it together. One piece is ready.
We do the same with all the circles.
3. Glue the quarters together. We also apply glue only to the strip of the center of the circle towards the outside.
4. We connect the first and ninth parts of the ball, we get a hemisphere.
5. Attach a wire leg to the center. Our umbrella is ready.
Paper techniques
Photo of leaf skeletonization
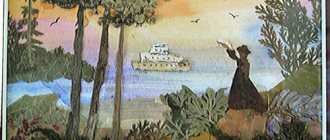
Creating a painting
Remove the backing from the brass frame. Place leaves on it. You can experiment with their placement until you find the right composition.
Once you have the picture you want, secure the leaves to the backing with a few pieces of double-sided tape. The adhesive tape should be located on the back of each sheet.
Then place the leaf backing back into the frame. Your painting is ready for display!