How to make a flower pot with your own hands from clay
The most popular material for making a flower pot is clay, from which you can make products of different sizes and shapes.
To do this, you will need self-hardening material, a plastic container, acrylic paint and moisture-proof varnish. Clay is the most popular material for making flower pots
The clay is thoroughly kneaded until a homogeneous and pliable mass is obtained. The mixture is rolled out into a layer, the thickness of which should correspond to the thickness of the walls of the future flowerpot. The bottom is made according to the shape of the plastic container. From the remaining mass it is necessary to cut a strip, the size of which corresponds to the height of the pot. The length of the product must exceed the size of the base circumference.
The bottom and strip are connected to each other, forming a flowerpot. All joints are smoothed to achieve an even, smooth surface. The process is performed by wetting the fingers with water. The finished clay flower pot must dry naturally for 48 hours. Finally, the flowerpot is painted in several layers with a final varnish coating.
Clay pots can be decorated as you wish
The ideal solution for making a small pot for succulents is polymer clay. To do this you will need the material itself, a knife, a teaspoon and a stove. The first step is to prepare the clay by kneading it until it is soft so that it becomes pliable for modeling. Form a ball from the material, the size of which will correspond to the dimensions of the future pot. The workpiece should be placed in the freezer for 10 minutes to harden the material, which will make further work with it easier.
Forming a pot begins with creating a recess for the substrate. To do this, use a spoon to select clay from the center of the ball, after which the workpiece is again sent to the freezer for another 10 minutes. Next, the pot can be given any configuration, leaving the walls rounded, or leveled with a knife, forming a cubic-shaped product.
The finished pot is baked in the oven. The firing temperature and time are indicated on the clay packaging. The finished product can be left in its original form or decorated using one of the techniques.
A clay flower pot is not difficult to make even without a pottery wheel
General rules
Creating containers for flower pots, at first glance, is not a difficult task. After all, this is just a kind of container, consisting of a bottom and sides, which should hold and cover the pot. Moreover, it can be hung on a string, nailed to a wall, or simply placed on the ground.
But without complying with basic requirements, a flowerpot can very quickly lose its visual appeal and litter the space intended for decoration.
The first rule is surface treatment that allows it to withstand temperature changes and the influence of precipitation. It is also necessary to exclude the processes of rotting and infection by parasites, using paints and varnishes intended for open air.
For a zonal design, several flower pots are usually used in harmony with other elements of the exterior. The various compositions of flowerpots shown in the photo for decorating facades, walls and garden areas are made with a single solution. Fashionable mixing of styles very rarely works in landscape design.
When decorating with flower containers, the general design concept of the site as a whole is taken into account, or an autonomous solution is possible in limited areas of terraces, gazebos, alpine slides, etc.
In order for the flowers in containers to remain healthy, the location of the flowerpot or composition of them must provide the appropriate light and temperature conditions. The pot must be firmly secured in a decorative vessel, avoiding shaking that is harmful to the plants.
Decorative containers are a kind of camouflage for flower pots, and, with the exception of models with mesh bottoms, they are not equipped with drainage. It is necessary to regularly drain the water accumulated in the trays, and also lay a layer of gravel or moss on the bottom to prevent rotting of the roots due to stagnant moisture.
How to turn a mayonnaise bucket into a beautiful flowerpot or garden chest
The most relevant use of mayonnaise buckets is for making elegant flower pots or containers for small garden supplies, seeds or fruits. They can be hung on any garden structure or placed on a terrace or in the open air. Depending on whether they will be under cover or outside it, suitable material for decoration is selected.
Materials for decorating a mayonnaise bucket that are not afraid of adverse factors in the garden
The simplest option is to paint the bucket with bright colors and apply some kind of ornament. For example, you can draw neat circles of a contrasting color. If you have enough talent, you can draw figures or pictures that you came up with yourself. Another option for decorating a mayonnaise bucket under a flowerpot or garden container is to glue pieces of colorful self-adhesive. Self-adhesive material of various colors is cut into circles, squares or any other shapes and glued in a chaotic manner to the surface of the bucket. An example of this design is shown in the photo.
Making crafts using self-adhesive tape
Gardeners with special creative inclinations realized that the lids of plastic mayonnaise buckets can also be used as decoration. They decorate a fence or the facade of a building. Painting it in bright, matching colors wouldn't hurt. Here's what it might look like.
Decorating the garden with lids of mayonnaise buckets
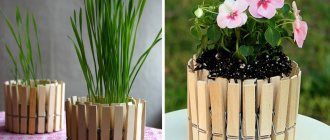
Decorating mayonnaise buckets for garden decoration using old clothespins
This craft will be an excellent decoration for a garden or terrace, creating an unusually cozy atmosphere. Making it yourself is not as difficult as it might seem at first. First you need to disassemble the old wooden clothespins into two parts.
After this, you should glue them to the mayonnaise bucket using superglue.
Now all that’s left to do is place the fabric bag inside and tie some cute ribbons.
Original crafts from plastic buckets for closed areas in the garden
If you want to create a real masterpiece of art with your own hands, then you shouldn’t make do with just paints or self-adhesive wallpaper. A great idea that doesn’t require any special skills or abilities from you is decoupage. It has become very popular lately, and it is clear why, because such crafts amaze with their sophistication and beauty. They will fill your terrace or balcony with romance. Just look how beautiful it is. How to create such a craft with your own hands? There's really nothing particularly difficult about it. You just need to follow this work plan:
1. Treat the bucket with a degreaser. 2. Apply a layer of acrylic varnish. 3. Without waiting for it to dry, glue the napkin. 4. Coat the top with varnish again. 5. Dry.
These simple steps will make you the owner of a very original garden decoration
If you are making a flower pot, it is important to remember to make a drainage hole in the bottom of the bucket. Look, isn't this a masterpiece?
Decoupage is a great idea
Finishing a mayonnaise bucket with rope
To get an interesting chest for small things, seeds, fruits, you can degrease a plastic bucket, apply a layer of PVA glue and wrap it with a thick rope of any color. You can continue decorating the bucket to your liking, using ribbons, beads, seed beads, buttons or any other materials. Examples of such crafts are shown in the photo.
Flowerpot made of thick threads and a mayonnaise bucket
You can simply wrap a mayonnaise bucket with a beautiful cloth, and you will get an original flowerpot. But do not forget that such crafts should not be displayed in the open air.
Decorating a pot from a bucket using fabric
DIY lamps made from plastic buckets
To make small lampshades for light bulbs in the garden, only transparent mayonnaise buckets are suitable. It will look impressive if they are covered with multi-colored glass or decorated in the form of a herbarium. In principle, the successful design of such a lampshade is the result of good taste and imagination. If there is no shortage of them, such a lighting fixture can look very nice. It will serve you for a long time, since plastic is not afraid of snow, wind, or rain. If the bucket becomes dull, then after eating the next portion of mayonnaise you can make a new copy that is practically free.
Lamps in the garden
Garden crafts made from mayonnaise buckets will become an original and charming decoration. The main thing is to believe in yourself and use all your imagination. Now, before you throw your empty mayonnaise bucket into the trash, think carefully. As you have seen, you can make a wonderful garden decoration from it, which will make you feel like a real artist, hearing rave reviews of your work.
“>
Unusual street planters made from unnecessary things
Stylish flowerpots that will amaze with their appearance can be made from old or out-of-fashion items. Giving objects a second life is now fashionable. Here are a few garden planters that are definitely worth your attention.
It’s as easy as pie to make a planter for a summer house from an old chandelier; just place pots of flowers on it. But it is important to take into account their size so that the composition does not lose balance.
happymodern.ru
happymodern.ru
happymodern.ru
happymodern.ru
A flowerpot-bicycle will look original on the site. Painting it a single color will make it decorative. And you can place pots with plants not only on the trunk or frame, but also near the wheels.
orchidlagoon.com
youtube.com
blog.gardenloversclub.com
orchidlagoon.com
youtube.com
A hanging planter made from an old T-shirt is very practical and elegant. It is unlikely that anyone will guess what it is made of. Just don’t take clothes that are too old to prevent the fabric from tearing. There are different ways to cut a T-shirt into ribbons. Some can be found on the Internet, and your imagination will probably tell you some!
zakustom.com
marliesmolema.nl
zakustom.com
marliesmolema.nl
Do you feel bad about throwing away an old leaky bucket? Turn it into a Provence style flower pot! To do this, you can apply a thematic design to the bucket, tie it with ribbons, burlap, or place lavender inside.
westwing.ru
livemaster.ru
livemaster.ru
landscapedizajn.ru
westwing.ru
livemaster.ru
Do not throw away mugs with chipped or chipped handles. It’s better to make a pot-cup, decorating it with any available materials.
A flower pot woven from newspaper tubes will look impressive. Just don’t place it in the open air, otherwise the structure will quickly lose its attractive appearance.
madeheart.com
youtube.com
maja-dacha.ru
madeheart.com
youtube.com
Bucket flower pot
From this step-by-step master class you will learn how to make a large flower pot for your home and garden with your own hands. We will transform an ordinary metal bucket - we will change it beyond recognition! We will need the simplest materials, which are usually available to those who own their own summer cottage. If you are making a flower pot for large house plants, take a look at the construction department.
The resulting pot can be used as a flowerpot or an independent container for flowers. It will be comfortable for indoor palm trees and large flowers like money tree or aloe. At the dacha, you can plant any plants that are usually planted in flower beds in such a pot.
If you are going to use the bucket as a flower pot and not as a planter, first make several holes in its bottom. This is necessary for drainage. If the pot will be at home, you will need a tray. When installing such a pot-bed on a summer cottage, a tray is not needed - excess water will flow directly into the ground.
What do we need?
- metal bucket of any size
- cement
- grout for stone
- gauze or burlap
- small pebbles (smooth pebbles)
- sponge
- craft varnish
You can try to find pebbles to decorate a flower pot on your site or purchase them as a set. By the way, suitable pebbles can also be found in a pet store - they are used for soil in aquariums.
How to make a pot?
First of all, we dilute the cement according to the instructions. Apply it in one layer to a metal bucket using a spatula.
While the cement has not hardened, wrap it in gauze or burlap and lightly beat the fabric with a spatula so that it sits more tightly. Next, apply another thin layer of cement, turn the bucket upside down and place stones next to each other on the cement. We try to push them as deep as possible and level them so that the flower pot turns out smooth.
Next, spread the grout for the stone and apply it to the entire surface of the bucket so as to completely cover the decor of the flower pot.
Any unevenness must be smoothed out immediately with a soft sponge so that all gaps are filled equally.
At the last stage, when all the materials are completely dry, you can add craft varnish to make our homemade pot glossy and smooth, pleasant to the touch. However, this is not at all necessary.
A flower pot made from a bucket will be quite heavy, so you don’t have to be afraid to use it as a flower bed. You can safely plant any tall plants in it - it will not fall from the wind, since its basis is made up of stones, cement and a high layer of earth. You can paint this pot as you wish using spray paints.
We recommend you see: plaster planters in the shape of swans
Cement and fabric planters
It will take a little time to create a cement pot. The task is so simple that anyone can do it without prior experience in such work.
You will need to prepare in advance:
- dry cement;
- an old tablecloth, burlap or bedspread;
- the shape of a suitable container (bucket, jar);
- paint;
- mixer-type drill attachment;
- water.
It is important to make sure before starting work that the size of the selected textile fabric matches the capacity of the flowerpot. Then the tablecloth (or piece of fabric) must be placed in a bucket, mark on the wall of the container how much space it takes up.
Take out the tablecloth and fill the bucket with water to the mark. Add dry cement and mix using a “mixer”. The consistency of the cement mixture should be similar to liquid sour cream.
A cloth (tablecloth) is placed in the resulting cement mixture so that the material is properly saturated. This procedure usually takes a few minutes.
Then the tablecloth is taken out and hung on the container chosen as the shape, which is first turned upside down. The edges of the tablecloth must be straightened at your discretion, giving the folds the desired shape.
After the cement has dried, it is recommended to paint the resulting product with a special paint for concrete. This procedure will not only decorate the product, but will also give it additional strength. After the paint has dried, the pot is ready to plant flowers in it.
Option using forms
Making your own garden pots from cement is a simpler task than it seems at first glance.
What will you need?
- bag of cement;
- any lubricant - paraffin, sunflower oil;
- protective gloves;
- molds - 2 pieces (one smaller, the other larger - corresponding in shape to the first);
- bucket for mixing concrete;
- spatula or small blade;
- a small heavy object in the form of a load (for example, a stone).
Step 1: Selecting a Shape
Before you make a cement pot, you need to find 2 containers of different sizes. They should have the same shape, but differ in size. Ideally, the gap between the smaller and larger container is at least 5 cm.
Can be used:
- carton boxes,
- plastic containers,
- old pots,
- glass containers,
- stainless steel containers.
The containers should have a shape from which the pot can be easily removed after drying. For example, cans have grooves that make removing the finished product difficult.
By placing concrete in a wooden box or thick cardboard box and loading a smaller box into it, you can create square pots. To prevent the concrete from soaking the cardboard, thin boards can be placed at the bottom of the box. Cover the box with film and grease the film with oil.
Step 2. Preparation of the solution
You need to prepare a bucket (bowl) for preparing the cement mass. Pour the cement mixture into a bucket and gradually add water, stirring constantly. The packaging of the purchased mixture contains information about the proportions for preparing concrete. You must follow the manufacturer's recommendations.
The mixture should have an acceptable consistency, then it is convenient to spread. Liquid cement takes longer to harden, but the surface of the pot will be smoother. A thick solution is difficult to spread; the finished product will receive more cracks, holes, and air bubbles.
Usually the mixture is prepared in the following proportion: 1 part cement – 2 parts water.
You can enrich concrete flowerpots with additional effects by adding various additives to the freshly prepared mass, giving the products a unique character:
- glass beads,
- small shells,
- small pieces of broken dishes,
- small items.
Step 3: Apply oil to molds
Apply oil to create a greasy, slippery coating on the surface of the forms in contact with the concrete. Thanks to the oil layer, the molds will not stick to the concrete, making it easier to remove the finished product.
Step 4. Filling with cement mortar
It is advisable to wear protective gloves and carefully and slowly pour the cement mixture into the prepared container. The mass is evenly distributed along the bottom of the container
A pebble or other object is placed at the bottom of the mold. You can drill holes in the finished flowerpot, but wait until the concrete has completely hardened. Hardening takes 2-3 days.
When the lower part of the container is filled, smooth the surface of the mass with a spatula. The smaller mold is then placed inside the larger one. Press down on the smaller mold until the desired bottom thickness is achieved.
Then the form is filled with concrete mixture to the brim and the top of the mixture is leveled.
Step 5. The cement hardens
You need to be patient and wait for the cement to dry. This will last 2-2.5 days, the hardening time depends on the size of the product. Smaller pots will dry faster, larger ones will take longer.
Step 6. Completion of work
When the concrete is completely dry, the mold is slowly, carefully, gradually taken out. There is no need to worry if small aesthetic irregularities are noticed after the flower pot has cured
You can easily remove minor defects using fine sandpaper.
It will take a week to dry completely. During this time, you can wet the pot once a day with a damp sponge to darken the final color.
Sometimes the product gets cracked when removed. Eliminating such a defect is very simple - just cover the crack with fresh solution.
DIY flower pots for vertical gardening: photos, descriptions, diagrams
In order to arrange vertical gardening on the wall of a residential building, a gazebo or on a balcony, the following master class is perfect. It requires:
- Wooden plates
- Saw
- Drill, jigsaw
- Metal ring, rope
- Sandpaper
- Brush and paints
- Vases
is created as follows:
- Place the pots upside down on wooden plates The rim of the pot should be circled.
IMPORTANT: You should retreat at least 5 cm from the outlined circle.
- Using a saw, you need to make squares from the plates.
- Now you should draw another one inside the first circles Their centers should coincide with the centers of the first ones, but it is recommended to draw the diameters a centimeter or two smaller. It all depends on how much the pots expand at the top, and how much they should rise above the planter.
For convenience, you can outline a smaller pot when creating a flowerpot.
- Circles of smaller diameter need to be cut out. It is recommended to work with a drill first, and then you can use a jigsaw.
As a result, a pot should fit inside such a square planter
- Holes must in the corners so that the plates can be hung.
In the corners of the blanks for the flowerpots you need to cut out small circles
- All irregularities should be removed with sandpaper . Only after this leveling has been completed can you begin painting . You can also decorate pots with paint.
IMPORTANT: If painting is not planned, it is recommended to give preference to treating the wood with an antiseptic.
You can paint not only flowerpots, but also pots
By the way, careless white strokes look great on a plain background on flowerpots and pots
- Now you need to cut four ropes - for all corners of the plates. The length depends on the desired number of tiers.
- Every 25 or 30 cm on each rope you need to tie strong knots - they will help the planks to hold on.
The planks of the pots must be positioned strictly horizontally
- Now all that remains is to thread the ropes through the metal ring and tie a knot.
This is how a pot for vertical gardening turns out.
The stand for the pot should be attached only to the bottom one. In this case, after watering from the upper tier, water will flow to the lower one. However, on the street you can do without stands at all.
IMPORTANT: In order to avoid soil falling out, filters can be placed at the bottom of the pots. For example, coffee.
You can also use the following schemes for vertical gardening :
Arch-planter for vertical gardening Here is another diagram of a planter for vertical gardening
Manufacturing
Attaching the sheathing to the frame
The garage dimensions for storing one car are 3.3 by 5.5 (or 6) meters. At the same time, if you plan to carry out insulation (for example, with mineral wool), each of the indicated dimensions should be increased by 15-20 centimeters.
The frame can be welded from a large-section metal corner - this will make the structure rigid and durable. All work is carried out immediately at the installation site.
The frame assembly process consists of the following steps:
- The lower frame is welded first (do not forget to weld it to the rods protruding from the concrete at the corners of the structure so that the reinforcement outlets are inside the structure).
- Then the vertical corner posts are welded.
- In the front part, two side gate posts are installed and secured.
- All fixed racks in the upper part are connected to each other by the upper frame.
- After this, it is necessary to carry out the load-bearing elements of the roof, in this case:
- with a pitched roof, the posts on the front side should be higher than the others (the slope of the roof will be towards the rear wall);
- with a gable roof, you will also have to weld triangular rafter structures and weld them to the upper frame.
Intermediate posts along all walls are welded at equal intervals to enhance the strength and rigidity of the entire structure. In this case, the pitch of the rack depends on the width of the metal sheet that will be welded to it as part of the wall.
Creating a wireframe
The outer skin is welded or attached to the finished frame using bolts and nuts. It can be made from stamped sheets of galvanized or non-galvanized steel, as well as from corrugated sheets. In all cases, the metal thickness must be at least 1.2 mm.
On the roof, the sheets begin to be attached from the overhangs to the ridge, ensuring that the top sheets overlap the bottom sheets by 15 cm.
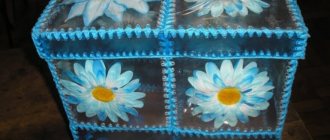
Pots made of mayonnaise buckets in decoupage style
Decorating in the decoupage style is now a very popular hobby, and besides, it is not a difficult task. To make the pots look beautiful, you will need:
- The bucket itself.
- Acrylic primer or white acrylic paint.
- PVA glue.
- Napkin for decoupage with any picture.
- Acrylic paints.
The bucket needs to be washed, cleaned of the product sticker, and dried. Sand the surface, cover with primer or acrylic paint to avoid unevenness. Leave until completely dry. Take a decoupage napkin and remove the two bottom white layers, then cut out or tear off the desired part of the design. Since the picture is flat and the bucket is round, it won’t be possible to glue the image right away.
It's easier to do this with an office file or a thick transparent plastic bag. Cut off one side of the file or cut the bag, place the drawing face down on it and pour in a little water, while using a brush to smooth it over the entire surface of the image, expelling the air. Lift the polyethylene and simply apply it to the surface of the bucket, gently smoothing out any irregularities with your finger. After the pattern has stuck to the surface, you can remove the polyethylene.
From the top with a brush you need to apply PVA glue from the center to the edges of the image, smoothing out the “wrinkles”. Leave until completely dry. Cover the drawing with acrylic varnish. When everything has dried, you need to apply paint of a suitable color around the application. For example, if these are sunflowers, you can make the top blue, symbolizing the sky, and the bottom green, symbolizing grass. When the paint has dried, coat the bucket with acrylic varnish.
How to choose a design?
Like any other products belonging to the “hand made” category, decorated flower pots are distinguished by the variety of their external design. First of all, the option for decorating such containers is determined by the imagination of their owner, however, there are general recommendations that allow you to solve this problem with the best final result. They help you choose the most suitable design ideas that match the material of the container being converted and the decor used.
Plastic pots go well with the vast majority of decorations. This is largely due to the properties of such products, which ensure perfect adhesion of decorative elements to the surface being transformed. Especially often, plastic containers are decorated with cereals and fabrics, although other solutions (primarily decoupage) are also popular.
Design options for pots for indoor flowers
What is the difference between a flower pot and a regular flower pot? Translated from French, cache-pot means “to hide a pot.” Thus, a flowerpot is a decorative “wrapper”. Of course, the best home for flowers would be a clay pot, but it quickly loses its attractive appearance, since the ceramic allows water to pass through and stains appear on its surface that cannot be removed. Glaze is often used as a protective film, but over time it will crack and crumble, and then the pot will either have to be replaced or decorated. In this case, a flowerpot comes to the rescue - with its help you can easily hide unsightly places and create decor in the same style.
If you have a couple or three pots, then the easiest way is to arrange them beautifully on the windowsill. But if there are more than a dozen colors, then placement can become a problem. The most common way to hang flowerpots is to use ready-made hanging hooks or make holes for rope. But you can make the mounting method creative.
Such a pot will not go unnoticed
You can organize a simple crossbar or build an entire structure under the ceiling, on which, for example, hang several flowerpots using the Macrame technique.
Pots on the crossbar
Multi-tiered hanging planter
Or here’s an idea for hanging flowerpots, even those who don’t know how to weave using the Macrame technique can implement it:
If you need to place many flower pots in a small space, then this idea is for you!
Using simple techniques from wooden blocks and rope, you can make an entire shelf for flowers with your own hands, arranging hanging structures. More detailed instructions in this video:
Imagine, combine different methods, the more colors you can place, the more comfortable your home will be.
How to buy ready-made flower pots on Aliexpress?
If it is not possible to make such a wonderful flower pot yourself, you can always contact the Aliexpress online store. How to find the treasured product? First of all, beginners are recommended to read the text instructions on how to use the site or the video instructions.
Now we can talk about flowerpots:
- In the main menu on the left you need to select the heading “For Home and Garden” , and in it in the category “Home Decor” - “DIY Decor”
So you need to start searching for flowerpots on Aliexpress
- In the menu on the left you need to click “Home and Garden”
The second stage of searching for flowerpots on Aliexpress
- Next, you should clarify that the product is needed “For the garden and vegetable garden”
The third stage of searching for flowerpots on Aliexpress
- And finally, the final stage - choosing the category “Garden Pots and Flowerpots”
The final stage of searching for flowerpots on Aliexpress
IMPORTANT: It is recommended to immediately install the “Gardener” category - it will help save time on finding flowerpots specifically for the garden.
The choice of materials is quite wide - for example, plastic, ceramics, cement, wood, glass, iron, etc.
The color palette is also pleasingly varied - brown, green, yellow, blue, white and many other shades will certainly enliven the area.
Both large and giant models are perfect for the garden.
You can also immediately indicate whether you need a hanging flowerpot, or perhaps you want to organize vertical gardening.
An interesting fact: Aliexpress visitors have the opportunity to immediately choose even the style of flower pots - modern, rustic, classic, European, cartoon, Chinese, American, Mediterranean.
The online store will also help you choose your preferred finish : hand-carved planters, glazed, vinyl-coated, powder-coated, galvanized models, etc.
What colors does it go with in the interior?
A distinctive feature of the “beech” color is its ability to harmoniously combine with other shades. Combinations of beech with other tones allow you to achieve the most interesting solutions - make the decor more expensive or add a little tenderness and playfulness to it.
Pink - in combination with wood, this color loses its vanilla sweetness and sounds new, bringing freshness and light to the room.
The warm colors of beech are laconic and moderately warm. They do not at all oblige you to maintain any particular style, so they fit harmoniously into any interior. If necessary, beech can be replaced with some similar wood shades.
Mountain larch - has a light shade, slightly softer than beech. It gives the room a feeling of softness and coziness.
It is easy to choose textiles and other accessories for beech furniture. Designers recommend following some tips.
The beech palette is universal; it looks especially good in combination with light canvases on the walls, ceiling and floor. In such interiors, you can add a few bright accents in the form of paintings on the walls - this will make the atmosphere more cheerful and positive.
Natural materials for decoration
From flat pebbles, nut shells, pieces of bark, picturesque knots, cones and shells glued together or on a mesh base, original compositions are obtained that will easily fit into the natural landscape.
You can also place such containers in thread nets or macrame and create an airy composition of climbing plants on terraces, open verandas and gazebos.
Properly selected plants in combination with stumps in which flowerpots are cut will create original compositions. A trench made along the log will turn it into a long container that can be conveniently placed along the edges of paths, stairs and walls.
- Where do they sell road curbs in Poltava (prices at the beginning of the year)
New Year's crafts from pine cones: decor ideas from pine cones for the New Year
- Decorative elements made of stone as an integral part of landscape design
Another option is to make a planter from a cross section of wood. By placing many of these products in the garden, you can give it a fabulous charm.
Decor of flower pots: creativity for the garden
Filled with colorful flowers, the garden is the perfect place to relax. Thanks to pots and accessories, you can easily create a spectacular composition that will catch the eye of all passersby. Metal flower boxes in bright, rich colors will be a wonderful decoration in a modern style, and hand-painted ceramic pots are ideal for a Provençal-style design
Are you interested in a large hanging box or individual flower pots attached to a balustrade? No matter what you choose, in each option the garden will bloom with a riot of colors. Mix different colors and materials, experiment freely and create unique decorations
Hollow bricks and stone slabs
The first idea is to use regular building blocks. Fill the container with soil and plant flowers in it. The second idea is to use paving slabs. 5 pieces are enough to make a pot. You need to use a good construction adhesive.
DIY garden decoration
With the advent of garden stores, manufacturers provide a huge selection of different garden decorations: from small lanterns to huge fountains. But skillful hands and imagination do their job, so garden decorations can be made from anything. For example, you can make a variety of garden crafts from mayonnaise buckets. If you use your imagination and put in a little effort, you will get a quite spectacular decoration.
What to make from a mayonnaise bucket? They can be used to create funny little animals or people, chests, flower pots, feeders or birdhouses, borders, etc. But it is necessary to take into account the placement of the product. If it is in a dry place, then using paper, tape or fabric will be acceptable. If the item is placed in an open space, then it will be necessary to use varnish during the final processing of the craft.
Interesting options for creating hanging flower pots
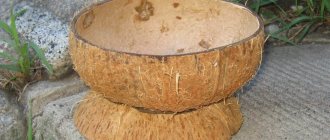
For plants that do not need frequent watering and hanging varieties, a hanging coconut shell pot is a good option. To make it, you need to cut the nut in half, removing the pulp from it. This way you will get two pots. Several holes should be made in the bottom of each half using a drill for drainage. To hang the structure, nests are also made on both sides of the shell.
You can weave a hanging flowerpot for your garden with your own hands from thin vine branches or artificial rattan threads. The product can have a round, cone-shaped or cylindrical shape. The material is pre-soaked to gain flexibility. First of all, prepare the bottom from plywood, along the circumference of which holes are made. Thick rods are vertically inserted into them to create a frame.
The vine is placed between the twigs of the frame and pressed with an awl, forming the walls of the pot of the required height. The finished product is treated with moisture-proof impregnation and varnished.
For flowers that do not like frequent watering, hanging products are suitable
Unexpected solutions for creating hanging flowerpots for the garden with your own hands
You can make a DIY hanging flower pot from an unnecessary plastic bottle of shampoo or shower gel by cutting it lengthwise or crosswise. Using an awl, holes are made. The blanks can be painted with acrylic paints, decoupaged, or tied with thick colored threads.
This unique hanging arrangement is made from a bird cage that is used as a flowerpot. This option is suitable for short plants. The cage can be spray painted and decorated with any decor.
An original solution for creating a flower pot for the street with your own hands would be to use metal baskets that are filled with substrate. A layer of coconut fiber is placed on the bottom, which does not allow moisture to pass through and at the same time gives the product an attractive appearance.
A hanging structure for flowers made from a plastic bowl, which is inserted into a vertical hoop, will look stylish and unusual. The flowerpot should be fixed using Moment glue. A hanging planter can be created from an old football or basketball by cutting it in half or making another unusual shape. There are holes on the sides at four points for hanging, into which you need to insert a rope.
How to make a flower pot
Will need
- Plastic bucket for paint or mayonnaise
- Gypsum
- Acrylic paints
- Fabric for decoration (cotton or jersey)
- Acrylic lacquer
- Putty
- Cardboard egg tray
- Sandpaper
- Glue gun
Manufacturing
First, the bucket needs to be cleared of any remaining contents. A clean bucket must be carefully scratched with coarse sandpaper so that the future plaster decor will better adhere to the plastic base.
Dilute the plaster with water. The amount of powder depends on the size of the bucket and the future decor. Pour some water into a deep bowl, and then gradually add gypsum to the liquid to form a thick mass of creamy consistency.
Cut the fabric into thin strips. Dip each piece of fabric into plaster and then wrap it around the bucket. The fabric can be folded, folded, straightened, laid only along the edges or on the entire surface - as you please. The main thing is that you need to work quickly with plaster.
When the plaster has hardened, the surface of the pot must be sanded again with sandpaper and coated with white acrylic paint.
Let's get to the fun part - the decor! Using stencils and putty, apply three-dimensional ornaments or designs to the walls of the future pot.
Cut cardboard egg trays lengthwise and then cut out each cell. Make flowers of any size and shape from the cells, paint each flower with white acrylic paint on all sides.
Use glue to attach the flowers to the bucket. Important! The decor must be attached not to plastic, but to fabric, so that it does not fall off ahead of time.
Now the most creative part is painting the flower pot. The craftswoman from the video below preferred a flower pot in dark colors. We think it turned out a little gloomy, but it wouldn’t hurt to add some bright colors to a flower pot with such an extraordinary decor!
After painting, it is necessary to fix the work done with acrylic varnish. You can use a car aerosol, or you can take an ordinary one and carefully apply it to all the details of the craft with a brush.
A durable flower pot is ready! Making such a craft will not take much time, and most importantly, it will give only positive emotions.
Did you like this easy-to-follow tutorial on making a flower pot from an old bucket? Hurry up and share it with your friends!
Share on Facebook
published on according to the materials
DIY flower pots for balconies: photo, description
This flowerpot is perfect for those people who have very little space on their balcony, but still want to place flowers somewhere. You will need to stock up:
- Pieces of wood – 4 pcs.
- Wood glue
- Drill
About the creation itself:
- Using glue you need to assemble all the beams together. You should get a kind of frame.
- Then you can glue the pot to one of the crossbars .
- You need to make a hole in the top crossbar through which the flowerpot will be attached to some hook on the balcony. You can hang the product either directly on it, or use ropes.
This is the end result of a flowerpot for a balcony.
Purchased flowerpots often cost a lot of money. So why not make something yourself from available materials? Moreover, things made by hand are always unique.
Flower pots made from old things
Hand-made masters constantly prove to others that they shouldn’t throw away old things. From any unnecessary thing you can create a real work of art.
Using an old suitcase as an outdoor flowerpot is an interesting idea.
From small tin cans you can make interesting flowerpots for petunias with your own hands. To do this, the jar must be cleaned both inside and outside, and then decorated. For this they use acrylic paints, shells, buttons, eggshells, ice cream sticks, jute threads - any finish is chosen that is in harmony with the surrounding environment.
A flower pot made from a chandelier for flower pots is created for true connoisseurs of beauty; it is easy to carry, so it can show off both indoors and outdoors, pleasing the eye
Vinyl records, which most often are no longer even worth listening to, can not be thrown away, but used to create original flowerpots. It is better to find a pan or bowl in advance that will help in shaping the plate. Vinyl is heated in the oven or over a burner, after which it becomes soft and pliable. Then the plate should be placed on an inverted bowl and the future walls of the pots should be folded down. The result is a bowl with curved edges, which, after painting, becomes a bright spot in the design of an apartment or garden.
Lifehack! In order for the flowerpot to be hung, you still need to make several holes in the heated vinyl along the edges.
Multi-colored old floppy disks can be useful in making cute little flowerpots that can be used to decorate your office desk
Old hats can also serve as plant pots
There is room for your imagination to run wild when making flower pots from plastic bottles with your own hands. From them you can create hanging flower pots using the top parts of the bottles, or you can create table or floor flowerpots using the stable bottom parts. Decorating plastic depends only on the desire of the needlewoman: painting with acrylic paints, draping with fabric or decorating with beads.
Vertical garden made from plastic bottles
A nice composition of white flowerpots of different shapes and sizes will decorate the interior
A variety of tin cans - the simplest option for a plant pot
Vintage white petunia planter chair
A whole flower arrangement can be made with old garden furniture. After painting and decorating, you can pull out all the drawers from the desk or chest of drawers and place potted flowers on the countertops and in the drawers themselves, and fill the free space with moss or coconut fiber.
An old peach-colored chest of drawers with flowers planted in boxes will take its rightful place in the landscape of a summer cottage
It will seem as if the flowers are growing directly from the furniture. Similarly, you can use an old suitcase or briefcase
Such bright flower beds will attract the attention of guests and will delight the eyes of the owners for a long time.
A composition of furniture painted yellow and plants will delight the eyes of both owners and guests of the site
Men can make decorative flowerpots for the garden with their own hands from car tires. From them you can cut out sculptures in the form of a flower, bird, animal, etc., which will decorate any yard. Some people do it much simpler by hanging the tire vertically: several climbing plants in pots are freely placed in the lower part.
A flower pot made from a tire suspended vertically from a tree is a simple and effective way to decorate the area of your home.
Old plastic toys, damaged lampshades, broken buckets or watering cans, outdated shoes, broken dishes - all this can be used to create a completely unique flowerpot. The main thing is to give free rein to your imagination!
Bright purple wooden boxes with green vegetation in them look contrasting and beautiful.
Flower pots made from scrap materials
Absolutely any items can become raw materials for an interesting garden planter: a piece of pipe from a sewerage device, half a bag of expanded clay, a dozen old tires, glass bottles.
How to make a flowerpot for the garden from such seemingly unsuitable items? It’s very simple, we involve the children in the process, dad with a sharp cutter, a few movements and now from a five-liter canister we get a pig, and not just a pig, but a flower pot.
Everyone has probably seen the master class on how to make a swan from a tire, but if this is difficult for you, then you can cut the edge of the tire with a wavy line and leave it like that.
Rubber can be easily painted; you just need to remove dirt and wipe with acetone. If you put such a wheel on the rim (from the wheel), you will get a very beautiful and not bulky planter.
Flowerpots made from old things have gained particular popularity. List of interesting ideas for further processing:
- umbrella
- vintage bag suitcase
- hat
- tarpaulin boots
Decorating flower pots with beads and dried flowers
You can glue beads of different colors and shapes to a flower pot, which are diluted with pebbles, buttons, shells, rhinestones, pieces of plastic or glass.
Using beads you can create an oriental style pot. The surface is painted anthracite with a sponge, then covered with two strips of mesh fabric along the top and bottom. The fabric should be painted gold, as should the large round beads. Beads frame strips of fabric.
Natural decor and herbariums confidently occupy a place in modern interior design. To decorate flowerpots in country style, you can use any natural material - bark, dried flowers, tree cuts. Dried flowers, twigs, leaves, berries or fruits should be collected in small bouquets and glued to the surface. The branches can be painted golden or silver.
Tree bark flower potsSource asparagusampenanbelalangtomato.pw/
These materials are very fragile, so they need to be handled with care and used more for decoration rather than for planting flowers. Do not add other elements to dried flowers
They are beautiful in themselves, organically fit into the “minimalism” style.
Artistic painting of potsSource samdizajner.ru/
DIY hanging flower pots: photo, description
For a hanging leather planter you will need:
- Leather square approximately 30x30 cm
- Leather rope or laces made of this material – 4 pcs. Each length is from 90 to 120 cm
- A dye designed specifically for the treatment of leather, gloves
- Purified water
- Tracing paper size 21x28 cm
- Stationery knife, drawing pencil
- Packaging tape
- Sponge
Procedure:
- On tracing paper you need to draw the template shown in the picture below. Then it should be attached to the underside of a piece of leather.
IMPORTANT: Fastening must be done away from the edges.
This is what a template for a hanging planter looks like attached to a piece of leather.
- Now you need to soften the sponge in distilled water and treat the front side of the skin with it. Moreover, it is advisable to repeat this procedure several times - this will make working with the skin much easier.
This is how you need to sponge the leather for a hanging plant pot.
- Now you need to trace the drawing on tracing paper with a pencil. It is better to press with medium force.
Outline of a template for a leather hanging planter
- Then you can unpin the tracing paper. Using a stationery knife, you need to make cuts along the lines that were drawn thanks to the template.
Cutting lines on a pre-prepared circle - future flowerpot
- If you want to add extra color to your skin , now is the time to do it! It is best to apply the paint with gloves and a sponge.
IMPORTANT: After treatment with water and before applying paint, at least an hour must pass.
- When everything is dry, you can pull the skin back by the cuts - this will gradually begin to show the shape of the flowerpot.
This is how you need to shape a hanging leather planter
Making holes for threading ropes to attach flowerpots
- Now you need to make 4 holes on top . You will need to thread ropes into them to attach the flower pots.
Threading ropes and tying knots on a hanging planter This is how a hanging planter made of leather turns out
Let's sum it up
Instead of buying expensive flower pots, you can easily make your own. This work does not require special precision, skills, or equipment. An old bucket or pot found in the attic can start a new life as an unusual flowerpot. Concrete pots look good in the garden and are durable. Homemade flower pots can be imperfect, and that's the beauty of them. Plants grow well in them and look harmonious in modern gardens. Their small size fits into some modern styles.
Caring for concrete pots is as easy as caring for plastic pots - just wash with water. Homemade pots are not only an easy way to create a functional, original decoration, but also a lot of fun from the work done!
Vessels made from building materials
Using various metal frames in the shape of a bucket or other container, you can make blanks for flowerpots from polymer gypsum or cement. The selected vessel must be surrounded with metal wire, then the resulting mesh must be removed and covered in several layers with strips of fabric soaked in the solution.
Then make a thickening by lubricating the resulting frame with plaster or cement. After drying, the surfaces need to be sanded, preparing the product for painting and decoration.
For lovers of garden sculptures, polyurethane foam may be their favorite material. From it, using various templates, you can sculpt figures that are resistant to external influences.