One Sheet Model
An origami mug made of waterproof paper is suitable as a disposable tableware. This is a rather rare model; traditional cups are usually used, very simple and convenient. But if you want to show off your creativity, a mug is just what you need.
Finding waterproof paper is easy. For example, sheets for laser printing with special impregnation are suitable. You can apply a design on them that matches the theme of the party, not only with a printer, but also with an indelible marker. It is recommended to use the most inexpensive brand of paper - TerraSlate, which is durable with a small thickness and holds its shape well. There is also waterproof Kraft packaging.
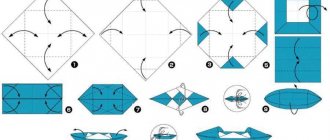
Step-by-step instruction:
- We use an A4 sheet without cutting it. Fold the paper diagonally and open it. We bend the remaining part of the sheet in half like a mountain.
- Fold the right side of the square diagonally back.
- Rotate the workpiece 90° clockwise.
- We make folds in a “mountain” along the dotted lines.
- We bring the resulting side valves inward. Fold the left side in a zigzag pattern to form a handle. We bend its lower corner. We place the upper triangular valves inward, holding the cup together so that it does not fall apart.
- At the end, pressing on the bottom edge with your finger, we press it in, forming the bottom.
Paper origami - basic patterns, procedures and features of combinations of colors and shapes
In today's rapidly developing world of new technologies, people do things less and less with their hands. We spend a lot of time on computers and smartphones, in work and entertainment. Apps on your phone often make you forget how useful it is to do things manually.
But if your “hands are itching,” then finding yourself a pleasant and soothing activity will not be difficult. The so-called “Art of the Whole Sheet” will help calm your nerves or keep your child occupied. It involves folding paper pieces into varying complexity of shapes and forms to produce finished works of art.
Initially, it was planned to make the figures from a single square sheet, without scissors, glue or combining with other parts. Now there has been a disintegration into numerous trends, schools and technologies that make it possible to use not only glue and scissors, but also a variety of materials.
This begs the question, what kind of action is this and how to learn how to do origami?
Where to begin?
The same new technologies come to our aid - a smartphone or a personal computer. It turns out that in our time we can’t live without it. If you want to quickly find any information or learn something, then you are unlikely to look for a person who will give you a master class on paper origami.
It is much easier and cheaper to find the information you are interested in on the World Wide Web. Fortunately, there are many online resources that will help you master the techniques and styles that interest you.
- Therefore, there is no problem finding simple folding patterns on the Internet and starting your journey as a master of “paperwork.”
It is best to use ready-made schemes and train on simple options. Especially if you or your child have not previously dealt with this art. This will allow you to “teach” your hand and give an idea of your capabilities and preferences. It will not take a lot of time to master the initial material.
However, if you find an incomprehensible diagram and cannot figure it out, then it is possible to find videos with step-by-step instructions for do-it-yourself paper origami. As a rule, the Internet has a wide variety of content in this area and you can easily find interesting schemes and be able to understand them step by step.
Now you have already mastered many simple schemes, received your first “combat” wounds in the form of cuts and sticky fingers. The entire desktop is littered with consumables spent on failed attempts and “ugly” paper ducklings.
But here in front of you stands a figure that is ideal from your point of view, which evokes a feeling of joy, satisfaction and a smile on your face. And do you think that you have already mastered the art of folding papers? If so, then you are no longer limited to ready-made models. Easily find photos of paper origami on the Internet, synthesize them and use your imagination.
You are completely unlimited in your actions and have the right to make the most complex figures, competing in skill with colleagues or relatives.
A little instruction for a beginner
To summarize all of the above, it is worth describing some instructions on origami for beginners. To do this, let's focus on several points: workplace, tools, consumables. The workplace is a very important part for any type of work, so it is worth preparing it.
Find a work surface that works for you. This could be a computer desk or a coffee table, the main thing is that you are comfortable and that at the first deep exhalation the paper parts do not fly apart in all directions.
So, the workspace for creativity has already been selected, which means it’s time to choose the necessary tool. You will need to look into your supply of office supplies, ask your child for something, or purchase something from the store.
First of all, you will need a ruler and scissors for high-quality folding and cutting of paper. To begin with, you can get by with one of these tools, but for more “jewelry” work it is better to get two.
The consumables are glue, a certain number of sheets and unbridled imagination. At the start, a few white leaves will be enough for you.
However, in the future you may need colored cardboard, glue and possibly other spare parts to bring various products from your imagination or according to the diagrams to life. Now you have enough information to start creating. Good luck!
Photo of paper origami
Floating money mug
A floating mug made of coins and coffee beans looks very stylish. The design technique of using an unfastening zipper will also add originality to your mug. Keys, bells, old small toys - everything can be used as decorative elements for your mug.
With coins you can also use imitation bills in which we pack candies.
The money tap is created using the same principle as the flying mug. Instead of a mug, we use a plastic tap, and a small chest or casket can replace the saucer. Coins will look more impressive if they are coated with gold spray paint or varnish.
Cash flows can be depicted using paper bills.
You can see how to create a money tap in the DIY gifts master class:
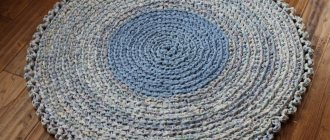
Applications from circles | 29 Amazing Applique Ideas
Website “Mom can do anything!” I collected the most interesting ideas for circle appliqué. Such crafts are available to children from a very early age; the simplest of them can be started at 1.5 years old; more complex options can be done at preschool age.
It is better to prepare circles for applique for kids in advance, but with older children it is better to first circle various round objects and cut them out, and then, perhaps the next day, get creative.
For the circle applique you will need:
- colored paper;
- glue;
- pencil;
- ruler;
- scissors;
- various objects around which circles or compasses are drawn.
An application of geometric shapes teaches children to compare objects and their shapes, develops imagination and logical thinking.
mamamozhetvse.ru
Three ways to make a cup
First
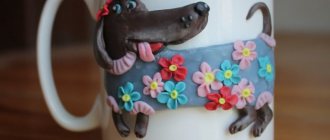
Roll a ball with a diameter of 13-15 cm from a piece of clay. Make a depression in the center with your finger. Then, pressing the center with your thumbs, use the rest to rotate the clay, giving it the shape of a hemisphere. Such a cup is sculpted from the bottom, gradually moving towards the top. Fingers and the surface of the product must be wet at all times. Level the surface of the almost finished cup with a spatula or small spatula.
Form a handle, attach it to the side surface of the cup and smooth out the joint. To decorate your almost finished masterpiece, use multi-colored polymer clay. Fashioned flowers, butterflies, beetles, cute animals will add personality and charm to the product. The cup dries within a day. If you decide to leave its surface flat, you can paint it after drying.
Second
A circle is cut out of thick cardboard. Its diameter is 20-23 cm. Inside the large circle, draw and cut out a small one. This is the future bottom of our cup. You will also need a strip 4 cm high and about 40 cm long.
We roll out the clay on the cloth, turning it over like dough from one side to the other. A round template is applied to a layer 3-4 mm thick and both circles are cut out. A larger circle is attached to the small bottom, the sides of which, during the attachment process, are slightly raised upward, forming a bowl. A layer cut out using a rectangular template is attached to the top of the hemisphere. Smooth out any unevenness with your fingers, lightly moistening the product with water. To smooth out some of the bumps, we stroke the future cup with a wooden spatula, rotating it in our hands. The handle for the cup is made and attached in the same way as for the mug.
Last
The third method is the easiest and children will really like it. Show them how to make a clay cup by snail-rolling strips. Roll out a long rope about 1 cm thick and roll it up on the table like a snail as tightly as possible. This will be the bottom of the cup, its size is 5-7 cm. With wet hands, smooth the snail so that there are no stripes left, to a smooth surface.
Next, we roll out a few more sausages of the same thickness and, placing it on the bottom, wind it in a spiral, forming the walls of the cup. Having laid the tourniquet tightly, we level the walls from the inside and outside with wet fingers. The same wooden spatula will help give the surface an ideal shape. We attach the handle, and - oops! The cup is ready!
If you don't attach a handle, you'll end up with a bowl. Its sides will be more open than in a cup.
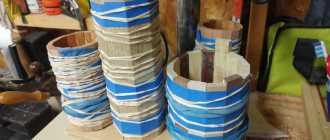
Step by step instructions
You need to cut out a template from paper, which will later be used when creating the mug. You can choose a template from a magazine, newspaper, or draw it yourself.
If you choose the latter option, then you will need cardboard on which you will need to draw six absolutely identical sides of the future mug, placing them on the same ruler. You must immediately determine the width/depth of the mug. There will be folds where the edges touch.
If the template has already been prepared, then it must be placed on cardboard, then carefully traced and cut out using a stationery knife. Next, the workpiece is folded in the required places and glued together using prepared paper tape.
It is important to pay attention to ensure that the slightest gap does not form, and that all edges of the mug are in proper contact with each other.
According to the resulting size of the side surface of the future mug, it is necessary to cut out the bottom so that the pouring mug craft looks like a real one. After this, an additional strip of approximately 1 cm in width is cut out.
In principle, you can use any old glossy magazine/newspaper to decorate a mug. You just need to tear their pages into many small pieces and paste them over the craft. Since glue will be used at this stage, it must be allowed to dry afterwards.
During this time, a strip of cardboard 3 cm wide is cut out. Depending on what design you want to see in the end, the strip can be cut straight or curved. After this, you need to give it the required color using paints and remove it until it dries completely.
- Bathroom tiles. What is it like?
- Angorka. What it is?
- Flowers as gifts.
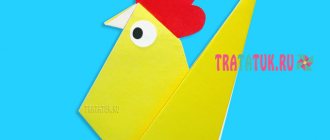
How to make an origami paper cup
Any paper is suitable for assembly, preferably thick paper. Colored cups with patterns look good. Take the one that happens to be at hand.
Fold the square sheet diagonally, with the colored side facing out.
Bend one end of the resulting triangle down so that the top side reaches the bottom border. Return the sheet to its original position.
Fold the right end of the triangle to the left so that its edge touches the beginning of the fold made in the previous step. It looks like this.
Turn the workpiece over. Repeat the last fold.
Two corners have formed in the upper part. Point one down, securing it on the outside.
Turn the glass over. Fold the second corner down. Open up the inside of the cup. Ready! Now it can be used for its intended purpose. As you can see, everything is simple and clear.
Cool DIY gifts. Intertwined hearts.
You will need:
- scissors
- felt (or thick paper or fabric)
Optional: tape.
1.
Start with two ovals as shown in the picture. You can make them from felt or thick colored paper.
2.
Fold the oval in half and make 3 parallel cuts from the fold to the rounded end, not reaching about 2-3 cm.
3.
Start weaving the ovals as shown in the picture - threading one strip into the other and moving them upward. You should get a coloring of a chessboard.
4.
You can add a handle for the heart so you can hang it in your home.
To better understand how to weave ovals, watch the video:
Preparation of the future fountain
The first step is to cut the bottle into a couple of long fragments.
Next, each person in turn is brought to the gas burner and kept close to it so that the plastic part begins to deform.
The result should be a smooth and sinuous shape. The top and bottom of these plastic elements should be made flat so that they can fit tightly to the dishes (saucer and cup).
Working on a craft
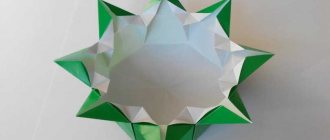
How to make accordion-shaped paper circles next? It's simple. It remains to collect two more of the same sectors, proceeding similarly to the previous description. To make a circle, all sectors need to be brought together. To do this, the outer strips of the “accordions” need to be smeared with PVA glue and alternately connected to the adjacent sector by pressing down. Before attaching the last part, think about how the fan circle will be attached - to the wall surface or hanging on a thread.
If you are hanging the craft on a thread above a window or on hooks on the ceiling, then at this moment you need to thread the thread into the inner hole between the sectors, and only then glue the last part of the circle. If you don’t do this right away, then you will have to use a needle to pierce the thickness of the “accordions” collected in the center, and this is problematic, since in this place of the craft there is the thickest section of the paper.
If you decide to hang a craft on a thread by punching a hole in the outer circle, then such a fastening will turn out to be unreliable; any wind can tear the paper and the circle will look sloppy, ruining the entire composition.
DIY cardboard cup
I continue to introduce you to techniques with which you can make interesting three-dimensional crafts from paper and cardboard.
In the old days, doll sets were made from different materials - even porcelain. Of course, they were a single copy, incredibly expensive and not accessible to everyone. The daughters of kings and emperors played with them. But all the girls, at all times, played with dolls and gave them tea. Any more or less suitable utensil could serve as a cup.
Modern industry produces a wide variety of doll tea and coffee sets. But standard plastic cannot satisfy the craving of little ladies for tea with their dolls or girlfriends. Children love variety. No matter how wonderful the factory set is, cups - DIY cardboard crafts will be beyond competition. In addition, such a wonderful children's craft made from paper or cardboard will be a wonderful gift for mothers and grandmothers for any occasion. Cups can be small or large, they can be made from paper, cardboard and papier-mâché and decorated in any way possible.
DIY cards with flowers inside
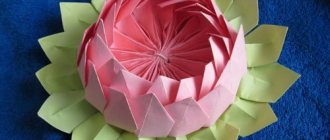
Even a child can make a heart-shaped card with a three-dimensional flower inside:
A lush flower for the inside or outside of the card can be made from colored or even plain paper painted with watercolors or pastel crayons. You can cut flowers using this template:
Print out the flower template and color it with paints. Fold it according to the marked fold lines and glue the resulting flower onto the base of the card.
Such a lush and bright card with flowers inside, made with your own hands, will undoubtedly delight the recipient.
She tells how to make it in her master class TheJulianaHappy
:
The option with delicate, pastel colors looks very cute. Making stamens for flowers is not difficult!
The original master class is in English, so for your convenience we offer a brief translation of the process of creating this flower card.
Standard materials and tools: colored paper, cardboard, scissors, glue, plastic to imitate glass in a window.
Take thick colored paper and fold it in half. Cut out a square window in one half.
We make a frame from colored paper of a different color. The glass for the window can be made from a protective film for your phone or transparent plastic. Glue the resulting window frame to the base of the postcard. You can do without “glass” at all.
Glue it into the hole
We glue a flower pot out of cardboard and glue it in the middle of the card on the fold line. Glue the sides of the resulting pot together so that when you close the card, the pot folds up.
Next, from colored paper we cut out green stems and all kinds of bright flowers: crocuses, hyacinths, daffodils and tulips. Perhaps your bouquet will not be spring, but summer, which means that cornflowers, daisies, pansies, etc. will appear.
Glue the flowers into the pot
The window can be decorated with a cozy curtain.
Original master class
Using the same principle, you can make a card with flowers from felt or painted cotton pads. Additionally, insert a laconic but warm congratulation along with the flowers!
In addition to flowers, balloons, stars, and bows may appear from the card.
TheWorkshop shows how to make a panoramic flower card along with a congratulatory envelope.
:
We take thick paper - the basis for our postcard. Create a rectangle in the center of the fold line of the card. The width of the rectangle is 3 cm, length is 7 cm.
We make cuts along the pink lines with a stationery knife. Then we fold the resulting rectangle inside the postcard. We attach the base of the card to another sheet, b o
larger in size than the original base.
Then we make a floral design: a flower pot, the flowers themselves, fluttering butterflies and grass. We combine all this and glue it to the front of our postcard.
Original master class.
Using the same technique, you can make an original vase postcard. You can also make flowers in such vases with your own hands from paper or other available materials.
We bring to your attention a master class on making a very delicate three-dimensional card, which will not only congratulate the recipient, but will also fit perfectly into the interior of, for example, a children's room.
First we make a box frame. To do this, take thick blue paper and cut out a template for the box from it. We fold the edges of the template 4 times, 5 mm on each side, thereby forming a frame. Glue the resulting frames together.
On top of them we glue colored or scrap paper in a color that matches your composition.
Next, we will prepare the elements of the future composition. Glue together a balloon from paper circles. We fold the circles in half and glue them together. A waxed cord is glued into the base of the basket and directly into the circles, forming a ball.
We cut out clouds from scrap paper and a sun from yellow paper. Glue the elements of the composition into a frame. We glue the balloon as follows: we glue the base of the balloon with bulk tape, and the balloon itself with glue. We glue the clouds using the same principle: one with glue, the other with bulk tape.
We make green grass from a simple napkin. First we cut it, then glue it. On the right side of the box we glue a tree made using a hole punch for Scrapbooking. The final touch is to glue serpentine, butterflies and a congratulatory inscription into the empty spaces! We glue a ribbon with embroidery or lace to the bottom of the box. The original three-dimensional postcard is ready!
Original master class.
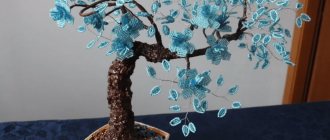
Unusual grains
This option will fit perfectly into the interior of the kitchen room. You can use grains, nuts, etc. as decoration. It would be ideal to use coffee beans, which will inspire you to take a break for a cup of this aromatic drink.
Those who love this drink should make a cup in an original design - in the form of a Turk.
How to make a decorative paper mug?
At all times, gifts that were made by hand were considered the best. Even if everything doesn’t always turn out smoothly and beautifully the first time, you shouldn’t despair, because you can always redo it, the main thing is to have the desire for this.
Gifts made with your own hands are filled with love and the desire to make a pleasant surprise; naturally, it will be appreciated.
If you show your imagination and make an effort, then a rather banal gift in the shape of a mug can be given an interesting and original look.
Before you start making a decorative paper mug, you need to first prepare the necessary materials and tools:
- a thick sheet of cardboard in a pre-selected color scheme, preferably plain;
- a sheet of decorative paper of the corresponding color;
- 3 brads;
- a ribbon for decoration with a satin base, or any other decorative element;
- ruler;
- ball pen;
- paper scissors;
- curly scissors;
- glue stick.
Let's look at the process of making a decorative mug:
- First, you need to draw a rectangle on colored cardboard, which has the appropriate dimensions: length - 27 cm, width - 13 cm. After this, it should be cut out.
- On the wrong side of the cut-out figure, every 3 cm, use a ballpoint pen to draw transverse lines that indicate fold lines.
- Step back 9 cm from the top edge of the finished piece and draw a longitudinal line.
- After this, you should bend the colored cardboard along the marked lines.
- In the lower part of the rectangle, on the smaller side, you need to make cuts that should reach the horizontal line.
- Now on decorative paper you need to draw eight identical rectangles that correspond to the following dimensions: length - 8.5 cm, width - 2.5 cm. Cut them out.
- Cover each edge of the future mug with these rectangles.
- Glue the extreme ribs of the product being manufactured together so that you form a cylinder.
- To decorate the bottom of the mug, you need to fold and glue the protruding “tails” opposite each other.
- Now let's move on to making the handle. To do this, you can use the remains of cardboard, from which you should cut a strip of 14 by 2.5 cm. You can trim the edge of the handle with curly scissors - this way it will be designed in a wavy version.
- Using brads, you can attach a handle to our product. It is best to attach to the densest segment. When gluing the cup together, the double edge serves as such a place.
- You need to tie a bow from a satin ribbon, which should also be attached to the mug using brads. If desired, you can add other decorative elements.
The decorative paper mug is ready!
Paper mug for dad for February 23
You will need material:
- white cardboard + 1 sheet of thick cardboard;
- colored cardboard;
- colored paper;
- tea bag tag.
Tools:
- scissors;
- a simple pencil;
- ruler;
- curly scissors;
- non-writing pen;
- glue stick.
Cut out all the elements of the paper mug blank. From thick cardboard you need a rectangle with sides 15 and 10 cm. From colored thin cardboard - a rectangle measuring 21 by 15 and a blank for a handle for a mug of the size and shape you want.
On a large rectangle, step back 3 cm on each side of the edge and draw fold lines along the ruler with a non-writing pen. Fold the edges of the workpiece along the marked lines.
Cut out two strips measuring 21 by 2 cm and circles from colored paper to decorate the paper craft. Decorate the mug the way you want, using military-themed elements if possible: airplanes, parachute, tanks, stars.
Glue the handle onto a 15 x 10 thick cardboard rectangle, covering the edges with glue. On one side of the mug, glue a tea bag tag using tape. On the other hand, record or write a congratulation to dad and the mug can be given as a gift.
How to make a cup out of cardboard?
By using cardboard, you can create a more durable cup. To make such a product we will need the following materials and tools:
- Paper or cardboard. As a starting material, you can use packaging boxes for products for which cardboard of various densities and qualities is used.
- Paper cutting scissors and matching knife.
- Glue gun or regular glue.
- Paper tape.
- Newspapers for papier-mâché.
- Napkins for decoupage.
- Brushes and paints.
- A cup template that needs to be downloaded and then printed on a printer.
Let's look at the step-by-step process of how to make a cardboard cup with your own hands:
- First, transfer the contours of the cup from the prepared template to the appropriate cardboard, and use a knife to cut out the blank.
- After this, you need to glue the edges of the sections of the cup together, then glue the bottom and glue the lower part of the base, the so-called rim, to it.
Important! To prevent gaps that may form in the cup at the gluing points, it is necessary to use paper tape on both sides of the product.
They need to glue the base and press it well.
In principle, our product is ready. But if you want to create a beautiful thing, then you need extra time to design the decorative cup in an original way:
- It is necessary to prepare a certain mass of papier-mâché from newspapers and glue. Step by step you need to paste over our product both outside and inside. We choose the thickness of the cup - this plays a role in applying the number of layers to our original thing.
- When the papier-mâché is completely dry, you can begin decorating our product. It all depends on your creativity and creative ideas. There are many interesting design techniques: you can paste the cup with unusual pictures from glossy magazines, apply the decoupage technique using a creative napkin, apply images made with paints in the form of still lifes and landscapes, or you can simply decorate it with rhinestones or an unusually beautiful tinted fabric.
- The handle of the cup should also be decorated accordingly, only after that it can be glued to our product.
At the end of the process, the product should be varnished.
If desired, you can make several of these cups.
Moreover, each personal gift should be decorated in a special way and not be repeated.
From the history of paper cups
The first paper cups were made in China, around the time of the Song Dynasty (905 - 1125 AD). By that time, the material had fallen significantly in price and became publicly available. Previously, only ritual objects, including dishes, were folded from paper, replacing expensive items made of metal or ceramics. During the Song Dynasty, paper toys appeared and became popular in China. As a rule, old letters or newspapers were used for them so as not to be thrown away in vain. The most famous children's toy was the “bomb” that has survived to this day - a ball folded using the origami technique, which was filled with water.
Another area of application for paper is tea cups. According to Eastern tradition, they were made without handles. The cups, called chi-pei, were covered with beautiful patterns and looked very decorative.
In the West, analogues of Chinese paper cups - disposable cups - became widespread only in the 20th century. Since 1907, they have been used in drinking water vending machines installed in public places. The author of the idea was Boston lawyer Lawrence Luellen. Before this, people had to use shared utensils to quench their thirst, which provoked outbreaks of infectious diseases. The production of cups was undertaken by the American company Dixie Cup - they were intended mainly for schools and passenger trains.
Disposable tableware was actively promoted by doctors and scientists as an important step in the development of public hygiene. This led to the widespread adoption of paper cups in the United States by the 1930s. The production used multi-layer paper with sizing that prevents deterioration. From the inside, for waterproofing, first a thin layer of clay was applied, then wax, and from about the middle of the 20th century - PVC compounds. This technology has made paper cups difficult to decompose, and the ban on the use of recyclable materials in their production has called into question environmental friendliness in general.
In 2022, the Finnish manufacturer Kotkamills introduced a new type of disposable tableware, without a polyethylene coating. The cardboard used in its production was not only recycled naturally, but also served as excellent compost. And the latest innovation is cups made from recycled pineapple leaves. The Philippines has learned how to turn tropical plant waste into waterproof paper. So far, “pineapple” cups are the most progressive solution in the field of environmentally friendly disposable tableware.
Draw flowers
It is customary for ladies to give flowers, and if they are also painted on a cup, then such a gift is doubly valuable! We draw several vertical lines of different heights - draw them from bottom to top.
We paint the entire mug with lines. Draw flowers on the resulting stems. Easy, simple, but most importantly – strong!
DIY soft sock toy
We drink coffee or tea and have fun!
Thank you for watching our work - we are sure that your results will be even more interesting. You can write your name on the cup, draw a sun or a kitten. You can draw one letter on each of the mugs from a large set and lay out words from them. You can decorate the dishes with aphorisms and slogans, or write a mood or motto on each device from the set, and then those around you will immediately know whether they should bother you today. The space of imagination is limitless!
Drawing on a cup is the most fun creativity ever!
Volume craft
You can also decorate three-dimensional objects using the appliqué technique. The grains are no longer glued to a plane, but to any surface. Continuing the coffee theme, we suggest making a cup of coffee beans with your own hands.
Take a couple of tea or coffee, a hot glue gun, a bag of Robusta or Arabica and start creating.
Note!
- How to make flowers from cold porcelain: chic floristry and DIY crafts for the New Year step by step
- How to make cold porcelain from potato, corn starch, liquid, without soda. Recipes and cooking methods
- How to properly make a birdhouse with your own hands from scrap materials: we create an original birdhouse according to sketches
Glue successfully replaces plasticine. And this is a solution if you plan to do the work together with children. There is no risk that the child will get burned with hot glue.
Coat the mug and saucer with a thin layer of plasticine on the outside and inside. The seeds are pressed into the soft base. The process is also good because you can always remove the unevenly light material and create again.
Of course, dishes decorated in this way cannot be used, but that is not what they were created for.