Any normal man wants to make a knife with his own hands, which he will be proud of. Making a knife with your own hands is always a fascinating process; this knife seems cooler than all the knives in the world, since it contains manual labor and the imagination of the master.
It often happens that there is a desire to make a knife, but there is no clear idea of what shape to give the knife when making it. But as soon as you look at a bunch of drawings for making a knife, your own image appears in your head. This knife can be unique in shape, since you can combine part of the drawing of one knife and complement it with part of the drawing of another knife.
I hope that after viewing 280 knife drawings, you will have the desire and image to create your own knife that will inspire admiration from your friends.
Everyone makes a knife at their own discretion, one for pride, the other for practical use, this applies to hunters and butchers. Each knife has its own characteristics, one for killing an animal and butchering it, another for skinning, the next for cutting brushwood and making a road in the wilds.
You can easily determine which knife you need and will form the basis for its manufacture by looking at the knife drawings.
Therefore, it is not important to exactly copy the size from the knife drawing, the main thing is to see your unique image.
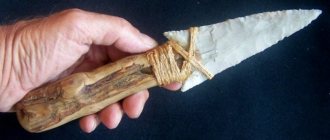
Many men like to have a beautiful and at the same time reliable knife with them. An item that is made independently is a special source of pride. The process of creating such a product with your own hands can take a lot of time and effort, but at the same time it is fascinating. A person is given unlimited options for designing a handle and blade; it all depends on imagination. Drawings of knives can help you decide on your choice.
It is important to understand that each knife is adapted for a specific area. A butcher, a fisherman or a hunter will use completely different tools. Therefore, when choosing a drawing, you should first decide on the purpose of use. It is also necessary to pay attention to the size so that the tool is convenient for its owner to use. You can borrow some part from the drawing or the whole element. The drawings will help turn your idea into reality and make you the happy owner of a new knife and delight your friends and acquaintances.
Read also: 1E95 lathe technical specifications
Types of knives
Based on their scope of application, they are divided into several categories:
For those who like to throw knives, one will not be enough, and buying a set can be quite expensive. Therefore, everyone can try to make it themselves. Let's describe a few examples that are popular.
Cobra throwing knives are manufactured in the city of Zlatoust. Drawings of knives of various models are publicly available on the Internet, but at the moment only one is officially produced. The fact is that the developers chose to produce one, but well-designed and well-balanced knife. Factory-produced items are painted red to make them easier to find.
Throwing knife "Gadfly", drawings of which are also easy to find, are made of branded Zlatoust steel. An original discovery in design is the use of a regular cord as a handle. From the same manufacturer there is another throwing knife called “Udar”. The increased size and weight allow it to be thrown longer distances.
Throwing knife "Gadfly"
The requirements for knives for tourism, fishing and hunting recommend the use of stainless steel; finding a sketch is not difficult. The handles should be mounted, since the applied elements may crack under loads during operation. A camping knife may include several blades and tools that can be useful on a hike. Options for hunting and fishing must be sharp for a long time so that a person can use them to properly cut meat or fish.
Plywood knife
The simplest version of a knife can be made from ordinary plywood. Children will enjoy playing with this attribute.
To make a simple model you will need to take the following steps:
- From medium-thick plywood you need to cut two parts for the future handle and one for the blade.
- To make it more convenient to cut out elements, you should make a stencil for each part.
- Holes for fasteners are made at the base of the blade and on both sides of the handle.
- For fixation, you can use either metal fasteners of the appropriate size or any available elements.
It is a good idea to decorate the upper part of the plywood knife with any decor or apply a layer of quickly drying varnish. You can also invite your child to draw something with paints, and then open the image with varnish.
By following the recommendations and creating a knife according to step-by-step instructions, every home craftsman can easily create a knife that he can be truly proud of. If any difficulties arise during production, we suggest you find a hint or answer to any question in the training video tutorial on the topic of making knives from a wooden base.
Basic operations for making knives
Before you start creating the blade and handle according to the drawing, you should prepare all the necessary materials.
Read also: Current stabilizer on lm358
The blade is made of tool steels, for example, P6M5 steel, which has good hardness. A blade made of this steel will not wear down for a long time. You can also use some carbon steels or material from car springs that have not been corroded.
Knife making process
The handle is most often made of wood, which dries out little and has sufficient strength. Suitable for this:
If the handle is overhead, then small diameter rivets will be required. They can be made from brass rod.
Tools you will need:
- drills and countersinks;
- sandpaper for rough processing and zero;
- electric drill;
- vice;
- files;
- hammer.
The technological process of making a hunting knife with your own hands consists of several stages.
- It is necessary to transfer the drawing with all dimensions to a metal plate.
- Cut the blank along the contour, grind off the excess and drill holes for the rivets.
- Make the cutting edge of the blade. Secure the future knife in a vice and grind off the metal with a file at a certain angle. Repeat the process on the reverse side if necessary. After filing, finish the process with sandpaper.
- Temper the blade in an oven or over a fire for 15 minutes. To do this, place the metal workpiece in close proximity to coals or another heat source. As soon as the metal turns red, you need to pull out the workpiece for a few seconds. The heating should be checked using a regular magnet. The heated metal stops being attracted to the magnet. In this case, heating must be stopped.
- Lower the hot workpiece into the oil with the cutting part facing down. The immersion should not be carried out completely, but only 2/3. Hold in this position for about a minute, and then slowly immerse completely in the oil.
- Temper in an oven at 400 °C for 45 minutes.
- Finish with sandpaper or other means.
- Make a handle from wood according to the sketch, drill holes for rivets.
- Impregnate the handle with special solutions to increase its service life.
- Assemble all parts.
- Polish the handle.
At this point the manufacturing process is completed and we have a beautiful and reliable homemade knife.
If you find an error, please select a piece of text and press Ctrl+Enter.
If you want to print a knife and then draw it well or make a knife from corrugated cardboard, then we have attached screenshots for this, and with the help of them you can first print the knives, and then do what you want. I will say right away that making a real copy of a knife is not so easy, so prepare yourself for a good sweat. After making a knife, add links to photos in the comments and I will publish the best ones in the article.
Read also: How to check the measuring head
Plywood product
To work, the master will need a sheet of plywood. It needs to be divided into three parts. On each of them there are drawings of the details of the future knife. On one piece of plywood you should draw the shape of the entire product, and on the other two - the shape of only the handle.
Using a jigsaw, all three elements are carefully cut out. The resulting two stencils with the image of a handle must be attached on both sides to the first stencil - with the image of a knife. Then, using metal pins or other fastening devices, all three parts are connected to each other.
The resulting product can later be painted and varnished. This knife is considered a souvenir. It can be used as a decoration, not a kitchen appliance.
Sharpening for beginners
Before we talk about sharpening a hunting knife, we need to remind you that homemade knives made from the metals recommended in the article are very difficult and take a long time to sharpen, since the alloy steels used have high hardness. This must be remembered when using a knife for purposes other than its intended purpose.
Now about the sharpening itself. At home, knives are sharpened on special sharpening stones. Such stones are ceramic (the cheapest and most common), diamond, natural and Japanese sea stones. The principle of sharpening on them is approximately the same, so in the future, by default, we will talk about the most common ceramic sharpening stone. In order to sharpen a knife efficiently, it is advisable to have either two sharpening stones of different grain sizes, or, what happens more often, a sharpening stone whose sides have different grain sizes. For ease of sharpening, the size, or rather the length, of the stone should be greater than the length of the knife blade.
It is advisable to sharpen a knife with both hands, so it is advisable to place the sharpening stone on a separate board, securing it either in a hole specially cut for this purpose, or using six nails driven into the sides. Sharpening the knife begins on the roughest stone. At this stage, the whetstone does not need to be wetted. We place the stone arbitrarily on the table, the main thing is that it is convenient for you to sharpen on it.
The entire sharpening process consists of giving the edge of the blade an acute angular shape. When doing this, you need to remember a few basic rules:
- you need to choose the optimal knife sharpening angle and stick to it throughout the entire process;
- The knife is driven across the stone with the blade forward, as if cutting off a thin layer from it;
- in one movement you need to sweep the entire edge of the blade for uniform sharpening;
- the edge of the blade should always be perpendicular to the direction of movement;
- each next time the blade must be turned over and held with the other side so as not to displace the center of the blade chamfer;
- movements should be smooth, without pressure;
- It is better to sharpen both sides with a unidirectional movement, either towards yourself or away from yourself, since moving the hand away from you is always worse and weaker than moving it towards yourself.
Now regarding the sharpening angle. It can be from 450 to 300, in the first case the knife will hold an edge longer, in the second it will be sharper. It is better to sharpen a hunting knife exactly at 300, this is not difficult to achieve, just when sharpening, move the knife as if you were cutting a thin slice of butter or cheese.
After you have turned the initial sharpness and brought out the angle of the blade edge, you can move on to a stone of lesser dispersion. It is advisable to periodically moisten it with water so that the edge of the blade glides better and metal dust does not clog the pores. You can finally sharpen the blade to a mirror shine and razor sharpness by sharpening it on an old leather belt with GOI paste. The main feature of straightening with GOI paste is that the knife is guided in the opposite direction to the blade, i.e. butt forward.
Material for production
Ideally, 1/8-inch thick fiberboard will work well. But you can choose another material if you wish:
- Natural wood.
- Acrylic.
- Platinum.
You should trace the area around the template twice with a pencil, and then cut out the piece with a band saw.
It should look like this:
The next step is sanding. The cut object must be sanded so that during use it does not drive a splinter under the skin. You can use sandpaper, but the ideal option is a sanding machine.
Additionally, it is worth drawing and cutting out the handle from 2 pieces, and then sanding them. All that remains is to make marks for the holes.
DIY Japanese tanto knife: drawings and step-by-step instructions
Kitchen
Which is better: heated floors or radiators?
Warm floorBatteries
Do-It-Yourself Tanto
How to make a transistor tanto knife from wood from Standoff 2 #37 Inspection – 8:22 DIFFICULTY: 7/10 MATERIAL:Cardboard PLYWOOD.
Expert opinion
Strebizh Viktor Fedorovich, leading construction foreman
For example, the triangular tanto yoroidoshi was intended to pierce enemy armor, and hasiwari had a blade with a special hook that could intercept or even break an enemy sword. If you want to clarify something, please contact me!
Drawings of knives for kitchen tools and edged weapons
- high carbon steel;
- angle grinder, belt grinder;
- vice, set of sandpaper;
- marker, pencil, paper, ruler, PVA glue and scissors;
- grinder with a set of circles for different purposes;
- furnace or forge, blacksmith's tongs;
- motor oil in a container;
- drill with drills;
- magnet, clamps;
- wood impregnation oil;
- wooden block;
- brass rod;
- epoxy adhesive.
DIY Japanese tanto knife: drawings and step-by-step instructions
Help the channel www.donationalerts.ru/r/timonas Making a Modern Tanto knife at home manufacturing.
Expert opinion
Strebizh Viktor Fedorovich, leading construction foreman
The original tanto 短刀 tan short sword is a traditional Japanese short knife, available to civilians in contrast to the long katana. If you want to clarify something, please contact me!
Butterfly Knife
The butterfly knife is one of the most popular knives in the game, because it has an interesting appearance, original animations, and some of the skins on it look very good.
Appearing after Operation Breakthrough, he was incredibly in demand. Now it greatly contributes to the variety of knives in the game, since many players like this knife, but there are other, no less interesting options. Taking a drawing of a butterfly knife from CS:GO, you can try to recreate it in the form in which it is present in the game, including its skin. Due to its popularity, it will not be difficult to discover the scheme, or you can use a ready-made option. For any fan of the game, a real butterfly knife will be a wonderful gift for any occasion.
Handle
Knives are decorated with different handles. The choice of material for their manufacture depends on the purposes for which the knife is intended, ease of use and personal preferences of the owner. Below are two ways to make a knife handle at home.
Wrapping the handle with paracord in a few minutes
Using a paracord cord as a knife handle is not only easier and faster, but also more practical. You will always have a couple of meters of cord with you, which can be used for a variety of purposes when surviving in extreme situations.
For the winding we need:
- cord, 2 – 2.5 m;
- thick adhesive tape or electrical tape;
- lighter or matches;
- scissors;
- gloves;
- screwdriver.
Before you start winding the cord, decide whether you need a lanyard loop and if so, where it will be, on the side of the blade near the stop or at the end of the handle.
If it is available, in addition to the ability to hang the knife, in the first case you can insert your thumb into it to make it more convenient and secure to hold the knife, in the second, you can use it to remove the knife from the sheath, etc. Paracord is wound in the following order:
- We wet the cord, and it stretches better, and when it dries, it will sit more solidly on the knife.
- We seal the knife blade with tape or tape to avoid accidental cuts or cutting the cord. It is better to perform all operations with gloves.
- We press one end of the cord on the head of the handle so that 10 cm remains free.
- We form a loop from the cord, laid along the handle so that the top of the loop protrudes a couple of centimeters beyond the cord winding area.
- Then, holding the knife in your left hand and pressing both ends of the loop with your thumb, with your right hand we begin to wind the cord around the handle, starting from its head. We make the winding tight, turn to turn, do not tighten it too much, keep in mind that the cord will still shrink after drying.
- Having brought the winding all the way to the blade, we thread the remaining end of the cord into the protruding part of the loop.
- We cut off the excess cord, leaving about 3–5 cm, and burn the end of the cord.
- After this, pulling the free end of the cord from the side of the handle head, we pull the loop under the winding until the end threaded into it is hidden under the winding. Avoid pulling the loop completely out, otherwise the entire winding will unravel.
Winding is complete. With this option of winding, we will not have a loop for a lanyard. If we want to form it, the winding is somewhat more complicated. Initially, two loops are placed on the handle on both sides of the knife.
To form a loop for a lanyard on the head of a knife, the end of the cord is pressed onto the head of the handle and one loop is pulled to the blade, then the cord is thrown over the head and a second loop is placed on the other side. The winding starts from the head of the knife. Having finished the winding, the remaining end is threaded through both loops near the blade and pulled under the winding by the loop in the headband, thereby forming it.
So that the loop is near the stop, we do the same thing, but on the contrary, we start laying and winding from the stop, and pull the loop there to tighten the clamped end under the winding.
Making an overhead handle as an alternative to paracord
If you are a classicist and want to make a regular handle, use wood for this purpose. It is more accessible, easier to work with, the wooden handle is more pleasant to the touch, does not get cold, slips less in the hand, and if processed correctly, does not absorb moisture. The handle of a knife can be made of oak, beech, maple, birch, walnut or mahogany. In order not to waste time and effort on preparing and drying wood, there are two simple ways to get it. The first is parquet, you can buy it in a special store, where, by the way, expensive varieties are sold individually. The second is old furniture, in the attic, in the garage, at the dacha, with friends, you can always find unnecessary household rubbish and use it. For the handle you need two dies, if you have a standard size hand, then 10 - 15 mm thick, this includes a margin for processing so that the thickness of the future handle is about 20 mm. The length of the workpieces is 150 - 200 mm, so that there is room for fixing them during initial processing.
In addition to the tree, we will need:
- dowels made of aluminum, copper, brass, iron according to the number of holes and the corresponding diameter;
- drill with drills or drilling machine;
- drills according to the number of holes in the handle of the same diameter;
- a sharpening or grinding machine, it can be replaced by a wood file and a lot, a lot of time;
- jigsaw or hand jigsaw, or see previous paragraph;
- an engraving machine or a file with a needle file;
- sandpaper of different numbers down to the finest;
- epoxy based adhesive;
- linseed oil;
- thick adhesive tape or electrical tape;
- vice, clamp.
We make the handle as follows:
- Before starting work, wrap the knife blade with tape or tape to avoid accidental cuts.
- The first step is drilling. We place the knife blank on a wooden block, press it with a clamp or, at worst, wrap it with tape and drill holes. To make the hole neat, first drill with a thin drill, and then drill out to the desired diameter. After the first hole has been drilled, we insert a key or a drill of the same diameter into it, this is done to fix it so that the die does not move. Let's move on to the next hole.
- We drill the second die in the same way.
- After drilling, we assemble the dies on a knife, using keys or drills, to make sure that all the holes match.
- Then, attaching the dies one by one to the knife using dowels or drills and a clamp, we outline the contour of the handle along the contour of the knife. It is advisable to mark the handle with a slight indentation, 1 - 2 mm, for subsequent processing.
- After marking, we cut out the handle with a jigsaw or grind it on a grinding wheel; in extreme cases, the file is in your hands.
- Preparing the dowels. To make the homemade knife look aesthetically pleasing, we will not rivet the dowels, but glue them in. To do this, use an engraving machine or a file to make chaotic cuts on the keys, in which the glue will harden and set. At the ends of the keys we remove an inclined chamfer at 450.
- Since after gluing it will be inconvenient to process the cheeks of the stop, we finally process and polish them using sandpaper.
- We carefully sand the handle halves from the inside so that they fit tightly when gluing to the plane of the knife shank.
- Before gluing, we make a final test assembly.
- We carry out the gluing itself according to the instructions for the glue. The assembly procedure is as follows: lubricate the inside of one half, insert dowels coated with glue into it, put a knife on them, and then the lubricated second half. We clamp the assembled handle in a vice and remove the excess squeezed out glue. Leave the clamped handle for a day.
- After the glue has hardened, using files, emery, a grinding wheel, and so on, we finally shape, grind and sand the handle of the knife.
- When the handle is completely polished, it's time to soak. It is best to saturate wood with linseed oil. You can buy it in a store for artists, they use it to dilute oil paints. The handle is kept in oil for three days to a week. The process can be speeded up by boiling the handle in oil for a couple of hours, but you must strictly monitor the temperature, otherwise the glue may leak.
- Then the handle should dry at natural temperature for about a month, during which time the oil will polymerize and the wood will harden and become impervious to moisture.
- After drying, the handle is finally polished with a soft cloth.
DIY Japanese tanto knife drawings. Tanto knives - the military heritage of the samurai
- to finish off the enemy;
- for battle in close quarters;
- for cutting off heads;
- for suicide (warriors-men, women, children);
- for self-defense (traders, artisans, monks and other travelers).
The object has a rather frightening appearance, which enhances the effect if the knife is equipped with brass knuckles and teeth on a curved blade. If you don’t know how to make a karambit knife from plywood that is indistinguishable from the real thing, look at the interesting products in the photographs.
You will be surprised not to see two similar models, since there is no limit to the imagination of the masters of their craft:
- Prepare a jigsaw, drill, files and sandpaper.
- It’s good if you ordered or sharpened a high-quality blade in advance. It is easier to adjust the handle to it in terms of design and size.
- For a preliminary sketch, it is better to use ready-made drawings of a karambit knife made of plywood, they are available on the Internet.
- Cut out the drawn blanks with a jigsaw, mark the places for rivets or screws.
- Amateur craftsmen who are confident in their skills can simultaneously make an imitation of brass knuckles. Plywood is not the most durable material, and a menacing appearance is more appropriate here for intimidation than for combat.
- The halves of the handle are glued together and the blade with liquid nails and fastened with self-tapping screws. Next, the product is dried and finished completely.
Note! The Criminal Code of Russia does not consider a knife to be a bladed weapon if the length of the blade does not exceed 90 mm. When engaging in this kind of hobby, take this rule into account, and you will not have problems with law enforcement agencies.
Tanto knife drawings
This section is intended for lovers of homemade knives. Drawings with actual dimensions of popular tanto models will be useful to them. It is advisable for novice knife makers and knife lovers to learn the details of these products. Using these parameters, it will be easier to determine the authenticity of the blade.
Expert opinion
Strebizh Viktor Fedorovich, leading construction foreman
But having found, for example, drawings of folding knives, you should be aware of the difficulties of their manufacture, since the desire to independently assemble a complex mechanism will require serious metalworking skills. If you want to clarify something, please contact me!