Peculiarities
A boombox is a small but powerful music speaker that has a separate power source. To create it, the following is required.
- Board 18 mm thick.
- 5 mm plywood (external front panel).
- 12 mm plywood (back panel).
- Background pipe 42 mm.
- Plexiglass.
- Fasteners (screws, furniture confirmations).
- Wood glue and super cement glue.
- Solder.
- Paint in a can.
- Clamps.
- The battery is 12 volt, 7.3 A/h (it can be taken from the laptop power supply).
Recharging 1 Ah. The sound is played from the Pioneer MV 194 UB car radio. The speakers are AV PB-64.2. Dimensions 152 x 192 x 642 mm. Weight 6.5 kg. You can take speakers for high frequencies - 17 cm, for low frequencies 22 cm. You should pay attention to the wiring coming from the linear output. It’s better to install shielded wiring and move the power supply away. It is permissible to think about increasing the volume of the container (box) itself. Some masters place cotton wool or a bag filled with foam rubber in the space, then the sound can change for the better.
The holes for the speakers are cut with a router, and the angle can be up to 46°.
It is important to calculate the correct dimensions of the panels so that they match and there are no distortions.
When gluing panels, it is recommended to use clamps; the back cover is mounted at the end, after all the wiring has been installed. The plywood body is treated with a universal bactericidal primer before painting.
Instructions for creating a music center from a car radio
You need a power supply to create a music center. But it doesn't have to be new. If you have an old computer, unplug it and use it for your project.
- To get started with your home stereo system, locate the green and black wires on the block and place a piece of wire between them to act as a jumper wire.
- On the car stereo, twist the red and yellow cables together.
- Next, connect the black ground wire on the stereo to the black wire on the connector.
- The red and yellow wires of the stereo connect to the yellow wire of the connector.
- Then follow the usual instructions to connect the stereo to your speakers.
While using a power supply to power your car stereo in your home is one way, you can do it even if you don't have a unit.
- You can connect the speakers to the radio using the gray and green wires.
- You may need to use an additional speaker cable.
- The next step is to connect the yellow and red wires on the stereo and add an additional speaker for stereo sound.
- Connect the wires with soldering or electrical tape to get a quality result.
- You need a 12V power cord to connect the device to the network. You can easily purchase it at any technical store.
- Cut the end of the power cord and connect the black wire to a line of white around the red and yellow stereo wires.
Necessary materials
To make a boombox from a car radio that has served its useful life, it is recommended to first remove the speakers. For this you need:
Tools needed:
- drill;
- Bulgarian;
- screwdrivers (plain Phillips);
- scissors, knife;
- wire cutters;
- pliers;
- glue;
- self-tapping screws, “3” mm bolts.
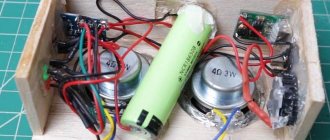
The power of each speaker can be 5 watts each, have 4 ohms. The speakers are fixed in a new housing, which can be made from a cardboard box. It is possible to make a container from an aluminum-wooden suitcase; it once contained a set of Chinese modules. Some craftsmen make the body out of plywood. What is needed to make a boombox from an old radio:
- speakers from 2 to 6 pieces;
- box;
- amplifier;
- Li-pol charger;
- switch;
- indicator showing the charging level.
First, points are marked for the speakers. Drill "3" makes holes. We install the speakers using 3 mm bolts. We install the drivers. Holes for mounting are cut into the body:
- indicator;
- power buttons;
- volume control;
- sound jack, which supplies an audio signal;
- connector, it provides charging for the lithium device.
It is important to ensure that all parts are tightly secured and that there are no gaps in the housing. It is recommended to pay special attention to the joints. It is good to use silicone to seal excess holes; it securely fixes and creates a reliable seal of the container.
Now it’s time for the electronic filling. We install a button on the battery tester, it will light up during operation. Another resistor (1 kOhm) is mounted on the switch, then the backlight can work and will be clearly visible . A connector for the jack is soldered into the board, we switch the wires to the jack of the future boombox.
The amplifier is connected to a 12 volt charger. The fan is soldered directly to the amplifier connector. The potentiometer can be further extended using a cable. All parts are placed in a container. Some elements can be secured with tape or sealed with glue.
We assemble speakers from 4 to 6 pieces, each with 4 ohms. We connect all audio units to one two-channel amplifier. Option one: turn off the speakers sequentially (we connect the minus of the first speaker to the “+” of the second, then the minus of the second with the plus of the third, etc.). In the end, the total will be 24 ohms - this is a lot, it is necessary to reduce the parameters.
If connected in parallel, the resistor will be extremely small, which does not always meet the necessary requirements. Therefore, it is necessary to combine elements. The total power will be about 30 watts. If two channels are connected, the power will be increased. As you can see, if we are assembling a homemade boombox from a car radio, then there should be no difficulties, this product is structurally simple.
Evolution of the boombox
Portable audio equipment from radio to Bluetooth speaker
According to Wikipedia, the first portable radio was invented in 1975 by some brothers Stacy and Scott Woelfel, who thought of placing an 8-track cassette machine from a car in a wooden case with built-in speakers. At the end of the decade, numerous manufacturers from the USA, Europe and Japan brought serial products to the market. With the development of breakdancing and hip-hop in the 1980s, boomboxes (“rattling boxes”) gained a mass audience.
The world has also learned an alternative term for loud street audio systems - ghettoblaster (“ghetto sweeper”). Manufacturers with renewed vigor continued the competition, whose model will produce a more powerful bass sound, while remaining portable and maintaining the ability to work autonomously for a long time on batteries. It should be noted that out of a huge foreign assortment, a very limited number of stereo radios and other audio equipment entered the territory of the USSR. And if an ordinary engineer could somehow purchase mid-level equipment for three to five monthly salaries, then very few Soviet citizens could afford to pay about a third of the state price of a car for one of Sharp’s top-end dual-cassette drivers.
But, according to personal impressions, it was these models in the second half of the 80s that achieved the maximum sound quality in their class. Their removable multi-band speakers played really loudly and formed a wide stereo panorama, an equalizer with a spectrum analyzer “pulled out” not the best recordings, but a good tuner was not very relevant in those days. In the early 90s, portable electronics flooded into the country along with other previously scarce consumer goods. These were both excellent devices from JVC, Sony, Panasonic, Philips and other brands that are iconic for our compatriots, as well as products from unknown Asian manufacturers whose weak performance potential was compensated by stickers with impressive PMPO numbers or flashing LEDs on the facade. Gradually the Russian market became saturated. By the end of the century, stereo radios in large numbers received a CD drive; their black plastic cases began to take on streamlined, sometimes very bizarre shapes. The final stage in the evolution of the classic boombox can be considered the ability to play MP3 files from a single CD for hours.
The further course of events is easy to describe in a few phrases. Ghettoblasters have fallen to the onslaught of portable docking stations for digital audio players and smartphones. The latter, in turn, were transformed over time into two classes of equipment. Gadgets that require physical contact with a signal source through a docking terminal have become stationary. They are also produced by the most reputable brands such as Arcam, Bowers & Wilkins, Loewe. And for lovers of “music on the move,” there are a huge number of wireless speakers with a Bluetooth adapter on the shelves. These speakers are made by dubious craftsmen from the Middle Kingdom, and companies with computer roots like Creative and Logitech, and audio gurus like Bang & Olufsen. A separate niche in the market is occupied by youth music systems such as the JVC Boomblaster, which received a docking terminal but retained a CD drive. A visit to the Yandex.Market search resource and a visit to the nearest M.Video store will give those interested a comprehensive idea of the current situation with portable audio. In the catalogs of former industry leaders Sony and Panasonic, only single copies of boomboxes were preserved - with a radio tuner, optical drive and cassette deck. Less famous players like Rolsen, Vitek, Supra, Mystery offer their own “variations on the theme,” but these are rather inexpensive toys. Of course, all equipment has acquired new digital functions. For example, the Panasonic RX-D55 model, visually closest to classic equipment in its final stage of reincarnation, can play MP3 tracks from USB drives, and also has a timer and alarm clock.
The device produces 2 x 10 W RMS. The know-how of Harmonic Enhancer, Extra Bass System, and Power Blaster are responsible for digital signal processing and the presence of a bass component in the sound. The Panasonic RX-D55 comes with a remote control. Philips OST690/10 is sold under the slogan “Welcome to the eighties!” The gadget is designed in a retro style, and only upon closer inspection can you discover that it is not a radio tape recorder. It does not have a cassette “pocket”, but it has a digital FM tuner with a memory for 20 stations, a Bluetooth adapter, and a USB port for playing soundtracks from external drives. The maximum power of the device is 2 x 6 W. Philips OST690/10 is more of a wireless speaker.
In general, a curious trend has emerged in this class when, in an effort to make their products attractive to buyers, manufacturers endow them with unusual properties and functions. Heading the line of portable speakers from the Logitech Ultimate Ears brand, the Megaboom model is reliably protected from shock, dirt and moisture according to the international IPX7 standard, so it is not afraid of the owner dancing in the rain, riding a bike down the mountain or crazy adventures on a mountain river. And these are not the usual formulaic formulas from an advertising brochure. The author personally witnessed an experiment when a playing speaker was sent to the bottom of an aquarium filled with water. There was only one problem: if under normal conditions the loudspeaker receives a signal via Bluetooth at a distance of up to 30.5 meters from the source, then when it is immersed in water, this distance must be reduced, otherwise interference will occur. On land, the UE Megaboom produces truly powerful sound with rich, rich bass, but, unlike old boomboxes, it spreads it in all directions - 360 degrees.
Fedor Oblovatsky
Editorial staff of Hi-Fi.ru
How to make acoustic speakers with your own hands - assembling a homemade boombox system
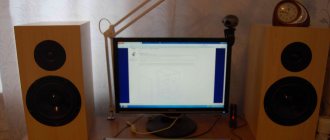
I made a powerful boombox speaker for my garage, and wrote an article on how to make acoustic speakers with your own hands. The body is made of fiberboard 2 cm thick, and the Truck Bed Liner was used for painting. The result is simply magnificent. All efforts to connect electronics will be in vain if no one sees and appreciates the result, so I made a hole in the case, covered with plexiglass.
I placed buttons and switches on the surface of this window. The boombox also has a power connector and a 3.5 mm audio jack, so you can connect any sound source. You can connect a guitar or microphone to the amplifier, it allows this.
Materials for making a homemade speaker system:
- Fiberboard sheet 2 cm thick
- A piece of plexiglass
- Wood glue
- A set of sheets of sandpaper of different abrasiveness
- Wood screws of different sizes
- Speakers (for low frequencies I took 20 cm speakers, for high frequencies - 16.5 cm speakers)
- Amplifier
- Self-resetting switches (optional)
- High quality wires
- Heat shrink tube 3mm (color of your choice)
- Solder
- Clamps
- Paint can Truck Bed Liner
- Can of primer paint
How to choose the perfect boombox
The market for portable speakers is huge - hundreds of models of different sizes, powers and functionality. But guided by a number of general principles, you can choose the most suitable option from all this diversity.
Sound
This includes such characteristics as boombox power, reproduced frequency range, number of channels (mono/stereo/2.1).
For small rooms without the need for high volume and deep bass, an inexpensive, compact boombox with a power of less than 10 W will be sufficient. In a small room, such a device will even provide some semblance of bass. If you are planning a party outdoors, the power requirements increase significantly.
The presence of at least two stereo channels is highly desirable, since even in an open space a stereo speaker will create a surround sound effect, while mono sound by definition lacks such a characteristic. It is already difficult to determine the quality of bass based on characteristics alone; you need to focus at least on user reviews and expert opinions, which is what we did when selecting candidates for this review.
Wireless connection
In the 20s of the 21st century, wired communication is a must have, but for boomboxes it is not discussed at all. But there are nuances here too. We looked at models that communicate with the sound source at least via Bluetooth. Ideally, the Bluetooth module should be the latest 5th generation, since it is Bluetooth 5.0 and higher that provides the maximum data transfer speed. This means that the boombox will be able to reproduce sound in high quality with a high bitrate and without annoying interruptions.
Also, some models can support Wi-Fi, AirPlay and other wireless add-ons, but Bluetooth is still the main reference point due to its versatility.
Autonomy
Another critically important point is autonomous power supply. Obviously, the boombox must be able to operate either from its own battery or from replaceable batteries. And the longer the operating time, the better. It is advisable to expect that the speaker will work for at least 6 hours at moderate volume from a full charge. For powerful models at high volume, autonomy will inevitably decrease. Therefore, it is important to ensure that it is possible to charge the boombox from a power bank without turning it off.
Moisture protection
Boomboxes are most often used outdoors and at parties where careful handling is not entirely possible. Therefore, it is desirable that the speaker has a durable body, and the filling of the device itself is not afraid of falls. It is highly desirable to have protection from at least splashes, and ideally, maximum protection from dust and moisture.
Additional functions
Many boomboxes have additional useful functionality - an equalizer, FM radio, a karake function with a microphone included, and so on. They should not be neglected either, since they do not critically affect the price, but can come in very handy at any time.
Design and decoration
The appearance of the boombox may seem like a minor point, but in fact, the impressive design of the speaker, and even with adaptive lighting, can create a special holiday atmosphere.
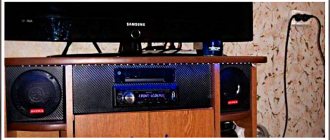
Car radio at home, DIY speakers. monoblock
car radio at home, DIY speakers
The idea of creating a monoblock from a car radio and car acoustics arose because listening to music in a car is noisy, and you can only enjoy the sound quality when the engine is turned off. I decided to remove these musical devices from the car, and when, on occasion, shelves from a chipboard wardrobe came to hand, I decided to make a candy bar for the house, because the music in the car sounded very good and these components should not be idle in vain.
After reading articles about creating speakers (acoustic systems), and first of all finding out the possibility of powering the radio from a PC power supply, I found out that it would be possible to power it and carried out a test connection of the PC power supply and a radio with one speaker. Everything is working.
After reading about the design of speakers (speakers), I took the easy way - without calculations, but made from what was available. Type of speakers - design in place in the car (speakers on the rear shelf) - called a screen or shield - open design. The sound of this performance is of the highest quality. I chose the ZY type (closed box) for execution - it’s easier to make.
Wall material: chipboard, MDF. plywood is not allowed, because they are flexible and will resonate. I used some chipboard I found for free. When designing speakers, consider that the larger the volume of air in the box, the better (softer bass) (but it is better to calculate).
I laid out the shelf in such a way that there was maximum volume left for the columns. I made the markings, used a jigsaw for sawing, then you can level the edge either with sandpaper by hand or with a grinder with a flap wheel. To connect the walls, it is better to use a furniture euroscrew.
Be sure to securely fasten the walls, do not spare screws, so that the rigidity of the structure is at the proper level, so that when there is a large sound load on the walls, they do not introduce their own overtones. After marking for the screws and drilling holes for them, assemble the entire monoblock structure with all the screws in order to ensure the correct location of the fasteners before the main assembly. If everything is assembled well, we proceed to the main assembly of the monoblock. To tighten the screws, I used a screwdriver with a 4 mm hexagon, which I sawed off with a grinder from a furniture key (straight section of the key). You need to understand how the load is distributed inside the column from maximum to minimum: front walls - rear walls - side walls - top - bottom. When assembling, we coat all joints with silicone sealant (+ a gun for a tube with sealant). According to the closed box theory, sound waves should remain inside the box and not leak out through cracks. This is how I assembled the monoblock except for the bottom wall; through these holes I will insert the remaining parts.
Screwed the speakers into place. At first I used the screws that came with the speakers, but then I started using wood screws - they are better in this case. My arrangement of parts is as follows: speakers on the sides, each in a separate column, radio in the middle at the bottom, power supply at the top at the back. I sawed with a jigsaw the first time, so it didn’t work out well. The next step is to strengthen the corners. We glue it with square or triangular glazing beads using PVA glue (I used something like Yaroslavl PVA_M - it worked well). It is clear that the wood must be dry, smooth and sanded.
We install the power supply before installing the radio (it is more convenient to screw the mount). Then the radio.
In order for the power supply from the PC to work in our case, we need to start it. Place a jumper on the large connector (green with any black wire), a paperclip will do.
Let's take 12 V from any yellow wire. earth - any black. It is advisable to check with a multimeter. If you will no longer use this power supply for a PC, then it is better to choose 3 yellow wires and 3 black ones. checking if they are all the same. connect, increasing the cross-section of the wire for power supply. It is better to cut the remaining wires so that they do not interfere. I didn't cut it because... Perhaps the block will still be used in a PC. It is better to solder all wire connections.
Next, it is recommended to fill the volume of the speaker with sound-permeable material without touching the diaphragm in order to reduce the sound speed. waves, reduce the load on the walls. I filled it with padding polyester, but when I checked the sound, I removed it because... the speaker became bright (a lot of highs and mids, low frequencies became very small). Before laying the padding polyester, I checked it without the bottom wall. The sound is garbage! the entire candy bar was on the floor (1 photo).
Next, I assembled the bottom wall with sealant and listened - again there is little low frequency, better than with padding polyester, but not like the first listening on the floor without a bottom. I will assume that the floor or table serves as a lower wall with a large area + the slots at the bottom play the role of a bass reflex (random). But the sound was definitely the best without the bottom wall on the floor. Those. After building the monoblock, you need to adjust the sound of the speakers to suit your desires (with a bottom wall or not).
Bottom line. When I finished assembling, I realized how it really should have been done.
- There is no need for large holes in the back wall. The fan of the unit blows from the inside to the outside, so heat will be removed from the radio. Enough at the bottom under the radio 1 and in the middle 2-4 holes of 30mm (they were there).
- Attach the power supply slightly inward so that its rearmost point (the button) does not protrude beyond the plane of the panel so that you can turn the box.
- Install the radio only after securing the power supply.
- Use wood screws when attaching speakers.
Costs: PVA glue 2*23, spent 11 rubles, universal sealant 112 + device for it 85, rulers 150, euroscrew 50 pcs-50 rubles, moving costs. the rest is yours or free. Conclusions. The unit is fully functional and the sound is decent for these components. The box turned out to be heavy (about 30kg), so it’s easier to carry it with two people. It is better to make calculated speakers with normal speakers, but this is more expensive and more complicated. On the electrical side, everything is simple in this version. For my speakers, a larger volume speaker is better. you can make not a monoblock, but 2 large speakers and 1 source with power and appropriate connections for switching. After listening, I will share my impressions. Best regards, EA.
Electrical connection diagram
Although most radio tape recorders have a different number of outputs and inputs, it is not difficult to find a method for connecting them to a 220 Volt network when making a home audio system. The standard electrical diagram for connecting cables looks like this:
To power the system, a regular power supply from an old PC is used. Before connecting it to the system, you need to check that the device has enough power to receive 5 amps.
Required connectors for connection:
ATX type power supplies must be connected via control connectors. They are on a 24-pin comb.
The image shows which wires need to be connected to the car radio.
The back of the device looks like this:
For different types of radios, the location of the power supply, the number of sound outputs and other parameters may differ. Only the color designations of the cables do not change.
A selection of mp3 modules for upgrading music centers and creating boomboxes
Many people have stereos from famous manufacturers that were released many years ago. They still work well, but they don’t have USB or TF ports, or bluetooth. However, you can get out of the situation and equip them with the missing modern capabilities. The information will also be useful for those who make their own crafts and want to make a boombox. The modules are small, and the variety of designs will make it possible to choose the one you need, suitable for specific conditions.
1. The module, identified by Bluetooth as BT-SPEAKER, has a small display to indicate operating modes, a kind of spectrum analyzer, and reads flash drives and memory cards up to 32 GB. Equipped with Aux input and FM radio. Power supply from 5 to 12 Volts. The kit includes an IR remote control. Using the buttons on the front panel you can switch tracks and change the volume. Overall dimensions allow installation in 1DIN format radios. You can find the same module, but with 2*3 Watt amplifiers.
2. The next module is also equipped with Bluetooth, Aux input, FM radio, reads flash drives and memory cards, but in SD format (or microSD via an adapter). Power supply 5-12 Volts, formats include MP3, WMA, WAV. Overall dimensions 107x25x38 mm, installation dimensions 83x20x38 mm. There is an equalizer and folder navigation. Remote control included. An important element of functionality is that there is a physical power switch, i.e. good for boomboxes.
3. The module is similar to the previous one, but understands more popular formats. This one can already play MP3, WMA, WAV, FLAC and APE. Power supply 12 Volt. The set of interfaces is standard - bluetooth 5.0, USB, SD card, FM radio and Aux. The latter is not on the front panel, it is connected on the board and you can also connect a microphone there, which will make it possible to organize a speakerphone.
4. The next version of the mp3 module, in addition to Bluetooth 5.0, FM radio and USB for reading flash drives, has a slot for microSD memory cards and an Aux input and microphone on the front panel. You can not only talk on the phone, but also record sound on the card. Format: MP3, WMA, WAV, FLAC, APE. Remote control, power supply 12 Volts.
5. MP3 module with a standard set of interfaces, but without a microphone (yes, not everyone needs one). Can read MP3 and wav. Power supply 5-12 Volts. A distinctive feature is the flat design. Overall dimensions 90*41 mm. The depth of the structure can be visually estimated at around 20 mm, i.e. Can fit well on the cassette deck cover of an old deck.
6. Another module in a relatively flat design. It is quite possible that it will also be possible to successfully install decks into the cassette deck. Declared formats: MP3, WMA, WAV, FLAC, APE. Overall dimensions 75*50*31 mm. Available in steel and black. Power supply 5 or 12 Volts. There is a microphone and the ability to select a folder. There is a preset equalizer and FM radio. Remote control included.
7. The module is only 23 mm deep and has a good set of readable formats - MP3, WMA, WAV, FLAC, APE. Link here. There is a radio and understands memory cards and flash drives up to 32 GB. There is a preset equalizer, repeat tracks and a spectrum analyzer on a larger screen compared to previous samples. Bluetooth version 5.0. The choice of color for the plastic panel is a little surprising, but the module is interesting and can take its place in homemade projects.
8. Module with two linear inputs - one on the front panel, the second on the board. In addition, Bluetooth, USB, SD card and radio. Understands WAV, MP3, WMA. Supports Chinese and English tags, you can switch folders, records sound, and connects an external microphone. There is an equalizer that does not reset settings after turning off the power (12 Volts). Dimensions 135*63. Installation depth 20 mm, with panel and buttons 28.5 mm.
9. The newly introduced module has a good appearance and a human control panel. Reads APE, FLAC, WMA, WAV, MP3, AAC and displays tags in Chinese and English on a 52*31 mm screen. The overall dimensions of the module are 106*66 mm, landing dimensions are 86*50. It has rubberized buttons, one of which mutes the microphone. The microphone is external and connected to the back of the board. In addition, you can connect two linear inputs and an encoder to adjust the volume. There is a symbol on the screen for the car's battery charge level. You can record from a microphone, radio or line-in. There is an equalizer, folder navigation, playback of tracks in a row, repeat one or random selection.
10. The most interesting module, in my opinion and in the reviews of knowledgeable people, which can read a lot of formats, has a spectrum analyzer that is already quite “adult” in appearance, and an input for an external microphone for talking on the phone and recording sound. There is an equalizer, folder navigation, and selection of playback modes. Power supply 7-12 Volts. Overall dimensions 120*63, mounting dimensions 101*53*20mm. There is a small mistake in the design - instead of CARD, CADR was written on the front panel)), but this is more than offset by the main advantage of this module - it can be controlled using the BTMate application from PlayMarket.
This version of the module (older model) has a yellow-orange board with the inscription AVN1715. There is a junior version with a red board. The screen is smaller, and the BluetoothBox application is there. However, the new version of the module is more advanced.
A powerful, portable boombox with a minimalist design
The boombox is assembled using 4 ohm 5-inch JBL car speakers with a power of 2x35W RMS (max. 2x10⁵W) and a 2x100W WUZHI amplifier with Bluetooth 5.0. An external 24V power supply allows you to extract maximum power from this amplifier. And the compact, 16x16x32 cm, completely enclosed body of the boombox contains a 21V lithium battery with a capacity of 3000 mAh (54 Wh), providing 10+ hours of battery life. The boombox features internal charging of batteries from a power supply with a charge indicator on the front panel and automatic switching of the amplifier to external 24V power supply when the power supply is connected to the network. According to subjective assessment, the boombox produces powerful, dense bass with a large volume reserve and mid and high frequencies that are pleasant to the ears. The review will contain a detailed story about the manufacture of such a boombox. The boombox was made for my school-aged son to listen to music from VK via Bluetooth. He showed me a video from YouTube of the shape of the boombox he liked - a parallelepiped with side speakers. He doesn’t need any displays, buttons, knobs, spectrum analyzers, or even a volume control on a boombox - it’s all on the smartphone screen. No one in this age group uses USB flash drives and AUX cables anymore; everyone listens to music in the cloud from their phone. Therefore, the interface of the future boombox turned out to be extremely minimalistic - only the ON/OFF button on the top and the built-in battery charge indicator on the front. Car door speakers are well suited for installation in a boombox. I decided to install the 13 cm speakers left after replacing the front doors with 16.5 cm JBL speakers. These 2-way coaxial 13 cm speakers (JBL GT5-502) are designed for installation in a closed box (Qt= 0.88) with a small internal volume (Vas= 3.45 l).
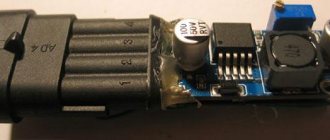
As can be seen from the product description, the 2x100W amplifier WUZHI aliexpress.com/item/4000211193938.html develops maximum power at a supply voltage of 24V:
I could not find the specifications for the installed power amplifier ICs (PA50WX2).
Photo of the board without a heatsink
After receiving the amplifier, we carried out a small test using a 24V 5A power supply of this type www.avito.ru/moskva/orgtehnika_i_rashodniki/blok_pitaniya_dlya_priborov_24v5a_1787909900
When power is applied to the amplifier, a short power-up sound is played. There is no voice acting. There is no hissing or crackling during playback or pauses. There are no interruptions in the Bluetooth connection. The WUZHI amplifier with Bluetooth 5.0 ensures stable signal reception within the apartment. The only criticism is that the wire cross-section of the supplied power cable is too small, we will not use it:
Now it's time to get to work.
Case manufacturing
The body of a boombox in the shape of a closed box is the easiest to make. If all components of the speaker system are selected correctly (speakers, box material, etc.) and all parts of the case are completely taped to ensure the tightness of the box, then the output will automatically produce an acceptable sound.
Since my son had already gotten his hands on wooden birdhouses and plywood boxes during technology lessons at school, he took full responsibility for making the body.
We look at a sheet of plywood for a long time - the hardest thing is to start). Then we decisively transfer the question to the horizontal plane). Mark and cut with a jigsaw:
We polish the parts and try them on. We cut out the internal spacers from a 4x1.5 cm wooden block, apply a silicone autosealant-gasket former, rub it in, remove the excess with a paper napkin and screw it onto the self-tapping screws:
We screw on the handle and legs (from an old suitcase), use an oscillator to cut out rectangular holes for the ON/OFF key and the discharge indicator, drill holes for attaching the nameplate with a connector from the power supply, DC/DC converter and battery pack housing:
We paint the body with ebony varnish. The photo shows the result after painting in one layer. The intensity of the color after drying seemed insufficient and another layer of varnish was applied to the body. After drying, screw the remaining 2 spacers onto the sealant. Because the front cover will be removable, apply sealant around the perimeter of the front part of the case and stick Tesa fabric tape on it. We apply the front cover, press it and leave it overnight so that the sealant hardens and repeats the topography of the cover. We also stick this tape on the lid:
This completes the manufacture of the body.
Installing components
Boombox diagram:
First, we make a sealed battery pack using a plastic case 158x90x64 mm aliexpress.com/item/4000319894355.html As you can see in the photo, it fits 4 holders aliexpress.com/item/32820903740.html with 12 18650 batteries. So far I have installed a 5S assembly from original Sony VTC6 3000 mAh batteries with a total capacity of 54 Wh. If necessary, the capacity of the built-in battery can be doubled, up to 108 Wh, by adding five more of the same batteries. For reference, the JBL Boombox portable speaker, which is similar in power, has a 74 Wh battery and can play music continuously for up to 24 hours. We solder the wires to the holder lamellas from above, in the area of the maximum cross-section of the petals. This will reduce the heating of the petals at maximum current. We glue the ends of the holders with 3M adhesive tape and stick them to the bottom of the case with regular double-sided tape. We crimp the wires with auto terminals and bolt lugs, put a 7.5 A car fuse in the positive gap. We put a banana connector at the end of the case and seal it with glue. I also planned to put a protection board with balancing in the case aliexpress.com/item/32868642283.html, but it still hasn’t arrived yet, so I’ll install it as soon as possible. All Sony VTC6 batteries are from the same batch and have a minimum voltage variation of ±0.01 V. I bought a lot of 8 pcs. a couple of years ago, 3 pcs. I put it in a screwdriver without a balancing board, the voltage is still the same on all banks. Place a polyurethane foam “cushion” on the batteries, cover with a lid and tighten with the supplied screws:
Setting up a DC/DC CC/CV 8A 300W step-down converter aliexpress.com/item/32822603345.html. To configure, temporarily set the output voltage of the converter to approximately 5 volts. We connect an ammeter in the mode of measuring high currents to the output of the board and use the CC trimmer to set the required charge current. I set it to 2A. Until the protection board with balancing arrived, I set the output voltage to 20 volts. At this voltage, the batteries will not be fully charged, but at the same time they will not be recharged (there will be 20 / 5 = 4 volts on each battery). When the voltage on the assembly rises to 20 volts, the charging current will gradually become zero.
We attach the step-down converter to the aluminum flange. I didn’t have an M3 tap for the fastening screws, so I pressed threaded bushings for M3 into the flange using a vice through pre-drilled holes. Before installing the converter, wrap the flange with heat-resistant polyimide tape:
We solder the wires to the terminals of the 8A 24V relay (I bought it offline for a dollar and a half). We crimp the wires with auto terminals and NShVI lugs, solder the amplifier power plug and bananas, and seat:
We screw the supplied acrylic plate to the amplifier board and stick it to the battery pack cover using 3M tape. We screw all the other components, connect the terminals, seal the power switch with glue, connect the charge indicator aliexpress.com/item/32889781936.html, turn it on and check. Everything is working fine. Attach the relay using 3M tape:
We also glue the charge indicator around the perimeter of the seat. We stuff the body with several packs of cotton wool. Screw on the front cover. That's it, the boombox is ready! View from all sides and nameplate on the reverse side:
Sound
With a normal connection from a phone (without an equalizer), the boombox produces quite acceptable sound. The sound can be slightly improved using an equalizer to suit your taste. It is also advisable to programmatically cut off the lowest frequencies that can damage the speaker coils. The JBL GT5-502 speakers have a resonant frequency Fs=102.48Hz, so everything below 100 hertz needs to be filtered out. I configured the equalizer (for example, the Poweramp and Equalizer applications) to my taste like this:
Poweramp also has many fine-tuning settings for real audiophiles, but my son and I don’t consider ourselves one of those). The boombox was made to listen to music from VK, Youtube or Internet radio via Bluetooth. The sound quality of a boombox is determined by the capabilities of the Bluetooth protocol and the bitrate with which this music is broadcast.
We also made a video of how everything works and sounds. It is clear that the phone’s microphone will not be able to transmit real sound)
One of my son's friends has a JBL Boombox speaker (this is one of the most powerful wireless speakers on the market with similar size and weight) and they argued whose boombox plays louder). There is nothing wrong with this, because even fully grown people like to measure decibels at car audio competitions, and not only that. Personally, I don’t see any point in such SPL competitions, so I hid the rest under a spoiler.
Additional Information
The guys compared the volume of the speakers away from people, in a forest belt behind houses. The photos below were taken after testing):
It is quite expected that the boombox from the review won in terms of sound pressure). JBL Boombox has 4-inch speakers with a nominal output power when operating on a battery of 40W (2 x 20W). The boombox from the review has 5-inch speakers with an output power when operating from 19 volts of at least 70W (nameplate 2 x 35W RMS speakers) and a maximum of 160W (2 x 80W) according to the WUZHI amplifier specification.
I don't mean to say that the JBL Boombox is a bad speaker. I like the sound of both of these speakers. It is also clear that these 2 speakers are structurally different and their sound is also different. I probably won’t evaluate what sounds better and what sounds worse).
Thanks for viewing this review! I will be glad if some information from it is useful to you.