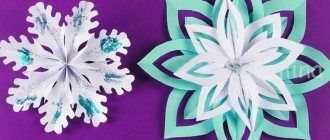
How to make voluminous paper snowflakes for the New Year? Let’s say right away that this is not an easy job: cutting out the usual flat snowflakes is much easier. But difficult does not mean impossible. If you have templates of voluminous snowflakes, the ability to hold scissors in your hands and the presence of adults, then any child aged five years and older can cope with the task. Moreover, there are very simple volumetric snowflakes that are absolutely easy to make.
So, we’re talking about making New Year’s beauty – voluminous paper snowflakes.
Shiny snowflake
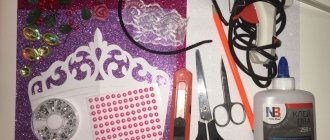
You will need: shiny blue and purple cardboard, a stationery knife, a glue gun, a ruler, a simple pencil, a toothpick.
Master Class
- Cut the shiny cardboard into strips (3 strips of each color) measuring 14x2.5 cm. There should be 6 strips in total.
- Draw 4 lines on the back of each strip.
- Cut the strips with a utility knife.
- Form the blanks using a heat gun and a toothpick, as shown in the photo instructions.
- Cut a circle out of cardboard, then glue 6 blanks around the circle, alternating colors.
The shiny volumetric snowflake is ready!
DIY 3D paper snowflake
This 3D snowflake amazes with its depth. It turns out lush and airy that you just can’t take your eyes off it. A special effect is achieved by choosing contrasting shades of paper. For example, you can make a pair of white-blue, yellow-pink or green-white. In general, there are no clear guidelines for color. Despite the fact that a snowflake seems difficult to make, I assure you that a child can handle this process with ease.
For the craft we will need:
- Colored paper
- Ruler
- Scissors
- Glue stick
Step 1. On a sheet of paper, measure strips 20 centimeters long and 1.5 centimeters wide.
We need 10 such blanks. There are also 10 more in a different color.
Step 2. Bend each strip in half and measure 7 centimeters. This is just a recommendation. You can distribute the length of the cut rays by eye. Before reaching the end, cut the strip into three thin strips.
Step 3. Start assembly. To do this, we overlap from the first row, connecting the corners, as shown in the photo. Then we take it from the second row and glue it to the opposite first strip.
This way we got ten droplets of one color and ten of another.
Step 4. Connect them together. If you plan to make several snowflakes, you can experiment with alternating colors. For example, glue a yellow one and then a pink one.
Please note that the tip of each part is turned in one direction. Therefore, it is also necessary to glue. Don't get confused! Otherwise, further assembly will go wrong.
Glue together 5 rays of each color. In total we have four snowflakes.
Step 5. Select the workpiece that will be central. Let it be pink. Rotate the snowflake so that the corners of the rays look up. Apply glue to the very edge and place another snowflake on top. We connect exactly along the corner. But the top blank should now be rotated so that the rays look down. It turns out like an unopened bud.
Step 6. Next, place a yellow snowflake with a pink one collected on it. And cover it again with yellow color.
Step 7. We do the same as with the pink parts. We connect the corners of each yellow ray with glue.
It turns out a very beautiful 3D snowflake. Hang it around the room or in the classroom and these decorations will create an airy New Year's mood for everyone present.
Exquisite snowflake
You will need: 6 blue square sheets, 6 white square sheets, a blue paper circle, PVA glue, rhinestone.
Master Class
- Fold a sheet of blue paper diagonally.
- Unfold the square and fold the sides toward the center fold.
- Turn the workpiece over to the other side.
- Fold the sides towards the center to create a diamond shape.
- Turn the workpiece over to the other side.
- Fold the top layers to the sides.
- Fold 5 more blue modules in the same way.
- Fold the white sheet diagonally on both sides, then unfold.
- Fold the corners of the square into the center and turn it over to the other side.
- Fold the sides into the center.
- Unscrew the side holes on the back of the module.
- Fold the sides into the center.
- Fold 5 more white modules in the same way.
- Glue 2 blue modules opposite each other onto the circle.
- Glue 4 blue modules.
- Glue the white modules onto the blue ones, placing them in a checkerboard pattern.
- Glue a rhinestone to the center.
An exquisite three-dimensional paper snowflake is ready! I recommend watching this video!
SNOWFLAKES - FLUFFS made of paper / New Year's DECORATIONS
Volumetric model
Another famous origami snowflake, without which not a single New Year’s celebration is complete. Thanks to its volumetric design, it looks good in the central part of the room. The model is assembled from 6 identical modules. Usually A4 sheets are used so that the product is large and does not get lost against the background of the rest of the decor. It is recommended to use double-sided colored printer paper or designer paper with a grainy texture.
Step-by-step instruction:
We fold the A4 sheet diagonally to designate an equilateral triangle. Cut off the excess strip. We place the triangle with the base towards us. We cut the figure into 2.5 cm strips. We leave a whole section in the center so that the product does not fall apart.
We roll the central square into a tube and glue the edges. Similarly, we connect the following extreme points of the “cutting”. Glue them to the central part. We simply connect the opposite corners of the remaining squares.
Turn the product over to the reverse side. This is one module.
We make 5 more of the same ones and glue them together. All that remains is to attach the fishing line and decorate the cornice or chandelier with a hand-made product.
You can also use modular origami snowflakes as voluminous decorations.
Beautiful snowflake
You will need: 2 square sheets of blue paper, scissors, glue stick, pencil, rhinestone.
Master Class
- Fold the square sheet diagonally.
- Fold twice more.
- Draw 3 lines along which the cuts will go. Do not cut all the way through at the fold as this is the center of the snowflake.
- Cut along the lines.
- Make triangular slits at the bottom of the workpiece.
- Unfold the workpiece.
- Fold and glue the middle stripes of each ray in the center.
- Make the second blank in the same way.
- Glue the blanks together so that the rays are staggered.
- Glue a rhinestone to the center.
A beautiful three-dimensional paper snowflake is ready! I recommend watching this video!
Volumetric paper SNOWFLAKE ❄ Crafts for the New Year
Templates for cutting out voluminous snowflakes
I am sharing with you ready-made templates that will help you quickly make voluminous snowflakes. Transfer the diagram onto thick paper or a thin napkin and cut it out. Hanging on a chandelier, they will sway from the light movement of air and create a fabulous ambience.
Such a snowflake can not only be stitched. Using thick paper, cut out two templates and along the dotted line you will need to make a cut only to the middle. After that, just connect the snowflake from the cut sides and hang it like a decoration.
Ballerinas in lacy skirts look very graceful. And if you look closely, these clothes are nothing more than a snowflake. You can create so many outfits from different napkins or paper that they will not look alike. Print and cut out the finished pictures and decorate with your children.
Several options for dancing ballerinas:
And patterns of snowflakes that will look elegant on their waist:
3D snowflake with Christmas trees
You will need: 6 green sheets measuring 8x8 cm, scissors, a simple pencil, a glue stick, a rhinestone.
Master Class
- Fold a sheet of paper in half crosswise.
- Draw 3 lines and half of the Christmas tree with a pencil.
- Cut the workpiece along the marked lines.
- Unfold the workpiece.
- Fold the central strip towards itself and secure with glue.
- Make 5 more blanks in the same way.
- Connect the 2 pieces together, overlapping them slightly, then secure with glue.
- Glue 6 parts together this way.
- Glue a rhinestone to the center.
The volumetric snowflake with Christmas trees is ready! I recommend watching this video!
How to make a 3D paper snowflake!
How to make a snowflake lantern
In the evening and at night, such a craft shimmers like gems, and if you add glitter or decorate it with glitter, you will get a breathtaking sight. To make it you will need an LED strip, then you will have a full-fledged garland. If you make large flashlights, you will need several diode bulbs.
You will need:
- office paper (5 sheets);
- threads;
- stapler;
- scissors;
- scotch;
- glue;
- LEDs.
How to do:
Bend the paper sheet to form an accordion. Fold it in the center, fasten the middle with a stapler. Use scissors to make cuts and cut out shapes along the long edge. The cutouts should be symmetrical, then they will look attractive.
Apply glue to one side and glue to the opposite edge. You will get an openwork fan. Do the same with your other half. The openwork snowflake is almost ready.
Make exactly the same craft from another sheet, then attach the LED between them with double-sided tape and connect the crafts together.
Make and fasten a loop of thread at the top so that the product can be hung comfortably. Bright snowflakes are especially beautiful in the evening, turn off the lights, light your lanterns and admire the winter charm.
It will take several hours to make, so if you want to make a garland, start creating a few weeks before the New Year.
Original snowflake
You will need: 2 sheets of yellow A4 paper, scissors, a simple pencil, white thread, glue stick.
Master Class
- Take a sheet of paper and fold it into an accordion.
- Mark the center with a pencil.
- Draw 3 triangles on each side, round the edges and cut out.
- Do the same functions with the second sheet.
- Tie 2 accordions together.
- Spread the accordions to form a circle.
- Glue the 4 parts together.
The original volumetric paper snowflake is ready! I recommend watching this video!
DIY VOLUME SNOWFLAKE made of paper Master class
How to make a voluminous snowflake in the shape of a heart - instructions
You should always confess your love for loved ones. And especially on holidays. I suggest expressing your feelings with hearts.
The first thing to do is cut out a circle. To do this, we will use a plate, pencil and scissors.
Next, bend the workpiece in half. And, starting from the edge, fold the accordion. Make sure that the fracture lines are parallel to the middle of the circle.
Now let's return the workpiece to the accordion and bend it in half. All that remains is to fasten the middle with glue.
Our wonderful heart is ready!
Volumetric snowflake
You will need: white and blue paper, scissors, ruler, glue stick, decorative elements - sequins, beads, flowers...
Master Class
- Cut 5 long white strips, 10 medium blue strips and 10 even smaller white strips.
- Glue the ends of the strips together.
- Assemble the 5 stripe snowflake piece as shown in the image.
- Assemble a snowflake from 5 parts.
- Glue the decoration to the center.
The volumetric paper snowflake is ready! I recommend watching this video!
Do-it-yourself voluminous SNOWFLAKE in 15 minutes.
Geometric snowflake
You will need: 2 sheets of colored paper, scissors, glue stick.
Master Class
- Cut each sheet into 3 equal parts.
- Take one piece and fold it in half.
- Make 4 cuts: 2 short and 2 long.
- Distribute the center stripes on opposite sides.
- Repeat this process with all the pieces.
- Glue the blanks together, alternating colors with each other to form a snowflake.
Geometric snowflake is ready! I recommend watching this video!
Crafts for the New Year: Geometric Snowflake
I recommend watching this video!
Large voluminous snowflakes on the wall
Large snowflakes that glow from the inside with openwork light look amazing. When adding another ray, i.e. instead of 5, make 6, you will get a symmetrical snowflake. Delicate white, bright red. They can be hung on the walls so that the bulbs through the holes cast beautiful patterns and create magic.
For the craft we will need:
- Thick colored paper
- Glue
- Scissors
- Ruler, pencil
- Figured hole punch
Step 1. The size of the snowflake will be determined based on the paper you will use. We need 5 identical square sheets. Or 6 to make it look more like a symmetrical snowflake.
Step 2. To fold evenly, draw a line diagonally and bend the sides towards it. Lubricate one edge with glue and overlap the other.
You should get 5 identical sharp triangles.
Step 3. Measure 4 centimeters and draw, connecting from the central point to the outer corners.
Step 4. Cut off all excess top part
Step 5. And also the corners on each side
Step 6. Now we retreat 0.5 mm from one side, draw a parallel line and cut it off too. Note. Only on one side.
Step 7 . For clarity, I showed with arrows how it should turn out. Where there are red arrows, they cut them off, and where there are blue arrows, they left them. We will connect this edge to the next part. We do the same with all the blanks.
Step 8. Apply glue to the inside of the edge, first bending it. We connect it with the next one, gluing it inside.
Step 9. When everything is connected, press the joints well and wait for the glue to dry.
Step 10. This step can be done in the sixth step. But then you will have to make patterns separately on each sheet. In this case, you will have to use force to pierce a thick stack of paper. You can simply make round holes or use a hole punch in the shape of stars, butterflies or flowers. Apply in random order.
Step 11. This time we will not glue the outer rays, because when the holiday is over, such a pointed star or snowflake will not be convenient to store. Therefore, we connect with a rope, which can then simply be untied.
And finally. To make the decoration shine in the dark, place a garland inside.
Volumetric snowflake made of component parts
You will need: 6 square sheets of paper, scissors, glue.
Master Class
- Take a sheet of paper and fold it diagonally, then in half.
- Make 3 cuts and unfold the workpiece.
- Glue the ends of the smallest strips, then glue the others through one strip on each side.
- Connect the remaining strips on the other side in the same way.
- Repeat this process with the remaining sheets, then assemble a snowflake by gluing 6 blanks together.
The snowflake from its component parts is ready! I recommend watching this video!
How to make a BIG NEW YEAR SNOWFLAKE
Snowflake paper heart: beautiful and voluminous
A piece of ice in the shape of a heart will look very impressive. Such a beauty will add romance to the festive mood.
To make such an openwork heart you need seven multi-colored stripes. 3-4 cm wide. One strip can be made narrower - 2 cm - we will hang it from it.
The strips are cut. Now we will leave 2 as the longest (29.7 cm), shorten 2 by 3 cm, and shorten two more by six. The main work has been done.
Now all that remains is to fasten our icy heart with a stapler.
A very original decoration, isn’t it?
Volumetric snowflake made from strips of paper
You will need: paper. scissors, ruler, glue.
Master Class
- Cut the paper into 10 thin strips of the same size.
- Lay out 5 strips on a flat surface, then lay out the remaining 5 in a checkerboard pattern.
- Glue together the ends of the strips located next to each other in the corners. Please note that the 4 “cross” stripes must remain.
- Make the second piece in the same way.
- Glue the blanks together to form a snowflake.
- Glue loose strips to the parts of the snowflake.
A snowflake made from paper strips is ready! I recommend watching this video!
How to make a voluminous Snowflake in a couple of minutes. DIY New Year decorations.
Schemes for cutting out volumetric 3D snowflakes for the New Year
You can make three-dimensional 3D snowflakes. This is also not difficult at all. Cut out 3 templates, glue them together and it’s ready. First, make one blank, and then cut out the rest of the templates from it. Then fold them in half and glue one half with half of the second piece, and glue the second half with half of the third piece. Well, glue the second half of the third blank with the remaining half of the second blank (I hope I didn’t confuse you).
Here are some more templates to cut and glue. But in fact, it’s very easy to fantasize here. The main thing is that the templates are the same.
First template:
Second template:
Or like this:
The same can be done with 4 templates, and even with five. The snowflakes will be even more voluminous. In general, use your imagination and come up with different patterns to make your home even more beautiful for the holiday.
creative snowflake
You will need: sheets of paper, circle template, glue, pencil, thread, needle, ruler.
Master Class
- Cut out 8 identical circles from paper.
- Divide the circle into 8 equal parts and make cuts.
- Twist each part of the circle into a cone using a pencil, securing with glue.
- Repeat this process with the remaining pieces.
- Thread the pieces onto a thread and a needle, fasten and form a ball.
The creative snowflake is ready! I recommend watching this video!
Origami, paper ball. Origami, ball out of paper.
Snowflake using modular origami technique
Modular origami is considered more complex than regular origami. Fold the first module according to the photo diagram, make a huge number of them and start assembling them according to the photo master class. Creating such a masterpiece requires a lot of time and patience. There are also huge advantages - you develop fine motor skills and will be able to surprise others with such a gorgeous snowflake.
Master Class
- Start assembly from the middle, forming a center of 12 modules.
- Insert the edges of the module into the pocket of the other modules.
- Attach the modules in a checkerboard pattern from one edge; a chain of two fastened rows should form - the outer row is 6 modules, and the outer row is 5.
- Turn out the remaining module and connect the ends of the chain with it, forming a ring.
- Increase the length of the beams by attaching modules.
- Add a module of a different color to each beam and continue building with the main one.
- Add modules until the snowflake reaches the desired size.
The snowflake using modular origami technique is ready! I recommend watching this video!
Snowflake from paper origami modules Step-by-step assembly for beginners
Snowflakes always please the eye and lift your spirits. Make the best, original three-dimensional snowflakes and give them as a gift. Then your loved ones will feel the fairy tale at home, remembering you.
New Year's snowflake - fluff
In my opinion, the simplest New Year's craft is Pushinka. Therefore, in this master class I will tell you in detail how to make it.
We will need a minimum of time. And the result is always amazing.
Let's make a square blank. To do this, connect the short and long sides of the A4 sheet.
Step 2. Cut off the excess along the edge.
Now let's bend the triangle in half.
And in half again.
This is what happened!
Let's add it up again.
And cut the resulting figure along the line marked with a dotted line.
You need to cut it so that after the first turn you get a diamond like this.
Let's return the figure to the triangle and start creating the fringe.
Now we begin to unfold.
The result will be a wonderful fluffy beauty.
To create a volume of such blanks you will need at least 3. If desired, the number can be increased. For example, for hanging in the interior, linings can be made on 2 sides. Then you will need 5 of them.
A little hint. If the largest one uses A4 sheet, then the next one can be made from A5. And crumbs from the strip remaining from the A4 sheet.
All preparations are ready. You can start assembling: put the largest part down, then the smaller ones, and the smallest on top.
At the end of this master class, I would like to add. Don't be afraid to experiment. Use colored paper in your work - it looks no less “frosty” than white.
And in the end we get amazing beauty.
Let's do a lot and we'll get a whole snowfall!